Seawave main page
General article covering PRVs
Unexplained Seawave failures ;-/
Testing unbranded PRVs
Servicing and troubleshooting PRVs
My Gumotex Seawave is a well spec’d IK for my sort of coast-hopping and occasional touring, especially as it was factory rated to run at a higher-than-usual 0.25bar or 3.6psi (Gumo normal is 0.2). That means greater rigidity which adds up to less longitudinal sag caused by paddler weight (who, me?!) . And of course a better g l i d e. My previous Amigo and Incept both ran an even higher 0.3 bar, and it’s said that this Gumotex can also be pushed to that sort of pressure on the side tubes without risking damage. Factory hull pressures are set on the conservative side to limit warranty claims.

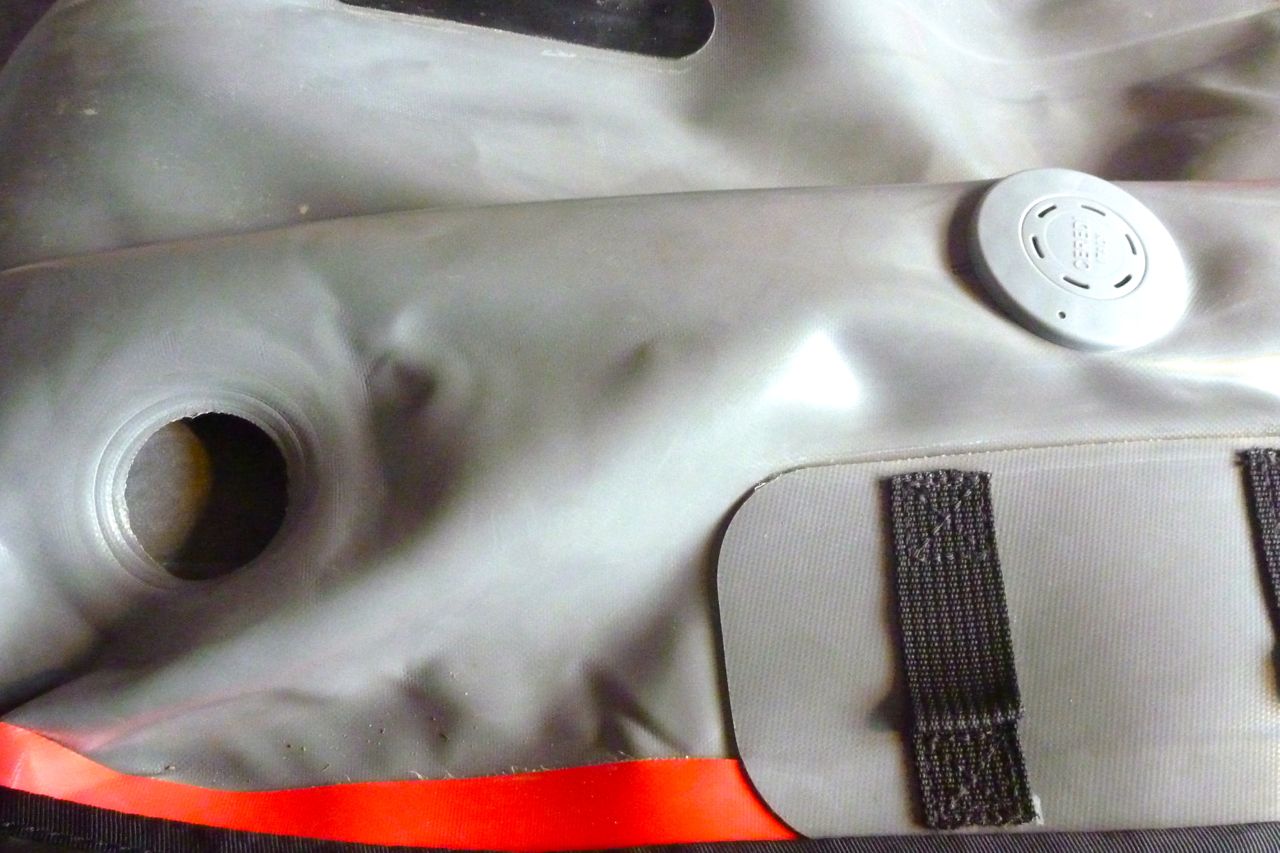
Like all the Gumboats I’ve owned, the more vulnerable I-beam floor chamber has a factory-fitted PRV set at 0.25bar/3.6psi (confirmed below). PRVs are important here as if an IK gets hot (typically out of the water on a sunny day) internal air pressure can increase to the point where seams might rupture. If separation happens to an internal I-beam in the floor it will balloon up and becomes a very difficult repair. I would not meddle with the factory-set PRV on an I-beam floor.
As we all now know, the answer to I-beam floor limitations is drop-stitch technology – effectively zillions on ‘I-beams’ spreading the load over the entire area which enables much higher pressures.

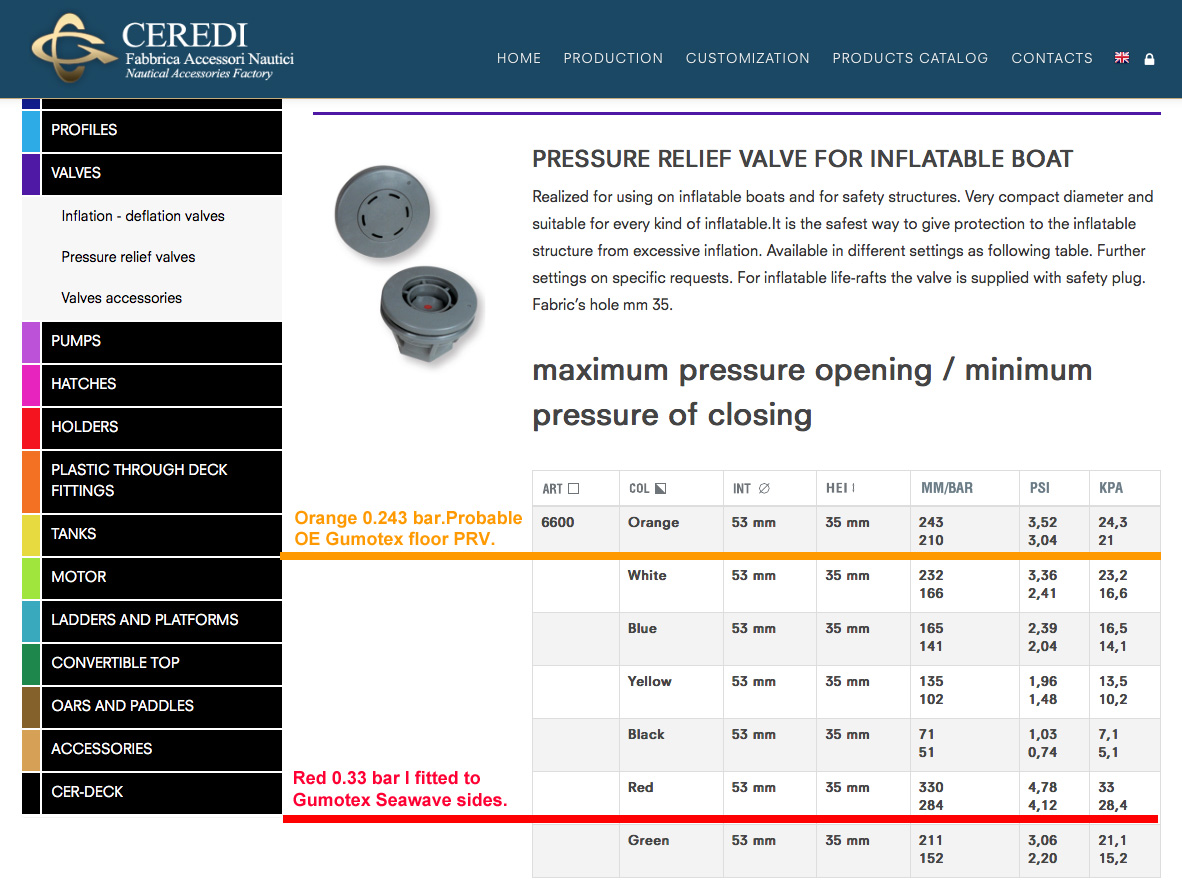
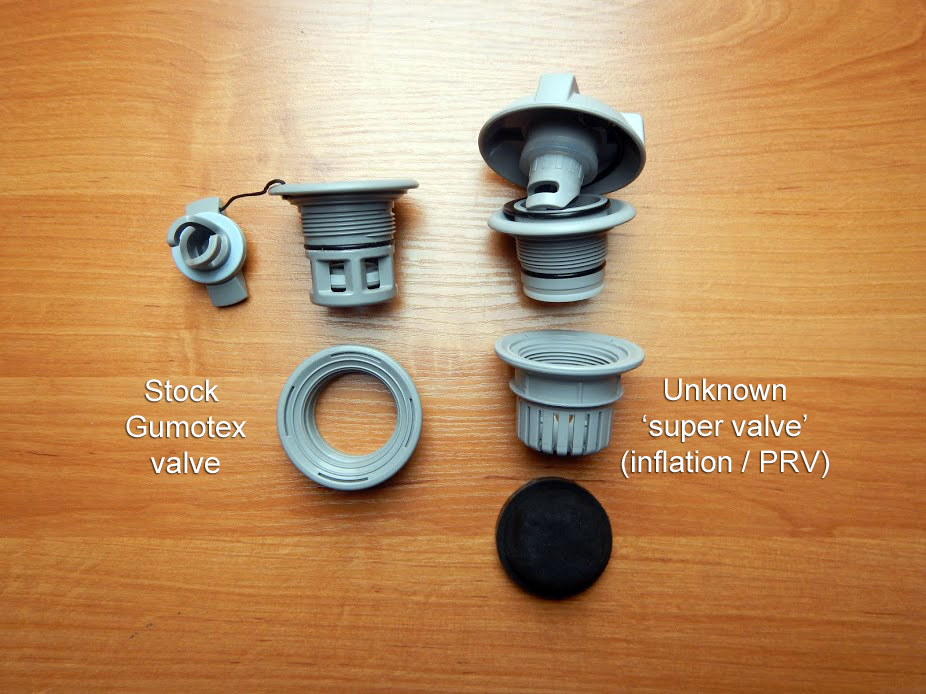
In a discussion with a French Gumtexer, he suggested that Gumotex use the same orange dot 0.243 PRVs in all their boats, irrespective of the stated official rating which is either ‘0.2’ like most – or ‘0.25’ on the Seawave. He sent me a photo of his 2016 Palava floor PRV (left) – orangey-pink, same as my Seawave and classified by Ceredi as 0.243.
Officially the Palava is a ‘normal pressure’ 0.2 bar canoe. Upshot? Your Gumboat’s floor may be rated at higher pressure than you think or is officially stated. You’d assume then that the tubed sides can easily handle at least as much pressure. Then again, in the table below, Ceredi state the orange PRV will open between 0.21 and 0.243 so perhaps 0.21 it is and we all just need to calm down a bit.

PRVs use springs set to purge air before pressures reach structure-damaging levels. Then again, my Amigo had no PRVs at all so you assume Grabner were confident their floor construction was solid enough to handle occasional neglect. But I’ve been caught out before and always try to ensure a boat remains in the cooling water when moored up on hot days – even getting up to splash the sides as they tighten up like a drum.
Like most IKs with single side tubes, my Seawave had no PRVs as the tubular profile can handle higher pressures better than the flat, ‘lilo’ floor. However, if you’re planning to run them over-pressure as I am suggesting, that could be risky.
The answer: fit PRVs in the side tubes – just like my old twin side tube Incept. That way you can safely leave you IK out of the water in the tropics, go and hike up a volcano (which might be described as ‘the planet’s PRVs’) knowing that all three chambers will harmlessly purge any excess pressure. Sure, when it all cools again back in the water the boat may be saggy, but better a quick top up with your K-Pump than pulling bits of shredded Nitrilon out of the palm trees.
Ideally I was looking for a PRV set at a reasonable 33.33% over the factory figure of 0.25 bar – i.e.: something around 0.33 bar or 4.8psi.
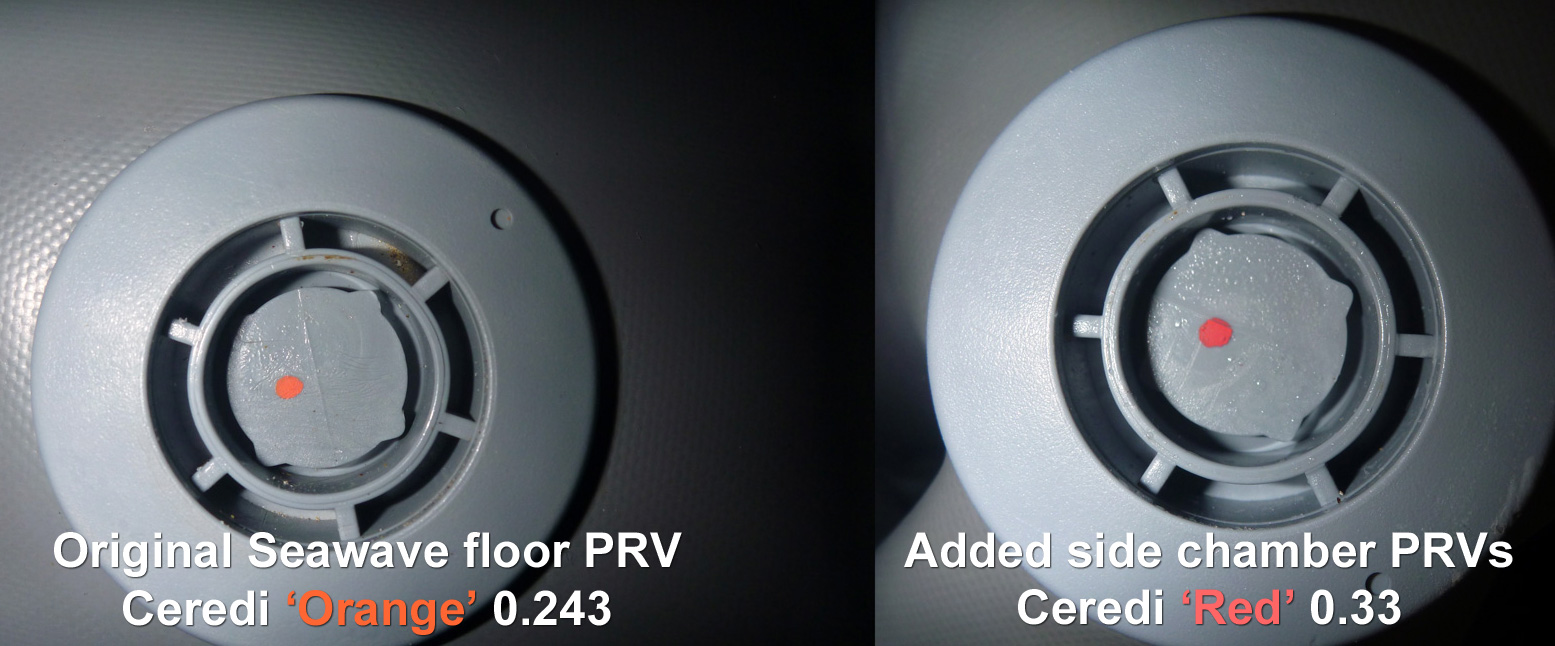
Well-known IK valve-makers Leafield and Halkey didn’t make anything matching my needs (or don’t sell to individuals). The Seawave’s valves are stamped ‘Ceredi Italy’ and once I managed to track them down online, I saw the same Ceredi 6600 PRV series came in options including Red 4.78 psi or 0.33 bar, (above right). In the UK they were a special order via IBS and cost £35 a pair posted.
Before you get too excited, scroll down to the bottom and read Nikola’s PRV nozzle idea.
Ceredi prices too steep for you? On eBay I bought unbranded ‘4psi‘ PRVs from China for about £4 a shot and delivered in less than 2 weeks.
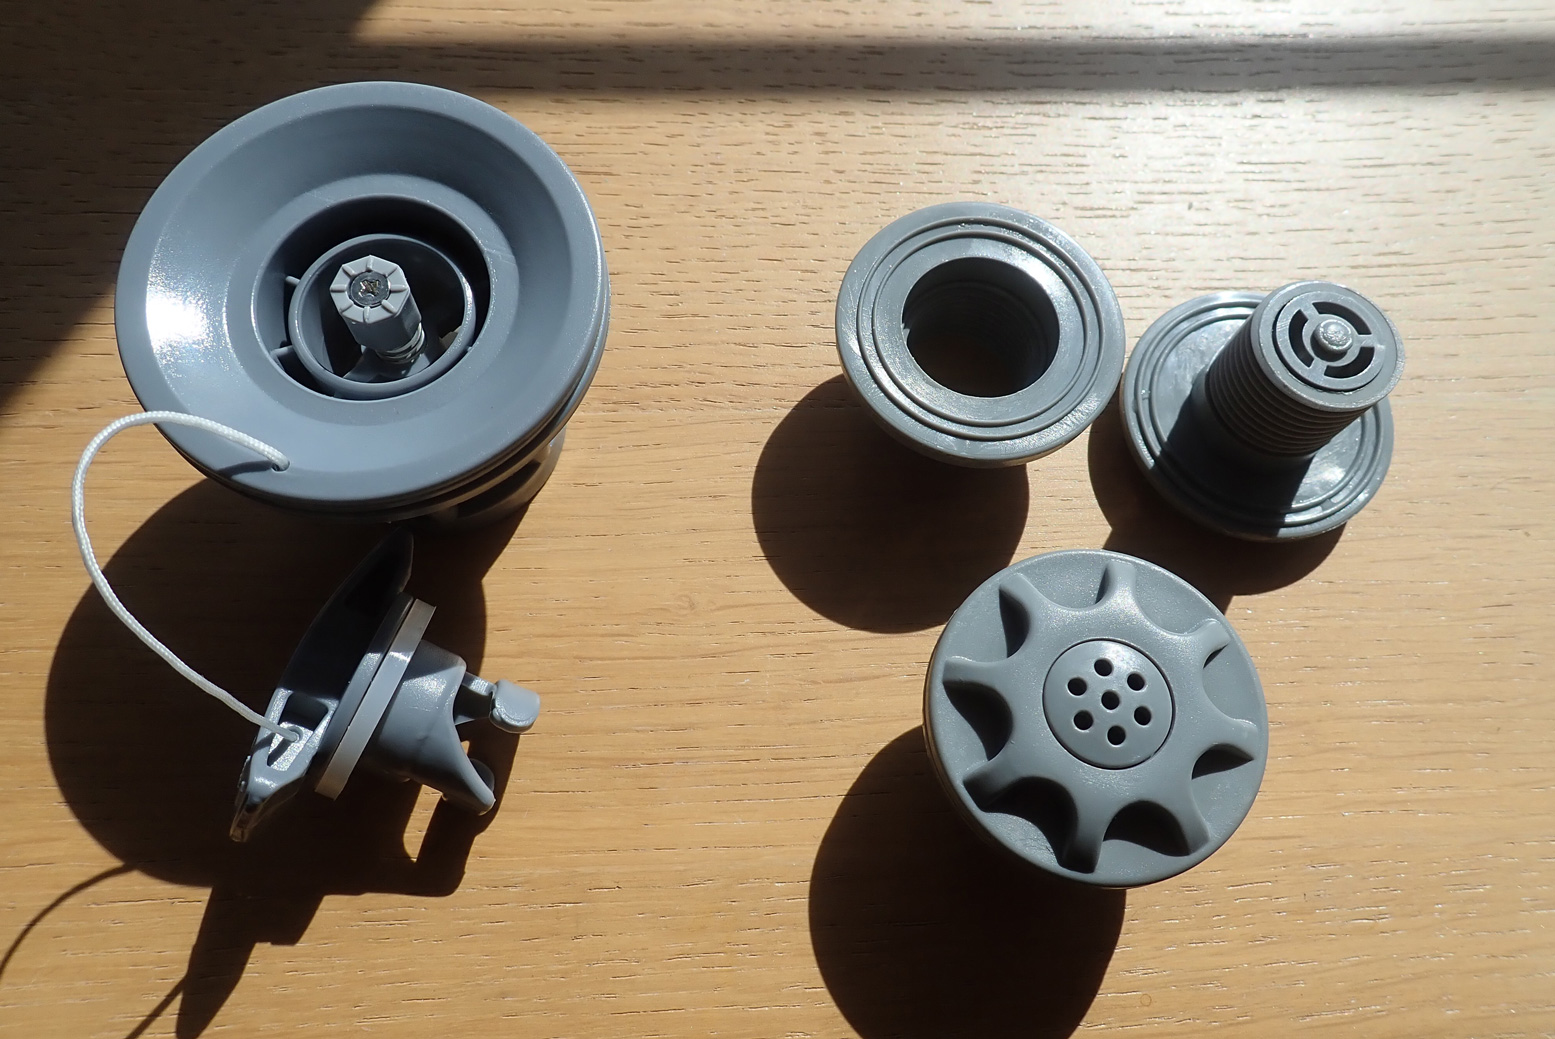
Note these are smaller than your Ceredi and require only a 25mm hole. The back nut will easily fit through the inflation valve hole, once you remove that.
I pressure-tested the valves I received and they stood up to the claim: more here.
Search eBay: ‘Air Safety Release Valve Kayak’.
As you can read from Adam’s comment below, there is – or more probably was – a super valve which combined both inflation and pressure-release duties which means you simply replace the stock inflation-only valve. No need for extra holes to be cut. His link no longer works but I tracked it down to here; the Bravo Super Valve – that’s Bravo as in the Italian branded Chinese-made pumps we all know and love. But there is no mention of a super valve on their valve page anymore, nor in their catalog.

Fitting the Ceredi red dot PRVs
Tools and time needed
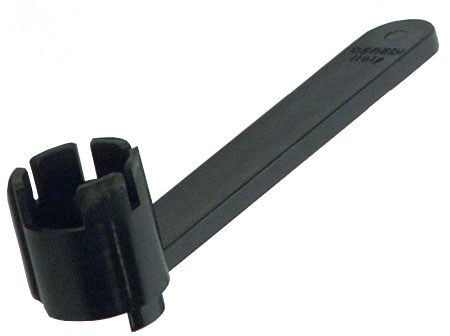
• Gumotex push-push valve removing tool (fits Ceredi PRVs also). Right; £12 on ebay
• Narrow-bladed knife or scalpel
• Water pump/lock channel pliers
• 30-60 mins
Short version
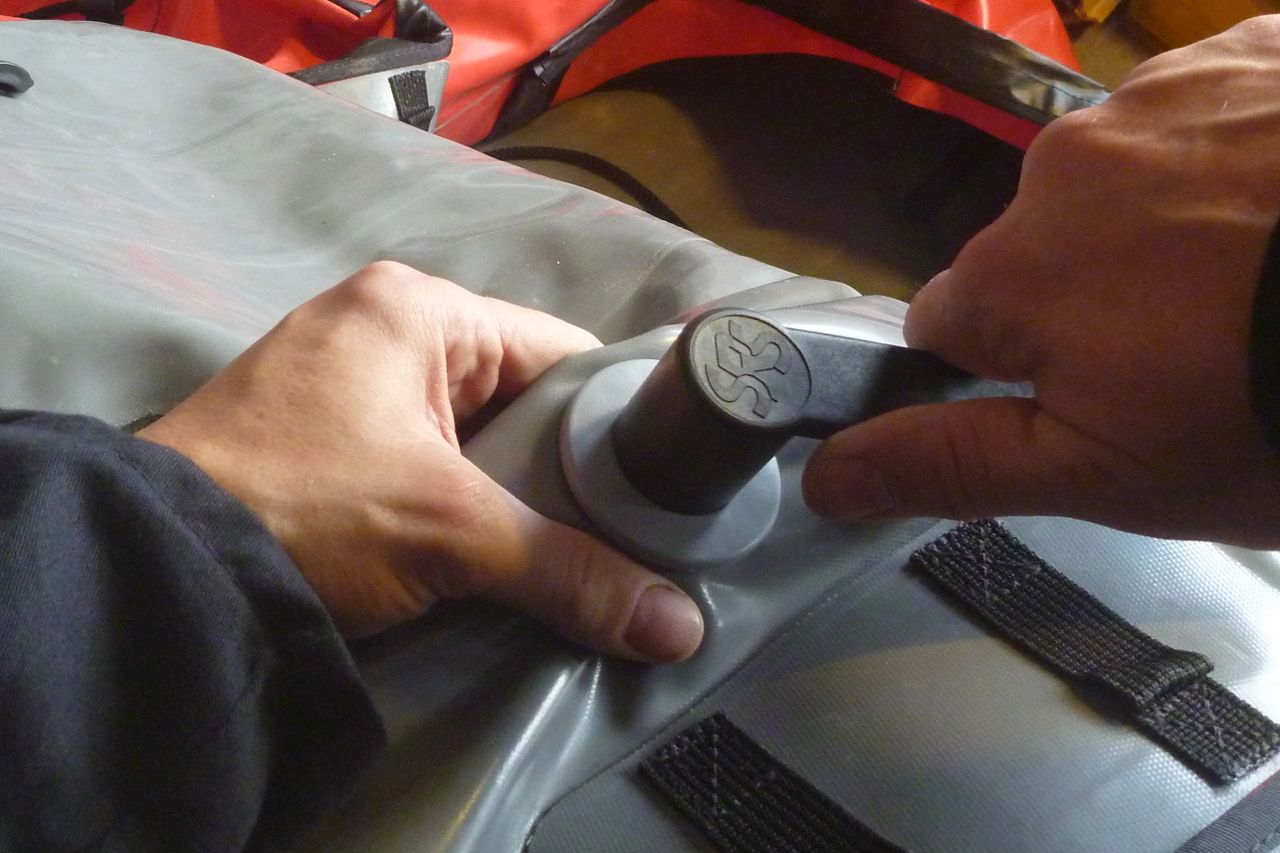
• First, remove the side chamber’s inflation valve with the tool. They can be extremely stiff. If you can’t undo it, maybe think twice before going ahead. Or try silicon spray grease of 303 protectorate to lube

• Choose your spot, mark and then cut a 37mm hole in each side chamber. The Ceredi-suggested 35mm was not enough. Or fit the smaller, unbranded mini PRV (~25mm hole); see above.
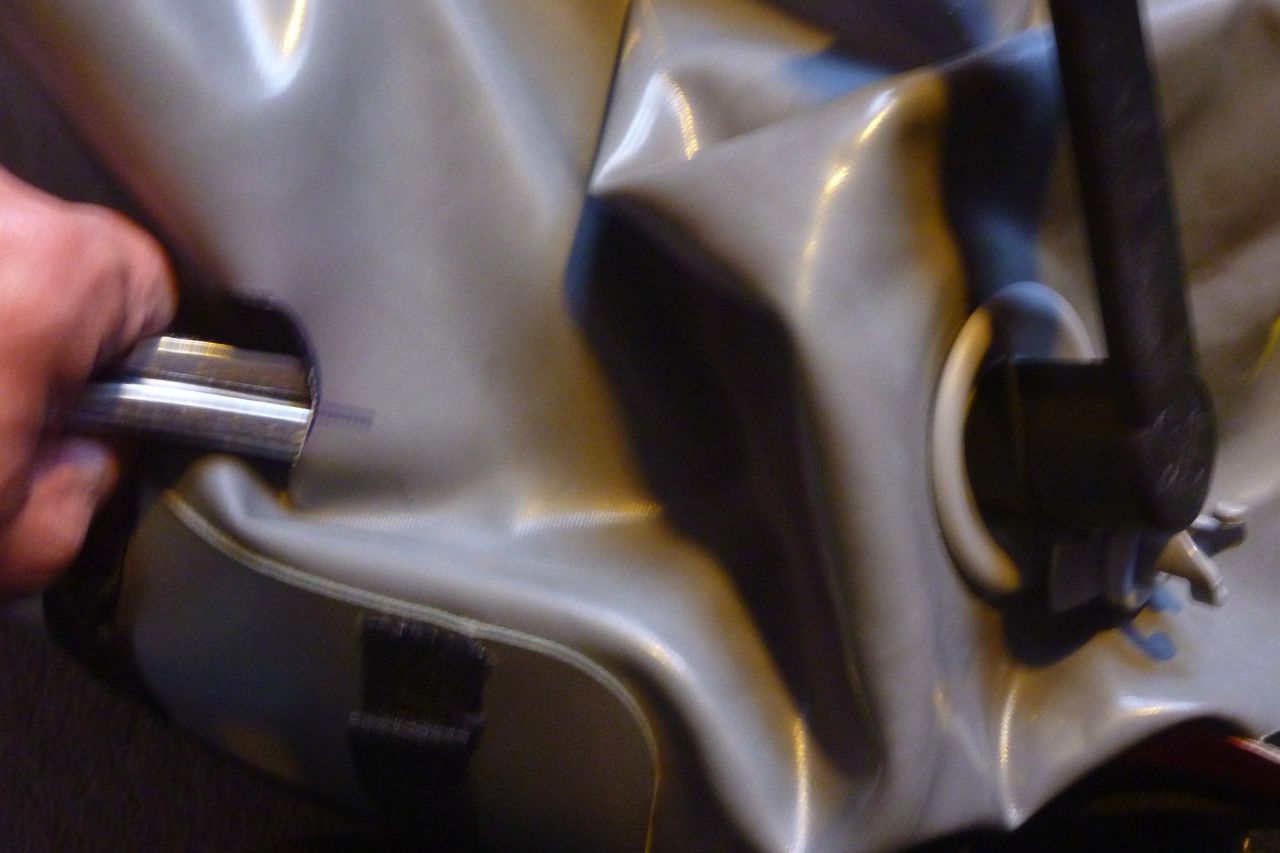
• Squeeze the PRV’s threaded back collar through the bigger inflation-valve hole, shuffle it over to the new PRV hole and loosely screw on the external part of the PRV by hand
• Reassemble the inflation valve and tighten both valves with the tool
• Fit push-on caps to the PRVs
• Pump up and check for leaks. Maybe retighten some valves with the tool


Long version
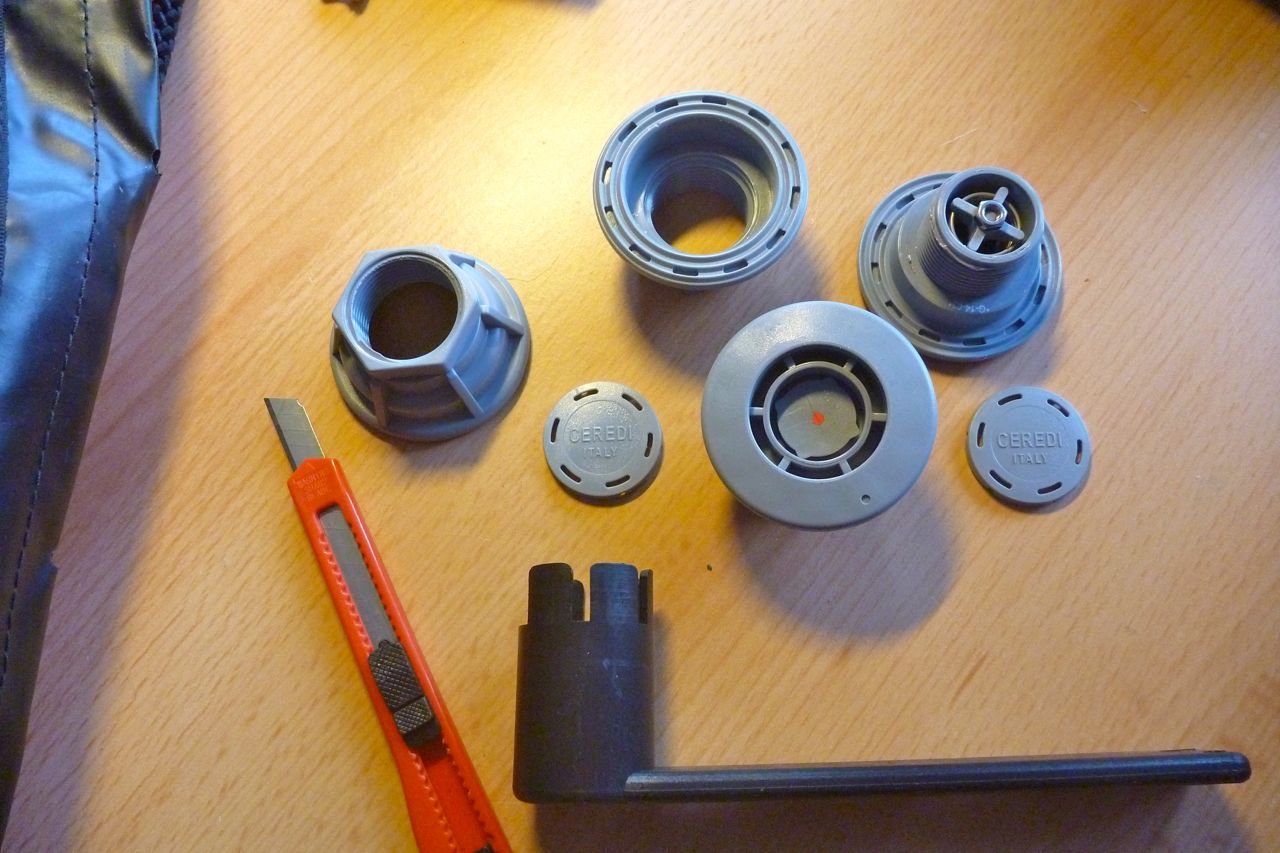
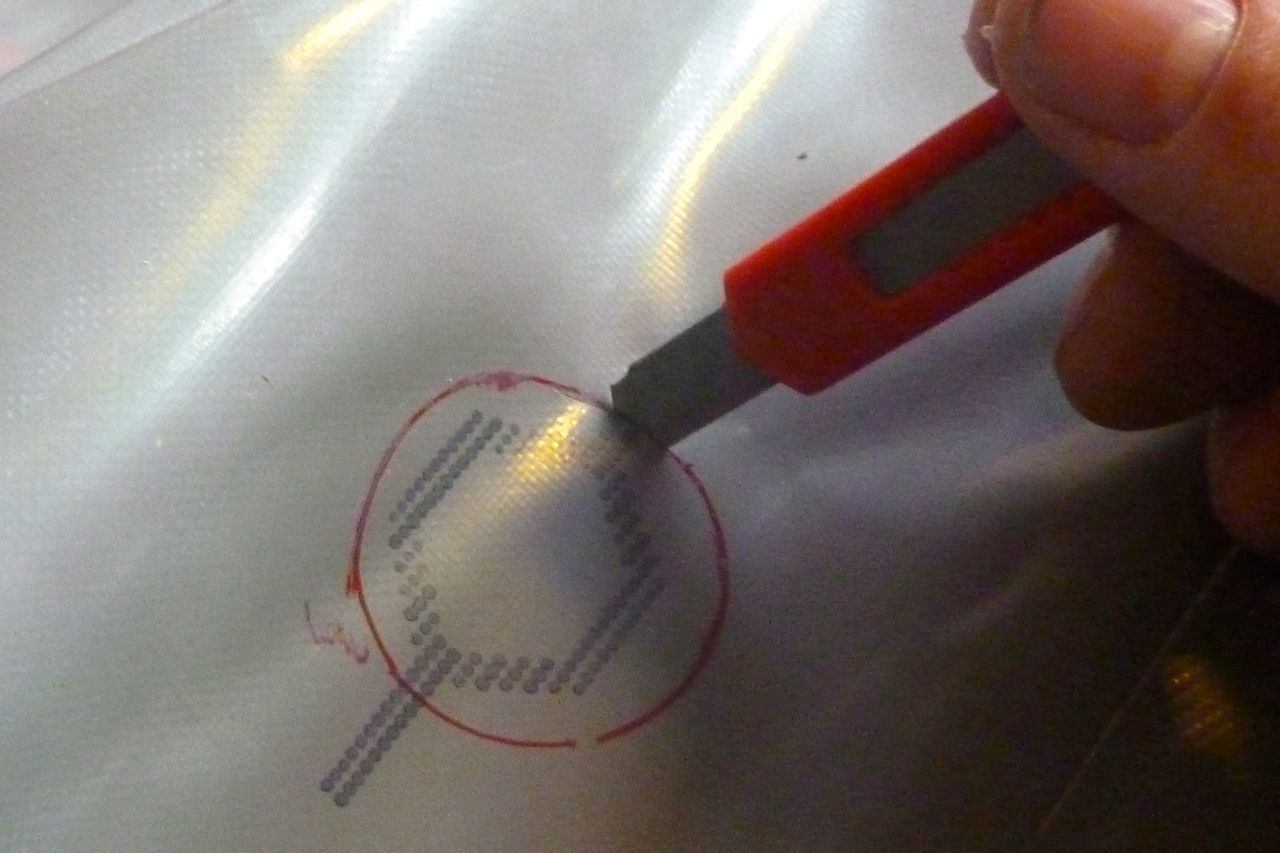
I chose to fit the PRVs close to the inflation valves and at about the same level. There are mysterious markings on the inside of the Seawave to aid symmetrical positioning (Pic 2, below). I used a narrow-bladed knife and of course took care to gather up the hull skin so I wouldn’t inadvertently puncture the other side of the side tube.
I assumed the 35mm hole would be big enough to take the back nut. When it wasn’t I was a bit flummoxed. Now I had a gaping hole in my boat, but no way of getting the back of the PRV inside the boat without performing a Caesarian on my Seawave. Luckily two brain cells dropped into my Hadron Collider and it occurred to me that once removed, the nearby main inflation valve’s hole might be bigger. And it was – just.
One stock push-push valve was extremely hard to undo. I wondered if it had been glued in or that the plastic valve removal tool would snap (you can buy a metal one for loads more). When the other side undid with less effort I knew it had to be possible.
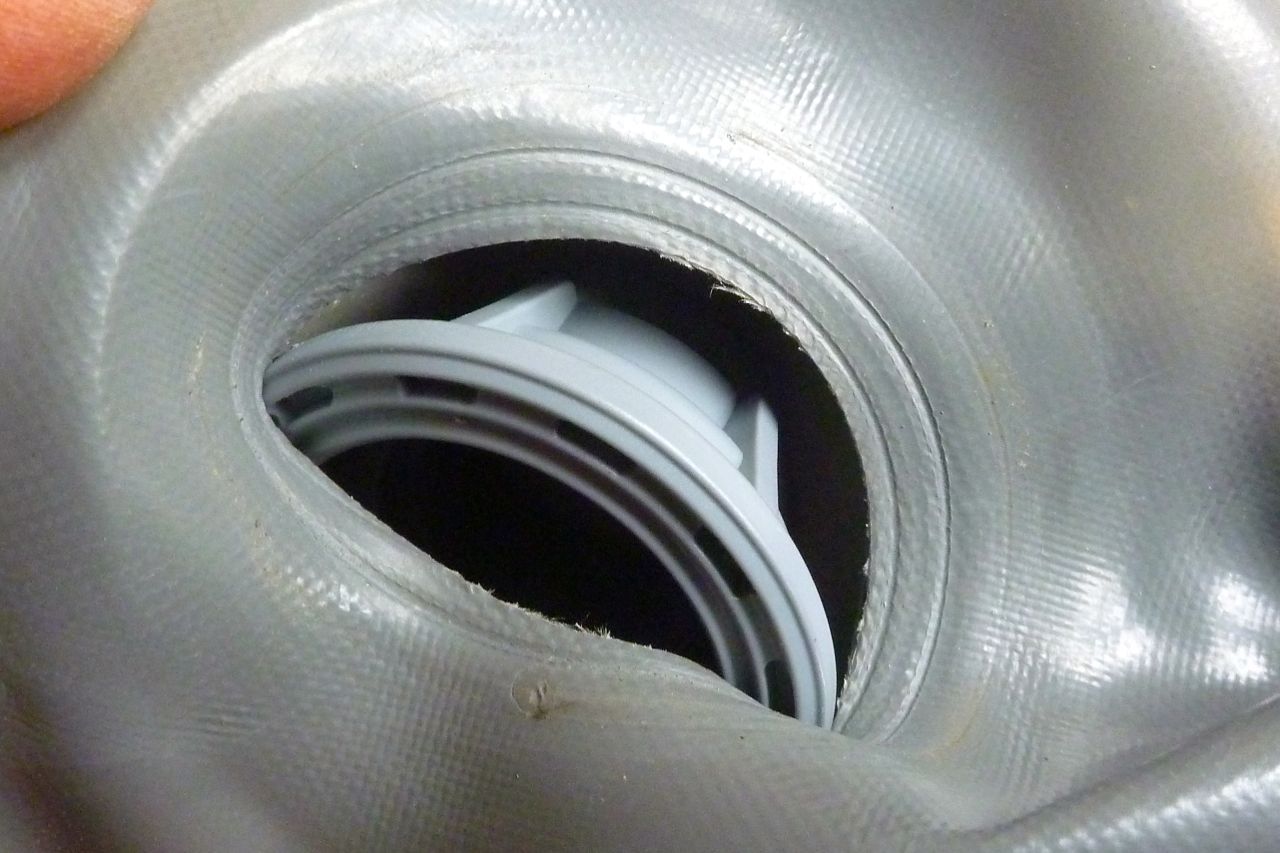
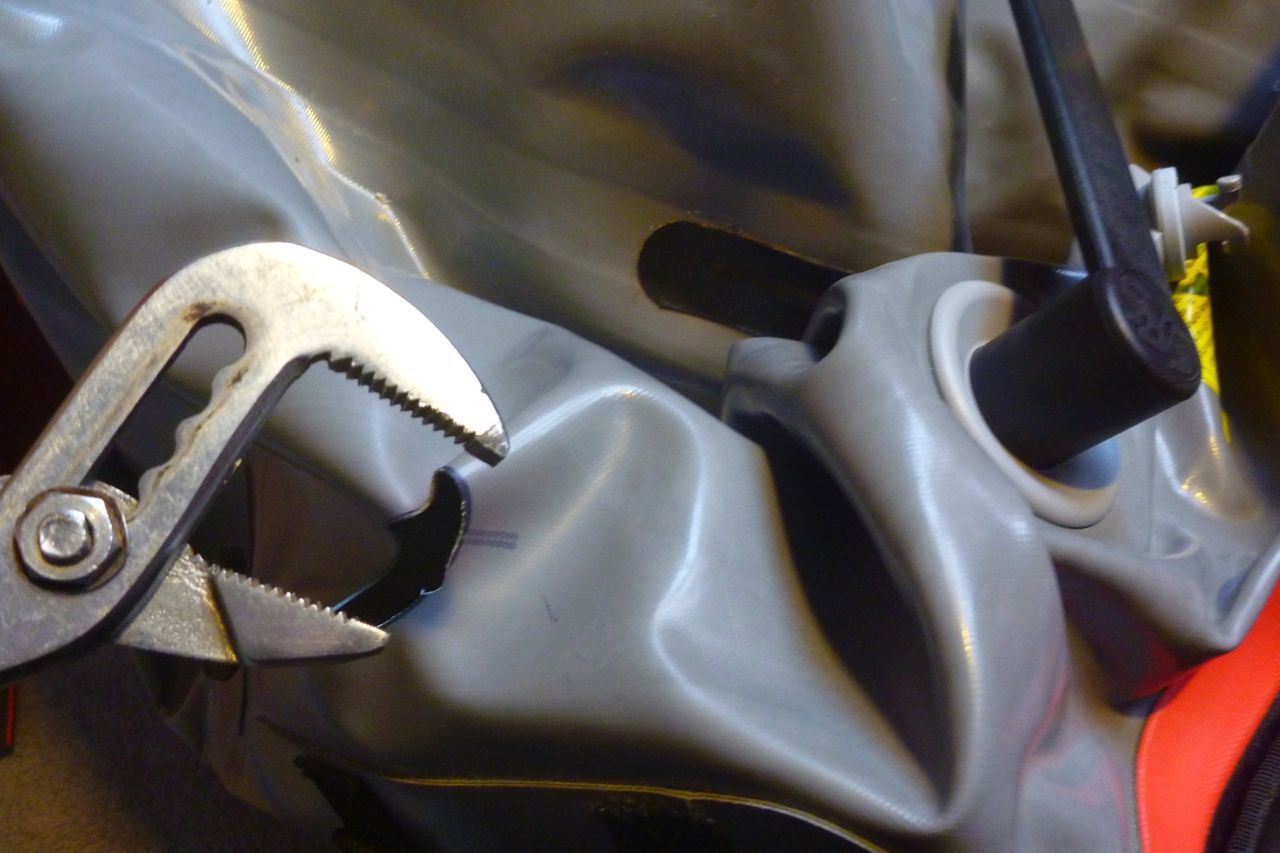
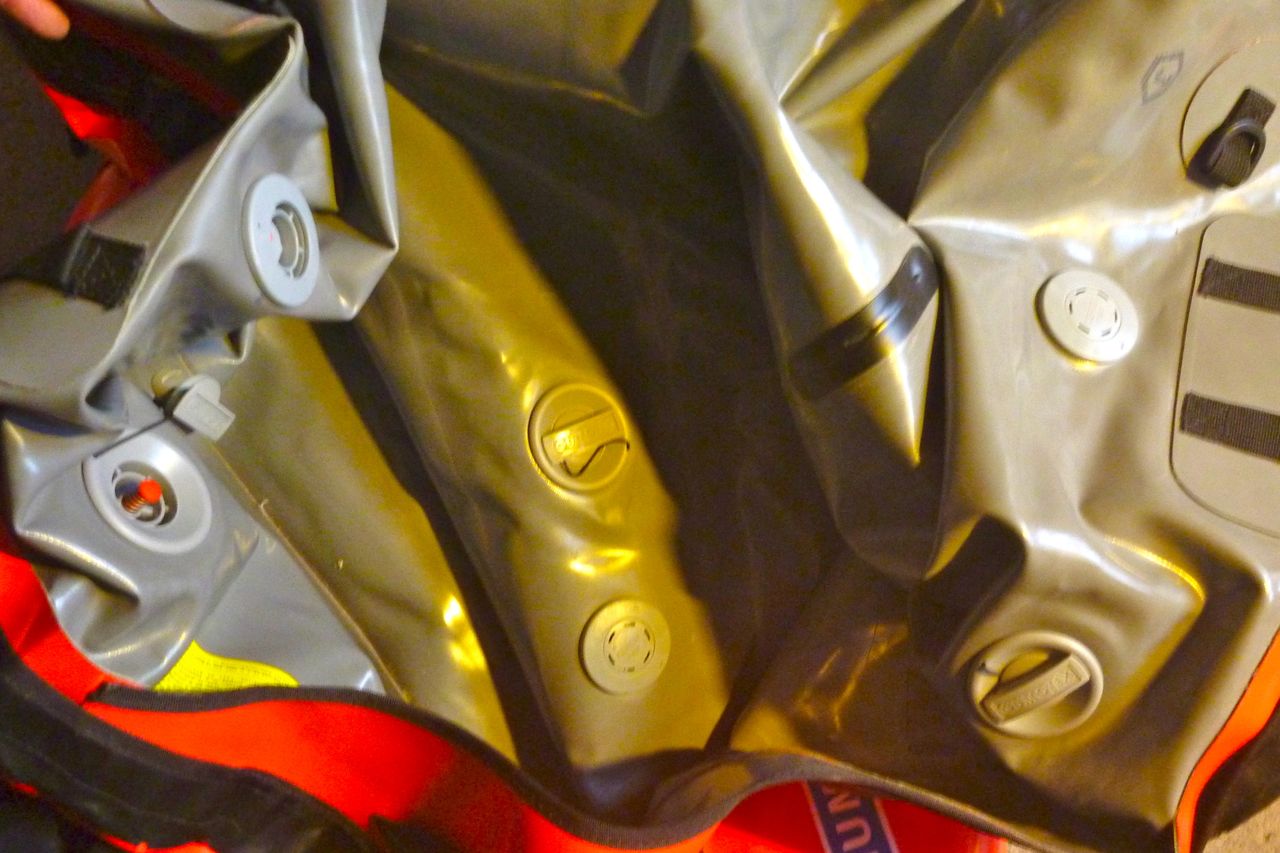
Another problem is that the internal collar or nut is only 10cm deep (pic 4, below) and so was hard to grab through the hull fabric. Until I realised this, I was grabbing the inside part of the outer valve body which screws through the collar from the outside. Trying to ‘unscrew’ the valve body from itself is like trying to pull you head off – eventually the valve tool would break. Another ‘Higgs boson’ moment came over me and I realised that by chance the two valve holes were close enough for me to get some water-pump pliers in there, grab the back collar and finish the job (pic 6, below). After that, no more problems.
One thing I noticed while doing all this was the unseen protective patch on the inside of the hull opposite the inflation valves to limit wear and rubbing between valve body and hull when the boat’s delated. Nice touch, Gumotex ;-)
I did all the valves up as hard as possible with tool and hand, and in four more years had no problems. On a hot day in the sun I can hear the high-pressure side PRVs hissing away. The gallery below shows the job in chronological order.


Now it’ll be good know that should I doze off as the tide ebbs away, I won’t be rudely woken by an exploding boat. Another side benefit of doing this is that you’ll never need to use a manometer (pressure gauge) again. You simply pump up all three chambers until they hiss and you know they are at full operating pressure.


Nikola’s PRV nozzle idea
In the comments below you will see Nikola suggesting the idea of using capped off PRV nozzles you’d usually fit to the end of your inflation pump hose to fill up a boat to the correct pressure without referring to a manometer. The integrated PRV in the nozzle purges at a given pressure. No scalpels required.
You will need to block off the open end where the pump hose attaches. The €13 red Ceredi ones he found (left) are rated at more or less the same pressures as a Seawave: 0.25 bar/3.5 psi. I think if I was running a Seawave in a hot country I’d definitely fit some to protect (or not have to worry about) the sidetubes.
It might even be possible to adjust the spring inside the Ceredis (beneath the vented cap) to get a bit more pressure before they open, getting closer to the red-dot in-hull Ceredi PRVs I fitted of Seawave 1. Or fit the similar black Grabner inflation relief valve which is rated at a more promising 0.3 bar, but, like everything Grabner, is double the price of the Ceredis.

Just wanted to mention that undoing inflation valves is VERY easy is you just inflate the kayak fully.
LikeLiked by 1 person
Thank you Chris for your amazi g reviews.
Look at this new Ceredi relief valve:
https://www.yachtshop.eu/en/product_fni/1130925/Overpressure%20valve
Do you think that thi could be use instead of Ceredi relief valve if I close it from the side intended for an inflation and let it stay on the main inflating valve while paddling. This could be an easy fix. I wonder why ceredy doesn’t make a super valve like Bravo in the past (which is not available).
Please let us know your thougts about this valve.
All the best!
LikeLike
Hi Nikola, I’ve seen those valves before to put on the end of yout pump nozzle but never thought of leaving them on the boat to use as sidetube PRVs. That is actually a good idea in hot places, even though they stick out a bit. They are rated at 0.24 bar / 3.6psi which is the same as the 0.25bar / 3.6psi standard on Seawave sidetubes (a bit more than other Gumo boats). So there may be no gain in stiffness/pressure, but the sides will certainly be protected. It may be possible to adjust the spring inside the mechanism and make it open later; I think I have seen this on other PRVs. Yes, it is a shame the super valve is no more – perhaps they were unreliable.
LikeLike
Another Seawave sidetube failure, but doesn’t seem to be overpressure (‘left in the sun’) related.
http://foldingkayaks.org/phpBB/viewtopic.php?f=33&t=8701
Photos: https://photos.google.com/share/AF1QipPW8LNxBkwrvJVZXDJdy63U6GjZwvrse3cexEcpti6Dxu0MYhN-huhWSCujjwgX7w?key=dWdidzlNWE9obDZHTWhFb2Z1X09BX0dXS3c3S2FB
LikeLike
Hi Chris.
Creedi PVR could be easy adjusted -> https://swobodneplywanie.blogspot.com/2019/02/wymiana-i-regulacja-zaworu.html. From 0,2 to 0.3 bar, by six-seven turns of nut inside.
LikeLiked by 1 person
Good tip Marcin, thanks.
LikeLike
Hi Chris, thanks for all the really useful info, think I’ve been referencing your site since before my original purchase!. I have an original Sunny (pre PRV) bought around 2005. I think adding prv’s would be a good addition as I’m always a little worried once the sun starts shining. I fancy trying the super valve idea. Do you know if the original sunny valves are the same size as those found on the later Seawave? Also, do you think the sidewalls would be able to handle up to 4.3psi – it is the heavy original Nitrilon construction
LikeLike
Hi Nigel. Are you sure you don’t even have a PRV in the floor? I’m sure mine from same era did. You dont want to meddle with that (or install an original).
It may he the old heavy Nitrilon but it’s how its glued together that counts + 13 years of wear and UV. Size is the same or very similar.
4.3 is a big jump from 2.9 but if you don’t mind it going bang, give it a go ;-)
LikeLike
There’s definitely no PRV in the floor.
I certainly don’t want it going bang – we’ve become close friends over the years :) To date, I’ve always pumped up by feel…. using the bravo foot pump until there is noticeable resistance. So maybe my first step is to get hold of a pressure guage and see what I’m actually putting in there – and in the meantime keep purging. Thanks for your help
LikeLike
Perhaps you’re right. Can’t find an old pic of mine with a floor PRV. It’s the I-beam floor that’s vulnerable; the sides can take it (Cap’n).
If it’s lasted so long probably not worth the faff of installing PRVs.
LikeLike
Hello Chris.
I was going to add safety valves to my Seawave according to your idea.
However, at the end of last year, super valves appeared, which combine two functions – a normal valve and a safety valve: https://sailor.center/motorboating-and-motor-accessories-401-1/66-accessories-for-inflatable-boats-503-1/inflationdeflation-valve-36468-1?search=66.446.31&description=true
I just bought them and put them into my Seawave. Sizes are identical to standard Gumotex valves. You don’t need to do anything, don’t need to make additional holes, just unscrew the original valve and screw in a new one.
Best regards,
Adam
LikeLike
Thanks Adam, I’ve heard of these valves before. I will update the page. Less holes the better.
Summer 2020: Adam’s link is dead but try this place: https://www.thewetworks.co.uk/products/bravo-super-valve-2017-inflation-relief-valve-4-35psi – 15 quid.
4.35 is about right for side tubes.
LikeLike
Hello Chris.
Your idea is great (was my inspiration), but as you wrote – less holes the better.
Here are some photos of my Seawave with a new valve: https://photos.app.goo.gl/UHA1dORXkyzVu9F92
Best regards,
Adam
LikeLike
Hi Chris, I’ve spent the last couple months scouring the world for Supervalves, Osculati don’t make them anymore, all the retailers in Europe who have them on their website can’t obtain them either. Was super excited to see your post for wet works. Unfortunately they are out of stock now too.
It doesn’t look like super valves really took off. Thanks for all the detailed info about modifications, but I guess I’ll be going with the Ceredi PRV pressure upgrade/mod.
LikeLike
I wonder if I bought the last 2 then from wetworks on the weekend or they’ll string me along for a bit then say out of stock?
I also wonder if the Bravo ones proved unreliable and that’s why they were discontinued?
You’d think a super valve wouldn’t be that hard to design and that the idea in principle is a good one: fewer holes in the boat.
Or perhaps PRV and inflation functions are best left separate.
LikeLike
Hello Adam and Chris, My name is Thanasis, I am from Greece and I have Seawave almost 1 year now and i am interested installing prv valves beacause Greece summmer is very hot. So Adam are you satisfied with this valves? I saw at the description of these valves that they open at 0.3 bar and closed at 0.21 bar. So if you inflate the kayak and you exceed this pressure the pressure will drop at 0.21 bar?Am I right? Chris great job with this site it is very helpful!!
LikeLike
Thanasis, the valves work very well and I’m satisfied with this solution. In last week I paddled six days on the Vistula river without any problems. It is as you write, after exceeding the pressure of 0.3 bar, the valve opens and closes at 0.21 bar.
LikeLike
Just got a seawave and am looking into the mods… I’m in the US and am contemplating the 4psi Leafield A6 valve from https://rivergear.com/product/raft-inflatable-boat-a6-pressure-relief-valve-by-leafield/, any reason to stay away from it? I see that Innova sells the Ceredi valves (std pressure, though) at http://www.innovakayak.com/store in the parts section.
LikeLike
Hi Thorsten, will be 20% less pressure than Ceredi but can’t see why it won’t work. The diameter ø of the incision hole may be different than the Ceredi I used, but also if the rear assembly is greater overall ø it may not pass through the main valve hole as I had to do, and you’re stuck. So I would ascertain the max ø of the Leafield’s inner assembly ‘nut’ and compare to a Ceredi. This measurement wants to be same or less than a Ceredi.
LikeLike
Ah, good point. Why does the inflation valve hole work for the ceredi? Is that hole larger than the PRV hole? The recommended hole dimension for the Leafield is 34mm.
LikeLike
Yes, inflation valve hole was larger, luckily. The 37mm hole required for my PRV was not big enough to let the back part pass through that hole.
LikeLike
Many thanks. Fitted my PRVs quite easily in the end and wouldn’t have attemped it without your write-up.
Any thoughts on how to attach a flag pole to a seawave? I have to fly an alpha flag whilst supporting a swimmer and can’t think of the best way of going about it. I could just duck tape it to the side. But would prefer a gued on fitting at the back in which a flag pole would slot. Not sure how stable that would be.
Thanks again for all the seawave information and ideas!
LikeLike
Glad the write up was useful Scott.
For a flagpole, my idea would be to mount a tent pole cup/foot (load spreader) on the floor.
No need to even attach it permanently, though maybe a contoured foam base matching the floor’s ribs would help position it.
Then all you need are 3 or 4 guy lines holding the pole in place – plenty of mounts on the back of the boat.
LikeLike
Hi Chris,
Great website – thanks for the great info. I live just north of Brisbane in Australia. I’ve got a C2 which I picked up used on Ebay and am visiting Vancouver in Sept and pick up a new Seawave there (can’t wait).
I installed a couple of PRVs in my C2 recently and was able to squeeze the back of the Ceredi PRV sideways through the 37mm hole with a bit of effort and persistence (I was struggling to remove inflation valve so gave it a go).
I tightened with the tool and holding the back with my hand as best I could from outside the tube. To my surprise, the first one was airtight first try and the second one just needed a bit more tightening. I’ll try the same with the Seawave and let you know how I go.
This might help someone who has trouble removing the inflation valve.
Thanks again for the great info.
LikeLike
Thanks for the info Warren. You will love your Seawave. What is a C2, a Gumboat?
LikeLike
No worries Chris. Sorry, I meant K2 not C2. People do get a laugh out of seeing “K2” on the boat – it does get along ok for a whitewater boat (my wife and I get about 5km/h out of it over 10+ km on flat water but the tracking is a challenge) but FAR from the speed of the K2s most people think of.
Certainly looking forward to the Seawave.
LikeLike
Yes, thought you might have meant K2. Nearly bought one once – a serious, high-end (and high-pressure) WW IK, but they wanted 500 quid.
LikeLike
Thank you for such an excellent website Chris. It’s such a help for someone like me who is just getting into iKs.
Have you encountered any anecdotals of running other Gumotex boats overpressure?
I have a Twist and I would love to add PRVs to the side tubes but perhaps 4.78psi PRVs might be pushing the nitrilon light too far?
LikeLike
Glad you like the website, Rob. A mate just added Leafed C6 PRVs to an old LitePack Twist, but 3.25s (£16 ebay) – about what a Twist is supposed to run normally. I would have thought the sides of a single sidebeam IK are less prone to over-pressure damage than an I-beam floor (or twin beam side, Like incept), but then pankanels’ experience with his seawave side blowing shows it can happen. Still, I bet the pressure was a lot more than 4.8 before it finally blew.
In the end it’s a gamble meddling with manufacturer’s recommendations, but they are probably set on the safe side because of people like us and also the risk of passive over-pressureisation (like pankanel’s). And yet my old Grabner Amigo ran similarly high pressures and had no PRVs at all.
You can fit manufacturer’s rated pressure PRVs in the sides to avoid accidents like pankanel’s, or you can take the chance and fit slightly higher rated PRVs in the sides as I did to benefit from a stiffer boat which is still protected from over-pressure. I would never meddle with the floor PRV.
Your Twist is factory rated at 3psi while my Seawave is rated at 3.75. So 4.8 is a bit of a leap for a Twist but 3.25 Leafield sounds just right. No harm in doing that to protect your boat if you live in a hot place.
LikeLike
Excellent project Chris, am using my Seawave in Greece at present and has been amazing just knowing it’s not going to explode on me. On a slightly different note do you know the PSI rating of the floor PRV just mine seems to be contantly letting out air to the point the floor goes squashy, had it in the swimming pool and sure enough it’s letting out air – the two I’ve put in the side chambers are of course fine :-) Do I need to do a a replacement on the floor or do they sometimes get stuck? Anyway of fixing it? Thanks any help gratefully rcvd!
LikeLike
Hi Gareth, never happened to me but they can get stuck with a grain of sand embedded in the rubber seal. If you have the tool take it apart, clean and inspect. That should do it and if not, I guess you need to replace. Make sure it’s leaking out the valve not the sides – if yes that just means it needs tightening down. One of my other IKs need that once. I imahgine in greek heat they’re all purging away quite a lot. Chris
LikeLike
I would recommend that all seawave owners should follow your example-solution with the prvs.
I left my seawave one hot noon, in a sunny Greek beach (without prvs). Even though I had relieved some pressure from the boat, the result was one of the side chambers to burst. One of the seams opened and I had to paddle 9 kms with one chamber less.
I repaired it myself and retrofitted prvs. Unfortunately it opened again (even with the prvs) in exactly the same spot. Which is now a weak spot. I will have it repaired by a professional and hope.
LikeLike
Sorry to hear that pankanel. I also once ruined a (near new) IK once. Left in the forest on a hot day but there was a gap in the trees… BANG! (x 3).
In that case it was a Feathercraft bladder boat – easily replaced with new inserts. Fixing a burst Gumotex would be very tricky. The PRVs I used at .33 bar – about a third higher that the .25 bar rating for the Seawave. I assume the round side tubes can handle a little over-pressure, certainly better than the I-beam floor. Hope you manage to fix it.
LikeLike
Fortunately the professional help gave the solution and the boat is fixed and working perfectly with its prvs. Its been used and left on the beach a lot this last month, with temperatures reaching 40 C. With no problem. And the prvs opening constantly.
I would also like to comment on the K-Pump Mini. I was looking for something compact and bought it from an online shop in Poland. When I first saw it, I was disappointed. It looked small for the job. Like a very fat version of my bike pump. But when I used it I was
astonished. Side by side, it inflates the boat as fast as my high pressure Bravo foot pump or an electric Bravo foot pump. Using an extension I made using a little garden hose, some duct tape, and three of the included adaptors (vinyl tubing, boston adaptor, universal adaptor), I can now inflate the boat very fast, standing up, or even in the water. It is the best pump I have ever seen. I Imagine the bigger models will do miracles.
LikeLike
Good to hear a happy ending, pankanel. I also just rolled my boat up after three months inflated. Rarely got to even half of 40° but always a little top up needed after a sunny spell which means the PRVs are purging nicely. And like you say, the K-Pump Mini works great with an IK.
LikeLike
How is the seal on the PRV’s have you had any issues ? Thinking of doing this project before the Summer. Thanks
LikeLike
No props, Gareth. Had more issues with previous 2 boats’ standard PRVs, but have not used it in hot conditions. May test it more.
Chris
LikeLike
Much Thanks for great reviews, ideas and how to’s!!!
Just want to get your opinion on PRV valve placement.
What do you think of position pressure valve on internal side of the tube with slight down angle to prevent valve water build-up?
Much thanks for excellent resources and experience sharing!!!
LikeLike
Hello Vitaliy – yes I thought about that but decided it was not so important when you think that water will more often collect in the original fitted floor valve.
On the sides as I have it – much less chance.
LikeLike