Incept K40 Index Page
See also this post as well as this post about using the PA in strong winds in Western Australia. There’s a video there too.

I’m pretty sure my 0.78m2 home-made disc sail is too small to push the 4-metre Incept along until wind conditions get beyond the pale. Recognising that, I tracked down a 1.5m Pacific Action for £175 instead of the usual £250 which is a bit much. As I mention here, you can easily make a V-sail yourself from bits of plastic piping and old trousers, but life is short and as I’ve experienced a PA in action in Shark Bay, I’ve treated myself. The nearest B&Q hardware store is half a day away.


They call it a ‘1.5m’ sail, but unless I am very much mistaken it’s more like 1.15m2 if you calculate the area of the Isosceles as 146cm across the top and 174 up the sides (graphic on right; or base x height of about 170 divided by 2). PA round those dimensions up on their website to 150cm and 180cm, but that still doesn’t add up to 1.5m2 or 16 square feet. Maybe I should chill out a bit; a Ducati 900SS is actually 864cc and so on. As you can see left, it’s about twice as big as my 0.78m2 disc sail and it certainly looks like a metre-and-a-half square, so perhaps my sums are wrong. And it’s bigger in the right area too: up high where it counts. Plus you can see where you’re going – always handy in busy traffic lanes.

The sail comes in a compact bag of less than a metre. Can’t weigh things here but they claim 1.9kg; could even be less. Inside you get the two, 3-part masts made of thick glass fibre, the sail, fittings and rigging or lines, plus adequate instructions* for what turns out to be a fairly straightforward task. These instructions and fittings are obviously aimed at hardshells, be they SinKs or SoTs. With an IK you have to improvise a little. It helped knowing that there’s a picture of a PA sail on the Incept website (right), as well as this Kiwi guy’s video (bottom of page). The supplied cleats (sliding cord locks) are tiny and I recall Jeff replacing them on his Perception tandem for Shark Bay, but see below. Because of the confusing instructions combined with my congenital density, I misunderstood their simply application. On my first go at sailing the PA I was holding and maneuvering the control string by hand, as I did with the disc sail.

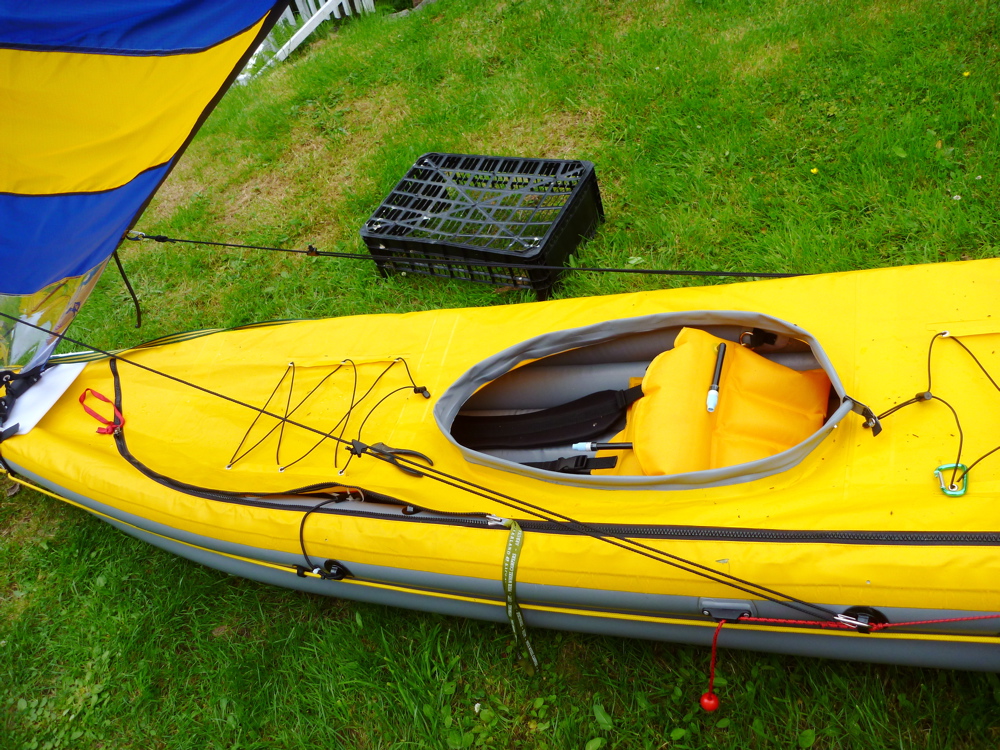
Up front the snaplinks (right) I’ve used to mount the disc sail also happen to be ideal positions for the PA’s webbing loop. And the bow handle ring toggle is the just about the minimum 12 inches ahead of the mast feet to take the shock cord clip (left) with which the sail springs forward when you release it. If that’s not quite enough far forward (as I think may be the case), I can stick a D-ring patch a few inches further forward right on the nose of the boat (as left). This position/angle may be more important than just getting a good spring forward, but also affect the sail support. We’ll see.

In Australia a few months later we did see. Further forward was indeed better, but I suspect still not optimal. When you think about it, the front attachment for the elastic would be better if it was set higher that the level of the mast feet. That’s because when you’re reaching across the wind with the downwind mast almost horizontal with the hull (as pictured left), the angle of leverage to keep the upper mast up gets very low; at 5-10° the tensioned elastic is almost at the same angle and so the sail collapses as shown in this video at 1.16. This happened to me all the time in Australia as the sail was pulled low to cope with the strong sidewinds. If I go ahead with my nasal bowsprit idea as mentioned here, I’m now thinking it might also be an idea to raise it a bit; have an upcurved bowsprit so the sail is more readily held up when reaching (near-horizontal).

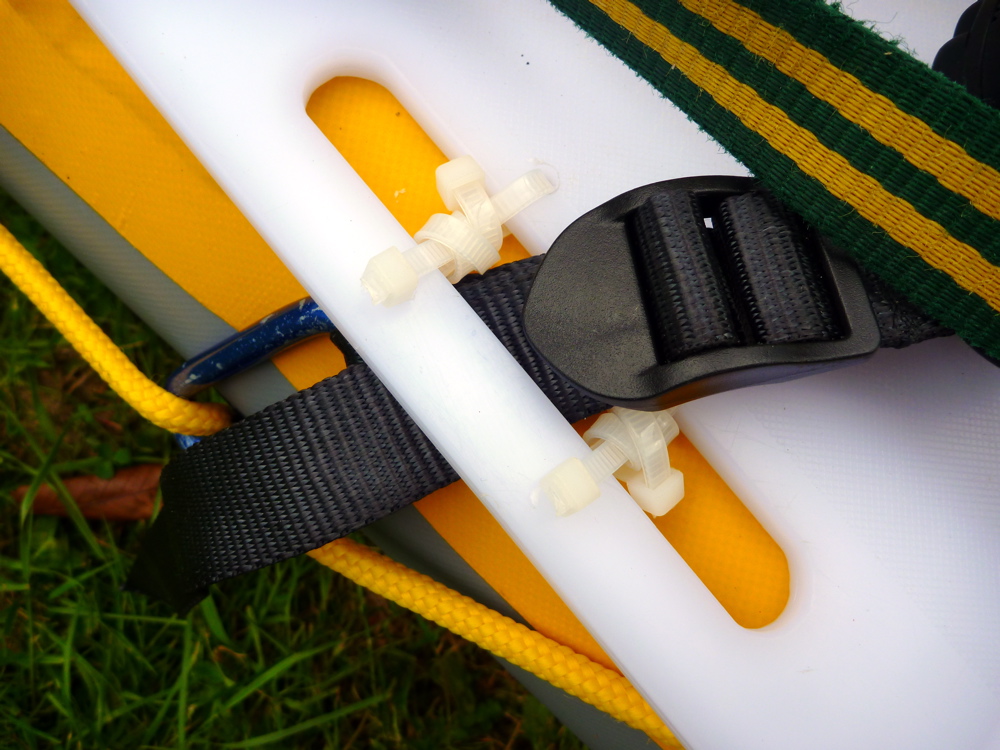
While in Australia I also pushed the snaplinks to mount the sail straps directly through the black lugs and not around them as pictured right. This was because the strong wind was pushing the sail mount (a plastic plate) forward, making it go slack, reducing the elastic tension and causing more problems with handling. But by the time I made all these adaptions we were locked into two days of headwinds so I never really had a chance to see if it made any great difference.
Back to the original mounting story set in Scotland in summer 2011. It all went together easily enough, until it became clear some fittings were missing from the pack which for some reason looked like it had done the rounds with a few previous customers. Most fittings were not needed for my IK, except the four ¾-inch self tappers with which you permanently fix the mast feet position in relation to your kayak’s deck angle and with the sail splayed. According to the instructions* and this picture I found on the web this is an ‘8g ¾-inch’ screw, but that seems way too long to have two from opposing sides – one alone would act more as a bolt than a self-tapper getting a bite, but that is what they recommend; the subtext is these screws are important to make a solid fixture. What’s not made clear (or is perhaps obvious) is that you ought to pre-drill guide holes deep into the plastic mast feet lugs for the screw can get right in there. Some hardshells will have a bevelled or convex foredeck which is why you must set the mast foot angle (MFA) specific to your boat for optimum operation. On my set up, the MFA is horizontal (flat) as I’m using a plastic chopping board idea as PA suggest to give the feet the all-important support and avoid wear on the PVC deck. The feet move around quite a lot under tension as you pull the sail this way and that but, as I found first time out, the angle of those feet against the mast (as well as the webbing tension) must be solid if the sail is to spring up and open or splay out.

The sail rolls down out of the way and doesn’t interfere with paddling, though it does mean yet more cordage hanging around; you could get in a right old muddle if you don’t keep on top of it. PA do advise paddling with a knife or a less pointy rope cutter. I have a quick-grab Benchmark one (left) attached to my PA.

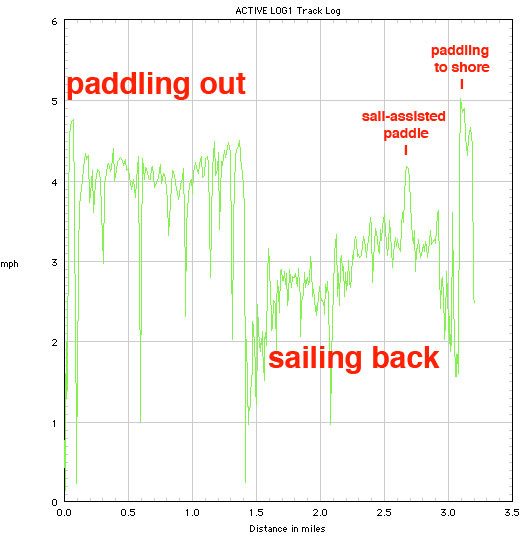
It was gusting up to 40mph before the local weather station packed up, and at times the sea was covered in foam streaks and swell, so I went to a back loch for a spin. Typically by the time I’d crawled into a dry suit in case I fell out and got dragged along by the sail, the wind had just about died, but it gave me a chance to test it out in tame conditions. That evening my paddling speeds back into the wind were greater than anything I managed under sail, but I was getting the hang of it and even got the knack of running almost across the wind. The vid from that session isn’t worth uploading unless you’re having trouble sleeping; I hope to have another session when the wind returns and on a loch that’s longer to the wind.
Lessons learned: need those self tappers to lock the feet, luckily the local store had some that may do the job. And I’ve since located that chopping board a bit better to the boat with some slots and zip ties until a better solution is required.

Rigging the sail-adjusting cleat
Working out how to rig the control cord to alter the sail angle was actually rather simple once I put my mind to it. As mentioned, you get some small plastic cleats in the pack whose use is unclear. But digging around online for an alternative cleat (as other PA users tend to fit), I discovered what the PA comes with are very much like, if not exactly Clamcleat Line-Loks. Now I know what they are, their fitting and application is more clear. It’s not illustrated or explained in the PA instruction leaflet* I received; in fact I’d go as far as to say that the tiny yellow picture of the rigged Line-Lok in the PA leaflet is the wrong way round compared to what’s illustrated in the Clamcleat gif on the left. But even though (as I found) it does work crudely when rigged the wrong way round, I think I finally get it now. A Line-Lok a nifty solution to tensioning a tent guy in the Arctic as the link shows, but as Clamcleat’s gif on the above right also illustrates, you need two hands to release it – not something that may be easily available in rough conditions while trying to grab your paddle and not spill your tea. But so far I’ve found in the light conditions I’ve been out in, one-handed works fine and if it’s a real panic you just pull the sail down in a jiffy.
In fact, testing the correctly rigged locking cleat off a chair leg, it’s possible to achieve the release movement by spreading your fingers as long as it’s not too tightly jammed in the cleats, while adding tension (pulling the sail back/down) is certainly easy.

Having worked out how to string them up, the next question is where to attach them to the boat. By trial and error I found that cutting the supplied 4-5m line in half, rigging as above and then clipping the stainless steel clip to the K40 at the plastic lugs just behind the seat seems just right (left; it shares the left side lug with the rudder lifting line). Even though the Incept image with the red boat above seems to use the more forward points, fixed like this it puts the full sliding range of the locking cleat within arm’s reach while sat in the cockpit; or at least that’s how it looks on the lawn. I used the spring clips supplied to fix the control cord to the mast shackles, but at one point while sailing one unhooked itself from the shackle, so better to knot the cords securely to the shackle as PA recommend. To see how it sailed first time out, see this.
NB: A more recent set of fitting instructions were sent to me as a pdf from Pacific Action and are much clearer.
As far as I could see it wasn’t to be found on their website.