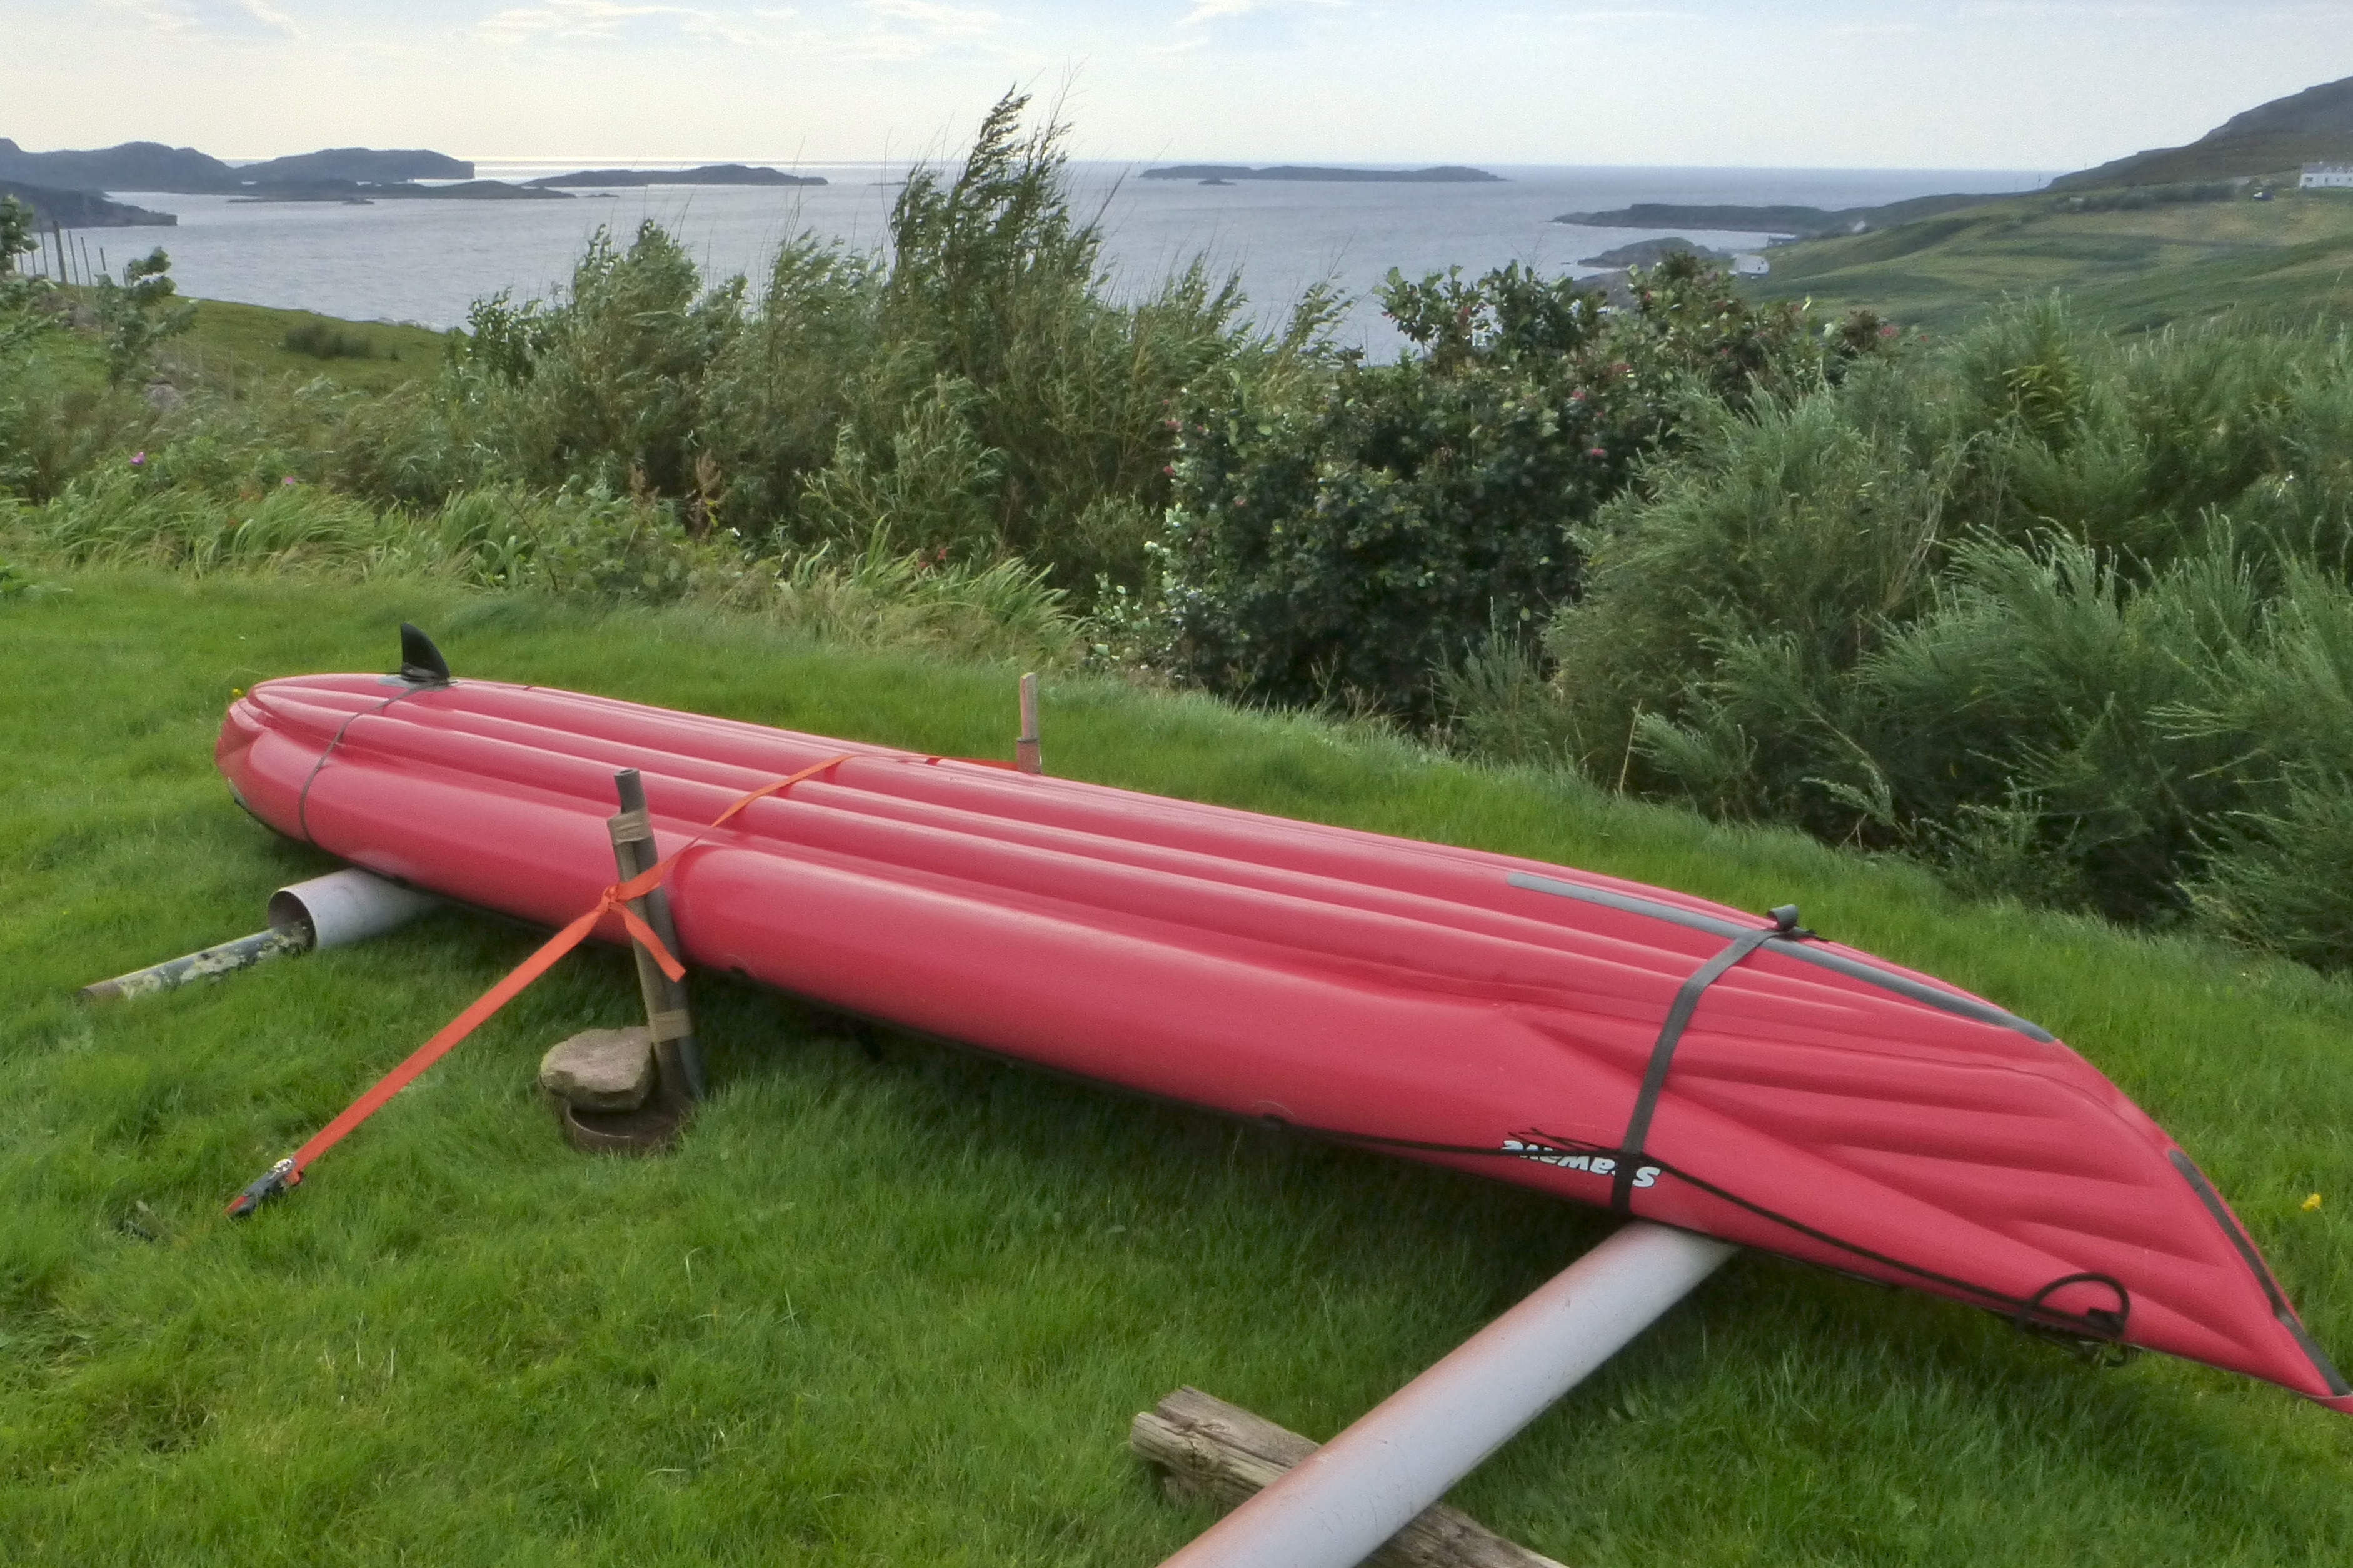
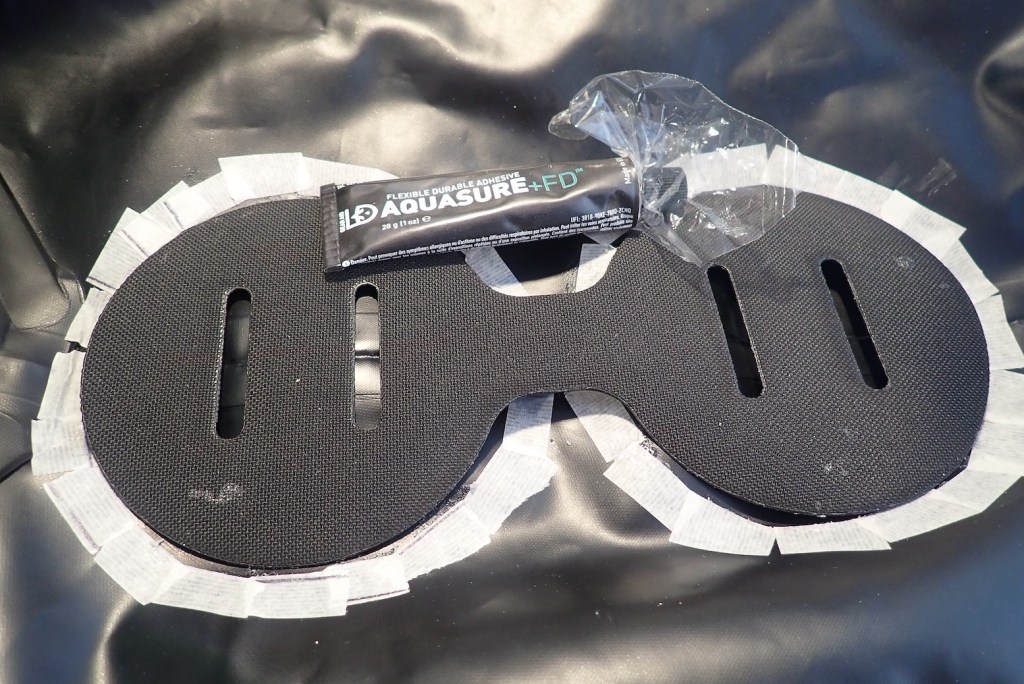
Lashing points and loading One of the limitations of all old Sunnys is a lack of lashing points – something that an Aire Super Lynx or FC Java have plenty of. Early on, I tried to glue a few on with what I thought were the right materials and technique, but half have since peeled off. Now I’ve discovered Aquaseal or two-part glue I manage better.
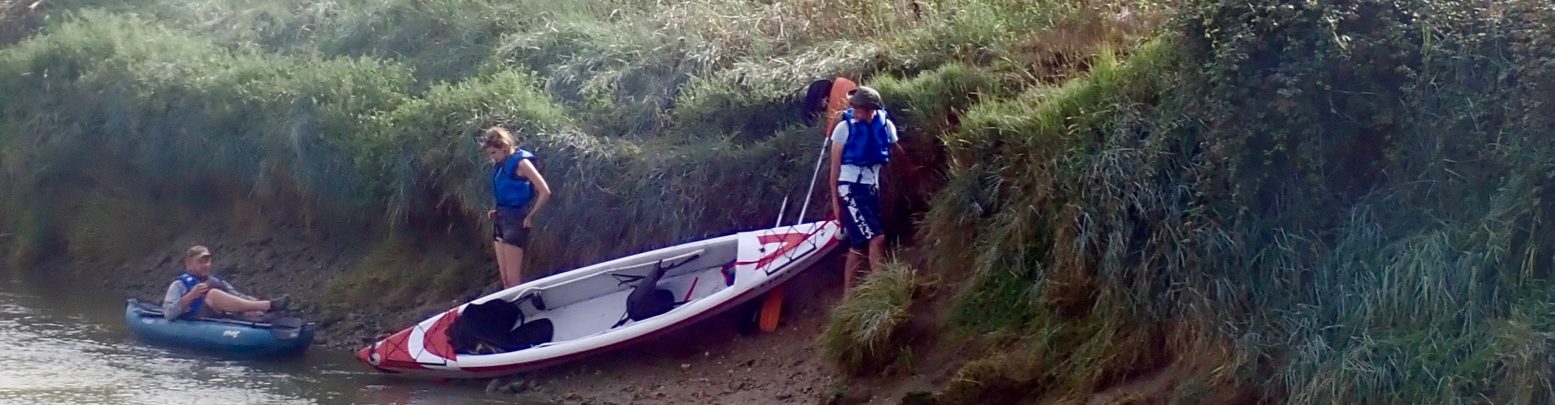
Another IK limitation is that nearly half the actual width of the boat is taken up with air chambers, reducing the interior packing volume (if not necessarily payload) to less than a foot wide, especially with single side chamber boats like a Sunny (as opposed to twin-chamber bloats like Grabner H2s or Gumo Seakers). I have to say though, on the trips I’ve done – nearly a week along a tropical coast (above) with one resupply – the volume was adequate. It might not be the same story in a colder climate or when you need to carry more freshwater. The limits with the Sunny are weight as much as space; the freeboard is reduced and it swamps easily, which at sea can be a hassle if sharks are circling.
As is well known, the position of loads has an effect on what they call ‘trim’ – the level or balance of the boat. This also effects tracking (more critical without a skeg). In some pics you can see how my 95-kg weight sinks the boat in the middle. To counteract this I generally try to pack the heavy weights out at each end. Too heavy at the front is not so good for waves and rapids, but the Sunny swamps fast in these conditions anyway; it’s only on flat water that baggage positioning is noticeable.
I kept the cargo nets off my FC Java (left and above) and used those on the Spey river one time, a quick way of getting to your stuff which of course is one thing that IKs and SoTs do so much better than SinKs.
Trolley tech The Gumotex backpack/drybag is a pretty basic sack with thin shoulder straps prone to tearing, and no hip belt. You wouldn’t want to carry the 16-kilo Sunny and say, 10kg of camping gear and paddling gear more than a couple of clicks.
A £10/1kg folding trolley is a handy way of transporting an IK around rail stations or airports. It folds up neatly and fits on the bow (right). In fact, with a bit of adaptation, I wonder if it could make an upside down set of wheels for portaging? It’s nice and light but the wheels on this black trolley are too close together, or the load platform is too high so the load tips easily on rough pavements. And you get what you pay for: the tubing and construction are pretty flimsy. Protracted gumboat trolleying over rough surfaces and tracks will eventually mangle such a lightweight trolley (my second) so it needs to be treated carefully.
On the Haute Allier river in France I used a heavier-duty and wider trolley (4.2kg) that fitted well under the seat (left, with the old original Sunny seat). Where weight is not a limitation (on trains and buses), I’d use this one again, but with any trolley a wide wheel track is the way to go. It all depends how far you’re trolleying of course, and if it’s over rough ground.
Sometimes I wonder about an integrated backpack frame with wheels, or a wheeled bag with more handles. Part of the reason the OE gumbag is tearing is that when you trolley up to some stairs you can only yank it by the top clips or the backpack straps. It’s something to think about when your current gumbag rips to the point of no longer being a functional drybag. Even in good shape it’s not a serious dry bag, but what roll top is? There’s more on dry bags here.
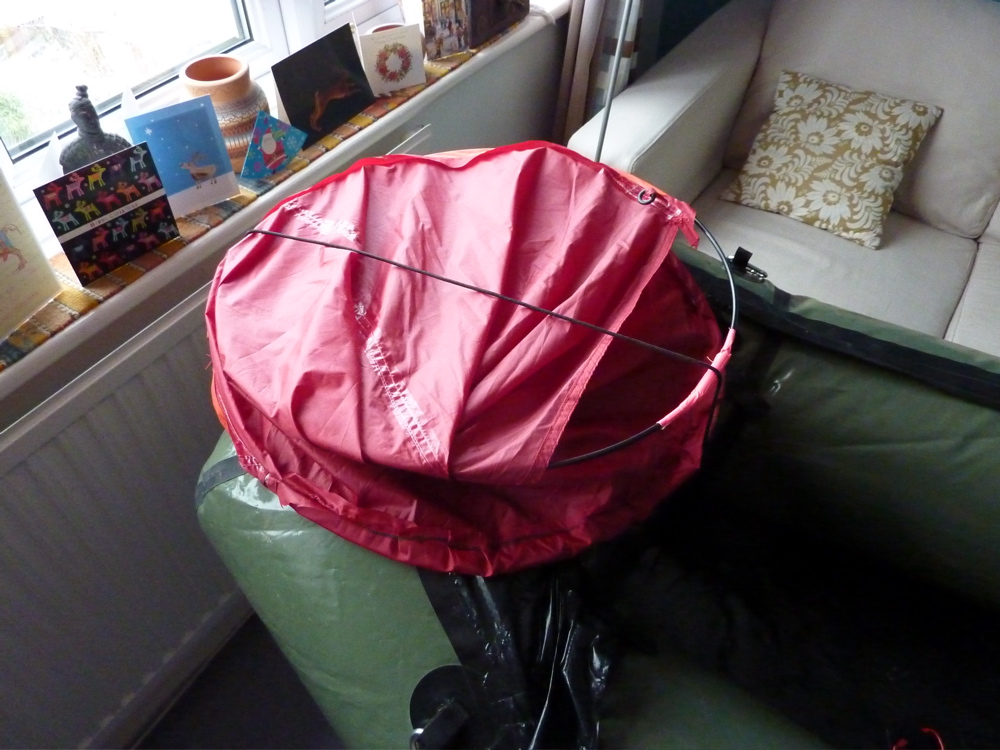
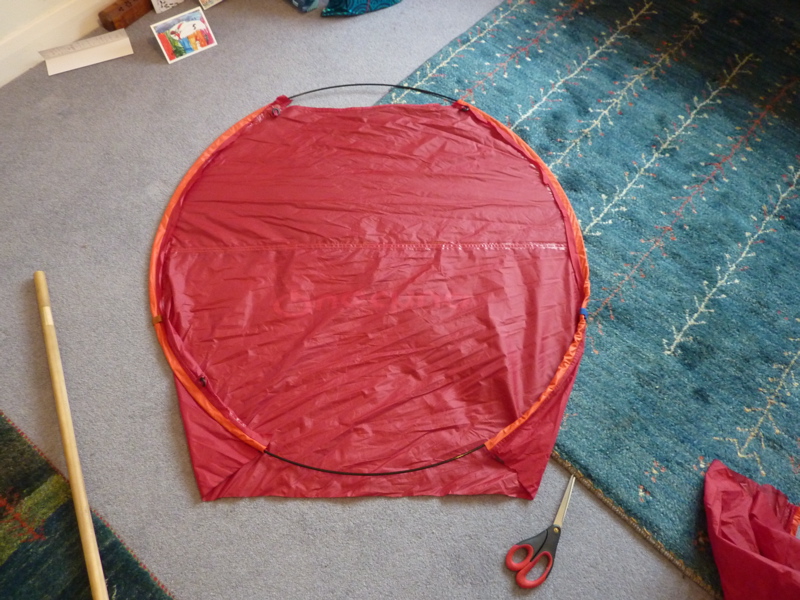
A few years ago I got a batch of discounted Decathon Quechua ‘2 seconds 1’ pop-up tents (right; £20) for a desert tour I was running, and have a couple leftover. Now everyone’s offering cheap pop-ups. People love the idea and though I don’t suppose this is a tent you’d want on the north face of Annapurna in a gale, when you arrive at a camp tired after a day of desert biking, you just want to click your fingers and, Abracadabra, you have a cozy shelter to call your own.
Whoever came up with the idea of flexible hoops sewn into a 3-D form to spring apart and make a tent or shelter was ingenious. I still marvel at it today. It seems a photographer John Ritson got to idea of adding fabric to a flat loop in 1985 and invented the collapsible Lastolite light reflector (right) after he saw a carpenter fold the blade of a bandsaw (See the bottom of this page). I imagine a Lastolite (a 38-incher costs £50) was the motivation behind the WindPaddle idea, but from a plain disc to a tent is quite a leap.
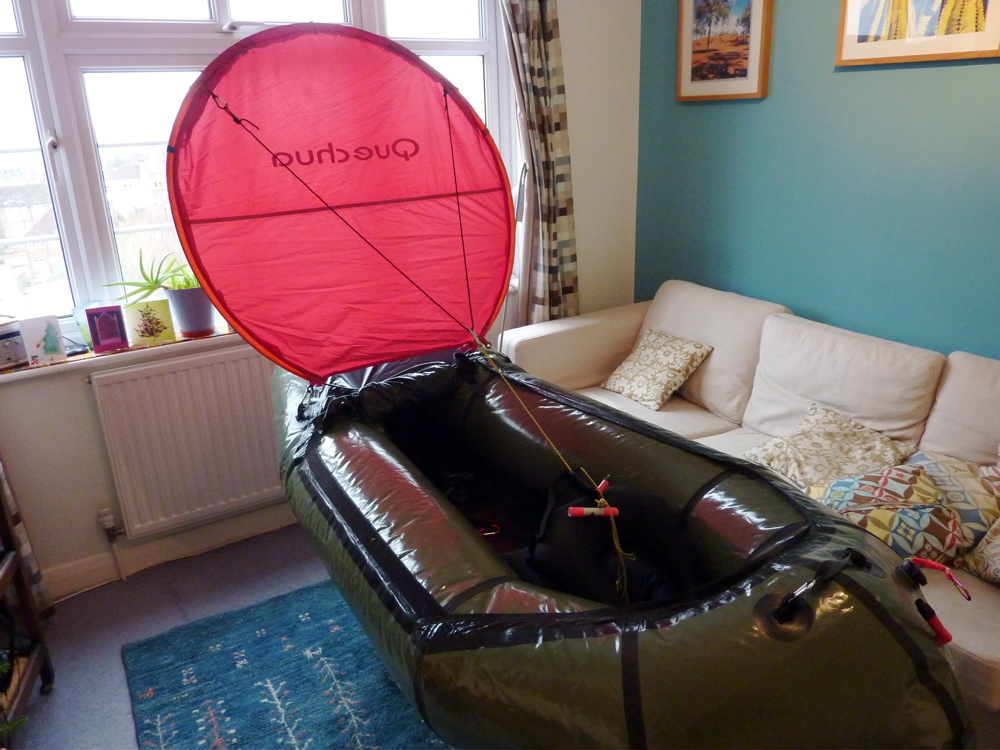
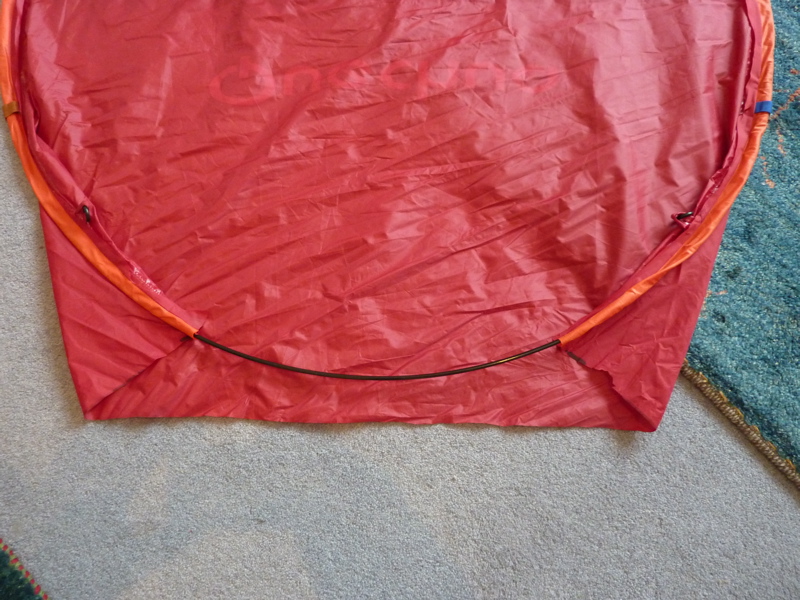
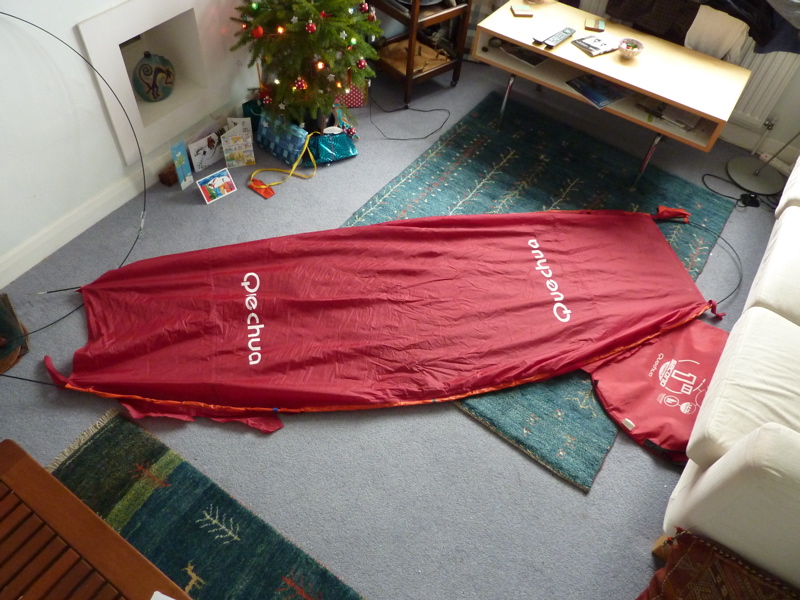
So I took a knife to one of my used Quechua tents. Bad though it felt shredding a perfectly functional shelter, in the spirit of the Inca shaman, it will be reincarnated as a sail – or more ill-conceived clutter to shove under the bed. Dismembering the Quechua gives two giant hoops of 4mm nylon-coated alloy and another of 6mm. Having been told that WindPaddles can deform easily under strong winds, I chose the thicker wire to use for the hoop (Gallery pic 2, below) in the hope of reducing this possibility. (Warning: when opened up these springy wires can fly about all over the place). Cutting the thick loop in half and rejoining it with the metal collar/tube (don’t lose this bit) gives a hoop of around 40 inches or 1 metre diametre making a sail area of 0.785 m2 (8.45 ft2) – similar to a WindPaddle, but with negligible dishing. I built up the sawn-off end with some cloth tape to stuff into the collar-tube, and then taped it all up (so it’s easily undoable). There’s enough fabric in the main body of the tent’s flysheet (Gallery pic 1) to make two 40″ disc sails if you cut from the middle, so 1 tent fly = 2 sails. I only worked this out after I cut. You want to use each curved end of the flysheet with as much orange hem-sleeve as possible (Gallery pic 4) – it saves on sewing later. You don’t want, as I thought, the flat middle section which of course won’t become a smooth disc once formed into a loop with the wire. Gallery pics 5 to 9 show how to gather up the slack, trim it, tack it down and get the Mrs to sew it up as if she hasn’t got enough work to be getting on with at this time of year. Gallery picture 10 is the sewn-up sail with a handy gap at the bottom for I don’t know what and which also happens to coincide with the position of two little hooped tabs at 5- and 7 o’clock which you can use mount it to an Alpacka’s rearmost bow loops using mini snaplinks (Gallery picture 11). By chance there are 2 more sewn-on plastic rings at 10- and 2 o’clock to mount a control string. The length of string I used happened to be just right to wrap around the folded over tent, though it’s all under tension and pretty unstable; you might want something like a bulldog clip to stop the sail deploying unexpectedly. I also think my control string may be on the short side, but it’s what was lying around. My disc tent doesn’t have anywhere near the dishing (depth) of a WindPaddle or an umbrella-like spinnaker sail I am told. I still haven’t worked out if this is significant (it is). One would imagine a deeper WP-like sail – a ‘bowl’ rather than a ‘saucer’ – would be more stable downwind but less good at tacking across it (probably correct) but what do I know? Last time I sailed a boat was over 35 years ago. I suspect a flip-out disc sail like this is probably a compromise when it comes to sailing effectively, but then so are pack boats. If round sails were such a good idea the Vikings would have them. It may even prove to be not fully useful and so just more junk to carry about which is why, after trying the umbrella, I chose to make one for next to nothing rather than spend £140 ($215) on a WindPaddle in the UK. It was easy to make, is light (250g or 9oz), and it can swapped between my Alpacka packraft and Sunny IK in the time it takes to unclip 2 snaplinks and attach them elsewhere. Other uses include something to sit on, a doormat for the tent, a windbreak, sunshade or umbrella. There is a slight problem: you can’t see where you’re going, especially on the shorter packraft with a metre-wide sail a metre on front of you, but on most water that ought not matter too much and if it does, I can cut in a window (like a WindPaddle) if that is the sail’s only flaw. As to how it sails, Monday after Christmas had a good southerly wind and the warmest day for weeks (ie: above freezing), but the reservoir I chose was a rink and looks like it’ll be that way for a while. It’s been the coldest December in the UK since records began so a test run make take a few weeks to complete. To see how it sailed first time out, click this.
I should have been off to France in early November to packboat down the Allier River, but the current job drags on. So despite the very short days, it struck me I ought to finish off my summer’s packrafting plan. On that occasion, I ran out of time at Fort William while realising my idea of traipsing merrily across the bogs of Rannoch Moor from loch to river was – as usual – over-ambitious. Being my first packing trip, I also learned a bit about what gear works for this sort of travel. End of November I’ll walk southeast for two days down from Fort William to west Rannoch along the West Highland Way, like any normal person. Then I’ll put-in near the road bridge at Loch Ba and paddle northeast for two slow days onto Loch Laidon for Rannoch station to train back home. Another perfect mini adventure!
Looks like the forecast is freezing and snowy, so I’m a little concerned that a weekend of sub-zero temperatures may be enough to thinly freeze the lochs by Monday when I reach Loch Ba, making it too thin to walk on but too hard to paddle across. (a couple of weeks later we indeed experienced a paddling-through-ice scenario on a local river. Wind is forecast at 18mph headwind, but not till Tuesday which on top of -2 ought to chill things down. But that’s the final day’s paddle to the station so it can be endured or walked.
On the way I’ll be trying out some new gear:
Full-length Seal Skin socks for bog-wading immunity.
Self-draining trail shoes (normal hiking shoes with a hole melted through the sides). My Keen Arroyo drainers were not up to loaded walking.
Watershed UDB drybag/backpack and W’shed Chattooga day bag.
A waterproof Panasonic FT2 camera that can just hang off the neck come rain or splash. No more scrabbling with a Peli box while watching out for camera-killing drips and the rocks ahead.
December 5 ~ All Pack and no Paddle
I ended up only packwalking for three days, reversing the West Highland Way (WHW) from Fort William to Bridge of Orchy. It was nice enough, especially the last day after a bit of snow to improve grip. The only other person I met was this guy who’d cycled the WHW from Glasgow (95 miles) in 2 and a bit days. Pretty good going as I soon found out it’s not all rideable or even easily walkable in icy conditions.
On the first day I misjudged what I needed to wear a couple of degrees below freezing and ended up overheated and worn out after a long climb out of Fort William. After 13 miles I descended to Kinlochleven, a former ally-smelting company town for which the Blackwater reservoir had been built a century ago. From above it looked like some sinister gulag hidden in a valley. With snow on the hills I thought the hostel here would have been packed out with climbers, but there were only 4 others in and close up Kinloch doesn’t look so bad. The smelting works have now been converted into an ice climbing centre, while I imagine plenty of excess hydropower still pours down the pipes to get fed off to Fort William.
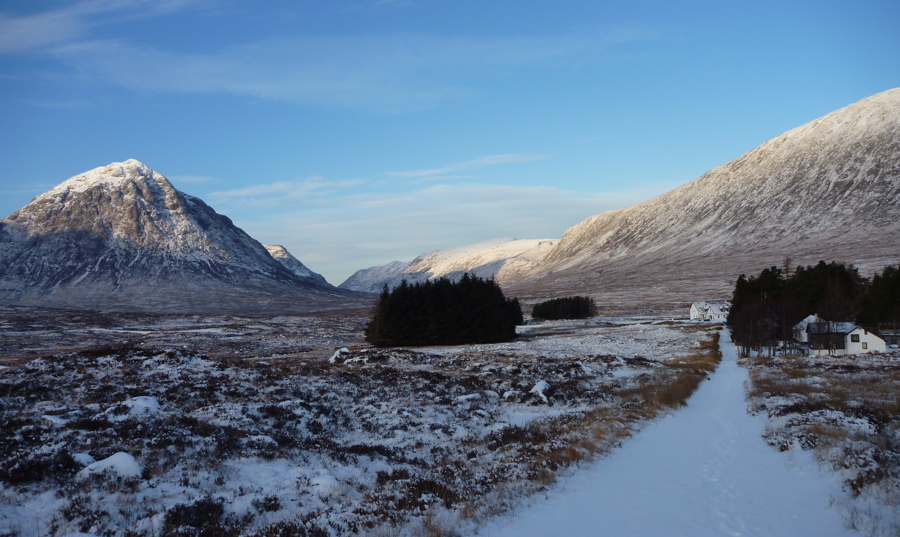
Day 2 was a slog up along the pipeline towards the reservoir and then breaking off on the WHW path towards the walk’s 560-metre high point at the Giant’s Staircase before dropping to Glencoe. From the top the Blackwater reservoir looked grim but was clearly unfrozen which boded well for tomorrow when I hoped to paddle the nearby lochs to Rannoch station.
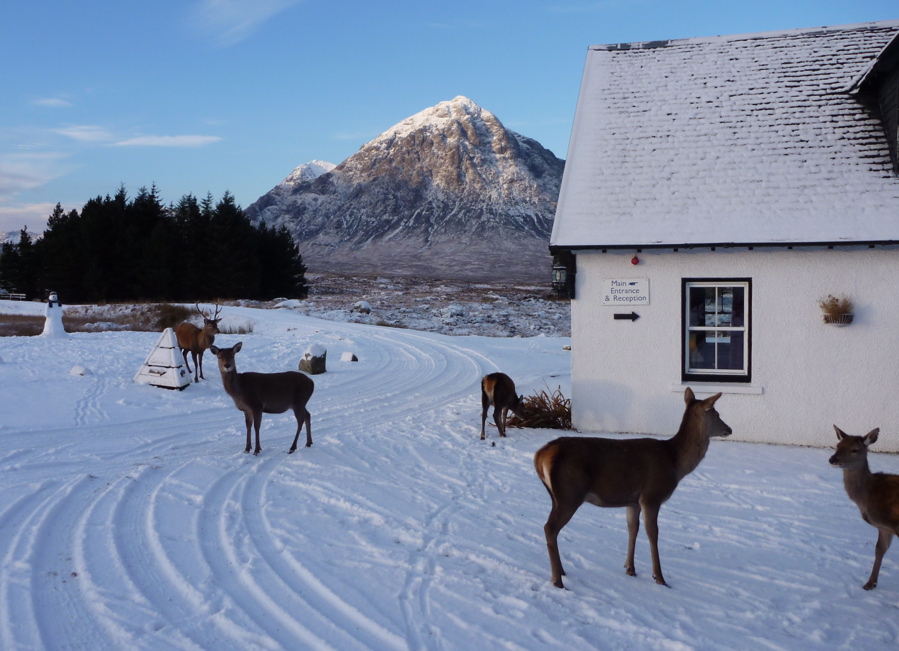
For the second time that day, I went flying on ice, ripping off my metal watch strap, tearing my trousers, and bashing my knee. The heavy pack amplified the impacts. Then later, walking on the flat towards the isolated Kingshouse Hotel at the head of Glencoe, I slipped again on and landed hard with the heel of my hand on a sharp rock which hurt a lot. With three similar falls on the previous day, after 9 miles I staggered into the hotel feeling pretty beaten up, but what a lovely cosy old place to spend the night! There was a fantastic view out of my room across to the pyramid peak of Buachaille Etive Mòr, while deer gathered below my window in the dusk.
It snowed overnight and leaving Kingshouse Hotel, after a few miles I was expecting to get a view east over to Loch Ba from a high point cairn on the WHW, to establish whether it was worth schleping cross country to get to the water. The previous night had been forecast at -10°C and at the viewpoint all to the east was just a snowy tundra, with a small, snow-covered frozen loch south of Loch Ba for sure. Was Loch Ba frozen too? I couldn’t see from there nor from any other point further on the WHW, despite scooting without a pack up a hill for a better recce. Only back home when I zoomed in on the photos could I see a thin blue line of the bigger Loch Laidon which was clearly unfrozen. So I probably could have managed it after all.
It has to be said it was a lovely sunny day on the trail with only me, the stags, and some scurrying tracks, so with days short, I was happy to stick with what I knew and plod on to Bridge of Orchy station, rather than paddle to Rannoch station (the next one up) as planned.
So, a 40-mile walk in the snow with a heavy load. Nothing new there. What I should have done is taken the path from Kingshouse east to Rannoch, passing north of the lochs, but that would have missed out Loch Ba and the easy and shallow chute between the two lochs (though that may well have been frozen).
If nothing else it proved that you can set off for a walk with a camping load including a packraft as an option. If the walking is more pleasant or the packrafting not worthwhile, the modest extra weight is no drama. It would have been nice to go for a paddle but it’ll all be there next time and on the way to the station at Bridge of Orchy I was sizing up the Orchy River which drains from the moor to enter Loch Awe which I’d never heard of but whose north end is right on the Oban rail branch line. Sounds like a couple of nasty waterfalls need the be walked around on the Orchy soon after the bridge, but in tame water that’s too low for any hardshell it could be another little adventure with packboat and paddle. With roads, rails, and trails, the more you look at a map of Scotland, the more packable stuff is out there.
A week back home and the temperatures have jumped, even in Scotland, so the papers have to write about something else. Today, December 10th, the webcam at Kingshouse is the standard miserable Scottish highland vista. We’re going back in a month to walk back from Orchy to the hotel and from there to Rannoch station. Bring on some more Siberian winds.
I was back in the area a month or so later in mid-January 2011 – still snowy but less thick cover. This time I could clearly see the path off the WHW leading down to the road bridge being repaired, the rushing torrent of the river Ba leading to the loch, and even the isles on the loch, not totally icebound. Maybe my eyesight improved over Xmas.
Gear
Seal Skin socks – very good while they last. Warm but not sweaty considering they’re initially waterproof. The knee-length ones ought to make great waders.
Self-draining Karrimor trail shoes. No real wading to test them, but certainly better to walk in with a heavy load than the thin-soled Arroyos, even if proper tight lacing (which could be adapted onto the Arroyos) had a lot to do with it. I may adapt a decent pair of decent trail shoes from Meindl or whatever with a better sole, if some turn up half price. It would be nice to get some plain, non Gore-tex trail shoes for packboating but I don’t think they exist these days.
Watershed UDB drybag backpack was surprisingly good when you consider the 16kg load I carried just on shoulder straps with another smaller yellow Watershed over the front. Part of the tolerable comfort I feel was that the UBD’s relatively rough fabric grips across the back like weak velcro and so spreads the load. The packstaff paddle shaft saved a few tumbles and so means the 4-part Aquabound paddle is well suited when trail walking and paddling.
The Panasonic FT2 never got to be splash tested either but was otherwise easy to use (once you know Pana interface) and took some great shots and video. It does lack the full 25mm width of my normal Lumix TZ6 and I wonder if on full zoom the relatively tiny lens is on the limit. A great back up camera for watery places. I’m still using one in 2016.
The Aire Cheetah seat (left) turned out to be no worse than the inflatable original, but was a bit lighter – even though it weighs just over 2kg. I’ve also set it up so I clip the seat to the boat’s seat mounts (which originally used a knotted bit of rope) so I can take it out at camps or to dry/clean the boat. Plus, along with the box for a footrest (below), it’s one less thing to pump up.
Firm backresting was a problem with the OE seat; or to be precise, fitting points to hold the back of the seat upright as you push back with your feet. Because the support strap is attached from the seat top to the front seat base, as you lean bank it just pivots rather than supports. The 410C is much better in this respect. To cut a long story short, I imitated them by gluing mounts to the hull’s side tubes to attach to the seat top. This way the pulling force is in a better line and the seat doesn’t pull down. Some say though that the old-style seat have better back support than the plain Mk2/3 style Sunny seats. Since fitting on the side tube mounts (the real answer to this problem) I don’t think about the seat now which must mean it works. The Aire seat is still a bit heavy though.
Footrest The OE inflatable footrest pillow was non-adjustable (on the 410C it is) and always too far away to be effective, even for me at 6′ 1″, so I replaced it with a 5010 Otter box (left), which of course has uses to store stuff on the water.
However I then noticed the strain of me pushing back off the box was tearing the lower seat mount tabs glued to the hull (where the rope used to be). The box is now attached directly to the seat with adjustable slings. This way I now push inside a ‘closed loop’ made up of the seat and box, so only straining the sling and clip joins which make up the loop – and not the boat mounts. Of course this does mean there’s some energy-absorbing slack between me and the boat, but it’s a gumboat not a K1 racer alas, so will have to do.
Although I find I’m happy to paddle with my legs lying flat, when you want to go for it a firm foot brace and a bent knee are much better, but require a fairly solid seat to push against. The long box-to-seat strap loop seems to work OK and I discovered a side benefit; the straps can be pulled over my knees to make thigh braces (right); another possibly handy feature when the going gets rough. It’s not like bracing directly off the hull or anywhere near as good as with a SinK’s ‘underdeck’; it’s more to achieve good paddle thrust using the core not the arms which they keep telling you to do. And anyway, even in the roughest rapids I’ve done, the Sunny feels stable enough without thigh braces and if anything I prefer having my legs free to stick out to steady myself (or fall out neatly). The Sunny usually swamps long before things get hairy enough to tip it over.
As mentioned above, sometimes I feel with the Cheetah seat that my butt ought to be a bit higher. It’s also pretty heavy at 2 kilos (4.5 lbs). Now I’ve inherited a spare new-style Alpacka packraft seat (left), I may try and adapt it to fit the Sunny. The Alpacka seat is not half as robust as the OE Gumo Nitrilon seat so it needs to be supported in a way that won’t wreck it. I haven’t worked out how to do that is yet; maybe a stick across the hull like a Grabner, but that requires gluing. This seat will be higher than the Aire which is an important feature with kayaks: butt higher than heels is much more sustainable, comfortable and efficient for paddling, so you want to set a seat as high as you feel safe, bearing in mind CoG and stability as discussed here. The Alpacka seat also weighs just 220 grams (half a pound), saving nearly 1.5 kilos, or nearly 10% of a Sunny, and a bit of bulk… (but I got rid of the Sunny before I had a chance to work this one out).
My OE seat burst at the heat-welded seam inside the ‘U’ while bumping through the shallows in France. I re-heat-sealed it to the full seam width with an iron and it’s lasted since then, though Alpacka say it will fail eventually. There was a rash of failing seats and they sent me a replacement a few weeks later. On the original there was only a 5-8mm heat-welded band; the new seat base is yellow (less prone to sun-heat expansion-bursting) and has an even 8-10mm wide heat-welded seam all around.
One annoyance is that the seat backrest always flops down just as you’re staggering about on the rocks trying to re-enter and get set up before the next rapid. It needs holding back somehow; easily done with an elastic to one of the back lashing points, though I’ve since realised this won’t work with the skirt zipped up, so maybe a velcro patch then, inside at the back below the skirt zip. In a bid to make the seat easily removable for drying and camp use, I removed the seat holding laces, tried some electrical wire instead for a while (as left), was going to velcro it in and finally decided just to attach it to the tabs in the hull with another couple of mini-krabs.
They say using an air mat is better for the floor, reducing high points of impact and also keeping your legs warm in cold water. I have a Thermarest (left, on right) which fits pretty well and is light, or an Exped (orange, left) which is much better to sleep on and fills out the back of the seat too. More weight forward is better, especially unloaded in white water with a strong headwind! Again, you wonder if inside the boat, gritty boot soles may cause excess abrasion when jammed in around the front end, so mats are best.
An Alpacka comes in a pretty basic form which allows you to customise it to your needs. Some mods I’ve made include attaching a clip and some bright tape to the main inflation cap – don’t want to lose that. I’ve also added a bit of garden hose to the spray skirt release tab to make it easier to find and grab in a panic. I still have a phobia about skirts, but am already learning to appreciate it in rapids. A 12-kg load sits very securely across the four bow lashing points using Alpacka’s Packtach quick release system. They say if you flip over with a pack on board you want to release it fast to make it easier to flip and drain the boat, if necessary. I’ve yet to try this but I’d imagine it would be quite easy to flip stern over bow, pivoting on the load. The load would also make getting pack in easier (though I have not tried that, either). I’ve improvised a toggle (inset left, pink) onto the Q/R buckle to make it easier to find and grab to release a bag, if needed.
I’ve also added mini carabiners – a blue one at the bottom below) to clip the thin Packtach chords to the 4 mounting points on the hull; it’s bad form having chord rubbing on nylon web under tension, plus it makes the whole Packtach system easy to remove without undoing fiddly knots. As you can see I’ve also added a 3-metre lead (yellow/green tape) for towing and tying off. I’ve since changed that to a piece of paracord. ‘Painter’ I believe is the correct boating term, but I’ve become aware that whatever you call it, needs to be hooked carefully out of the way for faster rivers. I find threaded across the two mounting tabs can be done and undone fairly quickly. I’ve glued another tab mount to the middle of the floor inside with Aquaseal and clipped a krab in to hold a day bag. These mini-krabs are my new thing and I’m using them for all sorts of things on the boat, the pfd and elsewhere.
Short answer: IKs: yes. Packrafts: helps away from white water
Generic, over-tall skeg. Snap-prone but trimable.
A skeg is like a fixed ‘rudder’ under the back of the boat which makes it easier to go straight (track). Only the very cheapest single-skin vinyl IKs don’t have skegs (Grabner, one of the most expensive IKs, is an exception; though it’s an optional add on). If you’re IK doesn’t come with one, it’s easy to glue one on (see below).
Some flat-floored IKS have up to three (imo, a gimmick), and many skegs on Chinese-made IKs are unnecessarily tall (too deep) which makes them snap-prone. Just about all skegs can be easily removed by hand, because in shallow rivers you might want to do so to avoid grounding. You can as easily buy a spare and trim it with a hacksaw.
Gumotex skeg glued to a Grabner Amigo
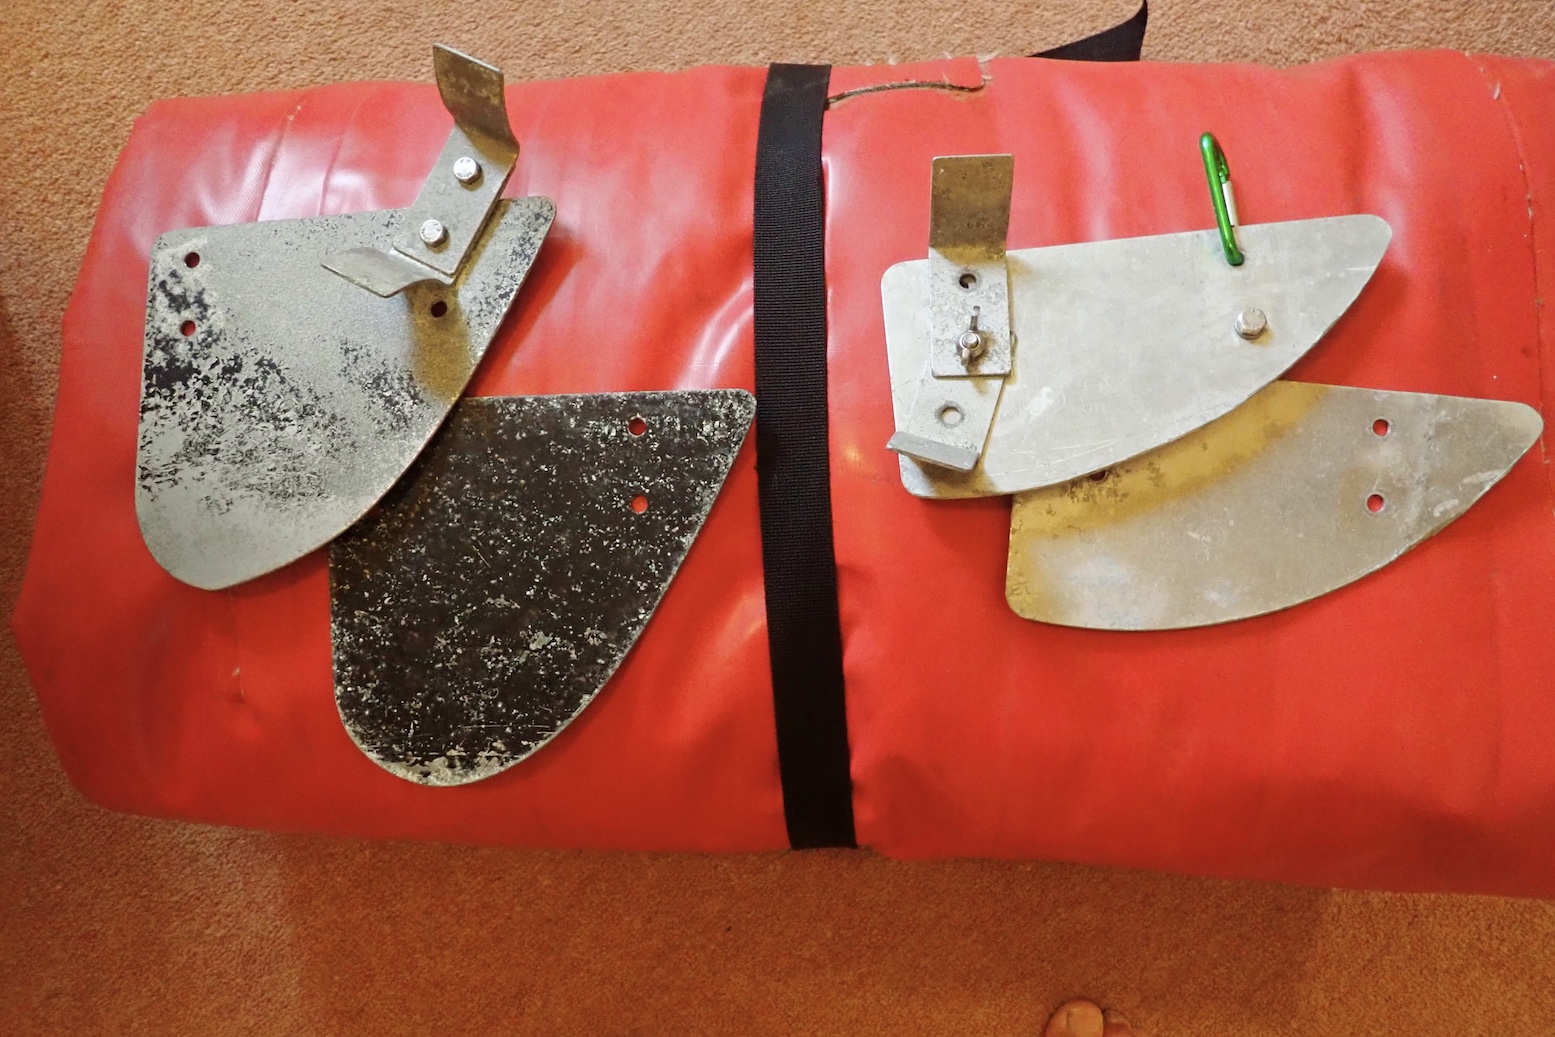
Original over-sized Gumotex alloy skeg on the left. Later smaller; now tough plastic.
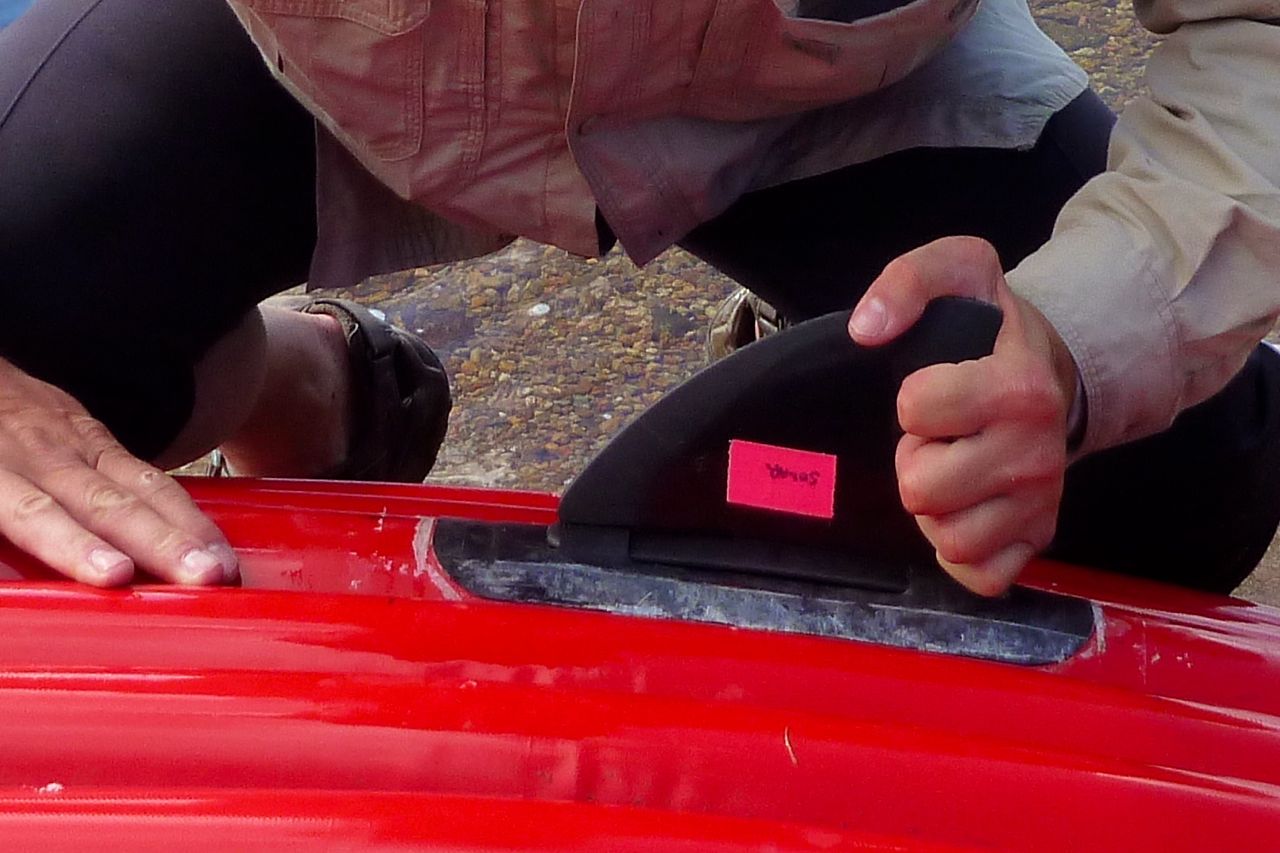
Years ago Gumotex introduced a slip-on, black plastic tracking fin (skeg, above) which was near identical in shape to one I’d had made to replace the old-style oversized alloy skeg (left). A smaller skeg made better clearance and still tracked fine. But metal bends; tough plastic is much better and that’s what all their boats come with now. I’ve fitted these plastic skegs to older Gumotex IKs and other IKs. The kit is about £25 + glue, and the plastic skeg is pretty much unbreakable. Just make sure you glue the mounting patch on really well; it helps if your boat is made from a matching rubber fabric as the supplied Nitrilon patch or make your own patch from same fabric. But I have glued PVC to rubber successfully – use good two-part glue. The pictures below help you see where to position a skeg.
On shore a skeg is a pain with a loaded boatSkeg: underneath and at the backGluing a Gumotex fin to a Grabner (which come with no skegs)
I fitted the Gumotex plastic skeg to my Grabner Amigo IK (above) and at sea used it all the time. But on the shallow River Spey (below) this boat didn’t handle at all well without a skeg, possibly because the tailwind pushed the kicked-up stern around. It was really quite annoying because a few years earlier my broadly similar Sunny managed the Spey just fine without a skeg, so skeg-free tracking clearly varies from boat to boat.
Paddling without a skeg If you’re an experienced paddler you’ll have acquired the knack of going straight without a skeg – handy for paddling shallow rivers where the skeg would ground. A little more paddling finesse and constant smallcorrections are required, especially if powering on. It’s good to learn this technique before you need to: fix your eyes on a tree or marker on a distant bank and paddle as gently as you like towards it, not looking away and keeping the nose of the boat in line with the marker. By using very light strokes you’ll see it can be done if it’s not too windy when again, a skeg helps with tracking (going straight).
Gumo Solar with no skeg
I even found I could paddle a ten-foot Solar 300 (above) without a skeg. Once you know you can go straight without a skeg, it’s just a matter of adopting the same finesse but with a bit more power. Only when you attempt the speeds of a Viking longship will bow deflection or yawing get too much because to paddle faster and still go straight you need a skeg. Out at sea or on busier rivers, I always use a skeg.
IK&P Tip: drill a small hole in your plastic skeg and attach a ring or zip tie directly to you boat. It’s annoying to turn up and find you misplaced your skeg.
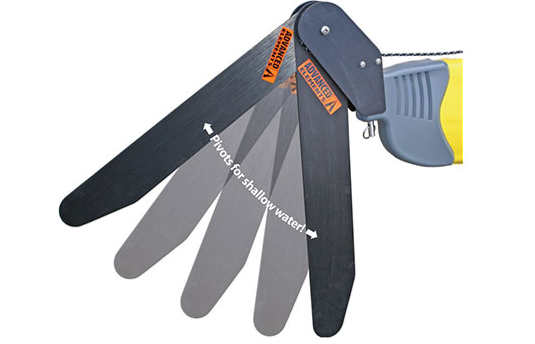
I’ve often thought a hinged retractable skeg would be a good idea: it would pivot backwards when dragging in shallows, then drop back down when there’s enough depth. It seems SUPs need skegs and in the US, FrogFish have made such a thing for boards, but you hear the spring can be a weak point. If your kayak has a rudder mount (or you can make one), another way of doing it is fitting a swing-down skeg similar to kayak rudders. It works the same way as a rudder with a looped cord swinging the skeg up over the stern, or down into the water. The pivot skeg shown top right is made by Advanced Elements for their AirFusion IK and costs about $/£80. Or have a look here.
Packrafts
On shorter, wider, slower solo packrafts the consensus used to be that skegs made little difference. Especially when unloaded and with a full-weight paddler, the bow yaws merrily left to right as your paddling pivots the boat from the back. Or so I used to think until I tried the skeg on my Rebel 2K. Up to then I’d been ambivalent about them – using the same boat fully loaded a few weeks earlier on a fast flowing river, yawing had not been an issue. But unloaded (and with my generous 95kg of ballast) yawing was notably reduced with a skeg. Speed however, was the same or was too small to measure.
If you think about it, a packraft actually pivots from a point around the middle of your swinging paddle, not from the stern, as it feels from the seat. The centre of mass behind the pivot point does make an unladen bow yaw more, but the stern will yaw too; just less and unnoticed.
Longer stern puts you more in the middle of the boat, like a kayak
One reason some packrafts may manage without a skeg is that way back in 2011 Alpacka invented the ingenious extended stern (right). It helped limit yawing much like a skeg, and effectively positioned the paddler more centrally, like a kayak, while also adding trim. This idea has been widely copied by just about everyone since and it definitely works, compared to the original dumpy Alpackas. But as mentioned, once there’s a good load over the bow, yawing is reduced in any packraft. Anfibio sell a detachable shallow skeg and glue-on patch for €21. My Rebel 2K came with a skeg and I must admit I use it most of the time now. But it does not have a fully extended stern like the Alpacka above right. Then again, my longer Nomad tracked great without the skeg.
Skeg on an MRS Nomad. Tbh, tracks great without itSkeg on an Anfibio 2K. Reduces yawing
Frontal skeg? Now I have a longer 2.8-m Anfibio Sigma TXL and I was curious to see if adding a frontal skeg would make a difference. Seated centrally or two-up, this boat does not yaw from the boat like an unloaded solo packraft, but it does wander a bit (track poorly), especially with the inflated floor pad). I decided a front skeg did not help much, though it might improve sailing.


