Category Archives: Gear

Paddles, clothes, buoyancy vests, etc

Tested: Anfibio Packraft AirSail

See also:
Packboat Sailing
WindPaddle on MRS Nomad
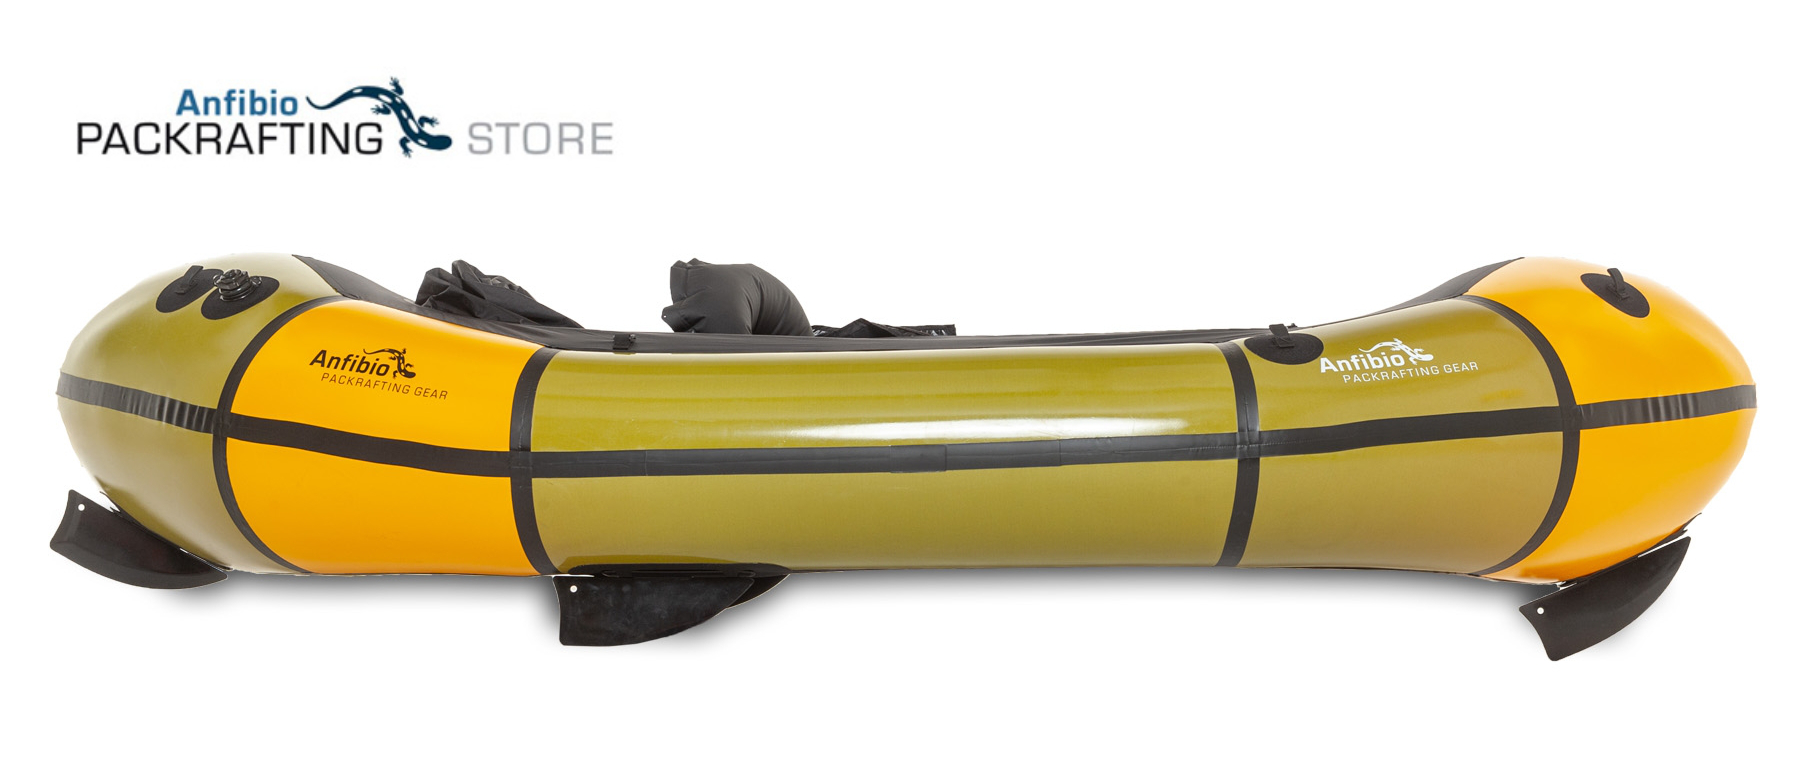
Anfibio Rebel 2K Index Page

In a line Huge. 1.3m downwind disc sail supported by an inflatable hoop and which rolls down into a small bundle.

Cost €149 from Anfibio Store.

Weight (verified): 513g.

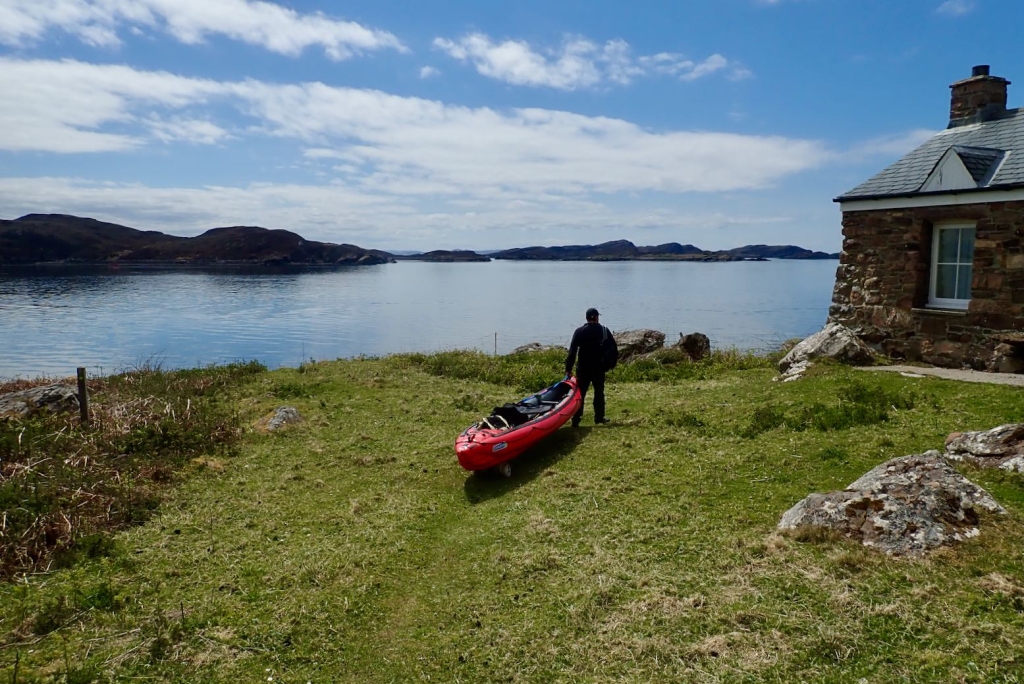
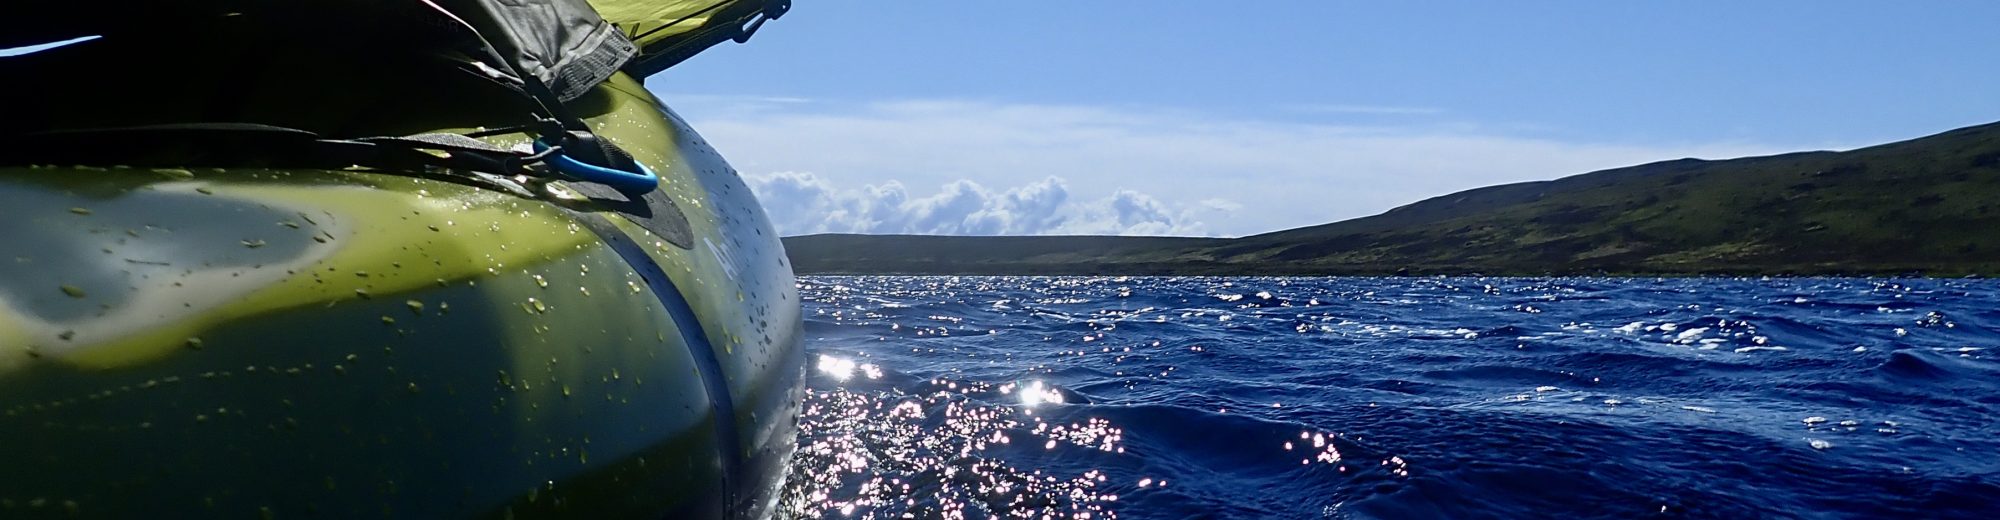
Where used Loch Hourn, off Knoydart, Scotland (on my Anfibio 2K, and alongside an MRS Nomad S1).

Barry tries his Anfibio AirSail as a brolly

Rolls up compact (unlike framed versions)
Big surface area
Unexpectedly stable, controllable and steerable
As long as you’re not using a deck, it can be temporarily pulled down and tucked under the knees when not wanted
A 3.5-m long Nomad S1 can move at up to 5mph in strong gusts
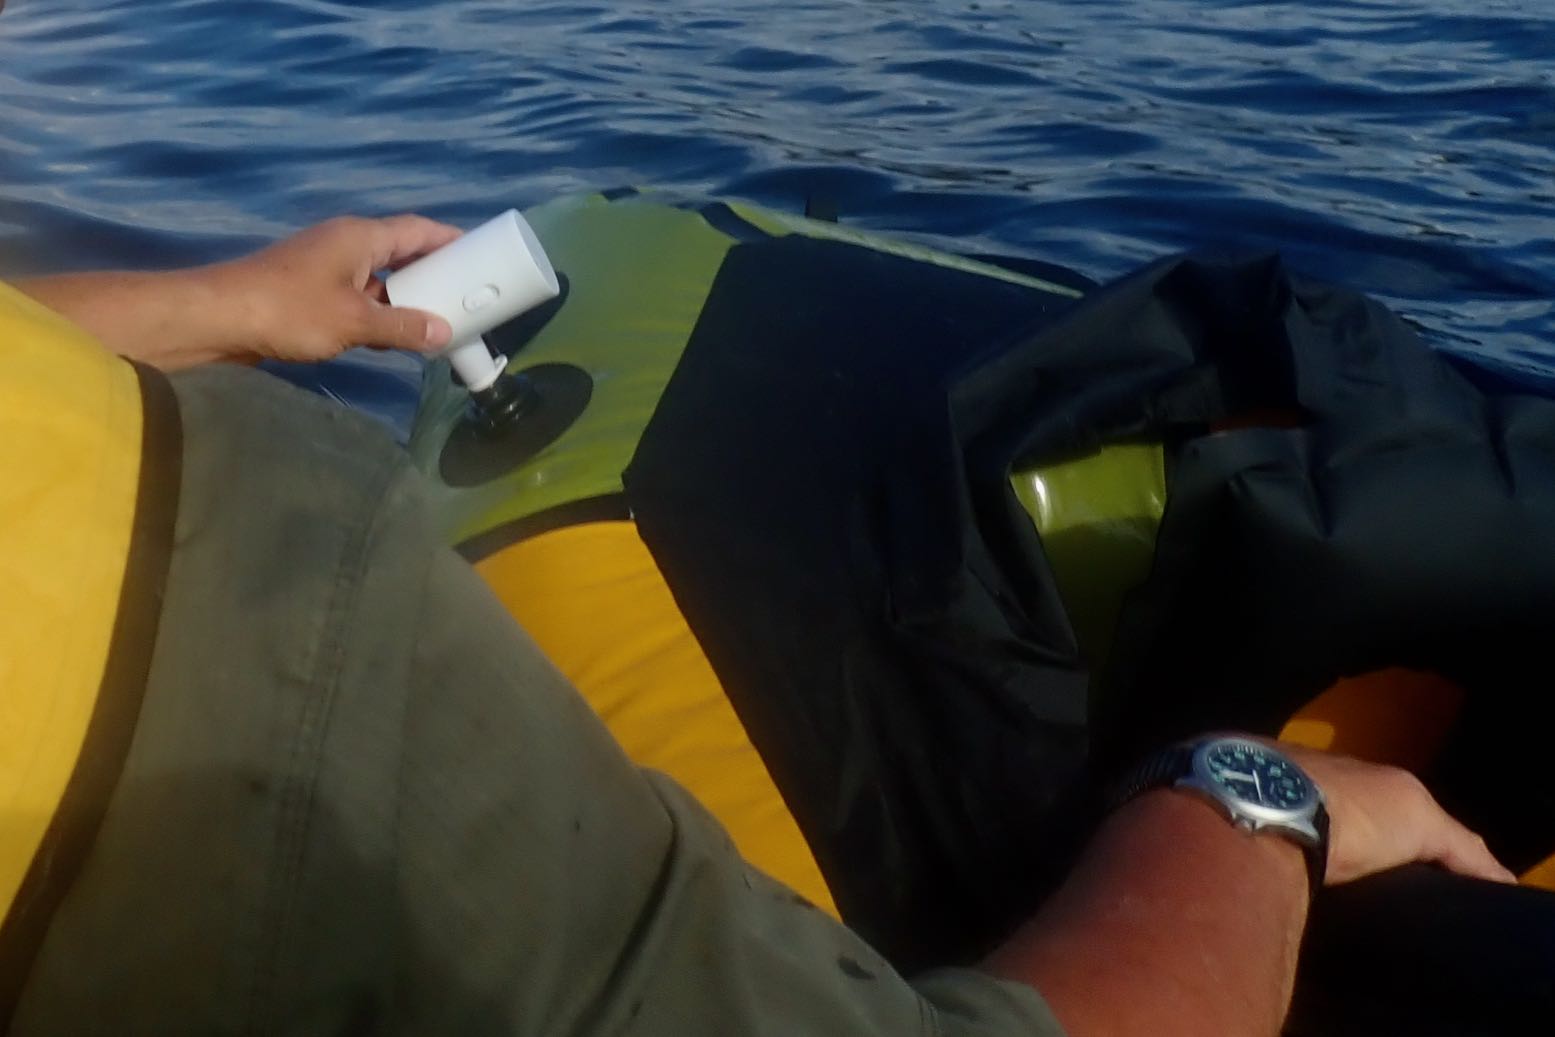
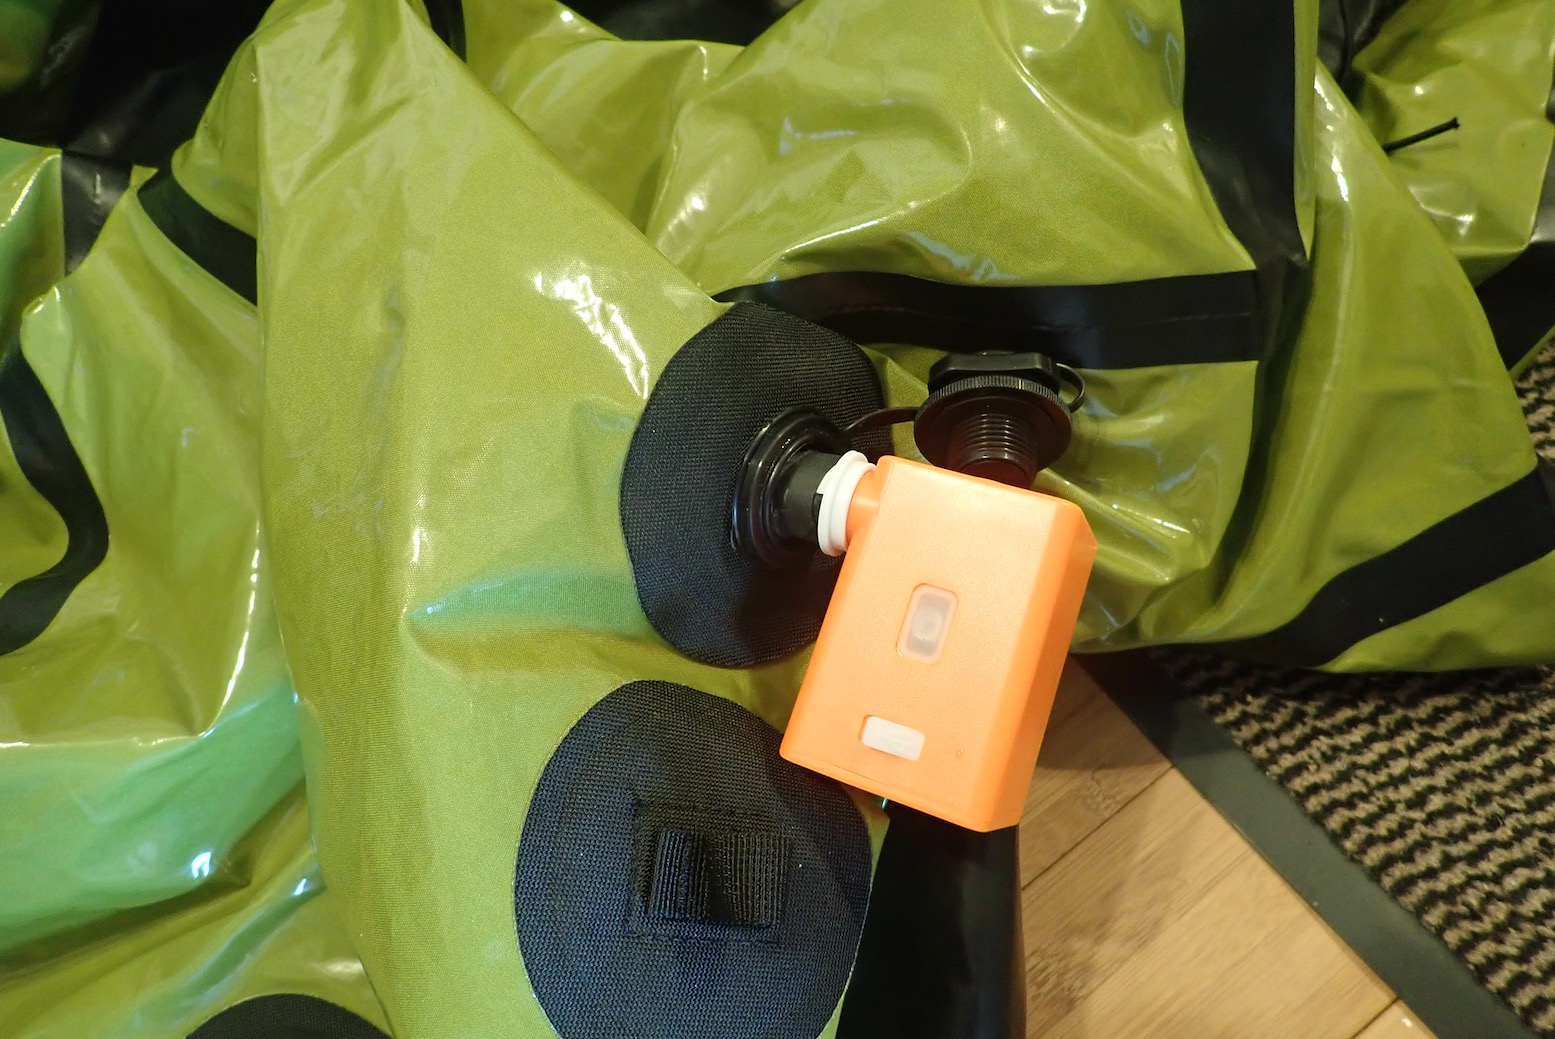
Uses the same valve and pump as the packraft
Doubles as a tent footprint or mini-tarp or even a brolly

Window is too high (on a fat-bowed packraft)
On a regular sized packraft, sailing might be slower than you think
About 20% more expensive than Anfibio’s same-diameter PackSail
Punctures or twisted bladder more likely than a broken batten?

The AirSail was supplied free by Anfibio for testing and review.


What They Say
The first packraft sail of its kind! The light, inflatable AirSail gets your packraft going and lets you experience speed even on calm waters. The sail creates completely new possibilities to be on tour with the Packraft. Only 466g and minimal packing size.


Review
On a multi-day packrafting trip or where you’re not returning the same way into the wind, sailing downwind is a smart means of conserving energy while enjoying a look around. At any other time, it’s just plain fun. Until now, the only options for packrafts were flexible, spring-out WindPaddle disc sails and their many inferior knock-offs. I’ve made my own and tried both, and currently own a WP Adventure 2 which has been OK on the Seawave IK and my old MRS Nomad, and even better on the Rebel 2K.

The Anfibio AirSail differs by using an inflatable bladder ring inside a fabric rim casing which you inflate via a Boston valve with the same 10-euro mini hand pump you use to top up the boat. The sail’s outer diameter is 137cm, so the sail is close to 130cm, as stated. Surprisingly, it seems to be possible to achieve as effective levels of stiffness to a flexible batten disc sail – a key to consistent performance – while an AirSail packs down to the size of a sleeping pad. My WindPaddle folds down to a flat, 40-cm disc which some might find more awkward to pack on the trail, though I can’t say I did.

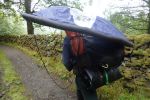
Alone, out on the water in windy conditions it would be tricky to deploy the AirSail. Assuming a skeg is fitted and the sail’s already clipped to the bow via a couple of mini-karabiners, you need to reach forward to unstrap the sail (hard in my 2K with a deck zipped up), unfurl to unkink it, plug in your mini pump and give it two dozen jabs to fully inflate – all without being blown around or losing your paddle. Were I doing this, I’d add a short ‘haul-line’ to the base of the sail so I could pull it back into arm’s reach.
I chose to do all this by the shore in the lee of a headland. I started with my electric Flex Pump but for some reason it didn’t do much, considering the small volume. It was the same next time, so in future I’d go straight to mini hand pump which needs around 25 pumps.

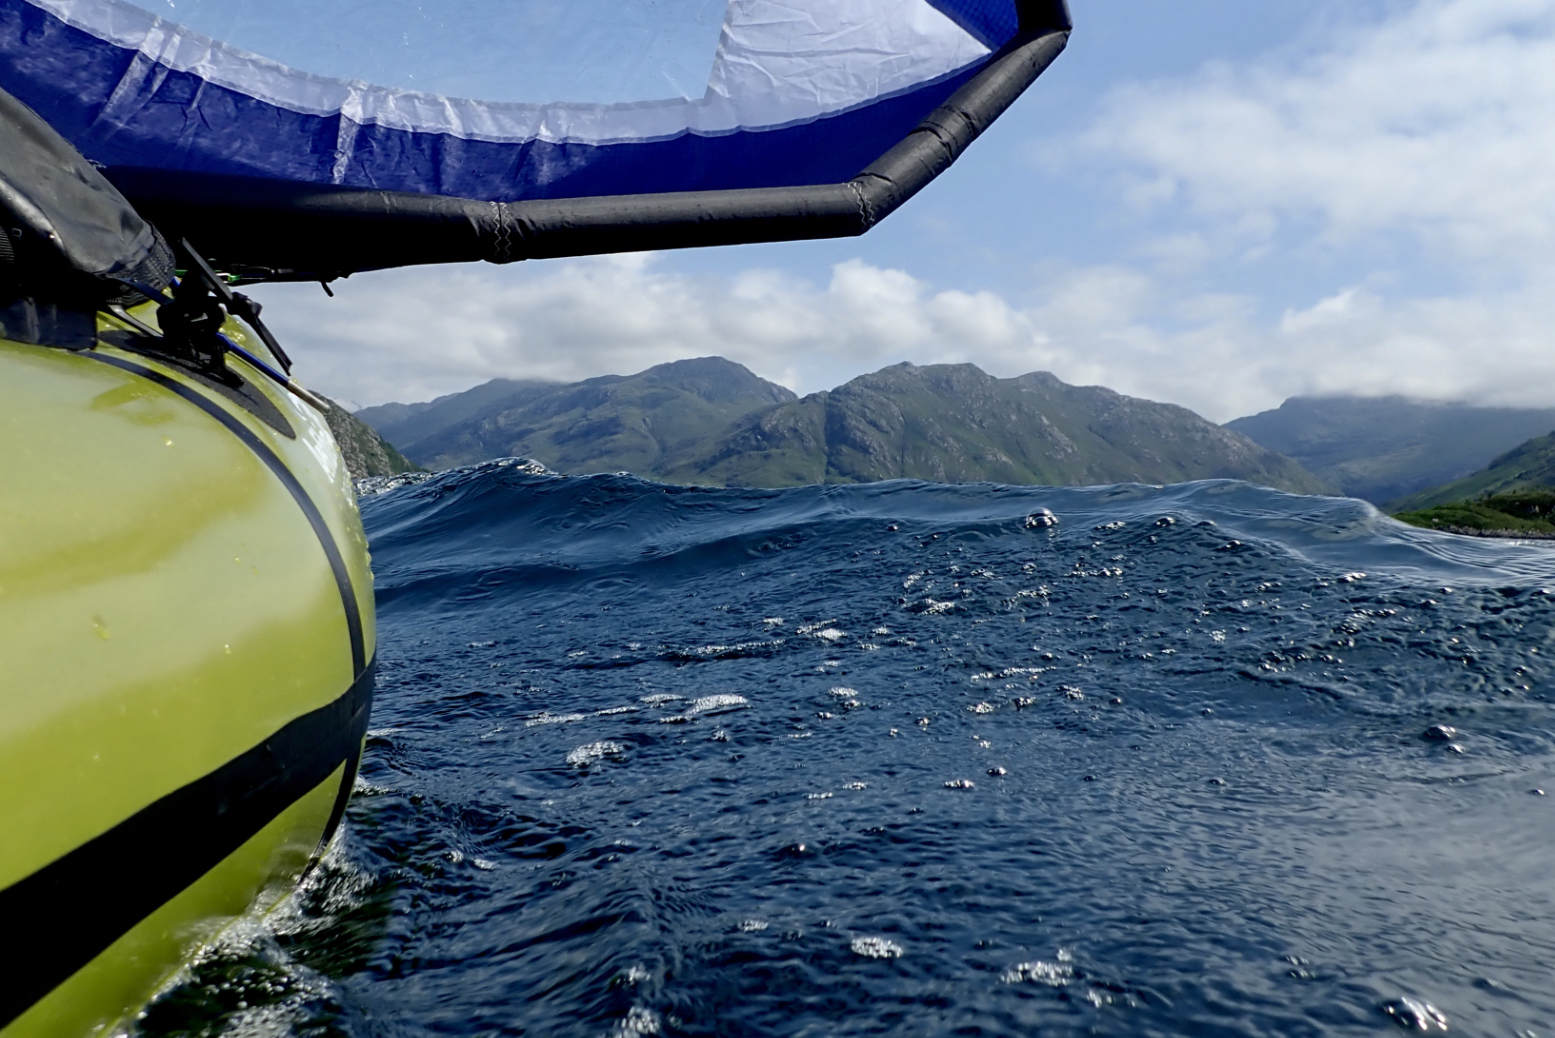
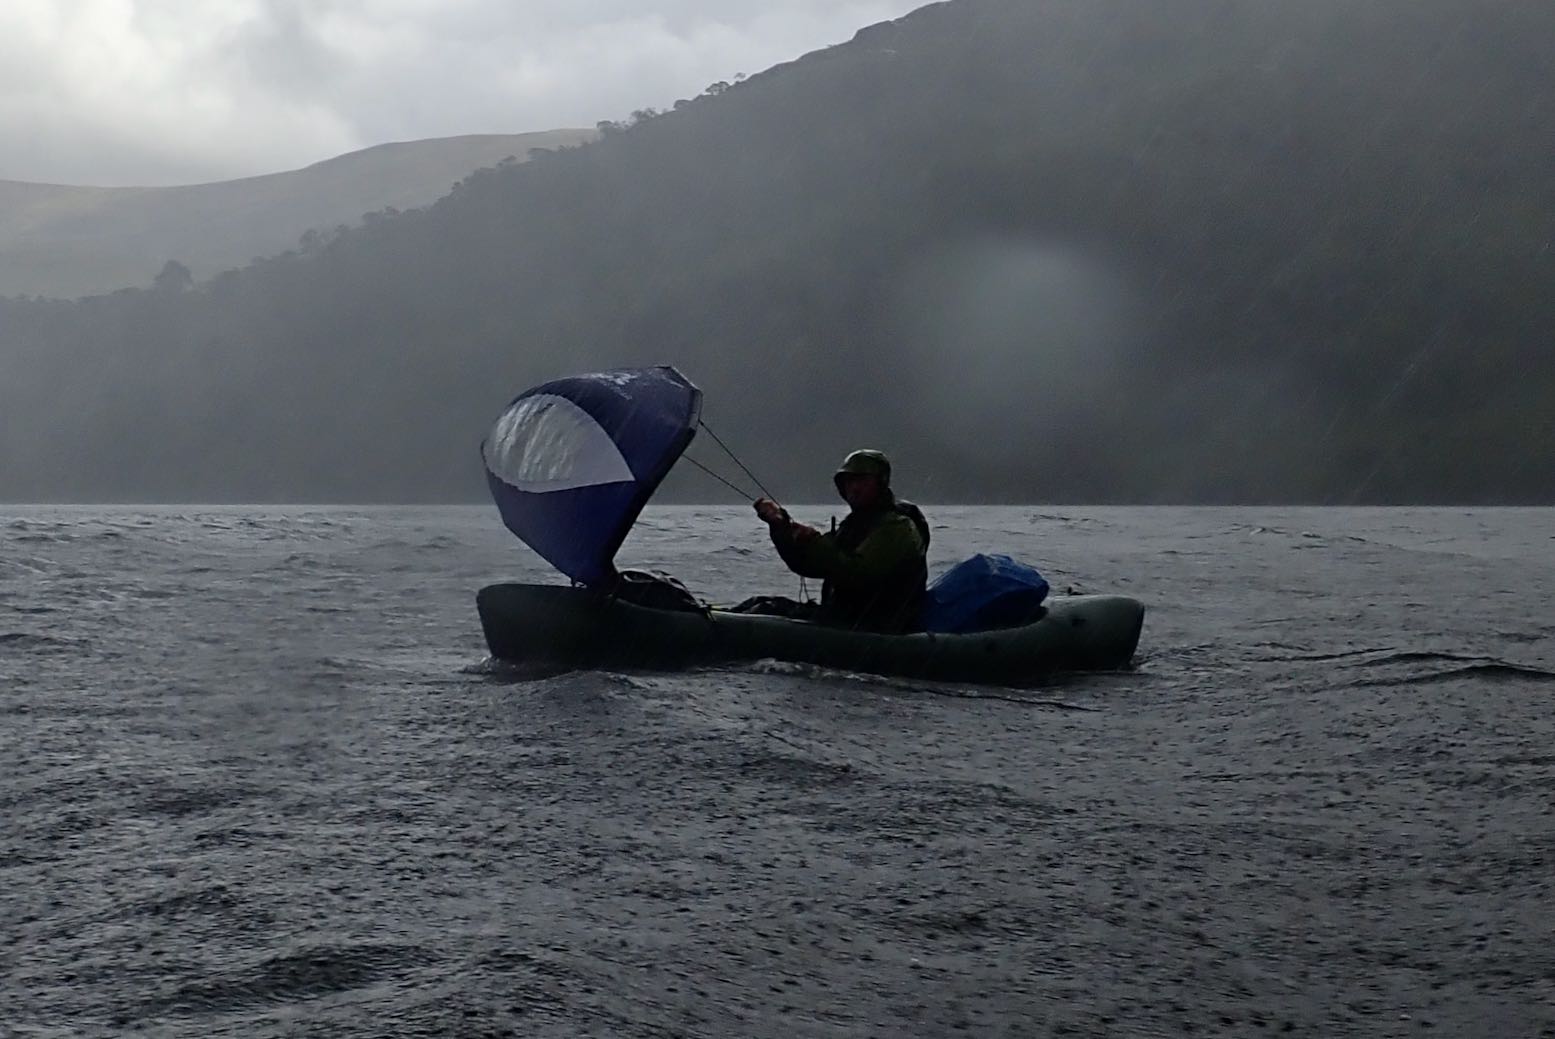
From my experiences with the WindPaddle on kayak and packraft, I was a bit nervous the even bigger AirSail might be a handful. I needn’t have worried. Funnelled down the steep-sided Loch Hourn, winds gusted to 15mph, but the Rebel 2K with the AirSail was easy to manage in a way the WindPaddle 2 never has been so far on other boats. And this was with an under-inflated air ring. There was no violent see-sawing from side to side, little need for constant correction and, considering I was out in the middle of a windy sea loch, I felt safe and in control. My paddle was leashed to the mooring line but also slipped securely under and out of the way underneath the DeckPack.

This plain sailing was partly because the 2K could not break into a gallop. I doubt I was going much faster than paddling, but it sure was effortless and relaxing. Had there been a signal I could have easily updated my profile on Insta or checked the forecast. The 4km which had taken me an increasingly slower 80 minutes, was covered downwind in an effortless 60 minutes
I also think the low centre of gravity of the loaded 2K helped it sit on the water and – crucially – the lack of slack between the sail and boat fittings kept the under-inflated sail from swaying. I must try this taught rigging on the kayak next time; that could have been my problem all along.

With the line clipped to a karabiner on my pfd or behind my head, most of the time I was sailing hands free which made filming easy. The line was just the right length, too. Only tiny tweaks were needed to keep the boat on line, due to the back getting blown round. This was most probably down to the small skeg, but was all much less frantic than my recent sail with the WP on the Seawave. I suppose with free hands, the paddle could have been used as rudder to maintain a heading, but I didn’t think to try that as I was going vaguely in the right direction. Something to try next time.
One problem with the AirSail: because the bow on a 2K is high compared to a kayak, the window is too high to see what’s ahead; it’s the lower third which needs a clear PVC pane. Most of the time it doesn’t matter; you can lower the sail or look around. In fact, it would be great if the whole thing was made of clear film, but weight, rolled volume or strength may not add up.

With the line out of your hands it’s easy to try and add a bit of speed by paddling as well, but at best this might add a tiny bit of speed and will help keep you warm. You do notice that not paddling can chill you. Once you’ve had a good look around, after being used to having to paddle every hard-won metre, sailing slowly might even be said to be a little boring unless the winds are strong,. But on a long day on a multi-day tour, you’ll welcome the break when you get a chance, as we did on Knoydart.

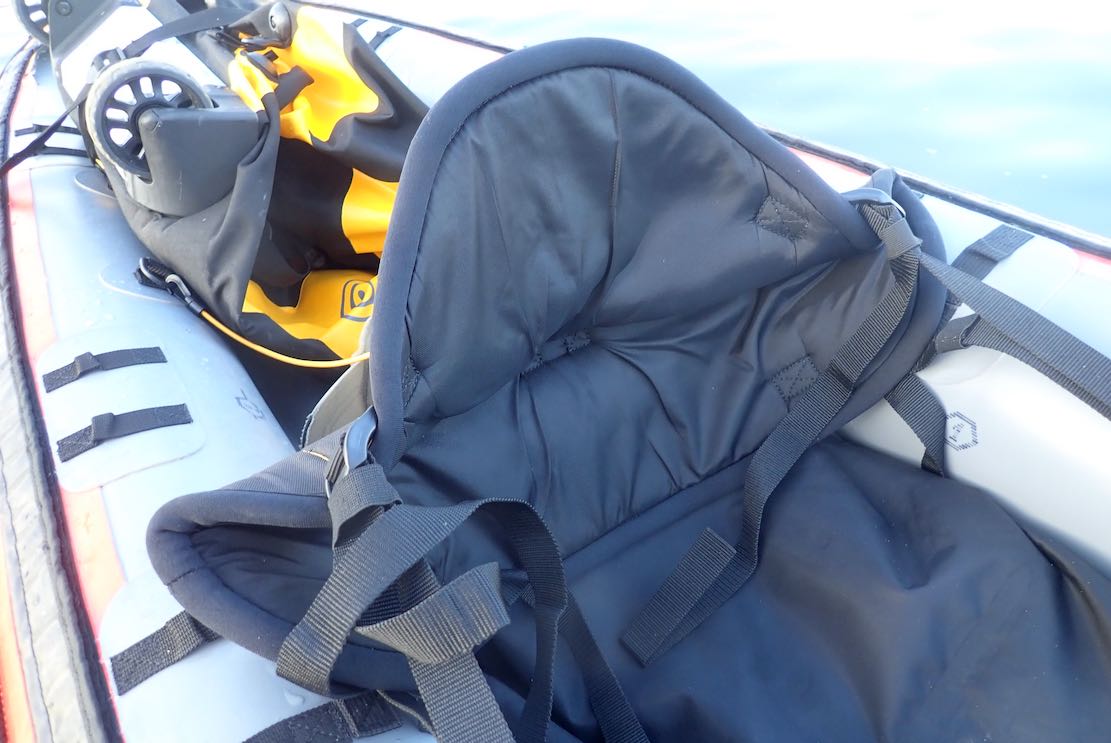
As you can see, a couple of weeks later I travelled with a mate in an MRS Nomad S1 using the same Anfibio AirSail, with me WindPaddling in my 2K. The longer Nomad is a bit faster than my 2K, and with the AirSail was quite a lot faster, maybe 15%, especially in strong winds. That meant that the Nomad had to stop to wait for me to catch up, which also proved that the AirSail could be pulled back and tucked out of the way under the knees. The added space up front on the Nomad makes this easier than in a regular packraft, but requires not using a deck, unless some sort of cross-strap arrangement is set up to hold the sail down.

Longer MRS Nomad S1 sailed quicker than my 2K

Sailing in squalls of up to 25mph took quite a lot of concentration but never felt unsafe. The Nomad was reaching 5mph (8mph) but remained stable and controllable (as did my slower 2K with the WP sail). With both types of sail, this was sailing at its best: satisfying, safe but exciting too
The problem with sailing is you don’t generate any heat. We were already wet from a long walk before we got on the water, and neither of our hiking cags were up to it. After an hour or so of hanging on in torrential squalls, and with another two hours to the end of the loch, my mate in the undecked Nomad had to go ashore to drain his boat by which time both of us were chilled. We’d both tried paddle-sailing to warm up (and me, to catch up), but were too far gone to make a difference in the conditions that day. If you plan to paddle and sail an undecked packraft in all conditions, get a dry suit and maybe a bilge pump.

Having used the AirSail and paddled alongside one, I still think I’d choose the cheaper, same weight/ø, batten-rimmed PackSail. For me the value in being able to stow or release a sail in a few seconds is not offset by the slight awkwardness of needing to stash a 40-cm disc. But it’s nice to have the choice.

Thanks to Anfibio for supplying the AirSail.

Tested: Terra Nova Laser Compact 2 packrafting tent review

See also:
Hillibery Nallo vs Vaude Odyssee

For easier access, unhook the left corner from the peg.

In a line Light and compact single hoop tent suited to packrafting; just don’t expect a palace.

Cost £330 ‘Grade B’ direct from Terra Nova (normally £500).

Weight As delivered in the bag: 1.26kg

Where used A few nights around Knoydart, Scotland and mid-Wales.

As light and compact and you’ll get, for the money
Long enough inside, once you lie down
Good venting options
Quick pitching, once you get the knack
As boring greens go, it’s not a bad hue

Smaller than claimed in nearly all dimensions
Way too small for two adults, despite ‘2P’ claims
The fly door zip always snags – this drives me nuts
Toggling up the tent door is awkward and unreliable (just undo one corner – picture above)
Afterthought lace-on rain cover
Basic (but light) bent-wire pegs
Fly only rated to 1200mm
Despite vents and an open door, it can be wringing wet with condensation


What They Say
The [Terra Nova] Laser Compact 2 is the small pack size version of the classic two-person tent, the Laser Competition 2, that offers a great mix of being super-low weight with additional comfort. With all of the benefits and features you would expect from a 2-person lightweight tent partnered with a compact pack size of only 30cm long.


Review
I talked myself into a new tent for a Knoydart trip; something with less weight and less uncompressed bulk, but still with UK-weather friendly all-in-one pitching.
At a claimed weight of 1.23 kilos (2lb 11oz), the Laser Compact 2 is over half the weight of my long-discontinued, five-year-old Vaude Odyssee. There was nothing wrong with the Odyssee apart from perceived bulk and actual weight. The space inside was great and the stand-alone stability was handy. To save bulk, one time I packrafted in France with just the outer, but for Scottish summers a midge-proof inner is as vital as a rain-proof cover. The Laser Compact 2 is like the older Laser Competition model, but the main pole now breaks down to just 30cm. TN also do an ‘All Season’ version with additional guys and a 30D/5000mm head flysheet at £550 and 1.8kg. And under their budget ‘Wild Country’ label, they do a similar looking Zephyros 2 for just £210 and 1.85kg. So weight-wise the Laser hits the sweet spot.
Other tents I considered were the MSR Hubba, as used by Barry on the Wye in April, the similar Big Agnes Copper Dome (both around £450). Tarp Tent’s Double Rainbow was another one I looked at before bouncing off on a Dyneema (Cuben fibre) trajectory. Once I realised this research could take some time, seeing the little-used Laser at a third off direct from Terra Nova put me out of my misery and I took a chance on something different. It helped that after more than five years and 10,000km, round-Britain walker Quintin Lake still rated his.

Garden pitch: first impressions
Even without watching the vid below, first-time pitching was not too confounding: thread the main hoop; fit the short end-poles and guy them out, then peg the four corners. My old Exped footprint (200g) slipped underneath. (I didn’t bother with the ‘rain cover’ till later). Apart from a bit of grass inside, the tent appeared like new.

At 10g each, the ten supplied pegs are light, but are just just bent alloy wire which date back to the 1970s. I left them in the box and staked out with my old MSR Groundhogs at an extra 4g a shot.
Peering inside, I was prepared to be a little disappointed with the Lazer, and so I was. As expected, it looked pokier and less welcoming than the Odyssee, and once measured (twice, over two days) proved to be substantially smaller than stated, most annoyingly in headroom of just 86cm. I’m sure glad I didn’t pay 500 quid to find that out.

On the bright side, at 220cm the sleeping length is fully usable because the inner’s ends are upright, not sloping, (so no damp sleeping bag foot). Like my old Hilliberg, with few poles to latch on to, the inner isn’t especially taught, adding to the cramped feeling, but better pitching and tensioning improved this. The inner mesh door zips right back down to one corner where there’s a small mesh pocket to stuff it into. With the main fly porch entry at the other end, this only pocket would be at your feet.
Two people my size in here would be unbearable, but as a solo tent it’s OK. At this weight, compromises are to be expected.
The Laser comes with an 80-g pole seam rain cover which you thread on with bits of string. It’s there to stop heavy rain seeping through the over-arching seam, but feels like a design afterthought. Once you fit it you can leave it there until it comes undone, then I left it off. It looked like mine had never been fitted and was missing a cord lock to cinch it up snugly. Some have reported the attachment strings coming away from the rain cover; others say the cover isn’t needed unless it really pours. Terra Nova now recommend sealing the seam. Why not just design a waterproof flysheet?

Compared to my 3 cross-pole Vaude, the single-pole Laser may get pushed about in the wind. Another reason to leave the rain cover fitted is that it incorporates additional guys to help stabilise the tent. The guy lines on mine looked too short to provide good triangulation, but I’ll give them a go when the time comes. With the rain cover laced and cinched, and the seams underneath sealed (more below), the Laser ought to be up for some rain and wind.

This after-purchase seam sealing to make a tent fully waterproof seems an odd practice, but for years many expensive American-branded tents required this. MSR even have a how-to video. Imagine; you pay hundreds for a bomber tent, then you’re expected to finish the job of making it an effective shelter!
Seam sealing is actually as easy as painting and it’s satisfying to start your tent-bonding process by enhancing impermeability. You can buy 28g tubes of tent seam seal for £8 or, if you have some clear bathroom sealant and mineral/white spirit under the kitchen sink, that’ll work mixed 1:1 (add more spirit for a runnier mix). It takes a good few hours if not a day to dry.

Camping on Knoydart
Considering it’s mostly wilderness, finding ten square feet of flat, smooth terrain fit for camping can be a struggle in Knoydart. Ironically I spent three nights in unexpected campsites where the roomy pitches and nearby kitchen buildings made the whole business of bug-free cooking so much easier.
Morning and evening midges made lounging around outside irksome; this was the first time I’ve used a midge net in Scotland, but I’ve not come here in July for that very reason since I was a teenager.

In fact the compact inner was not noticeably frustrating, and I realise getting out without snagging the fly is easier with side-entry tents like this. Condensation could be as bad or as negligible as any other similar tent. The end vents were never closed and neither was the fly door, where possible. Three nights the fly was soaking inside and out, and two nights all was nearly dry. But with the second door and easy to lift corners, wiping it all down prior to packing was easy to do well, especially using a cellulose sponge wipe (right). I’ll keep one with the tent in future. The sil-nylon fly material is very slippery; it’s even hard to shove it all back into the stuff sack.

One persistent issue I had which slowed down pitching was locating the fabric slot sleeves for the short pole at each end of the tent. It’s all a mass of green and black on black. I didn’t even spot the tiny sleeve at all first time round and put the pole in wrong. I’ve since added a bit of fluo tape to help make that easier while the rain lashes, the wind howls or the midges torment.
Others, who’ve been to SpecSavers, complain that toggling the door up out of the way to the inner is awkward and it comes adrift. I agree and one reviewer recommended simply using a tent peg; other TN tents now use mini-magnets for the same job. For the moment I’ll use a small bulldog clip.

All in all, I ended up with a begrudging affection for my Laser 2 because it packs down so darn small. And a year later, pitching after a very long walk in Wales, I was surprised to be heartened by the sight of the pitched Laser, rather than groaning at the thought of getting in.
I’ve yet to experience heavy winds or rain, or spend a rainy day tent-bound, which may change my view, but where weight and bulk count – as they do with packrafting as opposed to kayak camping – the Lazer ticks my boxes for the moment.

Coastal Packrafting

Rebel 2K main page

Around here the inshore sea paddling is exceptional, even if packrafting the inland lochs is also pretty good. Having done most of the latter routes, I thought I might try some coastal packrafting.
Garvie Bay arcing west to Achnahaird Bay looked like a good one and happens to parallel probably the best walk on the peninsula which we’ve done many times. That route could be a 20-km combination of cycling, walking and paddling, but as it was the last calm evening for a while, we thought we’d go out together in the kayak and I’d try the packraft on the way back. That way everyone got to play.

A light NW breeze blew onshore as we cut across Achnahaird Bay like a blue fin tuna. The approach of HW meant we slipped through the submerged skerries of Rubha Beag and into the crab’s claw inlet of Camas a Bhothain (Bothy Bay). This seemed a good spot to deploy the packraft with the aid of my exciting new gadget, a mini electric pump. I unrolled the boat over the water and let the pump buzz away for a couple of minutes, topped off with the hand pump, then clambered aboard.

Paddling away, I realised this was the first time I’ve paddled my Rebel 2K unloaded and I was a bit shocked by the bow yawing. Now fully back-heavy, one good swipe of the paddle and it could flip a 180°, just like my old 2010 Alpacka Llama.

Ah, but in my haste to launch the lifeboat I’d forgotten to fit the also-untried skeg which comes standard on the 2K. I waddled over towards Rubha a Choin beach and slipped it on easily, while the Mrs transferred to the Seawave’s front seat.

I’ve been ambivalent about the value of a skeg on a packraft, but now back on the water the yawing was notably reduced. If you think about it, a packraft actually pivots from a point around the middle of your swinging paddle, not from the stern, as it feels from the seat. The centre of mass behind the pivot point does make an unladen bow yaw more, but the stern will yaw too; just less and unnoticed.

On the Wye my 2K was fully loaded with the centre of mass moved forward and which minimised any yawing, even without a skeg. (With a heavy load over the bow a reduction in yawing is well known with packrafts). Now unloaded and with the bow riding high, swish-swosh yawing was exacerbated, but is actually happening at both ends of the boat. So any type of fin or extension of the stern (like the post-2011 Alpackas – right – and all subsequent copies) will constrain this, while not affecting steering. So, bottom line: skegs work on a packraft and are easy to retro-fit.

All the remains is a packraft’s agonisingly slow speed. These are not boats made to enjoy the sensation of flatwater paddling; they are boats to enjoy getting to out-of-the-way places easily. Any type of disturbance to progress, be it wind or current, may slow you to a stop, or worse. Something like the longer Nomad S1 I had would be better for this while still being packable. Still, in these ideal conditions it’s nice to float along observing the coastal features.

Paddling back down the east side of Achnahaird Bay, a back-breeze made progress feel achingly slow. Lately, I’ve come to value metres per second (m/s) as a metric of wind or paddling speeds. Something moving past you (or vice versa) at three metres per second is easy to visualise, though I suppose we can all visualise a 3mph walking pace, too. It’s what YR uses and is easily converted to ‘double + 10%’ for miles per hour (so 5 m/s = 11.18 mph). Or just double it and you nearly have knots (5 m/s = 9.8 kn), for what that’s worth. Crawling past the rocky coast it looked like I was doing 1 m/s at times. We had a race: diminutive Mrs in a big, long kayak; me in the packraft. Within ten seconds the Seawave streamed away while Bunter frothed up the water like a cappuccino machine.

Oh well, you’re as fast as you are. Like cycling in Tajikistan rather than Kazakhstan, for the best experience match your routes with your mobility and conditions. Next calm day I’ll do the full Garvie loop.

Tested: FlextailGear Max Pump / Plus

See also:
Pumps for IKs and Packrafts

Update May 2022.
Charged Max Pump packed up after a year/20 uses. Slide switch was off so not accidentally discharged. Plugged into computer; no charge light. Plugged into USB wall socket (as have done before): very bright light followed by smoke… Replaced with the boxy, orange, heavier, notionally waterproof Max Pump Plus for £23.

In a line Cheap, light, compact, USB rechargeable and fast, for when air-bagging is a faff or awkward.

Cost Max Pump £24 on amazon.
Max Pump Plus £23

Weight 148g + nozzle 8g.
Max Pump Plus 170g + nozzles
(Packraft airbag 110g).

Where used around UK

Light, compact
Faster than clumsy air-bagging – handy on a narrow bank/shore
Can suck (vacuum) as well as inflate
Ought to do > 15 fills
Max Pump as a conventional stiff slide switch, not ‘touchy’ inductive switch on the newer Max 2 version. Max Pump Plus has a silicon covered press switch.
Will do other stuff, like airbed mats and fire embers
Newer models can be used as a power pack, have LED lights, are IPX7 rated and can be programmed to sing Waltzing Matilda.

None of the supplied nozzles with Max Pump jammed nicely into a Boston valve
My Max Pump packed after less than a year and about 20 uses. Replaced with bulkier Max Pump Plus
Only replaces air-bagging; still need to top up by mouth and/or hand pump
Will discharge eventually, unlike manual methods, and will eventually die for good

What they say
My name is Max Pump 2020. I can quickly inflate and deflate your swimming tube. air mattress. and other inflatables. With vacuum bags .I can create more capacity for your suitcase and wardrobe at home. When in outdoor.I can provide oxygen for your burning ovens. enabling you to enjoy your food more easily.

Review
An electric pump to save a couple of minutes’ packraft air-bagging? Do me a favour! That’s what I think when applied to bulkier IKs where a two-way barrel pump is fast and easy. But factor in cost, weight, size, USB rechargeability plus supplementary uses and, for a packraft, FlextailGear’s range of pumps (above) is worth a punt.
Air-bagging is a clever idea to inflate a typical packraft, but on some days it’s not the most intuitive of actions, perched on seaweed covered boulders. Once a day is fine, but on a trip where you’re airing up and down a few times a day, the effortlessness of the Max Pump is welcome. A good case to point was my paddle on the Wye where accessing my Rebel 2K’s internal storage pockets to get to the camping gear each night meant re-inflating the boat every morning. The Flex pump would have made this less tiresome. Another example is getting back from a tiring sea paddle and wanting to reinflate the boat to rinse and dry properly. Plug in the Flexy and get on with other after-paddle chores.

Max Pump adapters but none fitted a Boston valve’s two ports just right
Actually the grey rubber nozzle (right) will push and seal into the main threaded port, and with my second Max Pump Plus, there was a hard plastic nozzle to fit a Boston’s mushroom valve (middle) too.
But to reduce loose bits, I made a 2:1 adapter (left) to fit both ports, using tape to make a good seal.

Out of the box
With Max Pump I got the pump, four nozzles, a short USB-A lead and a small bag. While one nozzle loosely fitted a Boston valve’s threaded airbag port / dump valve, nothing fitted the one-way valve body. You’d think with Boston valves so common on Chinese-made slackrafts, packrafts and cheaper IKs, this Chinese brand would include a Boston valve nozzle. Luckily, I’ve amassed loads of adaptors and nozzles, and one 16mm (5/8″) adaptor fitted the pump’s main nozzle and jammed into the Boston port. [The orange Max Pump Plus included a nozzle for the valved port].

Off a laptop allow two hours to fully charge the pump out of the box. After just three fills (12 mins?), it took just hour or less to get the green light. Off the mains is faster.

I estimate the volume of my Rebel 2K was 240 litres, (12 jerricans) so at the claimed flow rate of 300 L/min (currently the highest in Flextailgear’s range of mini pumps), that ought to take less than a minute. In fact it took 2:30s to reach the equivalent of airbag pressure (full volume; above).
But this was pushing through the one-way valve, (like a car tyre) not direct into the hull via the airbag port / dump valve which has no resistance.
Now with a bigger TXL with a volume of around 350 litres, I inflate directly through the screw port into the hull: 2:20s and if you’re quick you don’t lose much air screwing the cap on. Then I Flex for another 30s via the valve (or do 20 breaths to save the battery) and finish off with the handpump.
According to the Flextailgear table above, my heavier orange Max Pump Plus has 10% less power and max pressure than the Max Pump, but it’s hard to verify any of this data other than weight. The fact is, either pump does a packraft in a couple of minutes. Max Pump Plus: 170g + nozzles.

My comfy full-length Exped Synmat XP 9LW – which also needs air-bagging to avoid humid breath – inflates in just 25s. And as many will know, air-bagging a sleeping mat in a cramped tent when you’re worn out is not one of the joys of camping.
The Max 2020’s 3600mAH lithium battery is claimed to run for 40 minutes, so that ought to do at least 10-15 raft fills plus a few mats, when camping. I imagine the Max Plus will be the same.

Deflating either of these items is of course as easy as rolling them up, but getting the last bit of air out can be tricky, even though it can save a lot of packed volume. Pump suction definitely works on my Seawave IK because the one-way valve can be pulled open with the bayonet nozzle. On the packraft and mat, you have to suck from the unvalved airbag port, and by the time you’ve plugged that, some air gets drawn back in. I find just rolling up, squeezing, then sucking the last of the air by mouth works best, as your hands are free to get to the valve cap fast.

Max Pump Plus will do my Anfibio TXL in under 3 mins

Last word to Sven from Anfibio: “Can’t live without one anymore. Cannot remember when I last used an inflation bag.”
These young people, honestly. 

Gumotex Slip-On Skeg Roller (kayak trolley)

The effort of portaging the dozen locks of the River Wey the other month wore me out. On some portages you can drag the boat along harmlessly on lush grass. Others involved narrow gates, or crossing busy or narrow road bridges. It all got quite effortful, especially towards the end as my energy faded like a dying salmon.

I quickly worked out what was needed: a simple and easily deployed alternative to the typical strap-on canoe trolley, like the 60 quid Decathlon example (left) with identical examples on eBay for nearly half that price. A closer look at some images shows them to be needlessly high (unstable) and the clip-out joints don’t look that sturdy in the long run, though the tyres are nice and fat and clearance is great. With these trolleys I think the V of the alloy frame would sit better in line with the hull, not across it (with bends in the tubes). But crossways simplifies the wheel axle set up. My idea was to use the IK’s own weight with the skeg to locate and fix a trolley in place. Quick to use; no strapping needed.

With workspace-and-tools mate Jon, we came up with a stable two-wheel folding platform with a drop-in skeg slot and hinged wheels which folded out to both roll and support the hull either side of the skeg. To portage, lower the boat’s skeg into the platform’s slot, pick up at the bow and roll it away.

On getting the trolley, the too-high sides were easily sawn down by an inch, and another inch got sawn off the bottom to improve ground clearance, as in the graphic. We hadn’t pinned down a way of stopping the hinged wheel plates folding inwards on the move. The trolley actually worked OK on smooth surfaces without any hinge lock, but eventually a bump would knock one side in. Until a neater idea springs to mind, the easiest way for me was stringing a loop of stretch-free Dyneema cord round the top to keep the wheel plates from folding in.

At 1.7kg it’s not that light, but as a prototype it was dead easy to make and the thing needs to be durable. Something similar out of alloy tubing (like the Decathlon trolley above) might be half the weight, but is less easy to fabricate in the front garden.

After a few miles…
By chance, I was left car-less during a few days of great weather. In either direction it’s less than a mile and a 50-metre drop along a quiet road to the seashore: an ideal trolley testing scenario. What extra weight there is sits best over the wheels, and at the bow I tie a shoulder loop into the mooring line, leaving me hands-free to check my messages. Coming uphill for a mile from the beach, I could walk at normal speed with much less effort (and time) than carrying the deflated IK.
It seems the width and height proportions are pretty good for stability, and the cord works well enough to keep the hinged sides up. A couple of times over rough stony ground the cord came off and the trolley folded up, or on steeper side slopes it just fell over. So maybe another 10-15cm of width would be good, but without much added height. And there must be a simple latch or lock idea for securing the sides.

The solid plastic wheels (£12.50 for two pairs) make a racket or hard surfaces and will transfer shocks and eventual wear to the wheel mounts. Some near-identical rubber wheels cost about the same and ought to feel less harsh. But first, I may waste some time wrapping some spare motorbike inner tube around my current wheels.

Having a trolley makes an IK nearly as versatile as a packraft: a boat you can start here, end there and easily transport back across the difference.

Wax your paddle blades to reduce drips

See also:
Paddles for inflatables

IKs are mostly undecked and drips from the swinging paddle can be a bit of an annoyance on a chilly day if you’re not wearing waterproofs. A solution in three words: Wax Your Blades.

More than three words
After watching the vid above I found some Nikwax Solarproof (left) under the kitchen sink. As well as being a UV protectorant (like the Aero 303 spray I’ve used for years), it adds water repellency to outdoor fabric gear like tents and jackets.
Now that it’ll be out for weeks, I sprayed my Seawave 2 and noted the boat was slipperier than usual when we lashed it to the car roof to go for a paddle. Should glide better on the water, too.
I also sprayed Solarproof on one paddle blade and in the sink noted the unsprayed blade took over twice as long to dribble dry (4-5 secs), but the coated blade still brought some water up with it.

Out paddling on the water, I can’t say the coating made that much difference because, as in the video above, your paddle is typically out of the water and swinging forward for a second or two – not long enough for the Solarproofed paddle to shed its water.
However, his wax version did seem to shed near-instantly. So I beeswaxed the untreated blade and noticed wax sheds water as fast as the sprayed paddle did alongside the untreated one.
Conclusion: water repellant spray works and has UV benefits, but wax sheds water better and probably lasts longer, too.

Tested: Gimp stove (solid fuel)

See also:
Honey Stove (wood burner)
Woodgas Stove (wood/pellet)

In a line Lightweight, compact, airline friendly ‘day’ or back-up stove using ethanol solid fuel blocks 9which are also hand sanitisers).

Cost ‘Shoe polish’ tin (from £1) + optional band + cross-stand (from £5) + FireDragon blocks (from £1.14 a filled tin). Total: around £8.

Weight Tin (25g) packed with fuel: 133g. Cross-stand 28g, 10cm wind shield 7g. All up: 168g + lighter.

Where used River Wye, Knoydart.

Light, simple, compact
Fast set-up, easy to light
Sits low (stable and out of the wind)
Tin makes a large burning area and is refillable
Tin fits inside a 400ml Tatonka folding-handle mug
No noise, no smoke, no smell, no residue on the pot
Fuel cools and resolidifies quickly and will relight later
Presumably can be carried on a plane, especially if you label it ‘hand sanitiser’ (which it also is).
So light and compact it can be used alongside or to back-up a gas stove or a woodburner

Expensive at around 37p to boil a big mug
Fuel may be harder to find than gas cans at outdoors stores, but sold in ‘home & garden’ stores like B&Q

Review: 
This Gimp Stove (a military acronym, apparently) isn’t something you can buy off the shelf. My bush-crafty mate put it together once he learned FireDragon ethanol firelighter blocks could be packed into a ‘shoe polish’ tin and easily refilled and re-lit.
He identified a small, screw-top tin (multi-buys off eBay or amazon) with the right diameter to fit the notches of the CNC-cut stainless steel cross-stand also widely sold online from around a fiver. For a stable set-up, finding a tin to fit this cross-stand’s notches is the key. Or you can as easily make your own stand to suit any tin you like, but the tin’s lid needs to be airtight so the fuel doesn’t dry up. My mate even added a silicon wrist band round the base so you can seal it good and tight.

I managed to cram about four blocks (108g) into my ‘100ml’ tin (actually more like 130ml). From this I got three 360-ml (big mug) boils in the field. To extinguish blow it out, or smother with the lid. The liquified gel quickly cools and resolidifies and will readily re-ignite next time.
Timings were 4 minutes tested indoors, and about 7 mins outdoors, using a thick tinfoil windshield from the base of a fruit pie or a take-away curry. There is no noise, no smoke, no smell and unlike toxic hexamine tabs, no residue on your cup or toxic smoke.
On the first freezing morning of our Wye trip, even though I’d slept with a 45% full gas can inside my sleeping bag, it failed to boil my water once out in the freezing morning air. The Gimp would have lit up readily and done the job. And the fact that you’re easily able to place a windshield on the ground, and need clever, faster but totteringly unstable, bulky and pricey JetBoils is another tick for the Gimp. All in all, the Gimp is a handy, cheap and foolproof pocket stove.
I used the Gimp again on a four-day Scottish trip to heat up water for lunch soup. Light and compact enough to carry in your day pack, it made the whole business effortless, while saving gas for other meals.

A one-ounce block of FireDragon

FireDragon Fuel
Made by BCB International from waste vegetable matter, the blocks come in individual sealed 27g (1oz) pods, bought 6 or 12 at a time. It’s the same (and can be used) as hand sanitiser. Once the packet is opened, the block (a mashable wax of ethanol or denatured alcohol, left) will evaporate and shrivel, but sealing in the screw tin works fine, at least for a few days. Long term you may want to verify this. The good thing with a full tin or two is you have no packaging to get rid of responsibly; you just come home with empty tins to refill.
Apparently you can ignite with a flint (BCB’s stove kit, right). I tried but couldn’t do it on used fuel, even with some magnesium shavings (the fuel lit right up with a lighter). I may try again with a fresh block, but honestly Bushcrafters, a lighter takes one second.
The best price in the UK works out about 28.5p a block by the dozen, so a penny a gram with a big mug boil at 37p – quite expensive. And you’ll struggle to find it at that price; very often it’s nearly double, or gets that way with postage. Your best bet seems to be larger Go Outdoors stores. I would guess you could get at least 30 same-sized boils from a typical 220g can of gas costing around £4 which is more than half price.


I skimmed through an online review (one guy was even wearing camo gloves!) and apparently the FireDragon boiled loads faster than hexamine (which I’ve never considered trying). I’m told the Brit army now use FireDragon instead of hexamine.

Seawave 2: improving the SoT backrest

Seawave Index Page

As soon as I received Seawave 2 last year I ditched the heavy and squidgy Gumotex seats (right), and implemented my proven packraft inflatable seatbase + SoT backrest idea (left and below right) at a fraction of the weight and bulk.

The seatbase is fine of course; it weighs next to nothing and lifts you off the unavoidably soft floor for a good ‘raised-bum’ paddling stance. I’ve been using it for years, but sometimes I think I could use more back support than the SoT foam backrest. It presses nicely into the small of the back, but like a low-backed chair, is not something you can lean on. You could say in a kayak you shouldn’t be leaning on anything, but sitting bolt upright, knocking out a series of ‘searchlight beam’ torso rotating powerstrokes. But after too much of that you just want to lean back on something.

I picked up a used BICSport Power Backrest (for an SoT; right) which looked like it might be more comfortable. At 37cm, it was tall but lacked a hand rear pocket and instead had a centrally positioned adjustable bungy to counter-tension the back and keep it upright. Using it for the first time on the Wey last week, it started well but after a few hours collapsed as the pull from the front and back straps crumpled the backrest.

The problem: lack of stiffness. A backrest needs to be stiff like a chair back, while a seatbase wants to be soft like an armchair. One provides support; the latter takes your weight. The best way to fix the backrest was to insert a firm plastic plate. It just so happens I kept that very part from a rotting old Aire Cheetah seat bought 15 years ago for my Sunny.
I got that boat back last year, did it up with new seats and sold it. How’s that for recycling!

To be honest I’m beginning to think separate backrests and seatbases are a bit of a faff to fit and especially getting the seatbase just right under you when getting in and out a lot (did someone say ‘Wey‘?). It was ot that hard to attach the packraft seatbase to the BIC backrest, and like all these mods I do, is easily reversible.

For the back I bought another Chinese cheapie IK seat (left and below right; with back pocket; about £25) as I did for the refurb’d Sunny. The seatbases on these one-piece seats are just an inch or so thick; OK of a molded SoT but too low for the flat floor of an IK. So I attached a packraft base to it which provides the all-important raised position. The backrest is just more bendy foam so may need stiffening but we’ve found works fine as a second seat as the Mrs who never paddles like a Maori raider anyway.

Looks a bit messy but works great


25% off Fernhurst IK & Packraft guides

Buy my Inflatable Kayaking; A Beginner’s Guide direct from Fernhurst Books at 25% off if you sign up for their newsletter. Click this or the image below. More about the book here. You can also buy it off amazon.uk for about the same cost, depending in their discount and postage fees.

My similar Packrafting Beginners’ Guide is due in May 2022.