Category Archives: Gear

Paddles, clothes, buoyancy vests, etc

Summer Isles Kayaking ~Tanera Beg

Tanera Mor

beg06

The calm continued and with it the paddling. Today we tried the Grabner Amigo two-up around Tanera Beg island out of Old Dornie. I’d <a class="wp-gallery mceItem" style="color: #000000;" title="Summer Isles Overnighter camped on the island with Jon one time but have never been right round it.
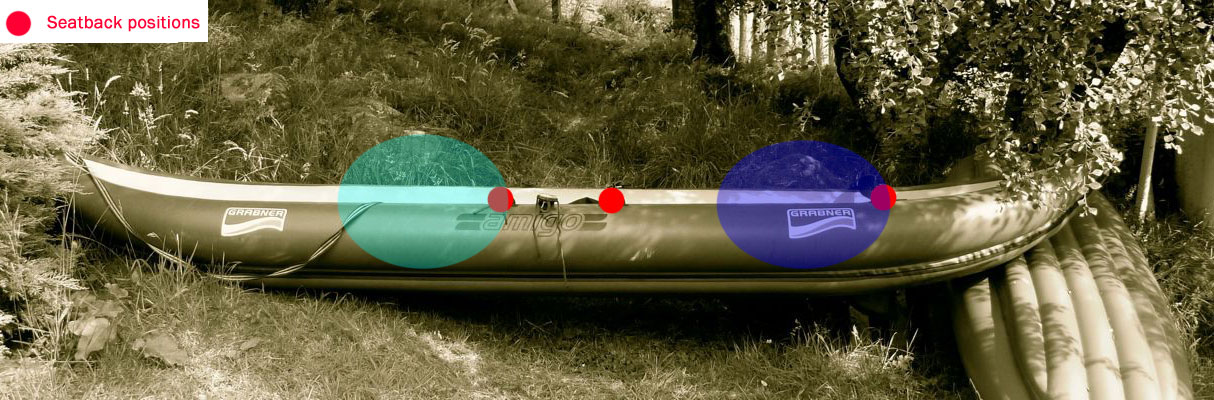
For some reason I assumed better the greater weight of me in the back and half-my-weight Mrs out front. But looking at the seating positions (image below right), back is quite far back and full frontal is only a little more forward than the solo position. So the heavier person out front centres the mass a little better on the boat which must be better for control and response.

amigt


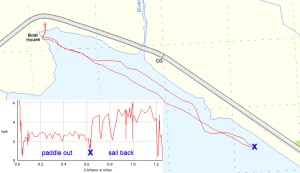
We set off me in the back, but suggestions on improving the forward operator’s poor technique and asymmetric delivery led to discord and erratic progress, as the speed recordings below testify. To be fair the g is way out of practice and also hadn’t had two hard days of paddling to tone up. However, claims that her inability to paddle straight was due to my diet and general girthlyness in the stern will have to be settled in due course by BCU lawyers.

beg2

Meanwhile, in the narrower back it was a tight squeeze for my (allegedly fat) arse and soon my legs – like my ears – were going numb. I’d initially perched on a spare Gumotex thwart but that felt unstable. It was better sat on the floor, jammed in. In this position my feet were against the back of the gf, so there’s only just enough room for my legs.
As we passed between the two Taneras where a fishing boat was checking pots, I spotted an easy portage over Eilean Fada Mor, an island between the two Taneras. It gave a bit of a short-cut, but more usefully a chance to restore circulation in my legs.

grablug

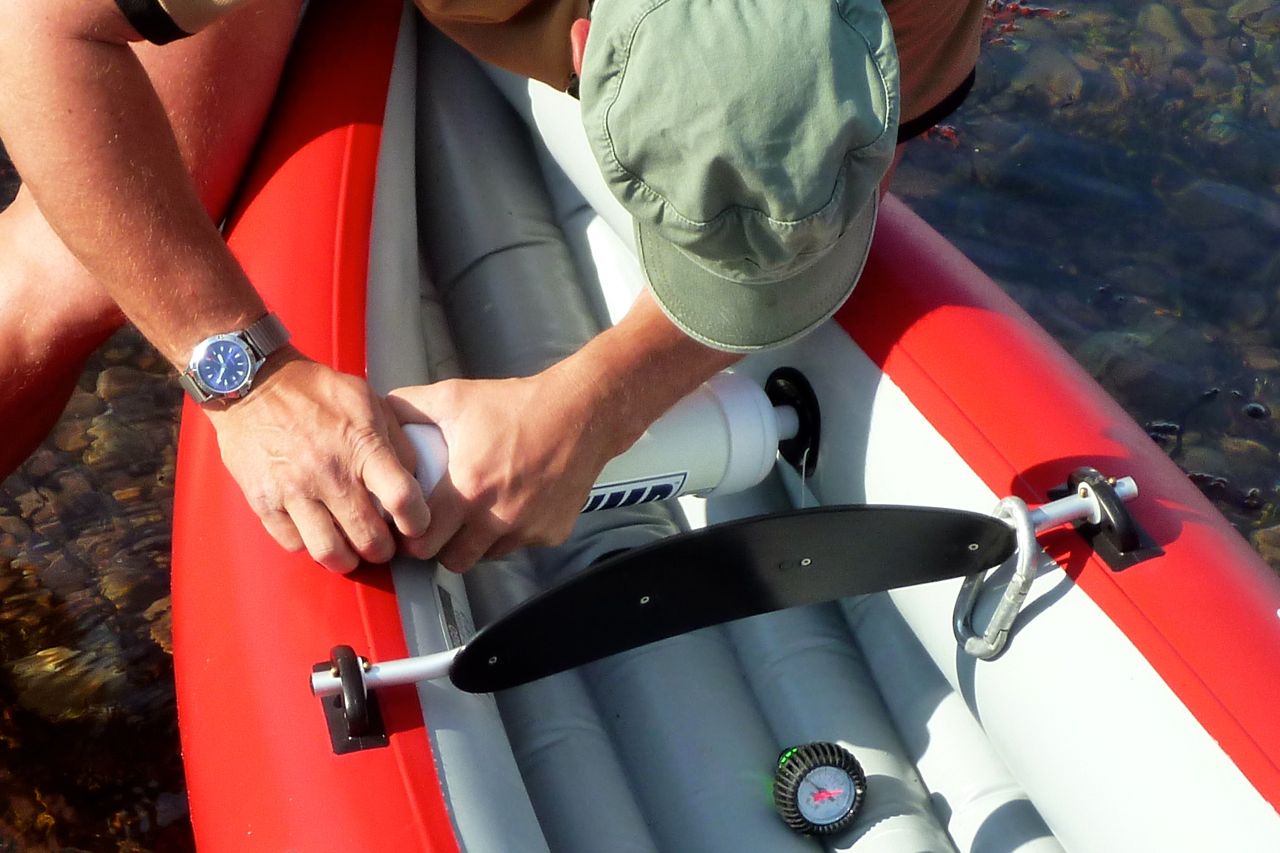
We swapped places here too, although one lean back on my new q/d back strap arrangement (left, a replacement for the alloy Grabner bar which bends too easily) broke the black plastic clip. I fed a spare krab through the seat strap and tied off the other end with some cord so that clip wouldn’t break too. I was expecting such issues and anyway, big karabiners are easier to use when swapping seats (see Grabner Mods). With the force on the Grabner rubber mounting lugs now coming from an unintended angle rather than directly back when using the seat bar, I’m trying to spread and articulate the loads with cord. But with only 3 square inches of contact, even if the lugs were factory glued, I feel I ought to glue on some 4.5-inch ø D-rings instead (as on the Solar; over 15 square inches of contact). Whether it’s just my clumsiness or all this weight I hear about, it’s clear that the strain on seat mounts is greater than I thought, especially with footrests to push back off.
As it was, with no footrests in the full-forward position I couldn’t rest fully against the prototype back strap, but as I noticed before, proper paddling is much easier out front as the boat narrows towards the bow. That’s another thing with big, single sidetube IKs: they’re over wide for good paddling. As it happens, should I want a footrest tube I do have a D-ring glued on the front floor in about the right place.

beg04


Back to the story. We were now back in paddling harmony and heading into mare incognita, the southeast corner of Tanera Beg where I’d heard there was an arch. And there it was – a very nice one too that could be paddled right through (this was 90 mins after spring HW). Its exposed position made the roof deeply scalloped by storms and weathering, reminding me of the similarly carved limestone walls of northwest Australia’s Geikie Gorge which we packrafted a year or two back.
Amazingly, out here on the ocean-side of the Summers there was barely a swell or a breeze to disturb our composure. Though an hour’s paddle away, Priest Island looked enticingly near. And from Priest it’s less than 5 miles to Mellon Udrigle beach at the top of Gruinard Bay on the south side of Loch Broom. Or from either Tanera island you can take a 10-mile loop south to Priest and back north via the smaller Eilean Dubh and a few other ‘Outer Summers’. One for the next calm day and a paddling chum for back up.

beg10


We felt like we were making good speed across the south side of Tanera Beg, although rarely got over 4mph. At the southeast corner was a huge cave – big enough to break the GPS signal. With a small window at the back this will become another full arch by around AD6565. This whole exposed side of the island has deeply weathered Torridon sandstone cliffs full of interestingly rounded cracks and fissures. Tanera Beg, like the bigger Mor has the same ‘waisted’ kidney shape presumably carved by the icecap along existing fault lines. Like mountain col, the ‘waists’ usually correspond with bays backed with a handy stony beach though flat camping needs a bit more of a walk. Had the Ice Age been a bit longer (or when the polar ice caps are gone) there’ll be a few more Summer Isles to go round.

beg13

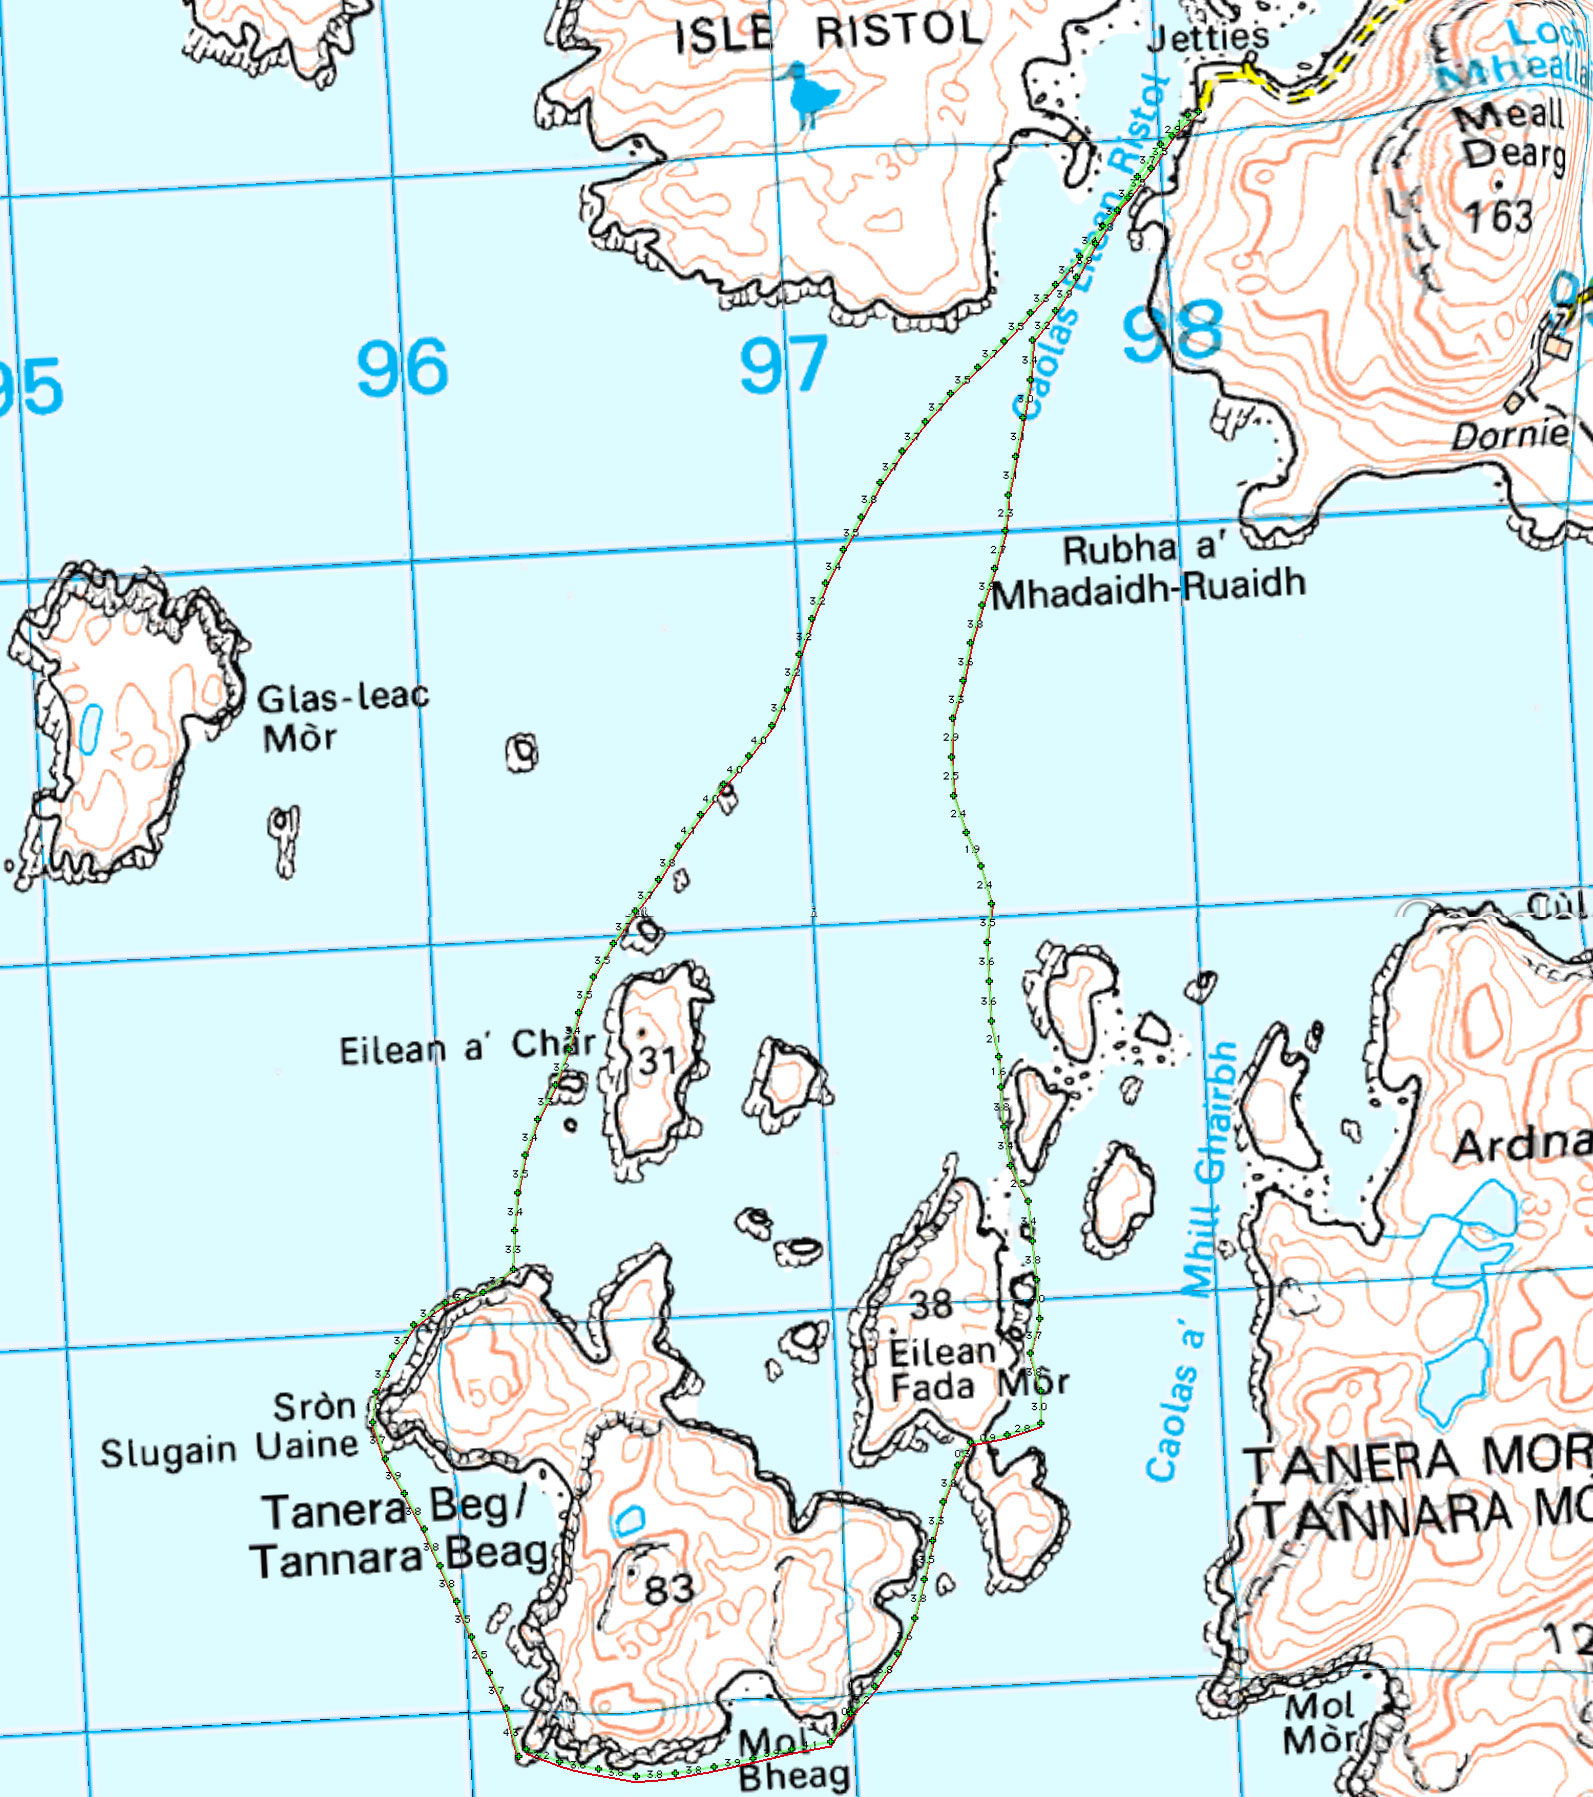
We then paddled below the 20-m cliffs on the north edge of the island (left). On a stormy day they reflect the brunt of the swells and throw up plumes of white spray over the cliffs themselves which can be visible from the road, miles away. Today, all we had to worry about was the peak of the ebbing spring tide in an hour’s time. Who knows if it mattered, but I’d deliberately circumnavigated Tanera Beg clockwise so as not to be in the inter-island channel where the current ebbing against us might have been more noticeable.

tanbegmap


Heading back to Old Dornie the speeds indeed seemed to drop, even though we were going as fast as possible in an effort to catch the weekly fish van down in Achiltibuie. At one point the kayak slowed right down as it passed over some unseen current or eddy thrown out by Isle Ristol. But that soon passed and with a quick turnaround in Old Dornie, it’ll be fresh local halibut for dinner.
So, closely analysing the data in the speed graph it seems that two-up doesn’t make the Amigo much faster than solo after all – perhaps it’s the same with tandems? I suppose the additionally weighted hull can only be pushed through the water so fast and then an IK’s unsophisticated hydrodynamics come against a wall. Instead, two-up enables greater potential duration as the paddling load is shared – and let’s not overlook the companionable element of two in a boat, as long as everyone is sitting in the right place and on form.

K-Pump Mini review

Inflatable Kayak pumps

beg02

Guess what! I got my Mini K-Pump the other day (left, 600g in the bag; ~$73) and gave it a go, topping up the Amigo at Old Dornie. The fat, 15-inch pump easily banged in the required psi into the floor, but getting to the side chamber valves wasn’t so easy (below). That required the angled nozzle supplied in the kit. Before I got a chance to fit that, the plunger or piston inside the housing got knocked off the shaft. Without a crosshead screwdriver I couldn’t fix that, but luckily I had the barrel pump at hand, so we achieved operational pressures in the end.

beg15

A quick reply from K-Pump apologised for the lack of adequate gluing on the plunger. With all the grease around the seal and the plunger / piston, I decided it was less work to fix the plunger to the shaft (right) with a couple of self tappers, rather than glue. Don’t know what I’m on about? Never mind ;-)

beg01

sw05

My very cheap Bravo two-way  R.E.D ‘kite pump (left) is much faster at effortlessly inflating a rolled up IK out of the bag, but is of course too bulky to take on a plane. With the angle nozzle (right), the K-Pump Mini is a much handier and more compact top-up pump: I estimate it takes less than ten pumps to top up a chamber; about twice as many as the bulky Bravo kite pump. And I’ve since found it can inflate my Gumotex Seawave from flat in about 15 minutes (picture below, in Venice).
Years later, it’s still my back-up or top up pump, especially handy on my Seawave which had PRVs all round and so would purge, and also to get bigger packrafts like the Nomad S1 over lung pressure to make them good and taught.

It’s hard to buy a K-Pump in the UK and I’m not sure there is anything similar. A Decathlon 1.4L D/A barrel is not that much bigger, easy to buy and just 15 quid.

Pankanel in Greece has this to say: 
I would also like to comment on the K-Pump Mini. I was looking for something compact and bought it from an online shop in Poland. When I first saw it, I was disappointed. It looked small for the job. Like a very fat version of my bike pump. But when I used it I was astonished. Side by side, it inflates the boat as fast as my high-pressure Bravo foot pump or an electric Bravo foot pump. Using an extension I made using a little garden hose, some duct tape, and three of the included adaptors (vinyl tubing, Boston adaptor, universal adaptor), I can now inflate the boat very fast, standing up, or even in the water. It is the best pump I have ever seen. I Imagine the bigger models will do miracles.

voga-03

Grabner Amigo kayak modifications

Amigo main page

amigomods

ami-data

Unlike my previous new IKs, out of the bag you don’t get much with a Grabner Amigo. In fact you don’t even get a bag. With Grabner IKs just about everything except the repair kit and air you pump in is an extra which undermines the otherwise striking 14kg weight. To make up for this dearth of equipment, in the catalogue they even list the specification label (right) as among the boat’s standard features!
So my Amigo added up to the bare boat with carry loops at each end and two backrest bars. No seat, skeg, pump, lashing points (D-rings). On purchase, I ordered half a dozen D-rings and a pressure gauge. The rest I’ll work out myself. Having learned what’s needed over the years, that suits me fine.

View Post

Manometer

grabguage

With the high pressures an Amigo runs it’s great to finally have a pressure gauge that’s easy to use (left). There are no pressure release valves (PRVs) to stop an Amigo splitting a seam if left out in the hot sun, so it’ll be a quick way of keeping tabs on the boat’s pressure or ascertain it’s at full charge. I’ve added a marker in pink to easily line up with the Grabner’s rating of 0.3 bar (4.3 psi) – not 4.3 bar as I mistakenly did once (the old eyes are going…).

Fitting a tracking fin

gumonewskeg

Before the Amigo even got wet I glued on a Gumotex skeg patch (left, £12) and thick plastic Gumo skeg (another £12). All up cheaper and stronger than Grabner’s similar slip-on €60 alloy version. I took a chance using MEK to wipe and one-part Aquasure to glue the Nitrilon patch to the Grabner EPDM hull as I didn’t have proper two-part adhesive to hand. I figured it would work OK as a skeg isn’t under great strain like thigh- or footrest D-rings, for example. Years later, no problems. Apply a thin film of Aquasure to both surfaces; wait half an hour, then press down with all you’ve got.

A skeg is a pain in the shallows or when dragging a heavy-laden boat over the heather; that’s one thing I liked about the Incept’s hinged rudder, but I can’t think how to make an effective hinged skeg except the way Feathercraft do it on their self-bailing Java (it slips up and down through a slot in the self-bailing floor).

A slip-in skeg can’t be slipped off a fully pumped up boat, at least one like a high-pressure Amigo, though actually after a couple of months it’s less tight and can be done. Being able to do that is very handy for portages or grass-dragging, though the skeg itself looks pretty tough. Of course, an IK works without a skeg, but on coastal waters they’re a good idea. More on that topic here.

Pump

ami-barrel

The Amigo uses more secure bayonet inflation valves which with the right adaptor (see inset below left) don’t pop out at the high pressures (0.3 bar/4.3psi) this boat requires.).
Pump hose-end bayonet adaptors are easily bought in the UK from RIB suppliers on ebay. Inset left, the black one is what Grabner sell with a fitted fibre sealing ring and steps in the bayonet to suit different valve depths. The ‘butterfly’ finger tabs make this easy to twist in place, too. The green one uses plastic spacers held in place behind a black rubber washer to get a good seal. You wouldn’t want to lose these push-on seals and it’s hard to twist in place, so for the moment I’d say the Grabner one is better. Write that down, quick!

A now almost extinct yellow-hosed Bravo foot pump that suits some Gumotex can’t manage Grabner pressures, at least not my aged Bravo which hisses from various leaks before you can get a full charge. I’m amazed it’s lasted as long as it has. I got myself a bulky 2-litre barrel pump (above left, £20) rated at over 11psi. As you can imagine, on a low-volume IK this works fast, not least because it pumps on up and down strokes. Like Bravo foot pumps, it also has a second port to suck out ever last dram of air – handy for compact packing at the end of a tour.

kpumpmini

The Bravo barrel is bulky so I’ve got a K-Pump Mini (right, review here) from i-canoe in Ireland who can import anything from the NRS catalog in the US, and without a huge mark up too (€80 delivered, not sold in the UK). My longer K-Pump 100 worked surprisingly well inflating the Incept; we’ll see how the Mini model performs on the Amigo. If nothing else it will be a handy top-up pump; Grabner cover themselves very comfortably by claiming that anything under a 20% pressure loss over a 24-hour period is not a warranty claim, though I’ve never owned an IK that lost that much air in weeks let alone a day. K-Pumps can’t suck out air like Bravo pumps, but using a loose hose with the bayonet fitting it can be done by lung.

Additional D-rings

ami-dee

Next, I glued on my half-dozen D-rings (left). Front and rear will hold down gear; the other four locate my cut down packraft seat as well as an adjustable footrest tube similar to what I made for the Solar last year. The seat and foot rings will also double up as thigh strap location points.
I’ve not always been that successful at gluing on previous boats, so this time did it by the book: roughen with sandpaper, wipe clean with MEK or alcohol, apply glue to both surfaces thinly and wait half an hour, glue again and wait less, then apply and press down hard with the roller.

ami-poly

Doing this I had a feeling the two-part Polymarine 2990 adhesive (right) was more effective than whatever I used doing the same job on the slipperier PVC-U Incept a year or two ago. I suspect Hypalon/Nitrilon is easier to glue; ‘plastic’ PVC-U is more effectively heat welded.

Thigh straps

ami-th2
ami-log

Over the years I never really got into using the thigh straps on my Incept or Java – perhaps the need for ruddering the Incept made them more tricky to use, or perhaps I’m just an idle paddler. But with the  Amigo, I want to have that option to help it shift. In any case, it’s worth persevering with thigh straps as this is one of the main things that separates IKs from hardshell kayaks in terms of boat control in rough conditions and optimal torso-centered paddling efficiency. Straps are not quite as effective as bracing your knees under the top deck of a hardshell, but they’re all you can do with an IK. Otherwise, you’re just sitting in a canoe or on a floating log. I’ve now got fully used to the straps on the Amigo and use them without thinking, just like I feel much more secure with the toe clips on my bike’s pedals.

Footrest

ami-th3

In my opinion, you need some kind of footrest too, if a braced body is to make an efficient paddle sweep – it’s probably more important than thigh braces. Last year I improved this on the old Gumo Solar that’s occasionally used by the g-friend. The Gumotex footrest cushion (same as my old Sunny) was too far away for the 5-foot Mrs to use effectively and is squidgy at best. On the Amigo I was able to use the front thigh strap D-rings to hook up the 4-inch footrest pipe (above left) with an adjustable strap looped through. It works fine.

Seat

ami-th1

At the other end I’ve separated the toilet-like seat base of my old Alpacka Denali packraft from the backrest section. It clips to the rear thigh strap hardware with mini snaplinks (left). This ultralight seat has already been repaired once by re-heat sealing the flat seam and another hard bounce may pop it again. It’s lasted the summer but if that happens I’ll come up with something better; any inflatable pad or IK seat base will do. The Incept seat was pretty good, so was the firm-backed Feathercraft Java seat which didn’t fold under strain. Right now, at about 50 grams, the cut-down Alpacka seat base is about as light as a kayak seat can be.

The hard plastic Grabner backrest was comfortable enough to lean on once I added a bit of karrimat, though it kept coming adrift from the lug holes when the bar pivoted down, usually when manhandling the boat, but occasionally on the water too. At sea it’s quite awkward to refit the bar into the black rubber lugs as the hull sides push apart. The only way I found was to face backwards in the boat, swing the legs out into the water and squeeze them against the hulls to repeg the seat bar.

To keep the bar in place while retaining a tool-free, quick detach element I hammered out the outer brass peg and replaced it with an R clip (above left). But that didn’t last too long – one clip bent and fell out and, as expected with footrests, the alloy bar was bending against the strain. I tried a blue seat strap instead (right), but hooking that to the rubber seatrest lugs looked like it put too much strain and distort them. Ripping those lugs off would be a pain. No way round it but to glue on another two D-rings as I did on the Solar; a 4.5-inch patch has four or five times the glued surface area of the seatbar lugs so ought to take the strain. D-ring prices seem high so I settled on what I knew – chunky Grabner items at €15 each (right). Grabner deliver fast from Austria.

grabner-D-rings

The seat strap was a crude solution so I figured I may as well try a proper, full-height backrest off an SoT. On ebay the ‘heavy-duty‘ item (left) with long adjustment straps and even a back pocket went for £24 – less than the two D-rings which hold it in place. As far as I can tell the rear straps’ only purpose is to hold the backrest upright, but it’s proved very comfortable – like a proper seat and with no inflation required. I’ll keep the original seat bar for less frequent two-up paddling where I don’t have a footrest to put a strain on it.
So after a couple of months use I have optimised my Amigo by completing the adaptions listed here, making a comfortable and more practical boat for coast hopping and river touring. The cost has been six D-rings £80; seat £24, glue £15, seat base and straps already had; Gumo skeg and patch £24, and two pumps, gauge and adapters £110.

sai14

Gumotex Solar 300 improvements

See also
IK&P Glues and Repairs

They don’t make the Solar 300 anymore – it’s been superseded by the lighter Twists, although the similar full-coat, white-water Safari is still made All these Gumboats and a few others may benefit from the footrest mod as described below, as might bigger Gumboats which both use a similarly mushy footrest pillow.
Our Solar dated from 2006 and although (or because) it doesn’t get used much it still looks like new. And it’s lost no air to speak of lying in the garden for over a month (can’t say the same for my Incept K40).

gumsolarstac

But the seat/footrest arrangement is poor, like all Gumos from that era. The seat pivots at the right angle base as you lean on it, because the top edge is attached to the bottom edge instead of the actual boat, like any sensible IK. You lean back, it lifts up – no good. I messed around a lot with my old Sunny before I got smart and simply glued some D-rings onto the top of the hull sides, which Gumo started doing soon after. This way when you lean back or brace against the footrest, you’re locked to the boat and so get more drive.

The pillow thwart footrest is OK, but I ditched that at the same time on my Sunny to use a small Otter box. For the Solar, the g-friend is short and can’t reach the footrest pillow even set right back.

I glued on a pair of big D-rings with Aquaseal, bonding much cheaper PVC D-rings to the Nitrilon hull sides to provide a fixed point to tension the seat back. I did this because the price of RIB hypalon D-rings is crazy: from £20 to £40 for one patch!
I Iused single-part Aquasure urethane sealant/adhesive (‘Aquaseal‘ in North America). Allow Aquasure or similar to half-cure in air for 30 minutes, then stick together and let it ‘seal’ to itself is a way of bonding anything – even non-compatible rubber-based Nitrilon to PVC. SeamGrip is a runnier version of Aquasure to get into cracks and seams and though I’ve not tried it yet, British-made Stormsure is the same thing.
That was years ago. Maybe it worked fine but these days, I’d sooner MYO D-rings from hypalon off-cuts and use 2-part glue.

Then on the Solar I removed the footrest pillow and replaced it with a bit of sawn-off four-inch drain pipe, taping the pipe ends to limit any rubbing against the hull. The seat straps were sewn into a loop and clipped to the D-rings.

This mod will improve bracing in the Solar: the bane of all IKs (and SoTs for that matter) which without bracing are like paddling a log. The footrest (the tape goes through a slot under the pipe) can easily be moved, even when inflated and will transform the Solar which is a nippy IK. The next step would be to fit thigh straps as found on the current Safari – then you can do cool stuff like this – but for the use our Solar gets, the current improvements will do.

Recently I also glued on the later style skeg patch to take the plastic fin. No more faffing about with butterfly nuts and bolts and bits of bent alloy. The patch costs £12 and so does the skeg, which I also fitted to my Grabner Amigo.

gumoldnewskeg

Trying out bikerafting

I’ve had Alpackas a couple of years now but I’ve been a bit slow about trying out bikerafting. I like pushbiking, walking or packrafting in the wilds and combining walking with paddling (aka: packrafting) is well suited to northwest Scotland, as several posts here show.
But add a bike and any off-roading becomes marginal up here. Most of the time you’ll be pushing or carrying, especially with an overnight load. No MTB is really rideable on the footpaths up here, although unlike England and Wales, since 2003 Open Access allows cycling on footpaths (there are no bridleways). Off the footpaths, at times you can barely walk, let alone ride a bike.

I like the simplicity of walking with paddling – you can traverse both surfaces most anywhere you like. A pushbike requires rideable terrain and on an Alpacka gobbles up payload, space and buoyancy, requiring you to design routes that combine flat water with ridable terrain, or even roads to make the most of the configuration. Then you got the faff of securing the bike reliably to the boat (or so I thought); the last thing you want mid-loch is 15 kilos of Cro-Mo steel slipping off and turning into an anchor just as the wind kicks up.

But let’s give it a try. The winds had backed down to a forecast 15mph (yesterday it was three times that) so we nipped out with the Gumotex Solar for a scoot around Loch Oscaig. I hadn’t tried it before, but with the front wheel off, strapping the bike on was actually pretty easy. The four Alpacka loops line up just right and two short straps plus the boat’s bow line were enough to secure the load without even a smear of chain grease. A loop of inner tube was handy to hook the handlebars around the top tube to stop one end dragging in the water. Once on the water, my arrangement was by chance correctly balanced, too.

My bike’s at the time was a single-speed Marin with hydraulic brakes so there were no cables to worry about rusting, but on the move it was clear the back wheel got in the way of a full stroke on the left, making for unbalanced paddling. I got used to it but for a longer stage it would be better removed, even if it leaves the chain flapping around. To me it’s a light bike, but the Marin probably weighs 14kg, about the same as overnight loads I’ve carried. The good thing is, such a weight on the front of the Yak only improves the tracking by reducing yawing.

The wind got up while we were out and at the downwind end of the loch it got a little choppy with splash coming over the sides, but the Yak bobbed over it. Here the Mrs set off against the wind for the two clicks back to the boathouse, while I hopped out, unloaded, aired down, rolled up and rode back along the road. 

Having now tried it I’m a bit less sceptical about bikerafting. On the boat it was less of an encumbrance than I thought. I’m not sure it would work well up here in the Assynt without contriving a route, but maybe all packraft trips are contrived to a certain extent, and anyway the motorable roads here are very quiet.

I suppose the real advantage of a bike with a raft over walking is that, providing the terrain is amenable, greater distances can be covered off the water which extends your range. But combining a multi-day trip with a bike away from roads gets challenging. I’m thinking of something like the 2008 Lost Coast bikerafting trip in Alaska I read about a few years ago, which ran northwest from Yakutat. Roman Dial, Erik Parsons (from ’08) and a couple of other guys did a similar route last year, but heading southeast towards Glacier Bay this time. Check out their superb vid below or Roman’s blog post and pics. The vid doesn’t not show much rafting but look at the route maps: they sure put in the days on the water.

Overhauling a Grabner H2

by Gael Auffret

Gael’s H2 review here,
Compared with other kayaks here
Solo paddle up the Scottish Sea Kayak Trail: Part 1 Part 2

After more than 12 years my tandem Grabner H2 IK was showing signs of wear all over. The most visible appeared behind the fore half deck where two grommets fed the grab lines (below left). Around those grommets the rubber coating had worn off, showing the bare woven core material of the Hypalon fabric.

I knew Grabner could provide an MRO service as stated on their web site and the French Grabner reseller confirmed he could send my boat to the factory in Austria for a quotation. That came the week later in German, but what didn’t need translating was the substantial figure at the bottom which added up to something like “you’re better off buying a new boat”.
Another major concern was a crack that developed under the aft backrest bracket (middle). This ill-designed bracket has a sharp edge that gets pushed into the skin under the weight of the paddler. After some years of chafing it had worn a small hole that proved difficult to patch reliably.

I must to admit the H2 is not as perfect and tough as I’d claimed so loudly. Encounters with various submerged obstacles and a number of uncontrolled landings had resulted in many scars and scratches all over the hull. I now also own a similar Incept K40 for solo paddles, but as I intended to keep the H2 as a tandem boat, I thought it was time to give it a serious makeover.

Grabner’s attitude to those requiring a more seaworthy kayak than an H2 was get an Explorer or the framed but now discontinued Discovery, but those IKs are way too bulky and heavy (26kg and 29kg respectively) for transportation when shuttling about.

My H2 weighs just 16kg. Plus they are just about the most expensive IKs in the inflatable world (left). I discussed the money issue with the other half of the H2’s crew who happens to also be the purser. She too wanted to keep the H2 and was not as appalled by the cost as I was, so after a short deliberation we decided to proceed.
Three weeks later my local reseller informed me enthusiastically that my H2 was here and beautifully refurbished. Save for the numerous patches it looked like new.

The Grabner folks had done a great job; even the foredeck grommets had been neatly repaired.
All backrest brackets had been replaced with new parts of a much better design. A new pair had been added at my request to enable solo paddling from a central position. Up till then I’d sat in the back of my H2 when solo.
Most cockpit fittings like footrest and D-ring brackets which had started coming loose had been reglued.

There was a keel strip on the bottom as well. Surprisingly the Austrian guys hadn’t paid attention to the colour of the patches (left). While the inside the H2 is yellow, they applied patches in external red. I should have supplied them the yellow patches I’ve got in my repair kit. Anyway, I’m happy the boat is in such great shape again, if not better than before. I can’t claim it’s worth as much money as I’ve spent on it, but I’m sure my H2 will go for another 12 years.

Pacific Action V-sail revisited

Packboat sailing main page

Windy but warm and dry thanks for asking – a good afternoon to take the IK out sailing. I’ve not done that since Ningaloo last September (left) when I was blown away so to speak, but not in a good way.
Even before then I can’t say I’d got the hang of the Pacific Action V-sail which should add up to either hurtling from crest to crest with all hands on deck – or kicking back and getting a free ride while looking around at 3mph. Both are good fun but neither scenario seems to last more than a minute for me.

Remounting the V-sail to the K40 was easy. I clipped the front ‘sail-hoisting’ bungie about 8 inches further forward, right out on the boat’s nose using a loop of string and tape (right) as opposed to using the boat’s lift handle-ring. Fixed here it ought to help keep the sail up when pulled down low to one side by increasing the angle and distance from the sail’s feet. It’s an idea we came up with in Australia in an effort to make the K40 controllable in the strong winds.

Winds today (left, from 3pm) weren’t quite as strong as WA but were getting there. And anyway, I was out on small lochs with no rudder-lifting ocean swell to deal with – another reason we thought the K40 got squirrely in strong winds out in WA. The K40s large draught but low weight acted like a sail of it’s own, weathercocking the boat.
To reacquaint myself, I first took a spin on the smaller Loch Raa. I’m never really sure what I’m doing so just try various angles and approaches until the kayak catches the wind. I’m told that sailing directly downwind with the sail fully upright is less efficient (or is that with regular, fixed-mast sails?). With the PA you can get a good speed for a while, but soon the sail starts rocking violently from side to side as it sheds the excess blast – my strong recollection from Ningaloo. I assume that’s just a sign of the sail exceeding it’s speed limit, though I think Jeff’s hardshell did it less.

Off the wind about 45° and up to 90- or even 100° (ie; slightly upwind) seems more stable but slower, with the sail cranked down low to one side. But even then a consistent speed or direction seems hard to maintain for long. Is it my poor technique, the design of the sail when applied to my IK, or just an aspect of gusting and shifting wind? As it was I felt the unloaded boat was rather light, though in Ozzie last September 20+ kilos of ballast didn’t help much either.

Big sailboats and windsurfers seem to manage OK, but it seems hard to get a smooth, steady run while sat back with the cleated-off sail doing the work. Usually I’m yanking hard on the rudder to get in line, or have handfuls of lines trying to trim the sail for best effect. The tiny ‘finger-and-thumb’ cleats are just too fiddly to use in a hurry or mild panic, and often require two hands to release the jam. I wonder if hand-sized cleats exist for the thin cord, or some better device all round? Something like a sliding tube you could grab, but with a release button, a bit like a mountaineering jumar (left).

Even then, on seeing the speed readings (above), it surprised me how fast I could hack into the wind at 2.5–3mph, admittedly with some effort (needed to keep the kayak pointed ahead). Coming back with the big sail I only got over 5mph a couple of times, and often moved barely more than upwind, although using much less energy of course.

I came across this image of a Micronesian waharek boat newly built on an ancient design. Looks like a big V-sail to me but crucially, it has an outrigger.


After crisscrossing Loch Raa a few times (above right), I went around the corner onto Loch Osgaig. Out in the open and with the wind bouncing off nearby Stac mountain, there should be room enough to get some speed up, providing I could hold on.

I set off and sliced the waves as best I could and stuck at it until I got opposite the small plantation. Here I stowed the paddle securely, got blown round and unfurled the v-sail, ready to snatch it back down should it all be more than I could handle. In fact, there were only a couple of hairy moments As you can see from the speed graph (right), my paddle out was pretty steady and straight, but under sail, speeds and direction were all over the place. A couple of times either a gust or the optimal line saw the boat fly at along at over 5mph (left), but it never lasted.

saijeff

It does make me wonder what the PA sail is good for on my K40. In winds of over 15mph it seems hard work to maintain. Is it an inherent flaw of a lose, articulated mast – and one whose feet are not pressing directly onto a solid hardshell hull (I use a plastic dinner plate to spread the load/reduce wear). The fact is, Jeff managed fine on Ningaloo (right), ripping along in a boat that was four times heavier than the Incept. And in Shark Bay a few years earlier in the same tandem tanker, he was towing me in my Gumboat.

A 10-15 mph breeze does often correspond to a nice steady sail, but that does seem a rather narrow margin of operation – something I recall someone else saying to me about V sails. I think it’s a combination of more practice required, hampered by the fact I’m in a light, buoyant, flaccid-chined IK. It makes me wonder if the WindPaddle is worth another look (it was and I did), though I’m fairly sure the PA V-sail is more versatile; I doubt you could ride at 90°+ to the wind with the deeply dished WindPaddle. Another good thing about the PA is that it’s out of the way when down but dead easy and fast to deploy or stash. Just throw it up and see if it takes to the wind. Out this time I also felt that the thigh straps were particularly useful when edging the boat against the gusts.

Water shoe review: Teva Omnium

See also: Packrafting shoes or boots

tevafloater

It’s 2025 and I’m on my my third pair of Teva Omniums after nearly 15 years. It pays to remember we’re not just ambling down to the sailing club for a drink, we’re balancing over slimy, head-sized boulders exposed at low tide, often while carrying a kayak, or walking through bogs or tidal mud which can suck off a shoe.

They were going for just $40 at REI Denver, back in 2011. Like it or not, much of how something performs depends on what it cost. As a replacement for my old Keen Arroyos, the Omniums hold my foot much more securely, with a velcro adjustable heel strap, a velcro adjustable clip buckle strap over the top, plus those dubiously effective cinch lock laces over the front. It’s the over-the-top strap that makes all the difference to holding to foot securely.

The Tevas also have no wear-prone threading attaching upper to sole, and a solid and chunky-looking plastic-rubber footbed derived from one of their sports sandals and doubtless designated with some snappy acronym.

I have found a closed-toe water show much better for wading than a regular sandal, because the open front of a sandal drags through the water as you wade. Closed toe ‘sandals’ work much better here and elsewhere, plus on land or water the toe protection is welcome. My Omniums feel more sure-footed than the Keen Arroyos ever were, mostly down to the fitting straps, but also due to what feels like a thick and less flexible sole which have not compressed and lost cushioning over time, as my previous Teva open sandals used to do.
We walked a couple of hours up The Narrows at the top of Zion park, following, crossing and wading along the Virgin River countless times. The Tevas gripped as well as anything here, drained readily and felt agile and secure when boulder hopping.

For regular dry walks up the side of Zion canyon and on a couple of longer dry desert walks in Canyonlands, they performed well enough, the softer-than-a-boot soles gripping very well on dry slickrock at the cost of letting some sand in in the washes. Lifting a foot behind you once or twice was an easy way to let the sand spill around the toe holes. At the end of a hot, 11-mile desert walk there was only a little soreness, but that could be due to my desiccated feet after a fortnight in this very arid climate. I feel that under the weight of a pack and clad in some seal skin socks, they’ll work well in northwest Scotland, though for an overnighter I think I’d sooner use the proper hiking boots.

With their wide snouts the Omniums are a bit Croc ugly, but wide shoes suit my feet much better. I haven’t read them all, but the reviews on Teva.com did complain of fast wear; no great surprise with modern sports shoes. I do wish they’s put a chunkier tread on their soles, but another plus: they float – always a good thing in the water. I give a paddlepacking thumbs up for the Omniums. If you can grab yourself a bargain you’ll have a great water shoe.

Two years later and my Teva Omniums are getting regular use for day paddles and are still hanging in there with no actual signs of breaking up. The soles are now too smooth to be useful on mud, but were never that good anyway. All in all, tougher than the similar Keens, but still limited for loaded overnight, all-terrain treks.

omnioo

Four years later and nothing much more to report. Decay is gradual but they’re still hanging in there. Nothing has actually broken or worn out. The soles are getting quite thin and have lost just about all the tread.. To be fair most of the time these shoes are in a boat or on a pushbike which may explain how they’ve lasted so long. So a short time later I used them on a three-day walk in Italy – about 80km. I  found the Tevas extremely comfortable on the mostly road and gravel track train (once I put some socks on). The thick, squidy heel really helped and the front sole wasn’t too thin for the gravel. They breath well of course (temps in the high 20s) and are easy to take off. 

tevaomnium

In 2016 I bought another pair in the US for about $60 and by 2020 the sole was peeling off here and there and I’ve just glued them up a second time. But they’re still my go-to paddling shoes.
Another five years later they’re doing OK. A bit more peeling going on. I think i got some Omnium 2s which look a bit less clumpy. It’s 2025 and they’re doing fine on the water on the bike and in the garden.

Testing the Sevy Slackraft

See also:
Slackraft Main Page

I got round to trying the Sevy ‘packraft’, a cheapo PVC dinghy with the outer hull cut off to make it less wide and hopefully more functional.
Compared to the single-chambered Alpacka, blowing it up takes a while. The floor is made of two interlinked ribbed chambers which require a ‘spike’ beach ball inflation adapter that fits on the end of the K-Pump (right). The main chamber fills quickly enough with the K-Pump – a one-way Boston valve ensures you get a good fill of the elastic material and it’s always a surprise to see it stay that way according to the SevyGauge™.

Even then, on the riverbank alongside the Yak it did look very small and rather low in draught so that even with a dry suit, I wasn’t convinced I wanted to get in off a steep, muddy bank. So I set off upriver to Sluice Weir in the Yak, towing the Sevy and intending to shoot the chute for a bit of fun. On the way I spotted a striking blue bird – never seen one of those before. Do you get bluebirds in Kent in mid-winter?

I got in the boat as gently as I could but it didn’t take long to have an inverted Archimedean revelation: the mass of the paddler was nearly equal to the peak buoyancy at the rear of the craft. That’s partly why Alpacka came up with the fastback tail in 2011. Unlike Archimedes, I didn’t jump out yelling ‘Eureka’. I just sat still thinking ‘is it spilling over behind me and if not, why does my back feel cold?’ I took a couple of pics behind my back (below) to establish plimsoll levels, then set off slowly across the pool, with the trusty Alpacka tender bobbing along behind in case the Sevy sank.

This was not relaxed or efficient paddling like in the Yak. I arched forward trying to offload the stern while pulling gingerly through the water for fear of initiating a possibly catastrophic water-bounce that would fill the boat. The Sevy sagged feebly under the weight of my butt and feet, just as I’d seen Jeff’s do on the Fitzroy. However Alpacka do it, it’s the rigidity in their hulls that makes them as good an airboat can be. The multiple coatings on the non-stretch fabric must have a lot to do with that. As expected the short, round Sevyslackraft yawed quite badly, even with the Alpacka in tow to act as a rudder. But that always happens first time out in one of these boats until you adopt a smoother technique. Either way, I was relieved to be wearing a drysuit.

As I bimbled around trying not to sink, the nearby weir boom opened up without warning and suddenly the Medway was kicking out a current such as it had not seen since the end of the last Ice Age. I could barely make headway in the Sev so allowed myself to be swept back to the canoe portage pier where I hopped back into the Yak. Within just a few minutes the river had risen 6 inches or more. I thought it had appeared rather over-full upstream in Tonbridge where I had driven through earlier.
Anyway, the 5-minute Sevy Slackraft trial were complete. To paraphrase Right Said Fred, I’m…  Too Hefty for My Boat, although it will make a nice packraft for the Mrs who’s a little over half my weight of 95kg + winter ballast.

So, packboating newsflash: the Sevy blow-up boat is not for bloaters like me. But as it’s so light I could still see a use for it as a tow barge for a bike or an extra huge payload (not that you could realistically walk with such a load). Maybe a really long river stage, or one where you want to be well equipped on arrival with a huge tent or something.