As promised, I’ve invested in a Sevylor Caravelle PVC dinghy. Cost: £34 delivered complete with pump, oars, repair kit, manual in ten languages and a box which is bound to come in useful one day. The heavy-duty Super Caravelle model, as modified by Narwhal, is out of stock in the UK until next summer, although an Intex Sea Hawk is the same thing and can be ‘skinned’ of its outer hull (as in the graphic, right) in the same way to make a lighter, narrower and nippier ‘PVC packraft’ – see bottom of the page. That’s the purpose of what is being done here, in case you’re wondering.
Pre-skinned and rolled up, the Sevy was about the size and weight of a proper Alpacka packraft, but awaft with that dizzying scent of PVC which takes you back to Mallorca in the late 1960s. Fully inflated, it’s too wide to take seriously, but it stayed like that long enough to enable the outer chamber to be surgically removed with a bread knife. Unfortunately, it’s on this outer chamber that the half-decent ‘high volume’ Boston valve is fitted – all the rest (2 floor chambers and the inner hull) get poxy, beach ball-style push-in valves which, in the latter case, take a while to inflate due to the pencil-thin aperture. Perhaps the Boston can be grafted onto the inner hull; what’s the worst that can happen? I’ll find out soon enough as it also took so long to deflate the remaining hull by squishing the push-in valve I decided to cut it out there and then and slap on the Boston valve from the trashed outer hull over the hole (above left). This was the first time I used MEK solvent to clean PVC. This stuff is pretty damn potent and ‘cleans’ the PVC a bit like paint stripper removes paint! Tellingly, it’s also known as polystyrene cement and has uses for welding too, so use it sparingly on PVC pool toys or they’ll dissolve before your eyes.
The squidgey little foot pump (right) is very light, but slow, especially when trying to get enough pressure into the main chamber for the slide-marker to move down and line up with the ‘A’ on the SevyScale™ (below left). This is a pressure guide so you don’t burst your new pool toy – easily done with thin, stretchy PVC and sharp words. But by chance the Sevy valve plug fits neatly onto the end of my K-Pump which is much quicker at inflating. The Alpacka air bag sort of screws into the Boston valve too, but you need a K-Pump to get max pressure.
Testing the newly glued on Boston valve, the boat was losing air, but it didn’t look like the glued-on valve was at fault. As it happens the bath was full so a check revealed a tiny, half mil hole near one of the seams underneath. I’m fairly sure I didn’t jab the boat with the knife while skinning it, so it must have come like that or my carpet is sharper than I think. Lesson: test all chambers in your cheap pool toy before running a coach and horses through the warranty by attacking it with a knife – that’s if you can be bothered to send it back instead of dab some glue on the hole, should it also be faulty. The oars are mere fly swatters as previously noted. It’s possible they could be joined together into a packrafting paddle, but why bother; there are decent Werners and Aqua Bounds under the bed so the oars can join the scrapped outer hull at the local dump.
It has to be said, once skinned it’s 36″ (91cm) wide, 60″(152cm) long, and no more than 12″ high at the bow, so there doesn’t look to be a heap of buoyancy left over for the likes of bloated boaters like me, but the floor also holds air unlike an Alpacka so a spell on a river will reveal all. As mentioned, if it’s enough to stop me sinking, I may invest in gluing a spare sheet of tough nylon onto the base. It may add weight but will make the Caravette unstoppable; that’s unless a sharp-clawed bird lands on the deck or it gets splashed with MEK.
With half a dozen attachment points cannibalised from the outer hull and glued onto the stripped-down packboat with some Bostik 1782 (right), it now weighs 1550 grams; about half the weight of my current Alpacka Yak and about half the volume once rolled up. So compact, it could even make a flat-water towing platform for the Yak – for carrying a bike for example, as I’m not sure it would so easily fit on the bow, especially with camping gear.
River trials will follow shortly, or I may well head straight out to Rannoch Moor for an overnighter with Intex chum Jon who lives up there – see the vid above from last summer. He has also been inspired to skin his SeaHawk 1 bloat into a purposeful packslab. Might be good to take the Yak as a spare up there; if Loch Laidon freezes up round the edges the ice spikes might be too much for our pool toys.
Access One reason I chose the Fitzroy was that it seemed easy and safe by Kimberley river standards. It was easy to get to Mornington; the river covered mostly flat terrain (no abseiling/clambering down waterfalls, etc); and it was easy to get off – either onto station land in an emergency – or at the end where it ran past Fitzroy Crossing.
The Cessna from Broome Air Aviation cost AU$500 (£300), and we were able to leave Jeff’s van at Fitzroy Crossing aerodrome safely. The flight took 25 minutes to Mornington where we were met by a ute and taken to the camp. They charged us around AU$150 each for air strip pick-up and river drop-off, gourmet dinner and breakfast, and camping. Fossil Downs just asked us to call on departure and arrival (as did MWC), Leopold Downs (a small section) were not bothered, and we wangled our way through Geikie Gorge NP, as you read. At the far end it was a 4km walk from the bridge through town to the aerodrome to retrieve the van. All in all, it couldn’t have been easier when you consider what we did, especially at the end of a trip when you can be tired or potentially lame or ailing.
Maps, Navigation and Comms Three 1:100,000 scale maps covered out route and proved to be very accurate, considering the river channels can move around after a Wet. Fitzroy Crossing 4061 Hooper 4062 (left) Lerida 4162
Oddly, 4061 was printed on some kind of blotting paper and fell to pieces under conditions which the other two maps survived with a bit of drying. All maps needed the long-lat grid calibrated by hand along the sides to work with my GPS. They use some other (Australian?) grid which I suppose I could have set the GPS up to read, but I prefer what I’m used to: long-lat.
We both carried a GPS. I had a little Garmin 401 (left) and Jeff a more modern SatNav Nuvi with a good WA map which even depicted the course of the Fitzroy. He could have just about managed without a paper map. My 401 is a splash-proof wrist-mounted GPS, much lighter and less bulky than the 76CSx I normally use. Unfortunately, I suspect the 401 uses old Garmin electronics from the XL12 era that aren’t particularly sophisticated or efficient. The two AAA batteries lasted less than 6 hours (my CSX would have lasted up to 3 days in the heat on its two AAs), so after that I gave up keeping a GPS track and just turned it one to get a location. Because of that, we never really knew exactly how far we travelled. But above all, the 401 is handy and light, so as a quick locator it does the job unobtrusively and while it tracked it managed the splash-prone attachment to my pack without complaint. I sold it later – too basic for my needs.
I had a compass too but didn’t use it much, although my 10-year-old Thuraya sat phone was handy to call Fossil one time, or to liase with Jeff when he was still on the river at the end (his Ozzie PAYG mobile didn’t work up north). Thuraya sat phones just about work everywhere except the Americas and are cheaper than Iridiums.
Food and water We brought a week of freeze-dried, Pack n Go food from the UK (below left) which weighed in at 3.5kg each but didn’t cover lunch – just hot choc, breakfast cereal and a two-course dinner. Pour in boiling water, seal, wait a few minutes and you got meal. Although it became quite boring after a while and some meals are tastier than others, I was amazed at its ability to sustain us considering the energy we were expending for up to 11 hours a day. I probably ate half what I do at home merely bashing at a keyboard; I suppose the heat helped suppress the appetite, but it must have also been due to the food’s calorific and nutritional values.
In the morning we had a hot drink and a hot P&G cereal of some kind. Smoko (morning tea break) was tea and a muesli bar or trail mix while both lasted. For lunch I just ate a double cuppa soup (good for salt) and another hot drink – Jeff got to eating his evening pudding at this time. And in the evening we ate the main bag meal and I had my pudding as well as more tea, coffee and whatever. I can’t say I was ever hungry, but I sure enjoyed some real food when we got back to Broome – including the brilliant seafood curry down at the Wharf – you gotta go there! We took my Pocket Rocket knock-off stove and a gas can but only used it on the last morning where there was no wood nearby on our sandbank. At all other times there was plenty of dry wood and little risk of a bushfire along the river bank. Out in the open during very windy conditions a stove would be less risky.
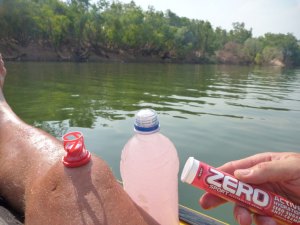
We planned to filter water daily with my Katadyn Pocket Filter (left), expecting lots of scunge due to low water levels. In fact the river was pretty full and running so after a day I dumped my cumbersome 5-litre water bag and filled a 750-mil bottle straight out of the river, while adding a Zero tablet (right) every time to stave off mineral loss through sweating. Jeff stuck with filtered (as did I on the day bat crap covered the river), and even though I didn’t use it much, I’m glad we brought it along,. There could have been an occasion where it would have meant clean water or no water, and out there you need water. Including drinks I drank up to 4 or 5 litres a day when engaged in hot and arduous portaging. Since sold and got an MSR Waterworks which I’ve not used yet.
Clothes I expected to need to cover right up to reduce sun burn and transpiration: long trousers, long sleeves and a hat. But in the end while the UV was the same, it was not so hot on the river due to splashing and shade, and the trousers were only useful against big flies in the gorges on day one. The problem with long trousers is that when wet they cling to your legs and drag – Jeff eventually ripped his North Face zip-offs above the knee, but both if us turned to shorts and a bit of slip-slap-slop on our legs. Rolling up the trousers didn’t quite work. Knowing they would get a hammering from the UV and all the rest, I invested in some American 5-11 Tactical trousers and jeans. They are basically the same as normal work or hiking trousers and shirts, but as far as I can tell feature a thicker synthetic material, countless pockets and other small details like tabs to hold up sleeves. The shirt was very good: huge pockets to take a map or whatever – both it and the trousers finished up fine after a rough week unwashed. And they both cost half of what Fjallraven and the like might charge. All in all, I am a 5-11 Tactical convert, even though I know it has a naff ‘special forces’ connotation. I didn’t find the synthetic material a problem in the heat with regards to rashes. odour and so on – if anything it dried much quicker and was tougher than cotton.
Footwear We both bought some Brasher Lithium boots which were going half price in London (£65), as we expected a lot of tough walking with full loads. In the end there was very little of that – and just as well in the heat away from the river. The Lithiums were great when portaging/balancing over boulders and wading through slimy, rocky shallows. But in the sands they filled up with grit and were hard to drag out of quicksands where they filled with sand all the more. Jeff who did more walking than me, wore his Lithiums more, or his Tevas, but in the end we both went barefoot in the river: lighter feet, easier quicksands and more hygienic. By the end our feet were a little sore and swollen from rough gravel, very hot sand and twig jabs, but I think Jeff found his Tevas the worst of both worlds for catching gravel on his already sore feet while not giving full boulder support or secure footing. On the last morning he duct-taped his shoes to his feet (left), but that didn’t really work either. Around camp I wore flip-flops. In the end, although lacing the Brashers up was a pain, you do need a pair of tough boots if you plan to be walking in the Kimberley – Tevas or Keen Arroyos will not do when packing a load. I poked drain holes in mine after a couple of days so my feet would not get sodden, but in the end it was better just to put them on when needed, even for a short portage. Teva Omniums much better.
Packs and camping gear Jeff used my old TNF Terra 60 pack with dry bags, which was barely big enough but extremely comfortable. He also had a day pack which he clipped to the front – a neat system (right) for portaging. I used my UDB (90+ litres) and the Watershed Chattooga as a day bag (both left). But the UDB was a floppy sack on my back compared to the TNF and the Chat bag just got in the way for portages, so that went inside the UDB pretty soon and my shirt pockets became my ‘day bag’. I made great improvements to the stability of the UDB but packing the weight low one time. After that walking with it was not so bad, but it’s nowhere near as comfy as a proper backpack. But it can be if you use this.
I didn’t take a sleeping bag, just a thin blanket that was going spare, and wore all my clothes on the one or two cold nights. Most nights I used the $15 K-Mart Tent which Jeff bought me – more as a mozzie dome than against the cold. The K tent was too short for me but for what it cost it was OK. Since then I’ve bought myself an Exped Venus UL which pitches with just inner for hot, insect nights and is longer than I am. Jeff’s mozzie dome is the same sort of thing – just right for the tropical bush. I used my Exped Synmat DL which is excellent and sold,it to Jeff in the end who suffered under his Thermarest UK which I used to use until I woke up (too much). I’ve since replaced my cushy SynMat DL with the UL version which weighs just 500 grams and is half a litre in bulk.
Cameras and recharging We both used Panasonic FT2 waterproof cameras – the ranger we met at Geikie had one too. At the time (before Olympus TG) it was good in that it’s waterproof (great for Ningaloo reefing) but of course the lens is tiny and so the picture quality- is not that hot, especially on zoom. The video quality, it has to be said, is pretty amazing for a £200 camera. We shot in Motion JPG and HD modes (not the AVCHD which doesn’t import so well I find). That gave a 1200 pixel image which is certainly good enough for youtube, even if it takes many many hours to upload a 5GB movie. I would love to have used my old TZ Lumix, or the even better LX5 I now have, but out in the wet and wilds it’s too hard to be careful with fragile gear so the FT2 is good enough until I get a commission from National Geographic. They’ve since brought out an FT3 as they do, with GPS and other gimmickry – there is no substantial improvement as far as I could tell and you’ll never get a decent lens in such a compact, flat, waterproof body. A pair of 16GB cards were more than enough for both of us. We carried 1 spare battery for the Panas and, with the Go Pro below, that just about did us. In the end I didn’t take the Power Monkey solar charging gadget on the Fitzroy, but did use it on the Ningaloo stage. It charges the Pana batteries very quickly and has the capacity to do that about 10 times. I also used my Go Pro which is temperamental and drives me nuts, but can get the hands-free shots other cameras cannot reach – mostly when on your head. The buttons are a pain so you have to check every time to be sure it’s on, but I also got into using it out of the box when the audio is of course much better. Out of bright conditions the exposure is not half as good as the Lumix; in the shade its terrible but maybe I should meddle with exposure settings which are on default. I also took a Gorillapod but that fell apart at the joints. Jeff used his newer one a couple of times; I’ll probably get another, maybe the bigger one for SLRs which may last longer.
Health and Dangers The Kimberley can be a pretty unforgiving environment, hot, harsh and full of nasty or just plain irritating wildlife. I must say I feel I got away from there with barely a scratch; Jeff suffered a bit of crotch rot and cut up feet. I like to think that the Zero tablets I ate religiously kept me in good shape, even with unfiltered river water. I used a bit of 50-factor on my exposed legs and always wore the hat in the sun. In my experience in Australia the UV is much harsher than even the Sahara.
We saw no snakes – maybe one – though there are big olive pythons around (we had gaiters for walking in long grass, as Jeff did on occasion). Big lizards and freshie crocs are also only a danger if you tread on them by mistake. The only cow that got edgy was clearly in a bad way and cornered, and the only time big horse flies were a pain was, funnily enough, in the Leopold Ranges, well away from cattle country. I think the biggest danger was portaging over boulders – a slip there could have ended badly once you crash to the ground under the weight of your gear. The answer is to pack carefully and take your time, or just do two trips as I did on one occasion. I found my packstaff was rather a hindrance with my boat on my head. There were a few mozzies at night, but they were nothing compared to the blood suckers I’ve experienced in the Top End. So all in all, no drama.
Roll-top dry bags (right) – even the best ones – aren’t really submersion proof, are they. That’s fine for a SinK with hatches (unless they get flooded), but no so good for an IK, packraft or any open boat on rough water or in crap weather. When I pack for either packrafting or IK I find myself putting roll bags within roll bags to make sure important things stay dry while hoping I don’t flip as I know they’ll not resist a couple of minutes submersion.
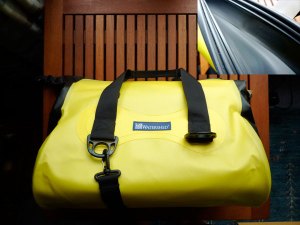
A year or two ago I came across Watershed Dry Bags from the US which seal with a big rubber Zip-Lok like seal (see image below) – ZipDry they call it. They’re expensive, but were available in the UK. In an effort to get one dry bag to you-know-what, I’ve got myself a 30-litre Chattooga ‘day bag’ duffel (below left) and by chance, on eBay an ex-demo Watershed Ultimate Ditch Bag turned up at 20% off (still £130). So that’s actually two bags.
The Chattooga is not quite the rich yellow of the brochures, but a bit translucent which actually makes seeing inside easier when the foam and fleece liner is not used. That’s another £18, but it may absorb ‘high point’ knocks to the outer skin as well as protect what’s within, though I’ve never used it as it takes up space. The shell plastic is a hard, slippery polyurethane rather than the soft rubbery vinyl of something like a SealLine Baja bag. It’s all RF welded and very solidly built. With the bag top rolled down as it is with a roll bag (not actually necessary) I’ve found this is submersion-proof. Once in a while a spray of 303 as a moisturiser along the seal grooves helps it seal readily. The bag sits fixed to the mid-floor lashing point in my packraft between my legs for easy on-the-water access, and it fits neatly in the front of my IK and on the back of my bike. I’ve also divined that if things get desperate the Chattooga can work as a paddle float (left). My Chattooga got nicked in 2012 and I’ve since replaced it with another which seems a little thinner and shinier material, but otherwise seals the same. I replaced the Chattooga with an Ortlieb Travel Zip.
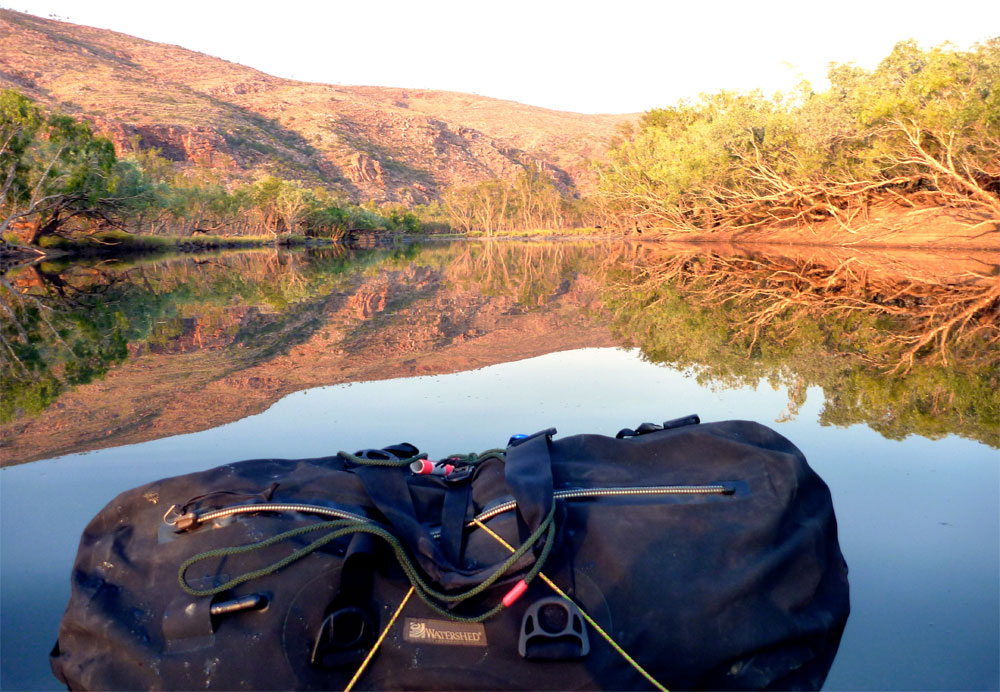
The since superseded Mk 1 Ultimate Ditch Bag (UDB; left) was unique to Watershed; a plain, big 96-litre duffel with basic detachable backpack straps, handy grab handles on each end and accessed by a single tough, dry suit-style waterproof zip, rather than the press-together ZipDry closure as with the rest of the ‘civilian’ Watershed range. My experience with dry suits is that amazingly, these zips actually work long after the material delaminates. Ortlieb have lately brought out similar bags in their usual soft fabric, but using what they call a TIZIP which looks like an ordinary YKK wetsuit zip to me and is only rated to the IPx7 standard (explained in the image right). I spent a couple of hours floating about in my Crewsaver drysuit the other weekend and nothing leaked; the UDB would manage the same while keeping the contents dry, and the fabric is much tougher than Ortlieb’s PVC. You could classify a UDB as ‘IPx∞’.
The UDB also has a complex, chunky inflation/purge valve for compression packing once the zip is done up or even to inflate the bag as a buoyancy aid if you’re in really dire straights and your boat loses air. This is reassuring when paddling a relatively flimsy packraft through a school of agitated swordfish or sea porcupines. If the boat goes flat you have a huge buoyancy aid to keep you out of the water and slow down hypothermia. And it can be used empty as an effective float bag inside a hardshell, folder or decked IK hull to limit the bailing required after capsizing or swamping.
Apart from my down sleeping bag which might be too much of a risk, I’m now able to simply pack and access things normally in the yellow Chattooga and the UD Bag and so can downsize my collection of dry bags which were gradually taking over the room. The UDB has proved itself as a functional packrafting backpack for the walking stages – more below, sea kayaking in Australia and remote river packrafting out there too. The good thing is the detachable straps can be modified or replaced with something better, although the UDB lacks any rigidity to carry its weight on a hip belt and as I say below, the shoulder straps’ position is too central. Plus you don’t want to strain those ‘probably-not-for-hiking’ harness fittings and risk tearing them off the bag (although they’re sewn to a patch as left, which is glued to the body, so not much chance of that rupturing the bag – unlike a Gumotex IK bag).
2013: Watershed redesigned the UDB as a smaller, 78-litre duffel now made from their tough, glossy PU-coated fabric, but still with the dry suit zip and purge valve. Or check out their pricier military range of packs, below. IMO while not perfect, harness wise, the original UDB was a better bag. The canvas textured fabric gripped better, didn’t wet out, and the size and shape were just right to slip into a slim kayak or across a packraft’s bow.
The 96-litre UDB is big enough to take the raft, a dry suit, paddle blades, tent, sleeping bag and 2 days food
Walking with the UDB As a backpack the UDB has been surprisingly good at carrying a load in Scotland for up to 3 days (40 miles). Part of the reason for the tolerable comfort was that the UDB’s relatively rough fabric and frameless ‘coal sack’ form grips right across the entire back like weak velcro and so helps spread the load. The chest strap helps greatly too, though I’ve half a mind to try the chunky, wide clip-on thigh straps from my kayak as shoulder straps to get two uses from one thing. It does lack exterior pockets like a conventional rucsac, but that can be got around by having pockets in your jacket or a using a waist bag.
Having used the UDB again in Utah and overnight in Scotland, I’ve reconcluded that the shoulder straps are located too much towards the centre of the pack which means that the pack sits too high on your back (see walking pic, top right), making you unstable at times. Loosening the straps to make the pack sit lower but isn’t the same thing as it’ll just be loose. Up to a point you could pack heavy stuff low and anyway, it’s clearly not designed as a full-time pack, but I must say that’s how I’ve used it when packrafting. It’s so convenient to just use it as a waterproof/submersible holdall: chuck stuff in, zip it up and get on the water. Occasionally I run beeswax along the zipper; a bar of soap will do the same and smells nicer. I’ve since got myself a packframe (left) but decided an NRS Paragon pack harness was the best solution to portaging. I used the UDB like this in Turkey.
Watershed Westwater Recently I walked and cycled the Coast to Coast with an ’80’-litre Westwater pack featuring a regular ZipDry seal, thin shoulder straps with chest and an added hip strap. (They now claim it to be 65L) The load was only about 12kg but I found myself unstable in the hills as, with no proper hip belt, the weight was hanging high from the shoulders. On the Lakes stage it was very hot and the back was very sweaty, but it carried OK. Once I got on a bike and the weather broke, the pressure on my butt became exceedingly painful (no surprise there).
The pack is handy in that in dry weather you can simply roll the top over and clip it down, not using the ZipDry seal (as above left) and so easy day access. While sealed up in the wet you know the insides will keep dry. Again, I can see the Westwater working well lashed to a Lastenkraxe packframe with the packraft rolled up beneath it, or in a harness like the NRS Paragon or Flex PR. The only drawback is the slippery texture and shortness doesn’t sit so well on the bow of a packraft (left) compared to the UDB.
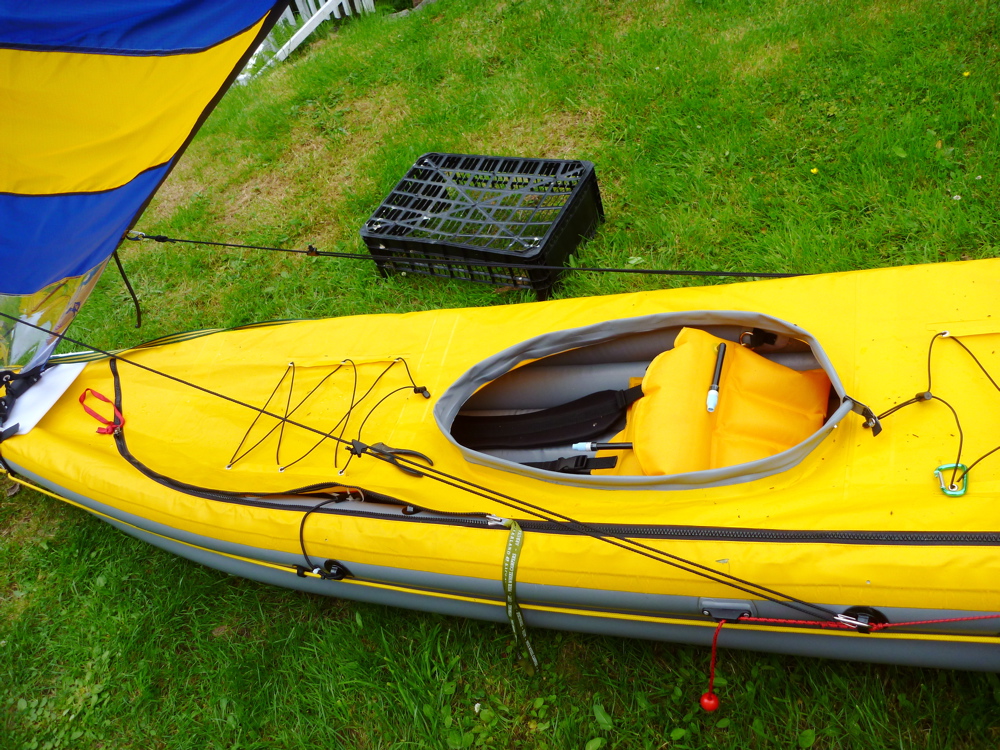
Not much wind today, but with a few refinements to try out it was worth taking the Pacific Action sail out on a regular ride over to the island. I chose my big-faced Corry paddle and it has to be said it’s quite a strain (the opposite of a Greenland paddle) when you’re a bit out of condition. But then I bought it primarily for the packraft. What felt like a worthwhile breeze heading out to the island was probably more than doubled by the 4mph I was chucking out. Knowing I could afford to be, I was pretty tired once I reached Tanera Mor’s rocky shore. The state of the tide? who knows – coming in I think so it was with the wind, but I really think it makes little difference around here most days. As the graph left and the video below both show, I had a bit of trouble getting it up and never got close paddling speeds while sailing back. But once I did get on the wind, it was a bit of a revelation to find I could pin the sail at a certain stance and, providing the rudder was on the case to, just sit back and enjoy the slow ride. It may have taken me longer to get back, but I could have easily read the Sunday papers, checked my email or just looked around and enjoyed the scenery, had most of it not been suffocated by the clouds of an imminent downpour.
It was also a surprise to learn I was not the prisoner of a given wind angle, but could modify it by up to 180° or maybe even more. At one point back near the beach, from the lapping of the passing waves across my beam it looked like I was paddling a few degrees upwind. Conditions were exceedingly tame but the cord-lock things worked pretty well and their position alongside the cockpit was just fine to slide them up and down. At one point I tried paddling with the sail which I’d assumed would be rather tricky. Sure, the control cords got in the way a bit, touching my hands as I paddled, but it was possible to paddle lightly and so – as the graph shows – raise the speed with little effort to 4mph. Had I tried paddling harder I think I’d have outrun the sail, but it proves a good point: it need not be either paddle hard into the wind or sit back and sail; you can sail and paddle too if conditions allow- or enable it, gaining a bit more speed and exercise. I may try fixing the shock cord a little further forward to the nose which may help keep the sail up at marginal (low) angles or low wind speeds. I also need to tighten the webbing a little more, so the mast feet touch directly toe-to-toe so that, at the angle they’ve been locked against the masts, they’ll splay the sail out more readily. The Google Earth screenshot of the GPS track on the right features the long-sought OS layer – useful as GE’s close-up resolution hereabouts is terrible. With it you can depict all the accuracy of a true GPS track over a detailed OS map. It’s a simple kml file found here. Download and open with GE and it’s there to click in the sidebar on the left when/if you choose to view OS maps in GE. Thanks to Gael A. for sending the link. As things stand today I’m pleased I bought the PA sail; primarily for its simplicity of installation, deployment and possible repairs, its ease of use in the hands of a sailing beginner like me, the compactness when furled, as well as its ability to pulled down fast and attached/removed from the Incept in a minute or two. All that remains to be assessed is the kayak’s stability in rougher and windier conditions. The forecast shows a bit more wind on Tuesday so hopefully, there might be some surf-slicing sail action to grab then.
I’m pretty sure my 0.78m2 home-made disc sail is too small to push the 4-metre Incept along until wind conditions get beyond the pale. Recognising that, I tracked down a 1.5m Pacific Action for £175 instead of the usual £250 which is a bit much. As I mention here, you can easily make a V-sail yourself from bits of plastic piping and old trousers, but life is short and as I’ve experienced a PA in action in Shark Bay, I’ve treated myself. The nearest B&Q hardware store is half a day away.
They call it a ‘1.5m’ sail, but unless I am very much mistaken it’s more like 1.15m2 if you calculate the area of the Isosceles as 146cm across the top and 174 up the sides (graphic on right; or base x height of about 170 divided by 2). PA round those dimensions up on their website to 150cm and 180cm, but that still doesn’t add up to 1.5m2 or 16 square feet. Maybe I should chill out a bit; a Ducati 900SS is actually 864cc and so on. As you can see left, it’s about twice as big as my 0.78m2 disc sail and it certainly looks like a metre-and-a-half square, so perhaps my sums are wrong. And it’s bigger in the right area too: up high where it counts. Plus you can see where you’re going – always handy in busy traffic lanes.
The sail comes in a compact bag of less than a metre. Can’t weigh things here but they claim 1.9kg; could even be less. Inside you get the two, 3-part masts made of thick glass fibre, the sail, fittings and rigging or lines, plus adequate instructions* for what turns out to be a fairly straightforward task. These instructions and fittings are obviously aimed at hardshells, be they SinKs or SoTs. With an IK you have to improvise a little. It helped knowing that there’s a picture of a PA sail on the Incept website (right), as well as this Kiwi guy’s video (bottom of page). The supplied cleats (sliding cord locks) are tiny and I recall Jeff replacing them on his Perception tandem for Shark Bay, but see below. Because of the confusing instructions combined with my congenital density, I misunderstood their simply application. On my first go at sailing the PA I was holding and maneuvering the control string by hand, as I did with the disc sail.
Up front the snaplinks (right) I’ve used to mount the disc sail also happen to be ideal positions for the PA’s webbing loop. And the bow handle ring toggle is the just about the minimum 12 inches ahead of the mast feet to take the shock cord clip (left) with which the sail springs forward when you release it. If that’s not quite enough far forward (as I think may be the case), I can stick a D-ring patch a few inches further forward right on the nose of the boat (as left). This position/angle may be more important than just getting a good spring forward, but also affect the sail support. We’ll see.
In Australia a few months later we did see. Further forward was indeed better, but I suspect still not optimal. When you think about it, the front attachment for the elastic would be better if it was set higher that the level of the mast feet. That’s because when you’re reaching across the wind with the downwind mast almost horizontal with the hull (as pictured left), the angle of leverage to keep the upper mast up gets very low; at 5-10° the tensioned elastic is almost at the same angle and so the sail collapses as shown in this video at 1.16. This happened to me all the time in Australia as the sail was pulled low to cope with the strong sidewinds. If I go ahead with my nasal bowsprit idea as mentioned here, I’m now thinking it might also be an idea to raise it a bit; have an upcurved bowsprit so the sail is more readily held up when reaching (near-horizontal).
While in Australia I also pushed the snaplinks to mount the sail straps directly through the black lugs and not around them as pictured right. This was because the strong wind was pushing the sail mount (a plastic plate) forward, making it go slack, reducing the elastic tension and causing more problems with handling. But by the time I made all these adaptions we were locked into two days of headwinds so I never really had a chance to see if it made any great difference.
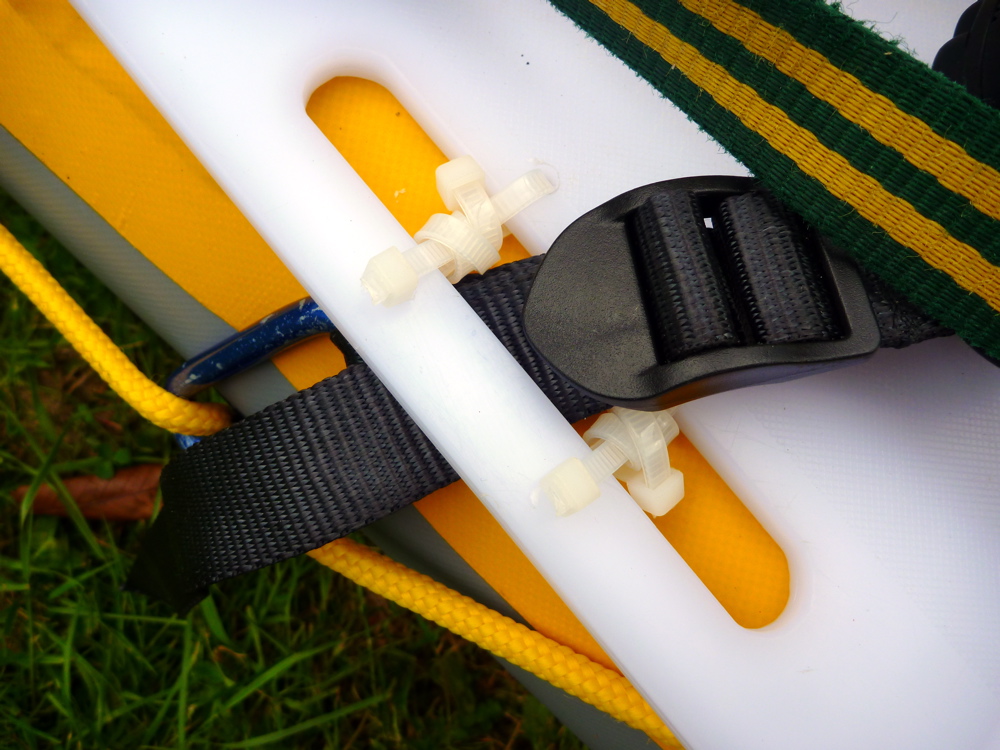
Back to the original mounting story set in Scotland in summer 2011. It all went together easily enough, until it became clear some fittings were missing from the pack which for some reason looked like it had done the rounds with a few previous customers. Most fittings were not needed for my IK, except the four ¾-inch self tappers with which you permanently fix the mast feet position in relation to your kayak’s deck angle and with the sail splayed. According to the instructions* and this picture I found on the web this is an ‘8g ¾-inch’ screw, but that seems way too long to have two from opposing sides – one alone would act more as a bolt than a self-tapper getting a bite, but that is what they recommend; the subtext is these screws are important to make a solid fixture. What’s not made clear (or is perhaps obvious) is that you ought to pre-drill guide holes deep into the plastic mast feet lugs for the screw can get right in there. Some hardshells will have a bevelled or convex foredeck which is why you must set the mast foot angle (MFA) specific to your boat for optimum operation. On my set up, the MFA is horizontal (flat) as I’m using a plastic chopping board idea as PA suggest to give the feet the all-important support and avoid wear on the PVC deck. The feet move around quite a lot under tension as you pull the sail this way and that but, as I found first time out, the angle of those feet against the mast (as well as the webbing tension) must be solid if the sail is to spring up and open or splay out.
The sail rolls down out of the way and doesn’t interfere with paddling, though it does mean yet more cordage hanging around; you could get in a right old muddle if you don’t keep on top of it. PA do advise paddling with a knife or a less pointy rope cutter. I have a quick-grab Benchmark one (left) attached to my PA.
It was gusting up to 40mph before the local weather station packed up, and at times the sea was covered in foam streaks and swell, so I went to a back loch for a spin. Typically by the time I’d crawled into a dry suit in case I fell out and got dragged along by the sail, the wind had just about died, but it gave me a chance to test it out in tame conditions. That evening my paddling speeds back into the wind were greater than anything I managed under sail, but I was getting the hang of it and even got the knack of running almost across the wind. The vid from that session isn’t worth uploading unless you’re having trouble sleeping; I hope to have another session when the wind returns and on a loch that’s longer to the wind. Lessons learned: need those self tappers to lock the feet, luckily the local store had some that may do the job. And I’ve since located that chopping board a bit better to the boat with some slots and zip ties until a better solution is required.
Rigging the sail-adjusting cleat Working out how to rig the control cord to alter the sail angle was actually rather simple once I put my mind to it. As mentioned, you get some small plastic cleats in the pack whose use is unclear. But digging around online for an alternative cleat (as other PA users tend to fit), I discovered what the PA comes with are very much like, if not exactly Clamcleat Line-Loks. Now I know what they are, their fitting and application is more clear. It’s not illustrated or explained in the PA instruction leaflet* I received; in fact I’d go as far as to say that the tiny yellow picture of the rigged Line-Lok in the PA leaflet is the wrong way round compared to what’s illustrated in the Clamcleat gif on the left. But even though (as I found) it does work crudely when rigged the wrong way round, I think I finally get it now. A Line-Loka nifty solution to tensioning a tent guy in the Arctic as the link shows, but as Clamcleat’s gif on the above right also illustrates, you need two hands to release it – not something that may be easily available in rough conditions while trying to grab your paddle and not spill your tea. But so far I’ve found in the light conditions I’ve been out in, one-handed works fine and if it’s a real panic you just pull the sail down in a jiffy. In fact, testing the correctly rigged locking cleat off a chair leg, it’s possible to achieve the release movement by spreading your fingers as long as it’s not too tightly jammed in the cleats, while adding tension (pulling the sail back/down) is certainly easy.
Having worked out how to string them up, the next question is where to attach them to the boat. By trial and error I found that cutting the supplied 4-5m line in half, rigging as above and then clipping the stainless steel clip to the K40 at the plastic lugs just behind the seat seems just right (left; it shares the left side lug with the rudder lifting line). Even though the Incept image with the red boat above seems to use the more forward points, fixed like this it puts the full sliding range of the locking cleat within arm’s reach while sat in the cockpit; or at least that’s how it looks on the lawn. I used the spring clips supplied to fix the control cord to the mast shackles, but at one point while sailing one unhooked itself from the shackle, so better to knot the cords securely to the shackle as PA recommend. To see how it sailed first time out, see this.
NB: A more recent set of fitting instructions were sent to me as a pdf from Pacific Action and are much clearer. As far as I could see it wasn’t to be found on their website.
I like to go barefoot so when I spotted Vibram’s FiveFinger ‘glove slippers’ a while back I thought they looked fun. Recently I took the plunge and selected the TrekSport model, thinking they were the most heavy-duty and hike-worthy of the range. The price is nuts, up to £100 or more in the UK, and as it is I’m still a bit shocked I actually paid $85 (£55) for these.
A BBC article shows how Vibram hit the jackpot when a bit of in-house experimental fun coincided with a barefoot running craze in the US. Sales went through the roof, and with success came the attack of the clones which the article describes. Outside of California, you might feel a bit silly going shopping in a pair of 5Fs, but it has to be said they do raise a smile, and where possible, less clumpy footwear is always better. I’ve read rave reviews about the improved feel and ‘back to nature’ ergonomics of 5Fs, allowing the wearer to reconnect their feet with the [mother] earth so as to run not unlike the virile, loin-clothed hero from the 1980s Countryman movie (brilliant reggae soundtrack, btw).
Out the box the TrekSports don’t exactly slip on like a pair of well-oiled Crocs. It took a lot of fiddling to get my smaller toes into the corresponding pockets. Once done, you tug on the velcro band to secure them round the ankle and step out. On the first walk, heading into Willow Gulch down in Escalante, the baking sand on a 105-degree day burned through to my feet, but at least the close fit stopped any of that sand getting in. Later on, in the shallow creek, they gripped reassuringly on all surfaces, even wet and slimy, and were certainly better than bare feet; the studded tread worked well. But for boulder-hopping they weren’t quite as secure as the Omniums, feeling a bit like the rubber-soled socks that they are. And after a couple of hours of wading some grit did get in which required a rinse out followed by a repetition of the tedious refitting dance. If there’s a knack to putting them on, I haven’t got it yet because next day up in the cooler Box Death Hollow forests, it took Five Minutes to get each Flipping Foot’s Five Fingers into Freakin’ Place. Tracking and crossing the rushing stream along the faint path for a few hours, the inevitable toe-stubbing plus head-on or side glances meant each time we crossed the stream I lingered a bit to let my throbbing toes numb a little in the cold water. I ended that walk deciding that while clearly not pretending to be a hiking boot, the many-toed TrekSports were too flimsy to be trekky after all.
The Emperor’s new shoes? And so we must ask the five thousand finger question: do individual toe pockets on slipper-like footwear give any actual advantages in comfort, agility and performance against a regular water shoe? Short of being a chimpanzee, I have to say not that I could tell. Had they been just a pair of snug-fitting, ten-dollar plimsoles or even a wetsuit ankle boot, they’d have worked as well on the trail and in the river. As it is, the thin soles transmit sharper rocks and maybe I’m clumsy, but in particular,the lack of toe protection bashed my toes as painfully as I recall back in my Teva open-sandal days. But that is for boatless creek wading. For something like a day paddle in my packraft, with its tight foot area for my size 11 feet, the Vibrams may have a use, being light and robust enough to deal with put-ins and portages. On cooler UK paddles where socks can’t be worn, they may not be warm enough.
And then you have to ask: how long will something this thin and stretchy last? About as long as some of my socks I suspect. I did also wonder if just two toe pockets – a ‘foot mitten’ – might satisfy the anatomical ergonomists who believe in the benefits of full toe articulation while making the shoe a whole lot easier to put on? It seems so with Vibram patent dodging 3T Barefoots from Bodyglove with three toe pockets. They seem to be pitched at SUP paddlers and not trekkers, but if I’d seen them earlier, I may have gone for them instead. I’m pleased to have tried the Fives but since sold them.
It’s worth remembering that you can’t wear socks (including drysuit socks) with such shoes, so for warm weather only.
Rounding it all up over the years and my packboating footwear has narrowed down to: Teva Omniums for light duty day paddles and Lowa Desert Elite boots for heavier tramping with loads.
Otherwise, this is what counts
No membrane
No mesh uppers, butatough,quick-drying fabric that can take the knocks and is salt water tolerant. Durability is more useful than the lightness and wet grip.
Good draining – particularly at the heel rather than the instep, as that’s how you drain a shoe when sitting down in a boat with your legs sticking out over the sides.
A thick, chunky sole, ideally from a boot not a trail shoe. One that offers solid support over rocky terrain and good grip in mud or wet grass. Custom insoles for comfort tuning can always be added later by the owner.
Proper laces. Forget velcro and cinch-cord locks – that’s for cag cuffs and stuff sacks. Laces may not be high-tech, but they’re field repairable and still the best way to get a shoe or boot to fit a varyingly sized human foot securely.
A wide fitting (for me).
Some provision to stop stones getting in and possibly wearing holes in a latex drysuit sock (though wearing socks over drysuit socks is probably a better solution).
And great build quality.
Until that distant day comes I’ll stick with my Teva Omniums (now on my second pair), even though they’re rather more for day-use than overnighting. Update here.
With an IK you hop in, paddle away and hop out. You’re not normally tramping for days carrying your gear. Even Neoprene booties will do, or just an old pair of trainers. Packrafting footwear (that is, trekking the moors and paddling the lochs, usually with a camping payload) requires an amphibious boot which will drain and dry quickly while giving you support on the trail.
Of course you can just use any old boot and let it get wet. But anything with a membrane (GoreTex) can take quite a while to dry. On my first ever overnight packraft trip I used Keen Arroyos (left) and paid the price. I made the mistake of putting water duties (drainage/easy drying) above ground support for trudging cross-country with an 18kg load. With the thin soles and feeble, slip-prone lacing Still used by Keen), I didn’t feel at all secure in the rough, and when I got to a long, road-walking stage the feet soon got sore. On any kind of rocky terrain or path they’d have been worse. Having said that, when my current Teva Omniums wear out, I may give the Keen Newport H2 a go. They’d drain a lot faster from the heel.
Keen Newport H2
I then adapted a pair of less flimsy Karrimor Meridian trail shoes (left)I got for 30 quid, by pushing draining holes through with a red-hot poker. Shame, as they have an eVent membrane, of which I hear good things. They weren’t a great full-on hiking shoe and under my 95kgs the sole got mushy and the tread offered little grip in steep or wet Scottish conditions, partly why I find a packstaff so useful. But they were better for loaded, rough-country walking than the Arroyos. And it has to be said they’re survived a regular sea-water soaking, rinsing, airing and drying pretty well for a pair of cheapies. Nothing came apart but it can’t be far off.
Brasher Lithiums (left) fitted me OK, had an usually stiff sole which also happen to make good MTB boots and they passed a test on the Fitzroy in Australia, although much of the time we were wading or even sinking in quicksands which were easier to get out of barefoot.
After a couple of nights I poked through drain holes (below) on the instep and above the heel so they drain as the feet point up in a boat. Back home on regular day walks the Brashers turned on me, rubbing blisters at the heel and then squishing the small toe as they were too narrow.
Another idea could be some Crocs. Remember the Croc Craze a few years ago? Their Swiftwater Mesh Deck Sandal (below) is an acquired look, like regular Crocs (left), but goes for under 40 quid on ebay and weighless than the Tevas. For something which gets squeezed out of a tube every few seconds in an Asian factory, with that mesh upper I’m no convinced they’ll last very long.
Impressions of some of the gear I used on the Suilven trip.
Packstaff™ Made of the two shaft sections of my Aqua Bound paddle and now with a metal- tipped ‘nib’ riveted to a piece of old Lendal. In the terrain I was tramping over, this is such a great walking aid. No need to expend energy balancing over tussocks and rocks with a pack on your back; take some of the strain off your legs and knees and just lean on the pole like a handrail, use it to probe a boggy patch that could be firm or knee deep; use it to vault over ditches, use it as a monopod to rest a camera on full zoom; use it as a tarp pole, tent peg – you name it, it will do it. Mine happens to be well balanced, just the right thickness to grip securely (warm, too), and because you can easily slide your hand up and down as a sleep slope requires, it’s much more useful than a pair of trekking poles with a moulded cork handle. And when you get to the water it converts into a paddle!
I’m now using it for all our mountain walks around here, and most of the time it’s much more useful than a burden. Of course it’s nothing more than a shoulder-high stick which any self-respecting medieval pilgrim would have used along the way, but mark my words, some time soon a packstaff will be re-invented and become the new must-have trekking accessoire obligé.
Kokatat Swift Dry Pants I’ve been looking for an alternative to my full-on drysuit for less lethal packrafting (as opposed to sea kayaking), and the Swifts look like the lower half of the solution – the top half is yet to be pinned down, but will a regular walking cag will do. I’ve only used them for half a day but I was not sweaty and they did not leak, but then I didn’t wade around up to my waist and was wearing the long SealSkinz over the top like riding boots. XL is my size which fits great, the waist is high and there’s a very handy thigh pocket – always useful on a packboat or open IK with no deck. I deliberately chose dry trousers with no sewn-in socks as my drysuit has those. With the Swifts in future I’ll just wear short Seal Skins and have no worries about the sewn-in socks getting holed by gravel. Time will tell how they wear and perform. They cost me around £100 from i-canoe in Ireland. Since then I glued on latex socks.
SealLine XL Mapcase Never had a mapcase but now I find it very useful on the water for the obvious reasons. Ortlieb does a roll-top; SealLine uses a ziploc which as you can see on the left, works fine. The size means you can have a large map area or other info on view and so don’t need to open it unnecessarily, and there’s a ring in each corner for attachment. Again, time will tell how it wears.
Seal Skin long socks I know, I look a bit of a knob wearing these in shorts. But the fact is these socks genuinely extend your wading ability while keeping your feet dry. The feet may get cold as you step into deep water and ‘feel’ wet, but that’s just foot sweat getting chilled – they soon warm up again. In the tent what to do with wet, muddy socks? Take them off and turn them inside out! No mess. They’re like a pair of ‘Wellington socks’ or mini waders. As I left for Suilven I realised I should have grabbed my knee-high gaiters too, mainly to protect my woolly wellies from the brush. Sure enough, at the end of the trip there were bits of twig knotted into the woolly fabric, which was all roughed up and scuffed. Next time I’ll know; wearing gaiters may reduce the prat-effect too. They cost about £30. Quite a lot for a pair of socks and tbh, I expect them to leak eventually.
Watershed UDB Hats off again to the UDB as a land and water submersible backpacking haul sack. No complaints, although I was only carrying 10-12 kilos. It just sits on your back like a coal sack and best of all you know it won’t take in any water and can act as a back-up buoyancy aid. More UDB here.
When I got back from this trip I was all set to give up on my Black Diamond Lighthouse (now called a HiLight) – a single-skinned tent using ‘Epic‘ ‘breathable’ fabric – I bet that’s now gone the way of Ventile from the 1970s. Reviews of the BD-L here – the lower rated ones reflect my feelings. It worked OK last year over two rainy nights, but as so often happens with Epic tents, it has its off nights which can mean a miserable experience: what you might put down to condensation (which is easily managed) is actually rain dripping off the top cross poles. If I’m to be doing more packboat touring in Scotland I’m going to need a waterproof tent. Using Todd Tex fabric, the famous Bibler Ahwahnee is exactly the same design as mine, but at double the price and double the weight (so what’s the point you wonder?). But it is actually waterproof. I spent hours on the you-know-what researching possible alternatives. Although outside the stuff can go under the upturned raft, I do miss a porch as well as external clip- or sleeve poleage for easier pitching without opening the tent in a downpour. I considered a 1.1kg Tarptent Cloudburst 2, or a Macpac Macrolight. Luckily I didn’t get as far as Terra Nova or Hilleberg websites before I figured there’s nothing that wrong with my tent that a splash of Fabsil proofing over the vulnerable flat-to-the-rain roof section might not cure. Plus the fact that back at the house, while it was drying, pegged out in the garden, a gust of wind picked it up, blew it over our house, over the road, over the store and into the field behind before it caught on a wire fence. It survived all that without a scratch as far as I can see, so I’ll give it another chance. The steep sides can’t let rain in anyway, and it really is such a light and compact shelter that’s roomy for one and OK for two, it dries in a shake, stands without pegs (I never use guys), and has a nice big door. If the Fabsil doesn’t do the trick or makes the condensation much worse, I may have to give up on the BD for packboating in Scotland and go double-skin. I do like the idea of a tent that pitches fly first and can be used just fly, or just inner. There must be tents like that. Or maybe I should get a Nemo Morpho airtent to go with my airboats… More on tents here.