Hypalon is a cool-sounding word and although not made anymore, has become a generic term for the similarly durable syntheticrubber-coated fabrics still in production, like Nordel and Nitrilon. Once upon a time all rafts and were made of hypalon, then less expensive Asian PVC came on the scene. More about IK fabrics.
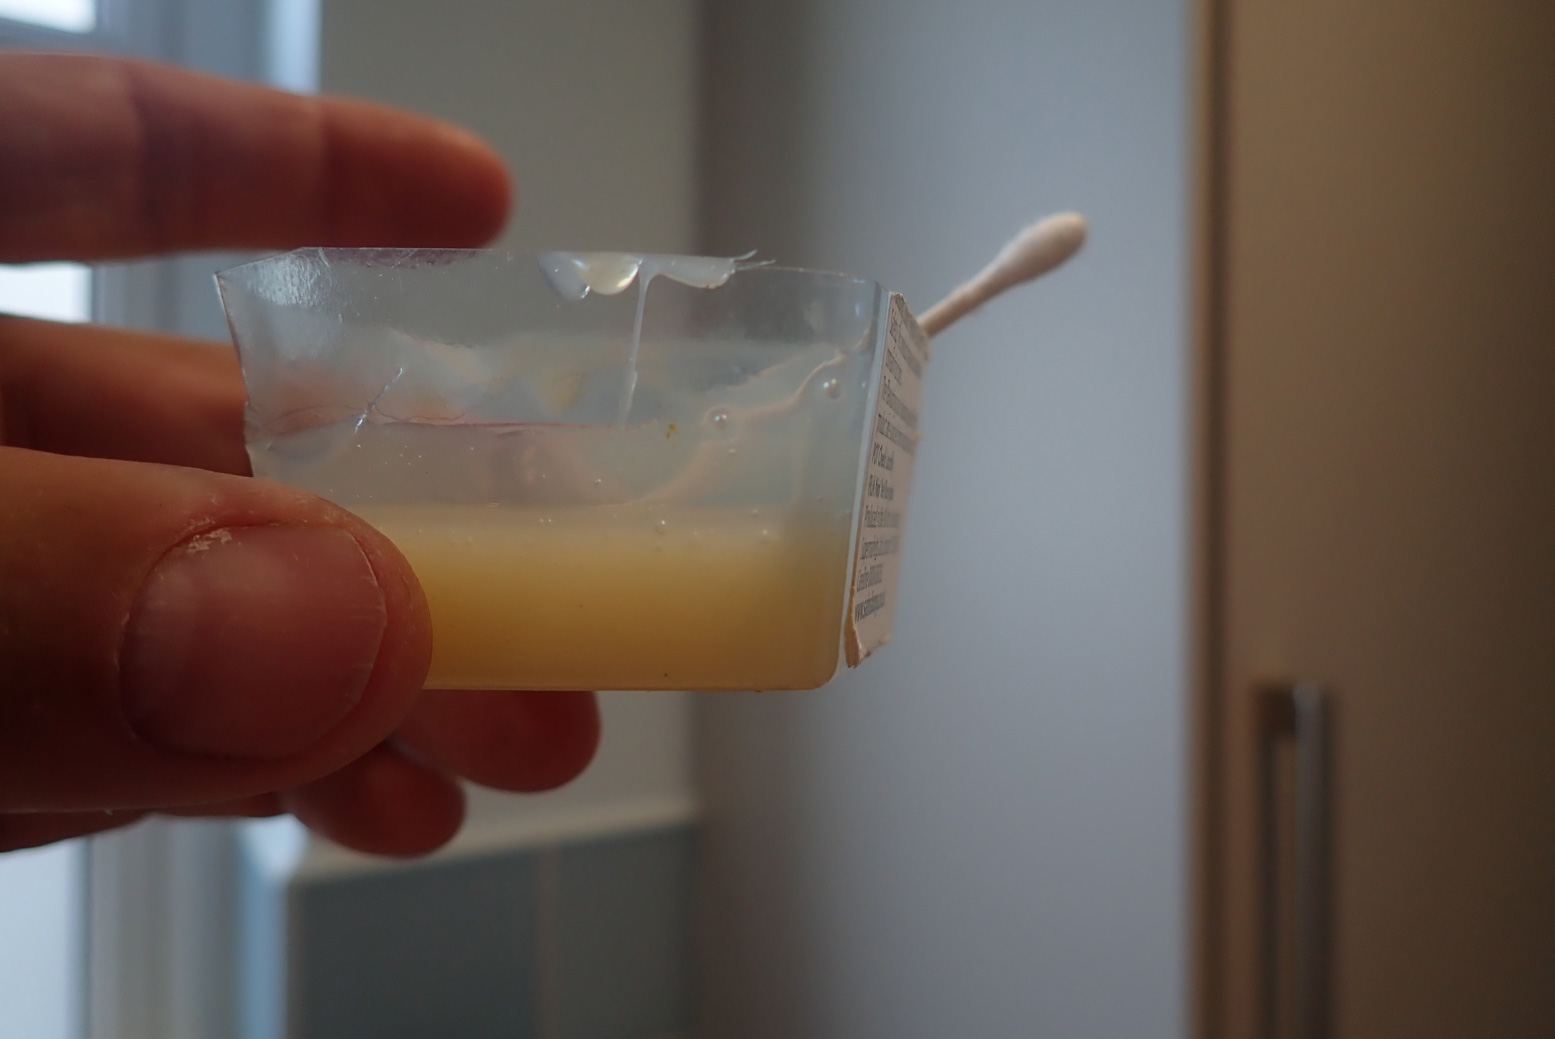
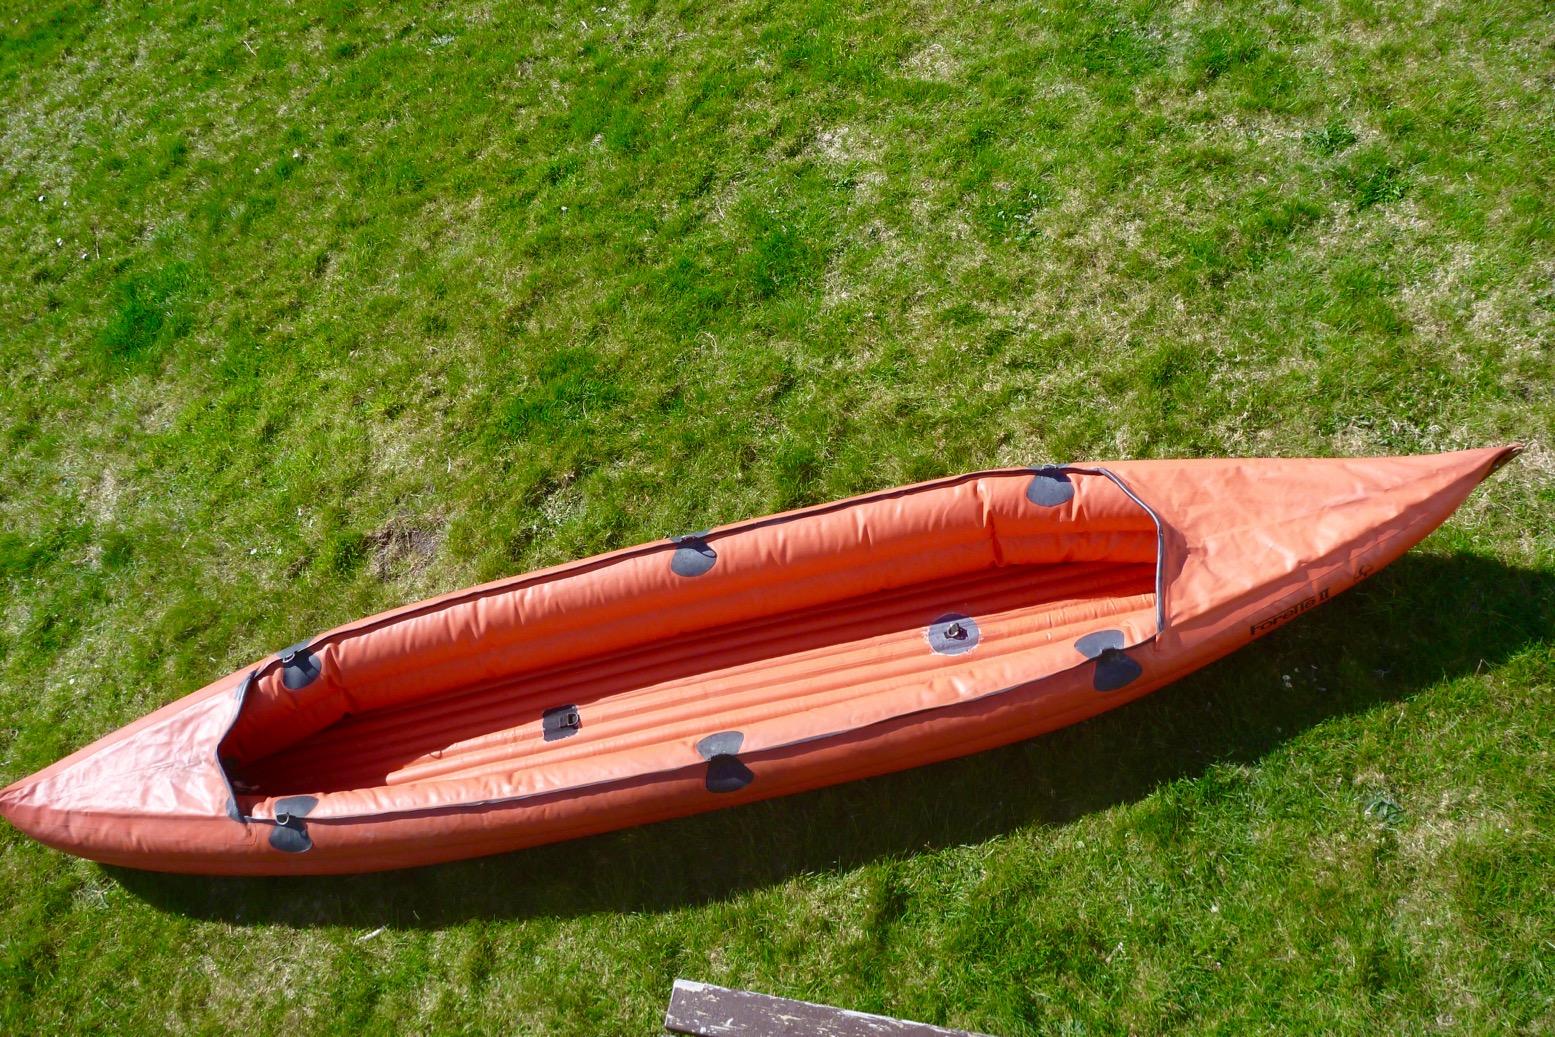
The other day, while lashing the Seawave to a chopped-down trolley, the bag sagged under its own weight and rubbed on the sharp edge of the hard plastic wheels which wore through the pack and then the boat’s hull (left) ;-((
The trolley had worked fine with my UDB drybag in New Zealand (below left), but that was partly because you can fully inflate a UDB via its one-way oral valve, transforming it from saggy sack to firm travel sausage.
Ironically, just two days before I damaged my Seawave I’d snagged a BNWT Orlieb RS140 (right) on ebay. I’d been eyeing up this non-rigid wheeler duffle for a while as a versatile Seawave transporter plus a reliable on-water drybag/buoyancy aid. With a bag like this, an IK or whatever you got can be transported easily across any wheelable terrain, or carried as a holdall or on its backpack straps if you’re strong enough.
With enough practice applying D-rings, let along bike and moto punctures over the decades, I was confident I could do a bomb-proof repair on my Nitrilon Seawave. In a way, I was even a little chuffed that my 5-year old IK was earning its first battle scars. Plus, in my experience rubber-based IKs like Gumotex, NRS and Grabner glue more reliably than PVC boats. Shiny packraft TPU is even easier: you can just tape it, but packrafts are low-psi boats not normally inflated with mechanical pumps. My adapted Seawave side tubes run 4 or 5 psi.
Things you will need
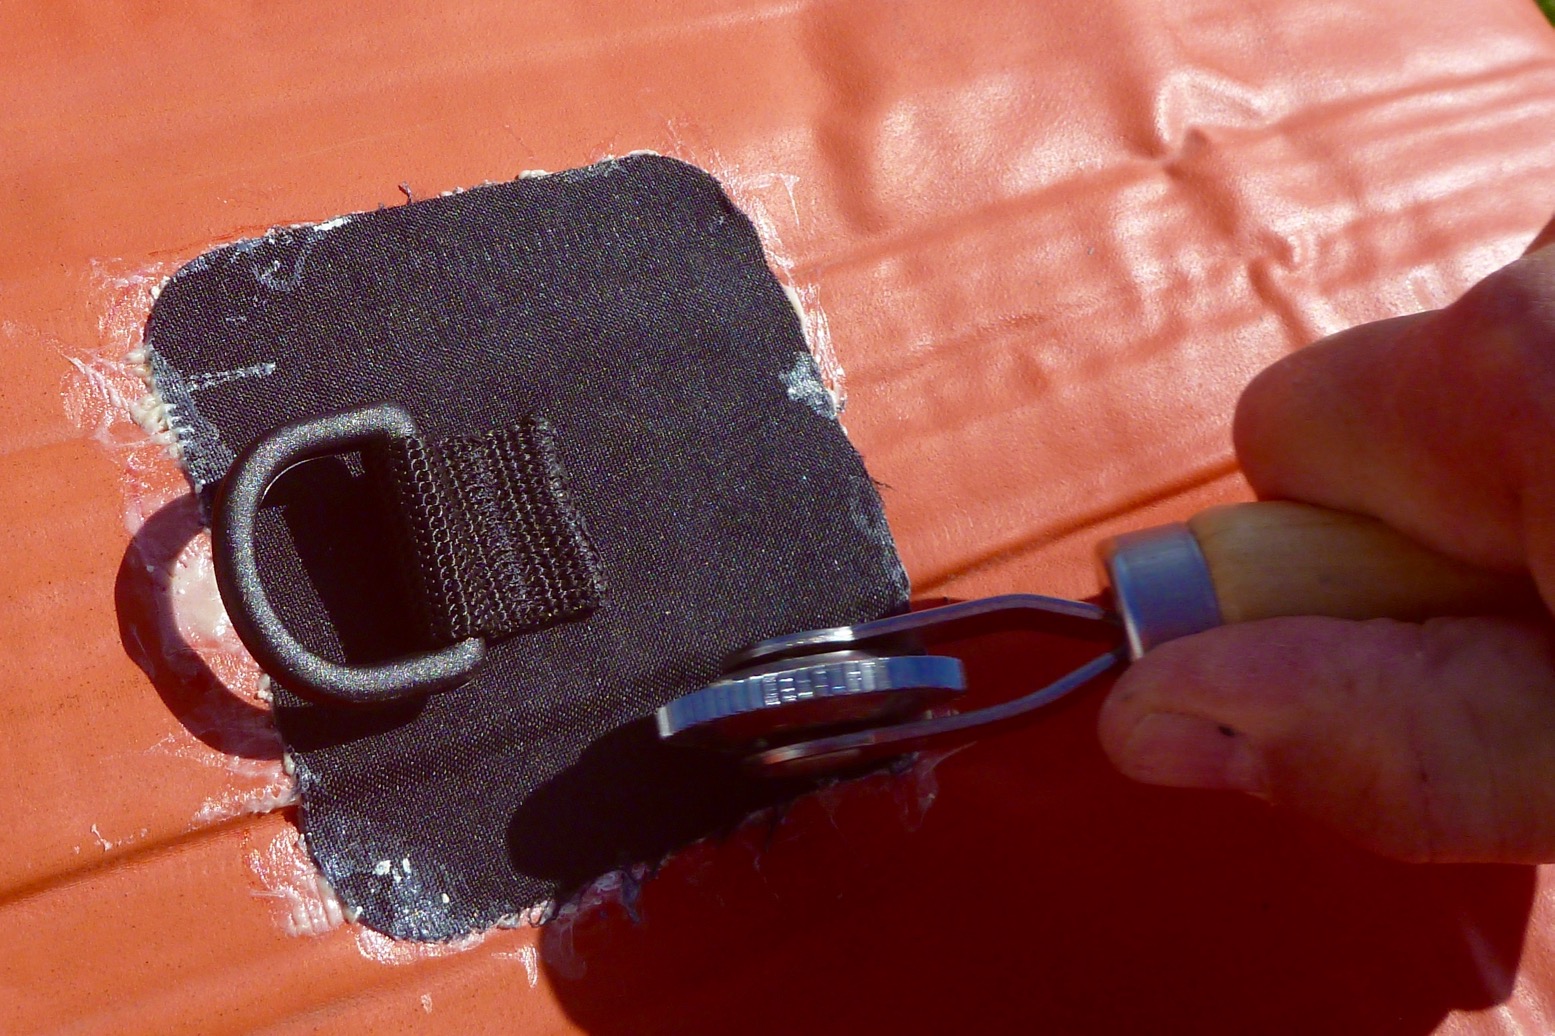
Patch The right two-part glue (below left) Solvent (MEK, Toluene) and rag Sandpaper or abrasive foam sanding block (note: Toluene eats foam plastic sanding blocks) Masking tape Small brush or wipe-stick Tyre repair roller (right) Well ventilated space to do a good job
Two-part glue. It’s a faff, but worth it
Tyre roller – a great tool for secure bonding
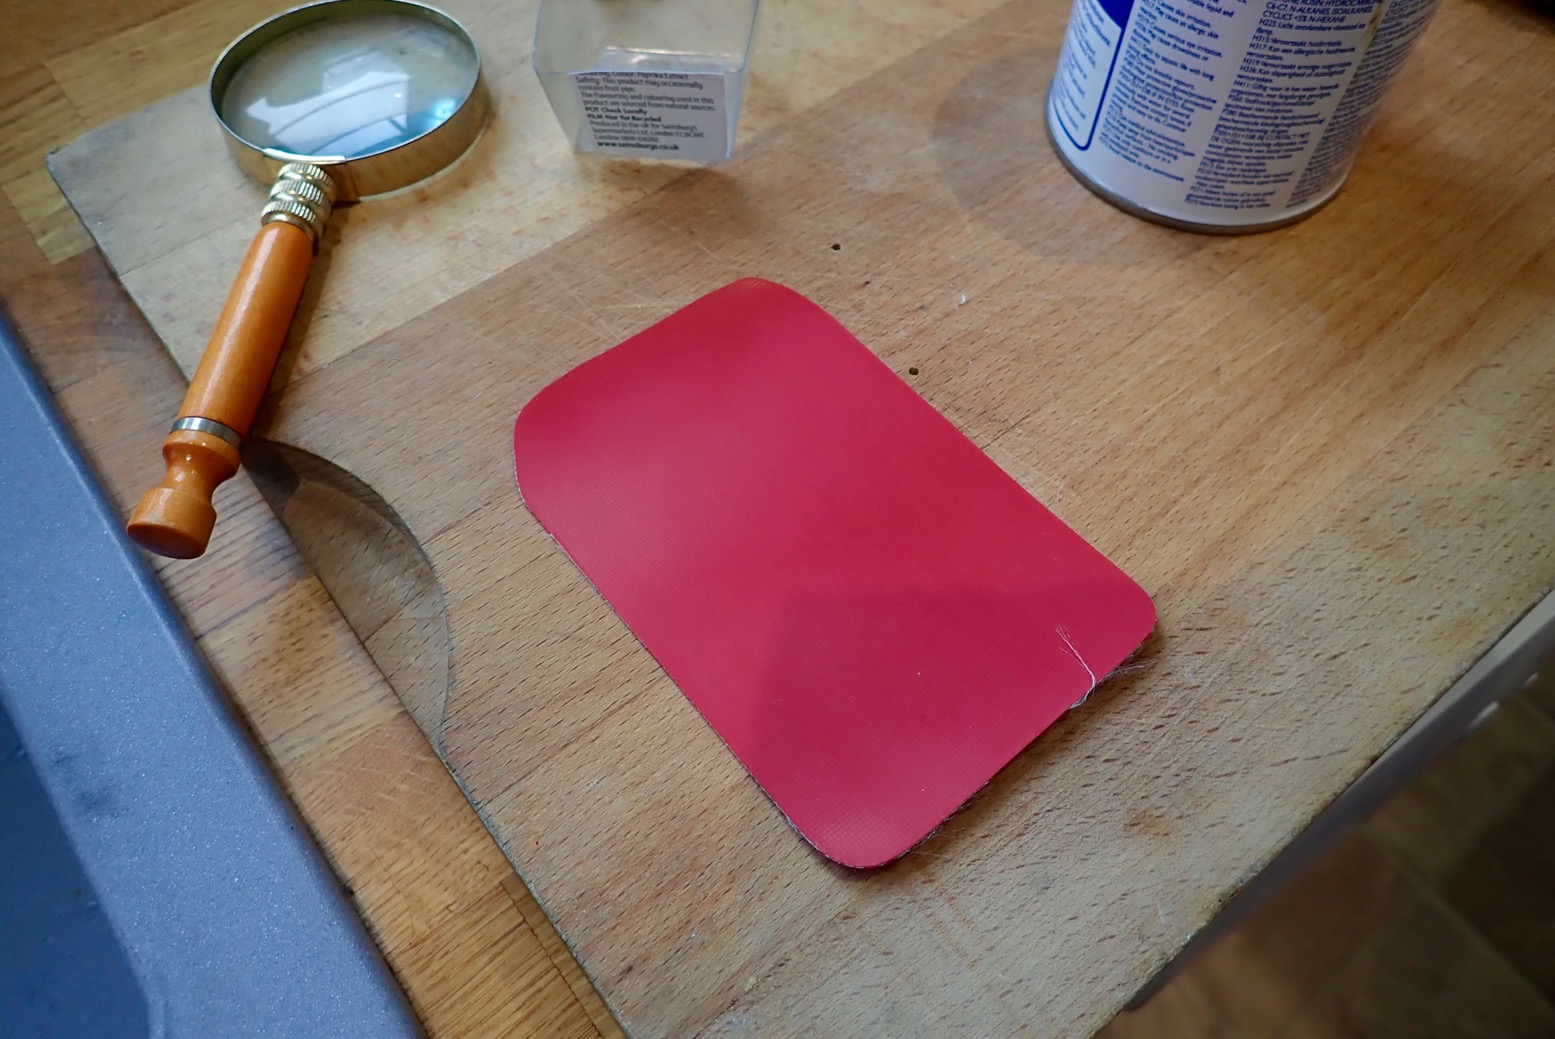
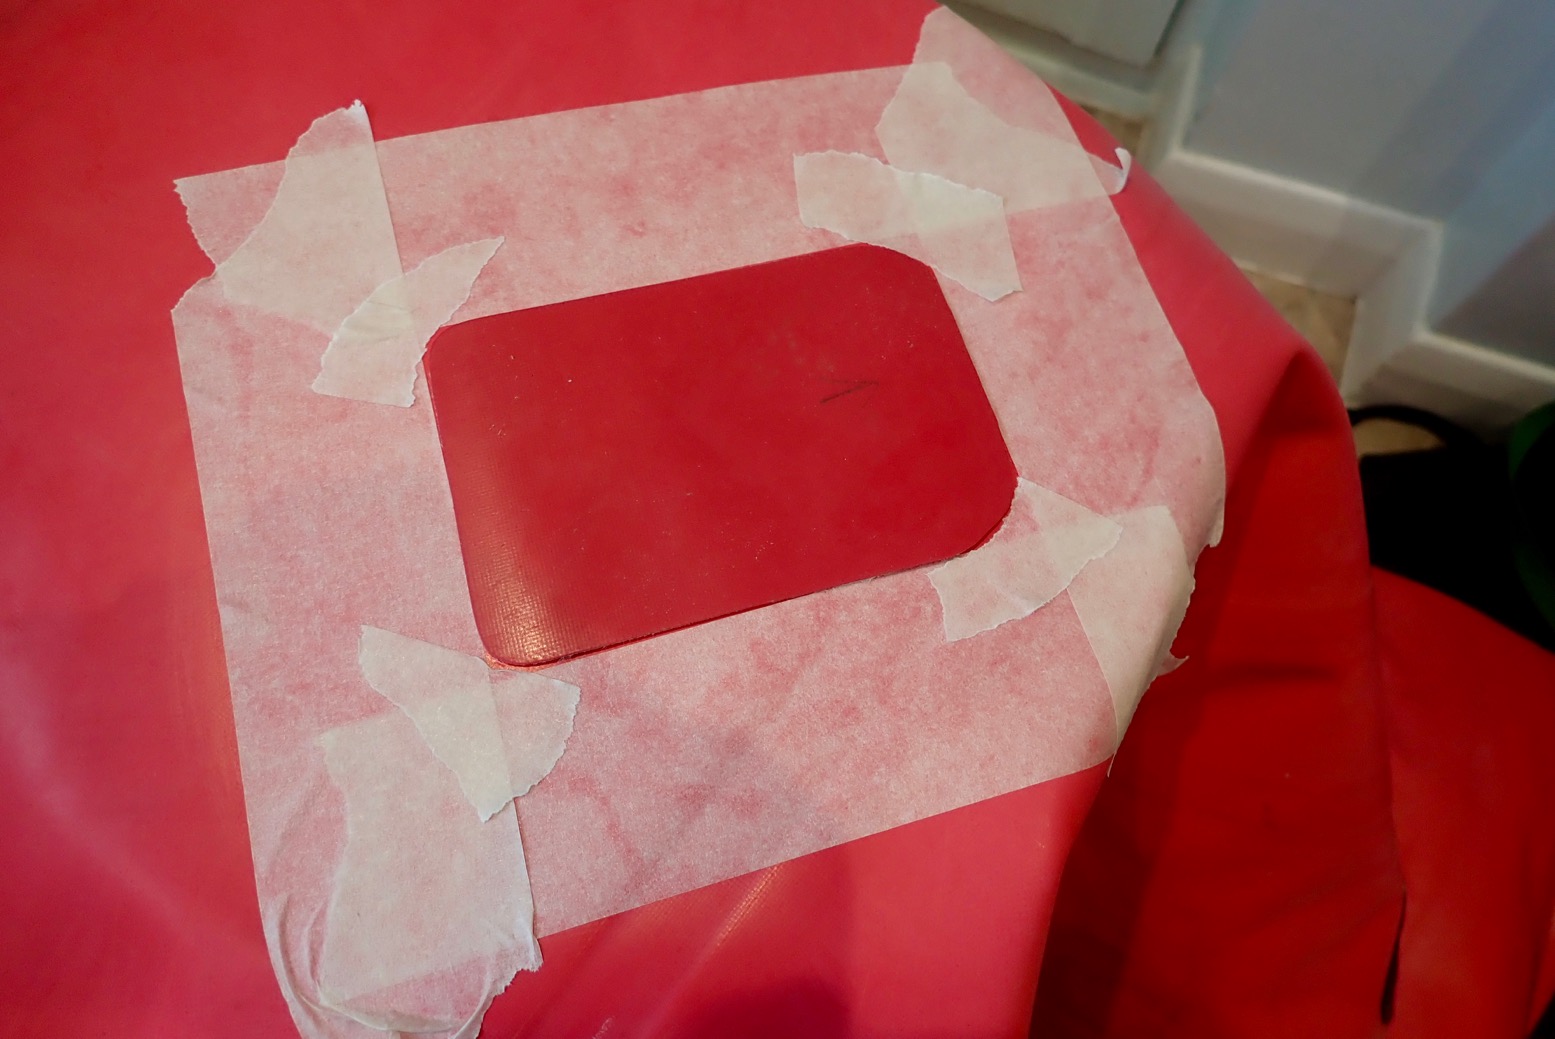
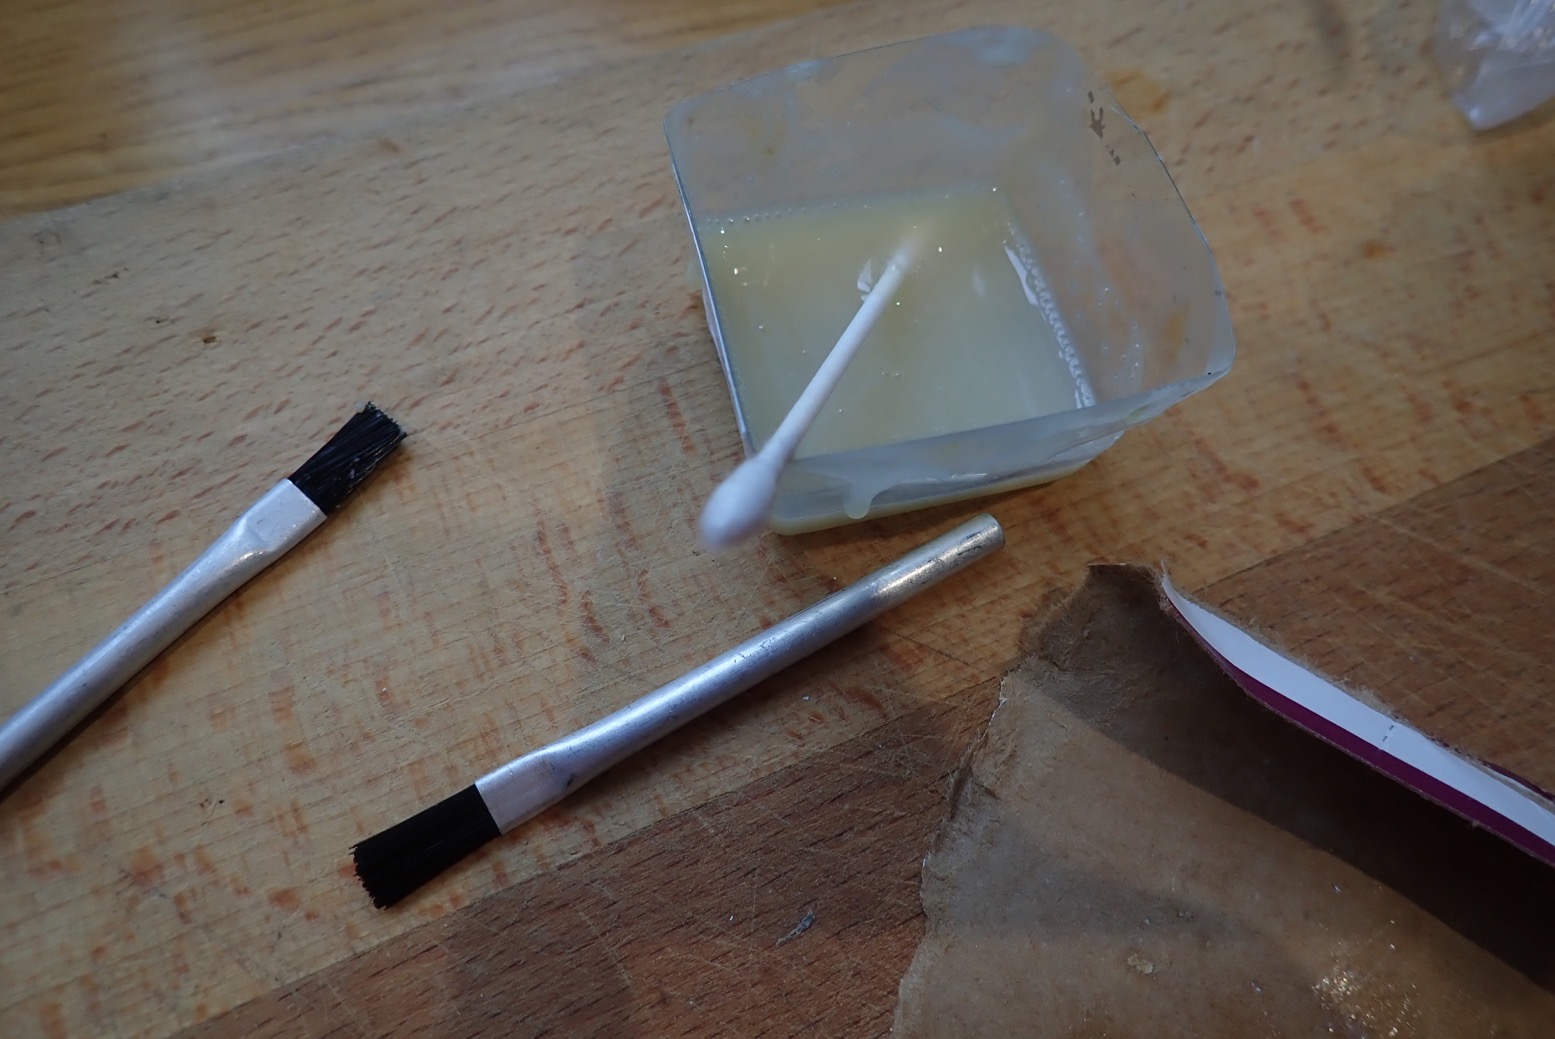
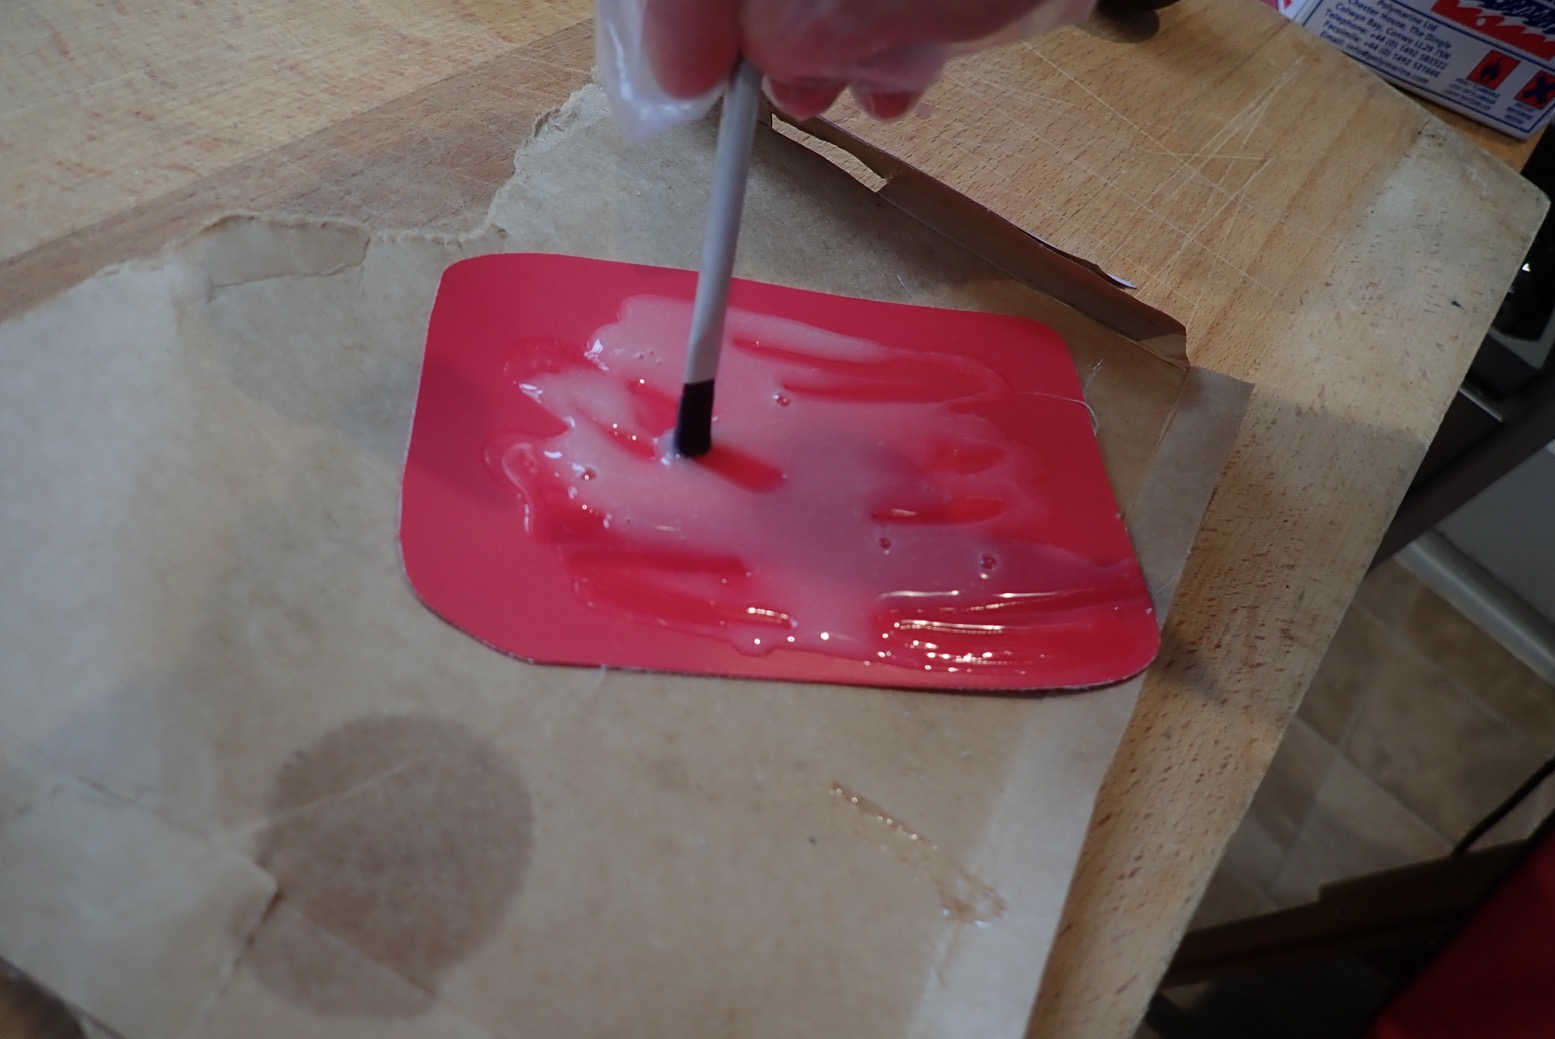
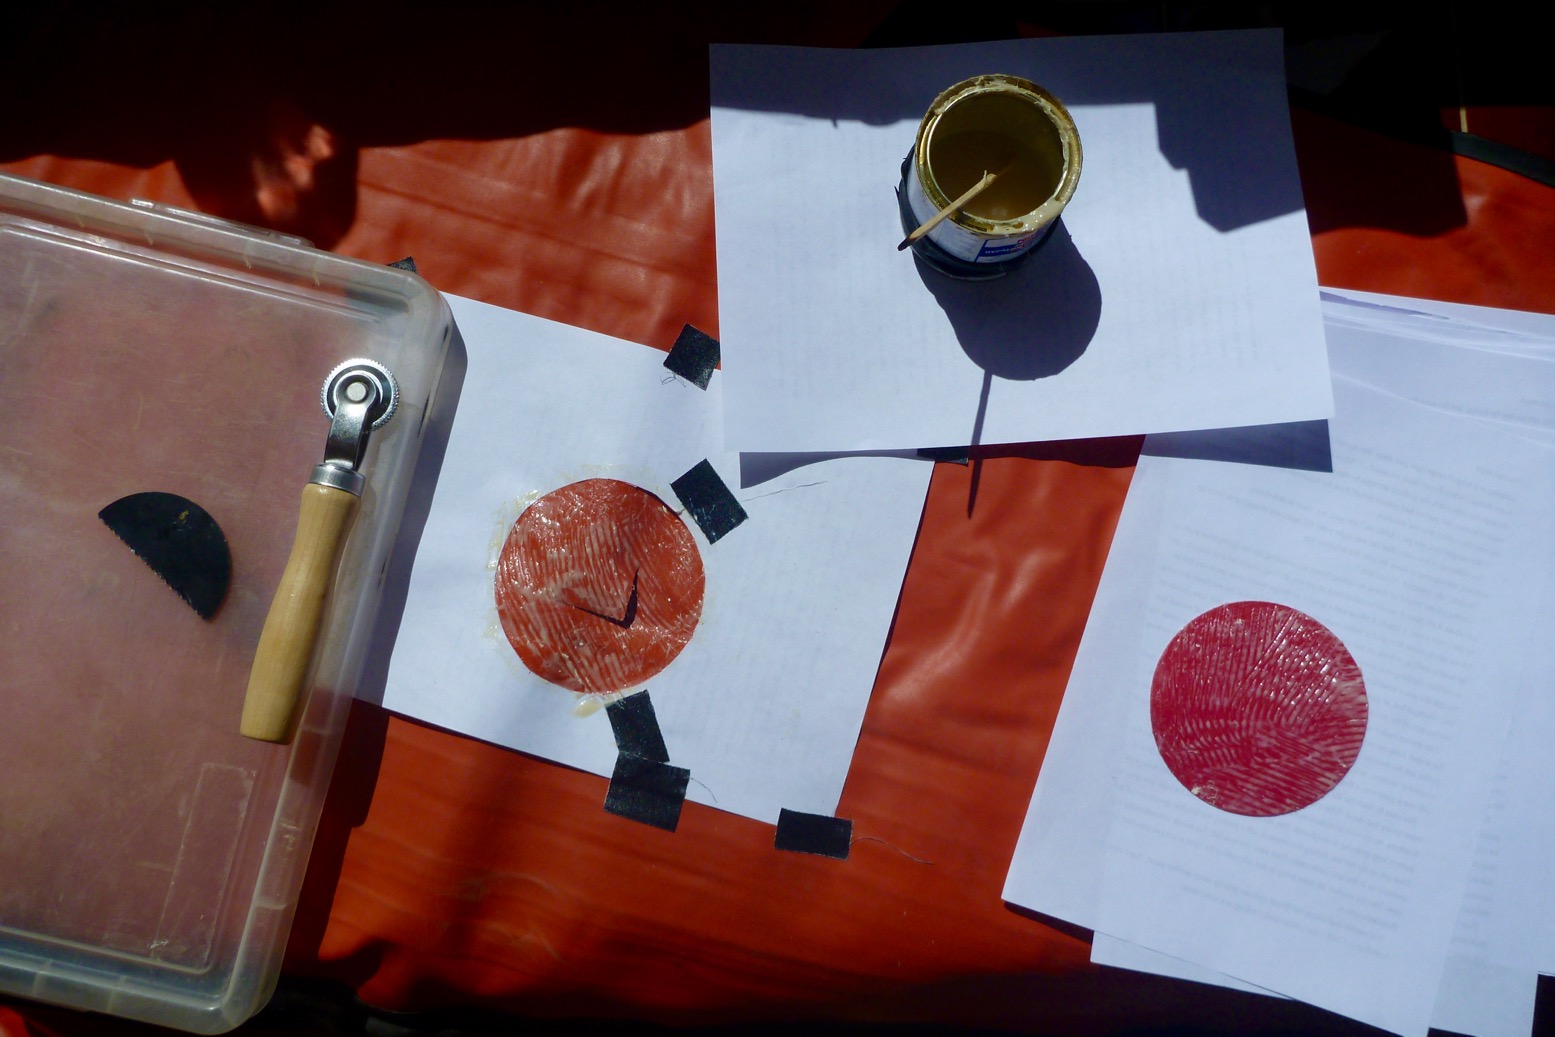
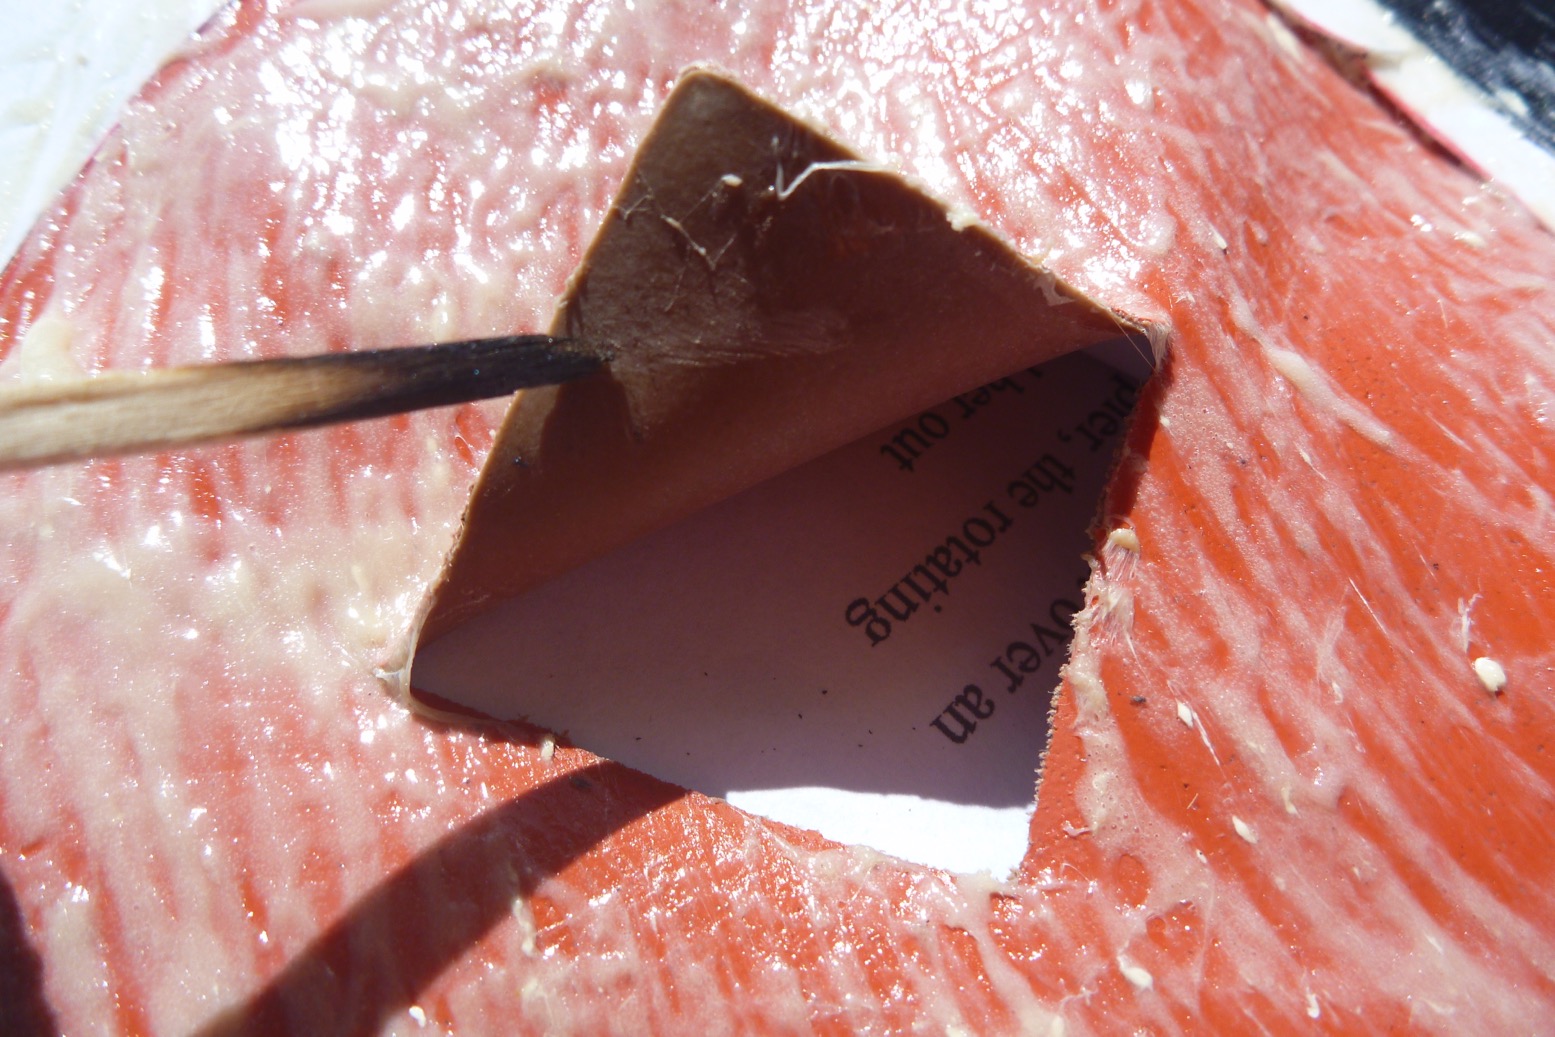
STEP 1 • Match up a patch from your collection, ideally identical fabric. For a small hole extend the patch at least an inch.STEP 2 • Clean the punctured area and patch surface with solvent and wipe dry. This time all I had was brake cleaner spray, but ordered some toluene for next time.STEP 3 • Sand down the two surfaces and then clean and wipe again with solvent. Avoid touching these cleaned surfaces with your fingers.Some colour coming off is a good sign you’ve removed any sheen or patina.STEP 4 • Position the unglued patch and mask the perimeter with tape to avoid excess residue and to help with positioning. If the patch is not perfectly symmetrical (like above) mark it – but make it bold – I still got it wrong!STEP 5 • Mix up some two-part Hypalon (Nitrilon; EDPM) glue. It’s rare than one-part glue works as well, but Aquaseal has worked for me, gluing a skeg-patch to a Grabner.I found some mini brushlettes in my repair kit box – they must have come free with some glue.STEP 6 • Brush on the glue thinly to the two surfaces. With Polymarine you then to wait 30 mins for it to cure/dry, then apply another coat and wait till touch dry (5-10 mins). Here’s their full guide: http://www.polymarine.com/advice/hypalon-adhesive-how-to-repair-inflatable-boat-tubesYou can see I made typical errors: mixed up too much glue (but better too much than not enough)…… and applied too much glue on the patch…… but a just-right thin later on the hull.STEP 7 • With the deflated boat repair positioned on a firm surface like a hard floor or better still, draped over a wooden stool, carefully lay the glued patch over the damaged area…… then – STEP 8 • peel off the masking tape and ROLL DOWN HARD moving from one edge to the other and again at 90° and again diagonally with your Baltic pine-handled roller, making sure the edges have stuck down. It won’t hurt to roll again in 20 minutes and again after an hour to make sure the two parts have well and truly bonded till death do them part. And actually, only about 25% of the glue was wasted.In 12 hours the repair is cured and ought to last the life of the boat. Never do that trolley thing again!
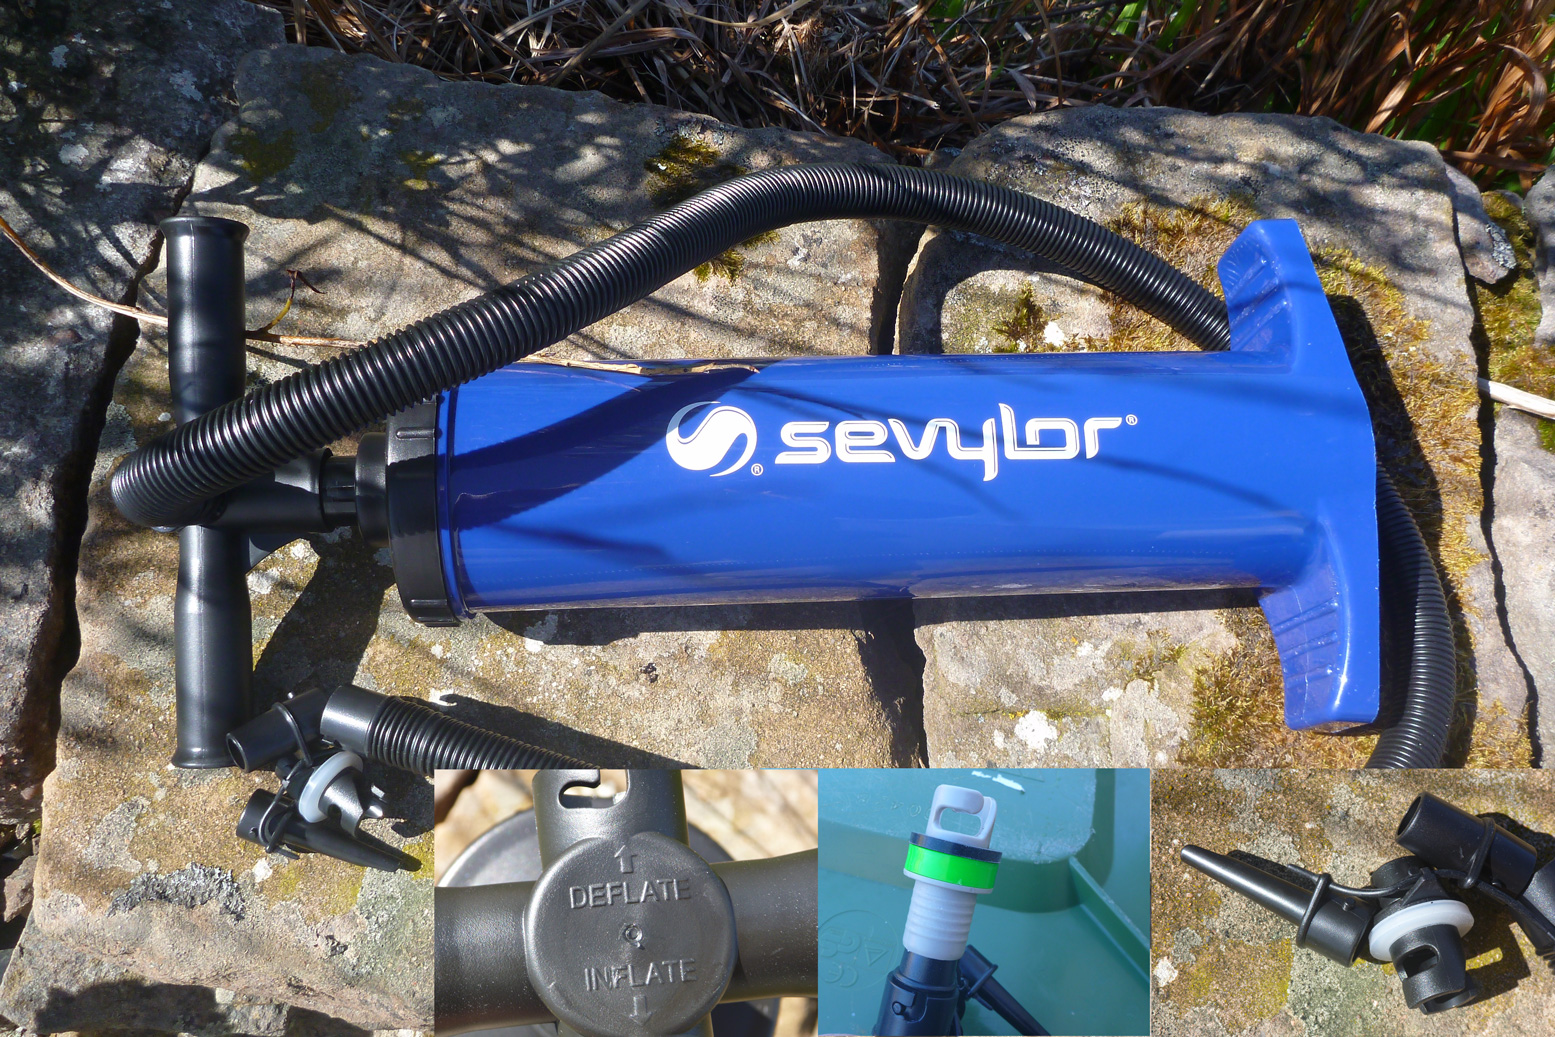
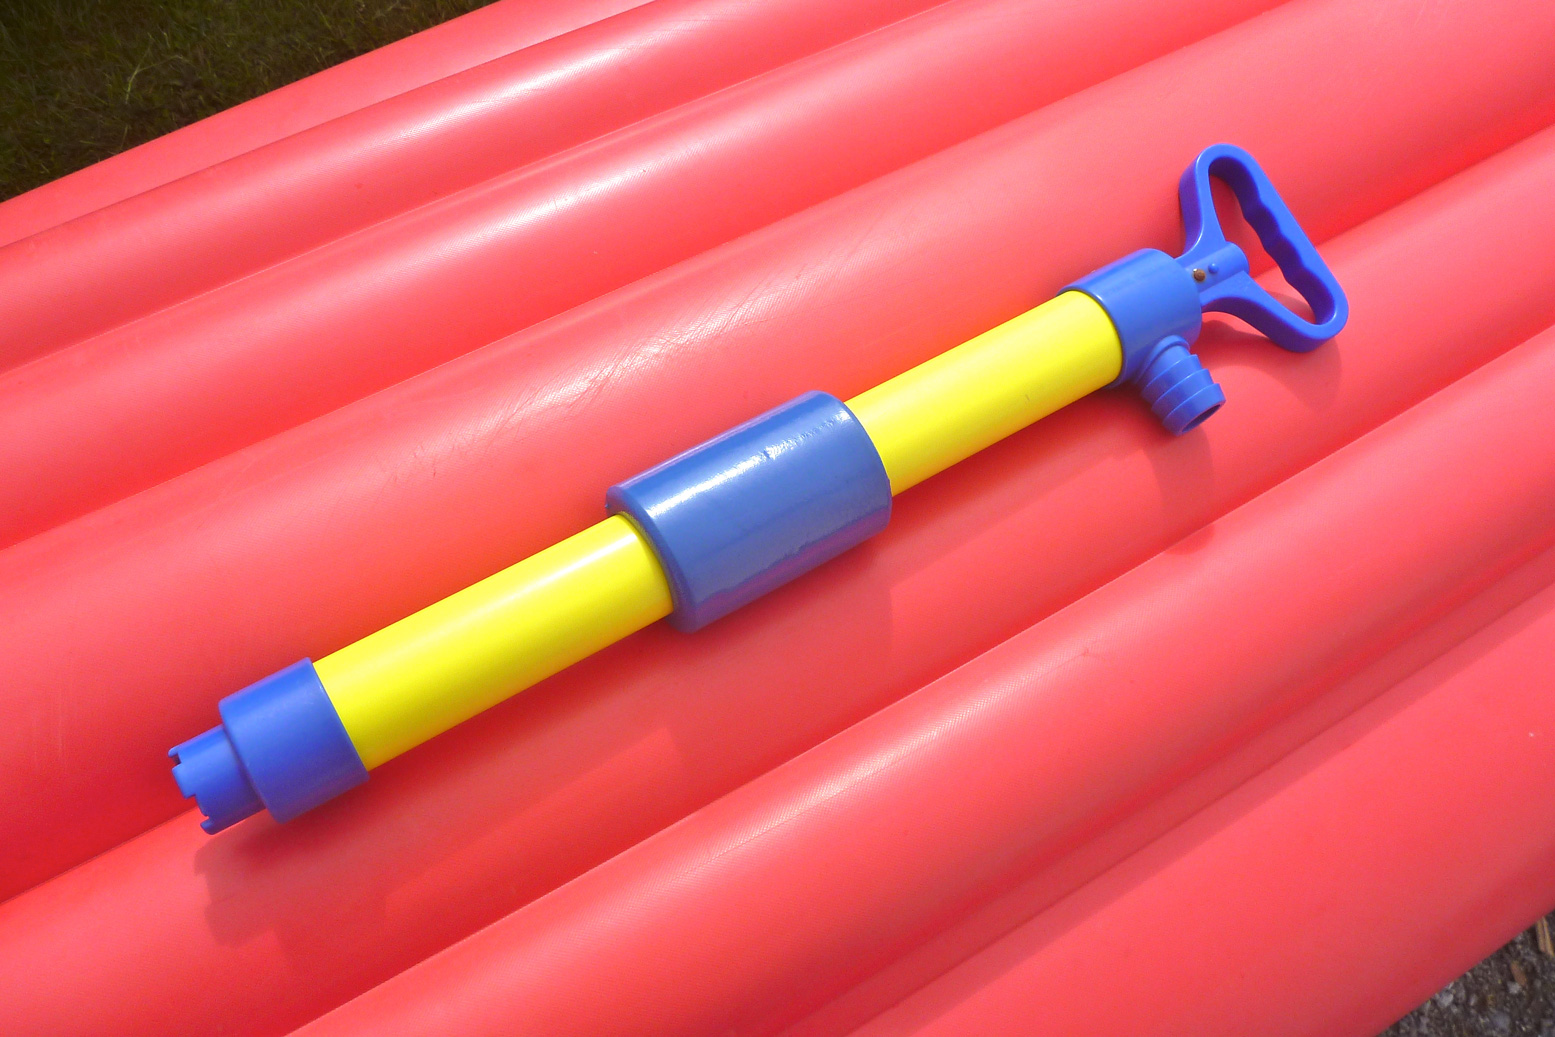
Your inflatable packboat needs a pump to take form as well as to top-up once on the water. These functions may be best performed by two different pumps. The folding bellowsfootpump (left) is history and even low-pressure IKs now come with some sort of hard plastic barrel pump. Some pump on both up and down strokes to fill your boat faster, but as you reach higher pressures they automatically or manually switch to downstroke-only inflation to reduce the effort. They work best on flat, firm ground where you can stand on the stirrup plates and get stuck in. The excellent Bravo 4 RED Kite pump below (newer ones are blue) is still well under £20 and will pump up an IK in 5 minutes.
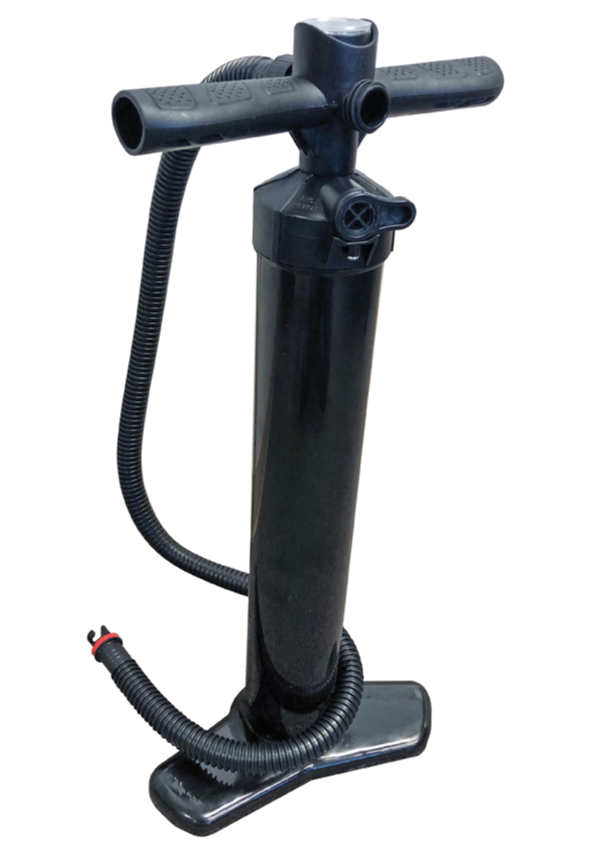
I got a Bravo 6 with my Seawave once but found it hard work – who knows why. The cheaper Bravo 4 does claim to be an ‘R.E.D’ (‘reduced effort device’) and I can confirm this isn’t some gimmicky acronym. The other port on the Bravo’s handle can be used to suck air from an IK so it rolls up good and flat; you can see creases forming in the hull as you suck it down. I left my Bravo 4 RED at home one time so bought a Sevylor RB2500G barrel pump (below left) for a tenner. Same size as the Bravo barrels, it did OK for the awkward topping-up of my Semperit’s lilo plugs and came with others adaptors plud sucked as well as pumped. But pumping up my Seawave from flat was exhausting towards the end: I actually got out of breath and had to rest! Morale of this fascinating anecdote: get a Bravo 4 RED and the right adaptor for your boat. Not all barrels have a built-in pressure gauge which is obviously dead handy in getting the right pressure without needing to faff about with a separate manometer (see below). It’s worth an extra tenner to get a built-in gauge, especially with DS boats.
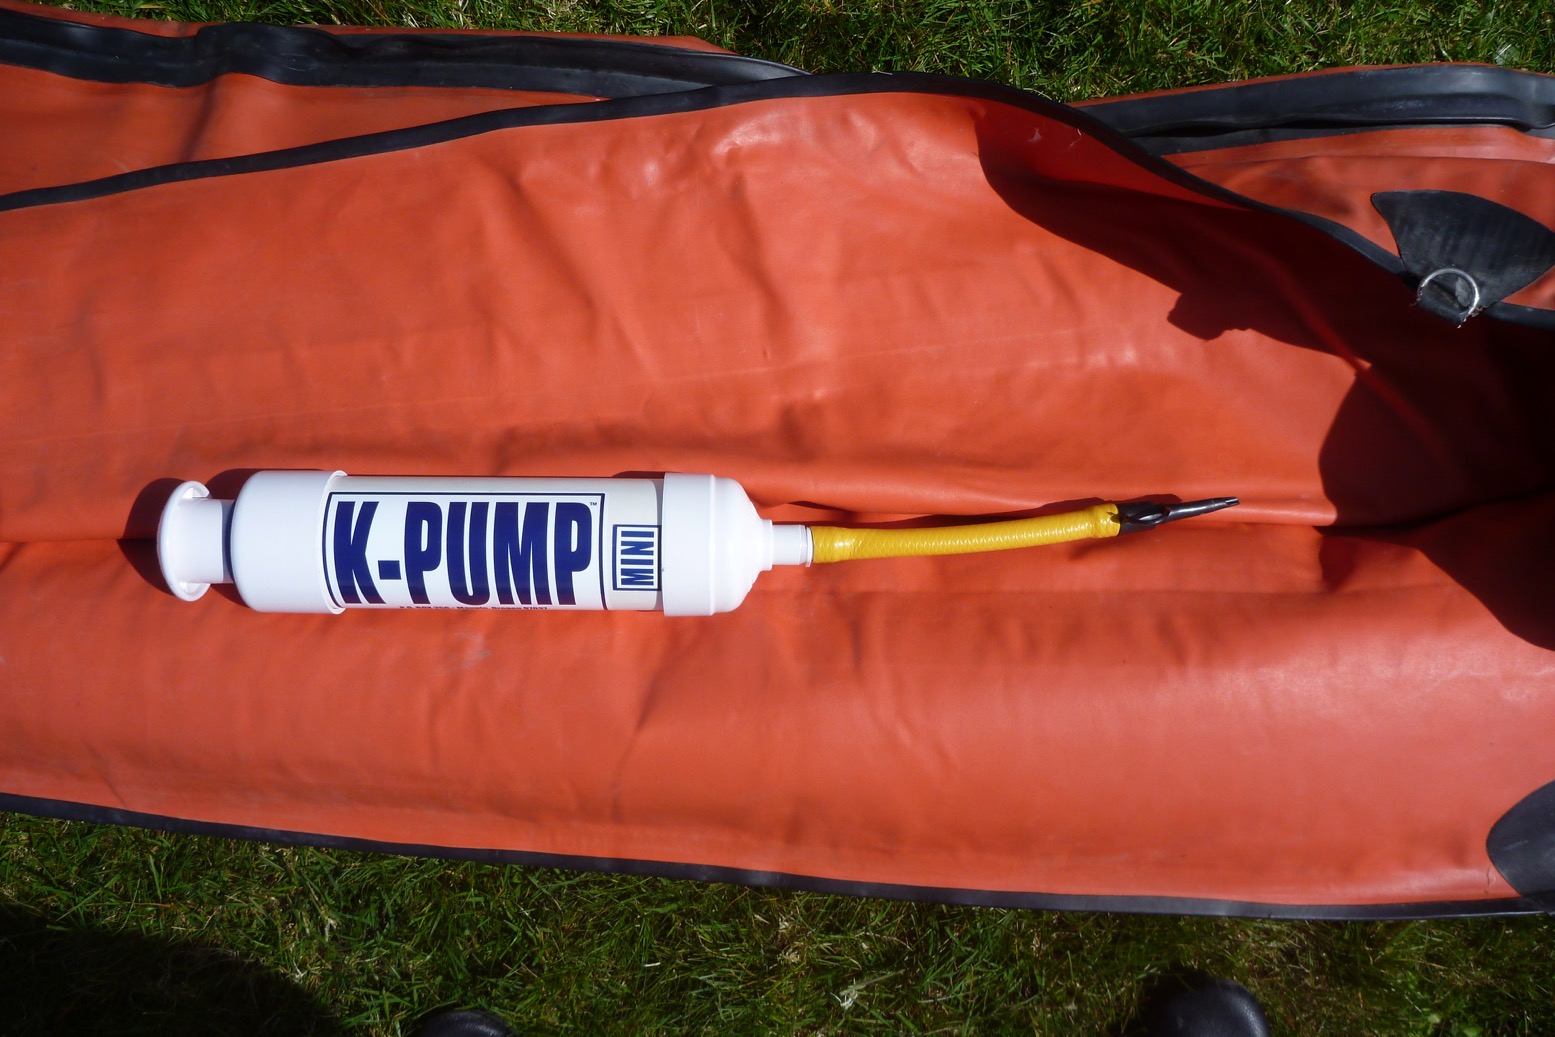
Cheapo Sevy barrel – tiringHandy K-Pump Mini for topping up on the water
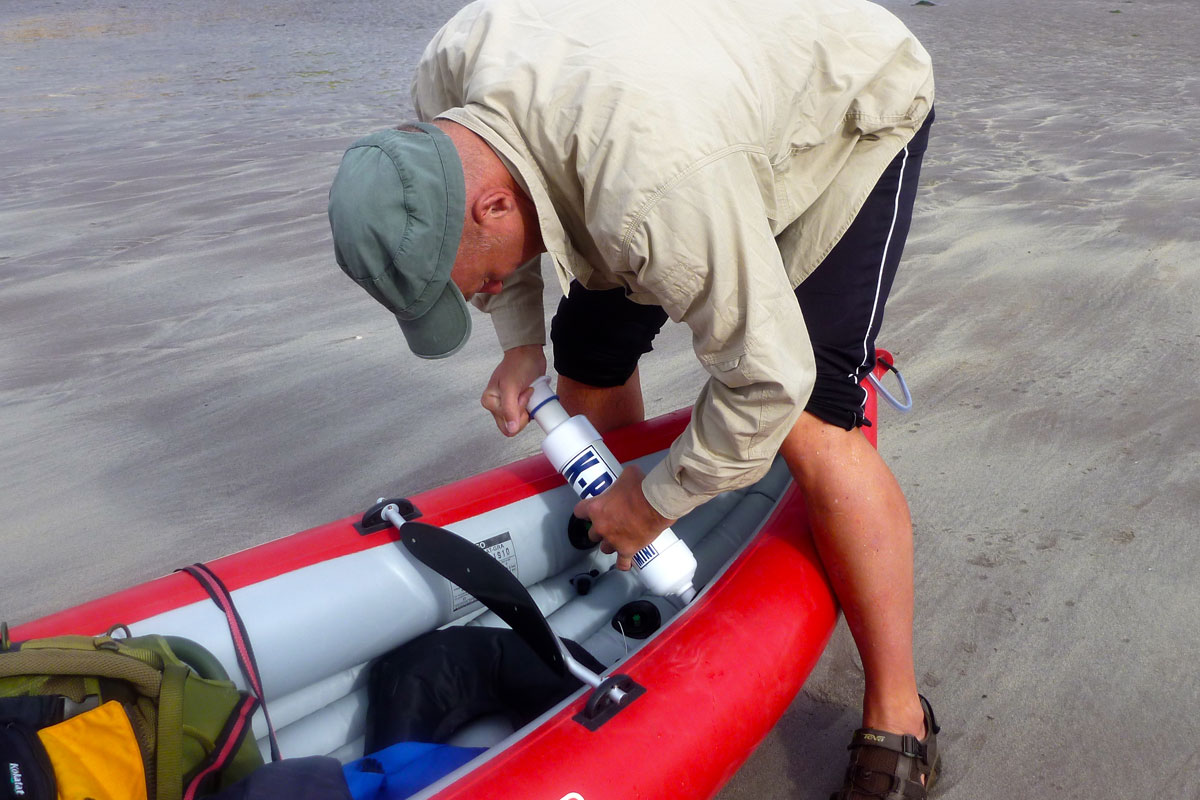
The K-Pump Mini (above right) is a handy top-up pump or compact 600-g travel pump. It took 15 minutes to fully inflate up my 14-foot Seawave; the push-fit nozzle works on any IK with one-way spring valves. You have to press and hold the nozzle against the valve. Using it a lot one time, I got the feeling it might break something or wear out the seal (which needs regreasing once in a while). I’ve also used the K-Pump to top up my Nomad S1 packraft which was too big and long to inflate firmly with just its airbag. Fuller review of the K-Pump Mini here. They’re hard to find in the UK, the very long, and slim US-made K-Pump 200 (right) may also be suited to higher-pressure dropstitch applications.
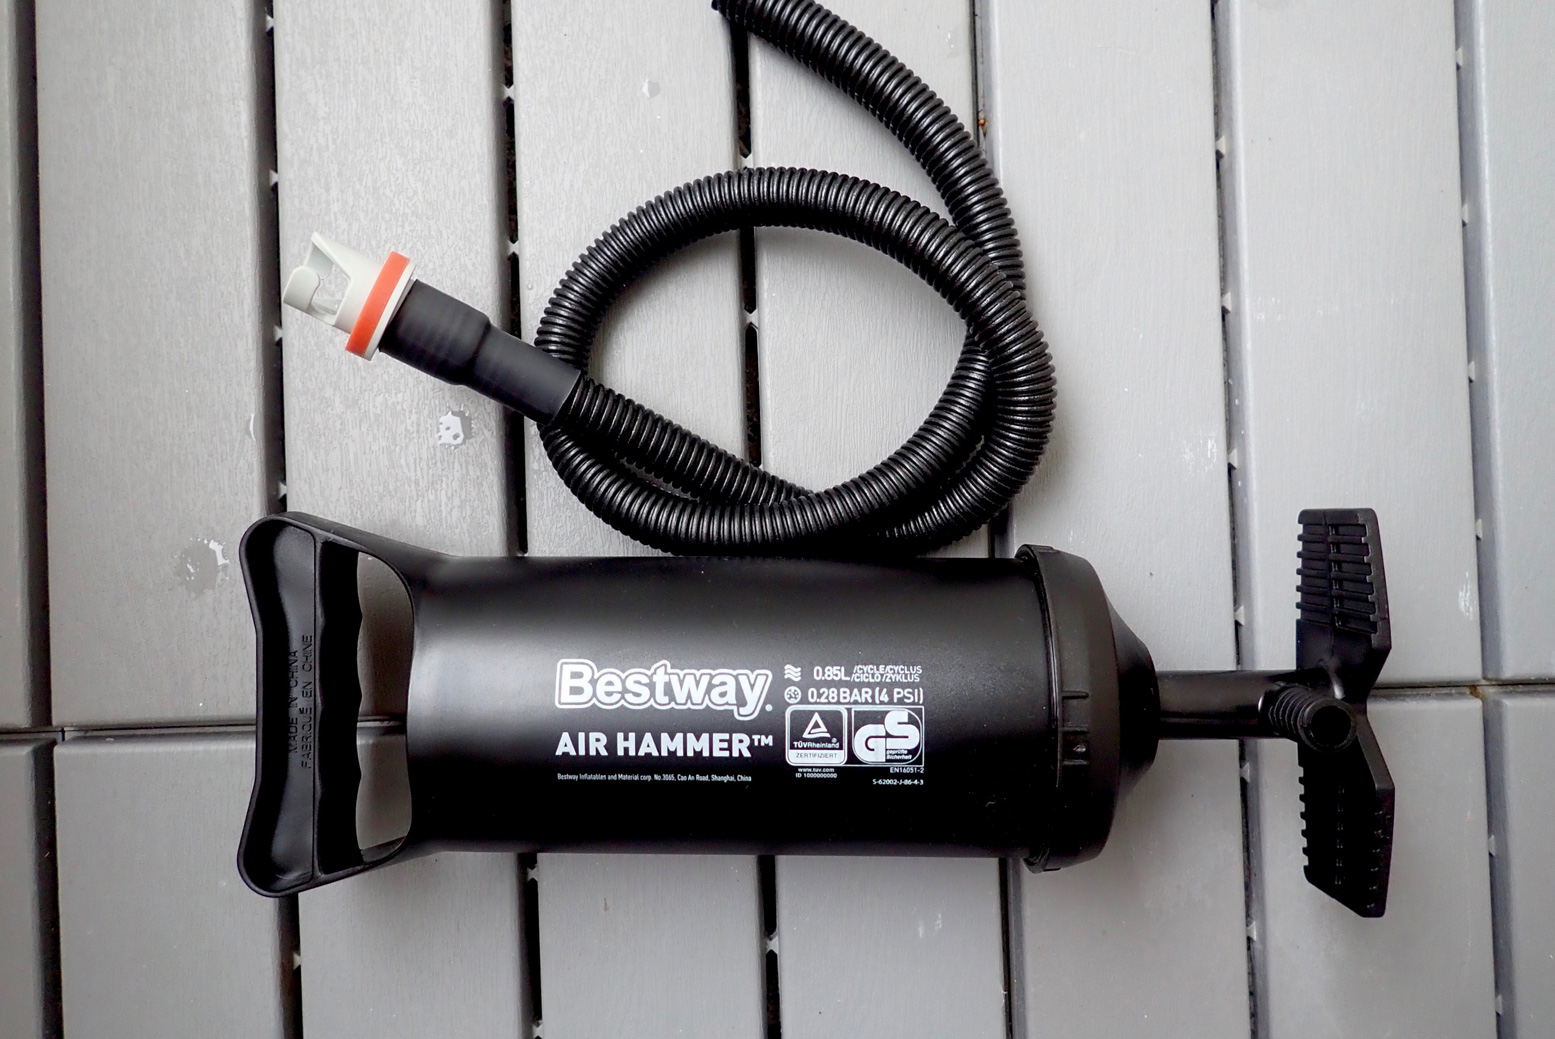
Left, the Bestway Air Hammer is an ‘upside-down’ barrel pump which comes in three sizes and costs from just £6 on eBay. If you don’t want to paddle with your full-size barrel pump, the smallest Air Hammer could work as a compact top-up pump like the K-Pump, but a tenth of the price. The one on the left came with a ROBfin and was rated at 4psi.
High-pressure pumps
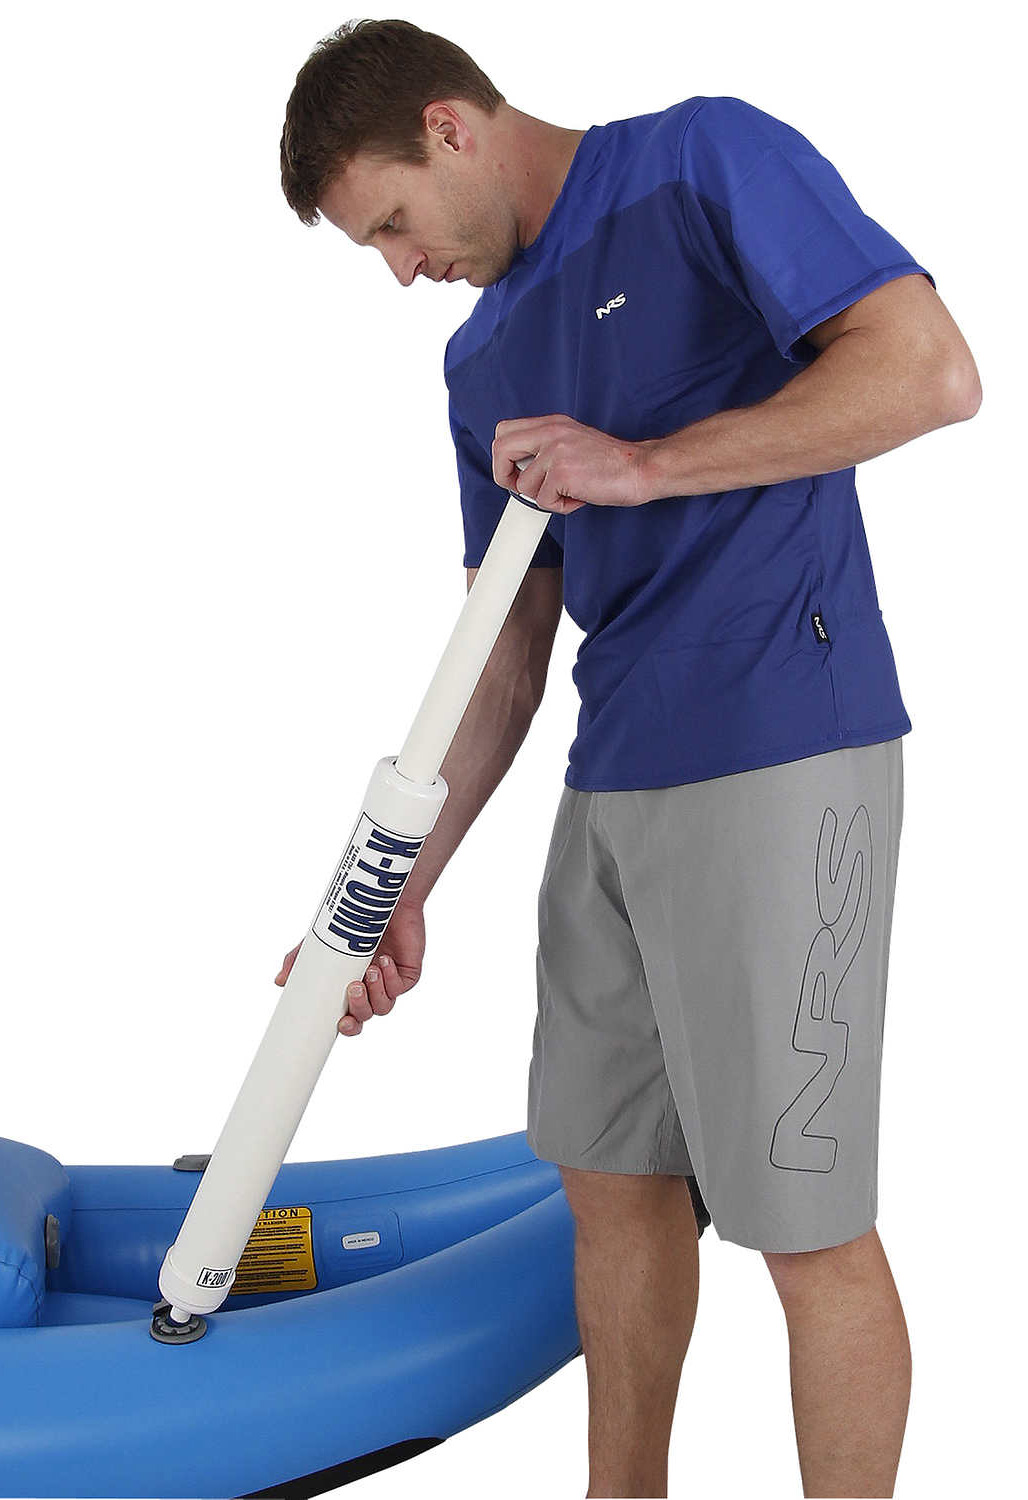
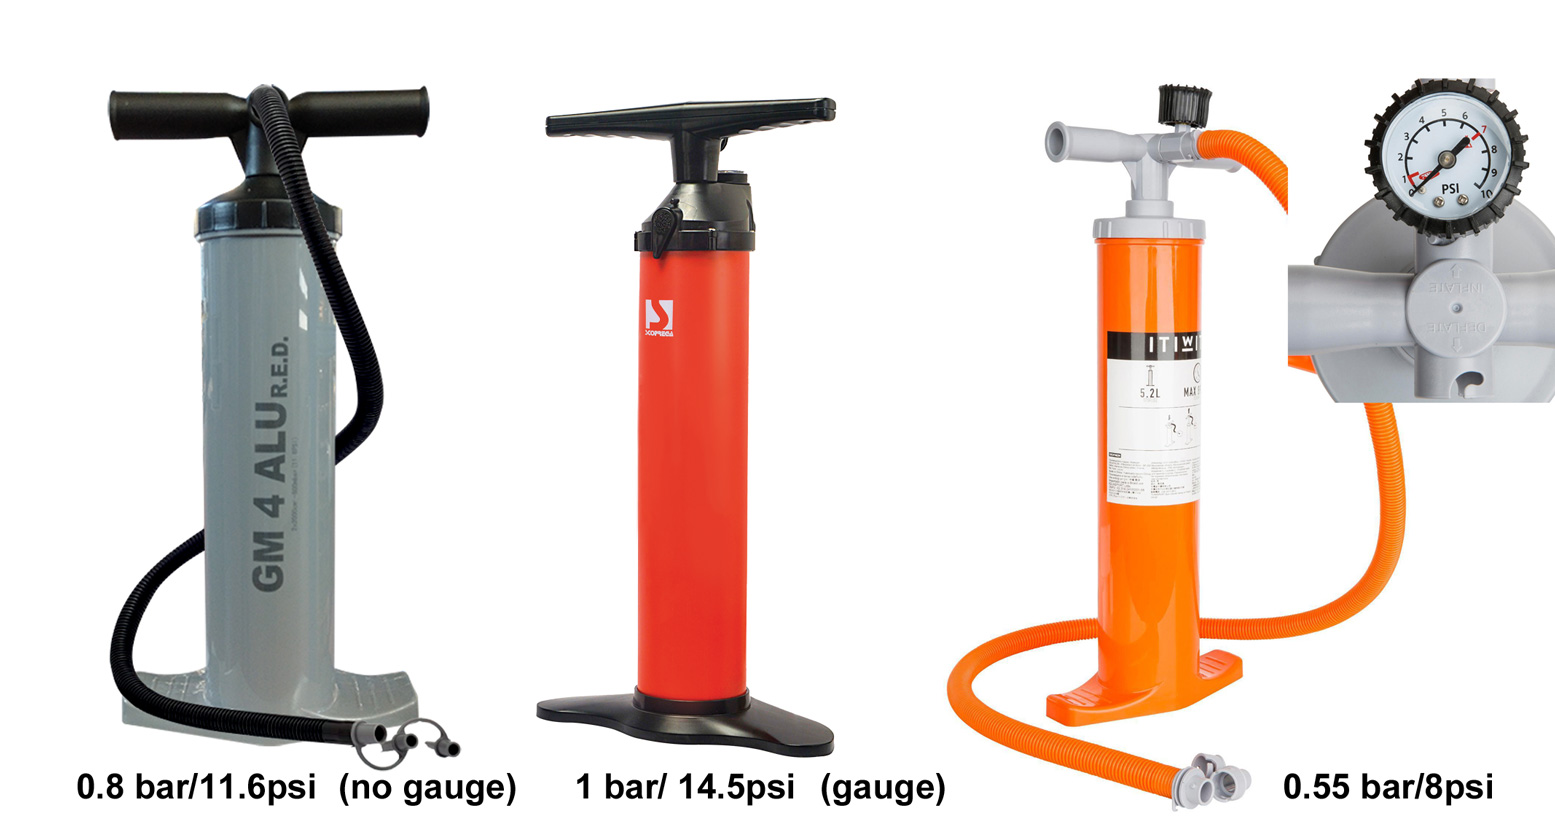
More and more IKs now feature super-rigid, high-pressure dropstitch hulls – either just floors or the entire hull which runs 2–5 times higher pressures than regular IKs. Your old Bravo footpump will blow its brains out trying to reach a typical 7-10psi. Barrel pumps with long, slimbodies, as opposed to the shorter, stockier examples above, put out less volume (DS IKs have less volume anyway) but can more easily attain higher pressures. It’s something to do with the ø of the pump face x the stroke. You don’t necessarily need a super high-pressure iSup board pump.
Left: Bravo Alu RED from £16 • Middle: Bravo 110 >£40 • Right Itiwit (Decathlon) £20
Some of these pumps may be double action. At a certain psi they become single action (downstroke only). I believe the Bravo Alu 4 RED (0.8 bar) works like that. Or they have a switch to do the same and help attain higher pressures. It works. Whatever pump you get for your DS IK, make sure it is rated to comfortably exceed your DS boat’s pressure rating.
Left: Kokopelli Nano pump ticks all the boxes: fold-out feet, screw-off handles, switch for one-way pumping as pressures increase, manometer in the handle. Right: twice the volume Bravo Alu 4 with auto one-way switching (so it says). The bayonet valve nozzle on the Nano keeps the valve open and so is for live (constant) manometer readings. With the push-fit (non-bayonet) adapter on the blue pump suited to Boston valves, a manometer only reads as you pump and push open the valve. Both are better than soggy footpumps.
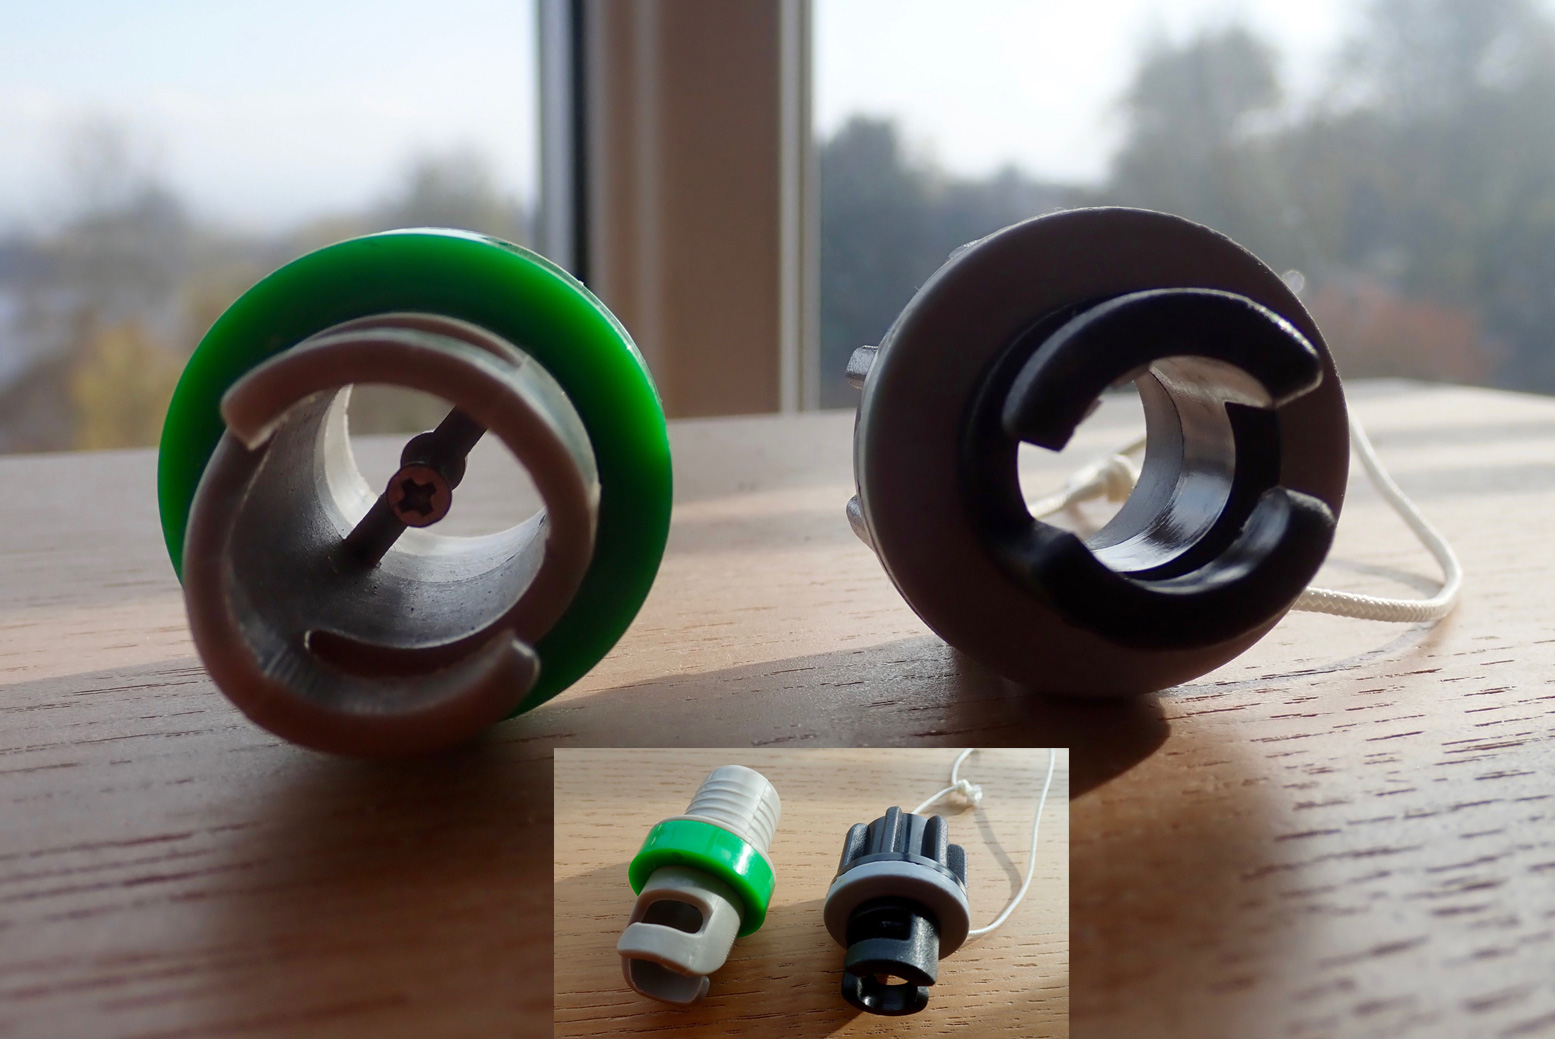
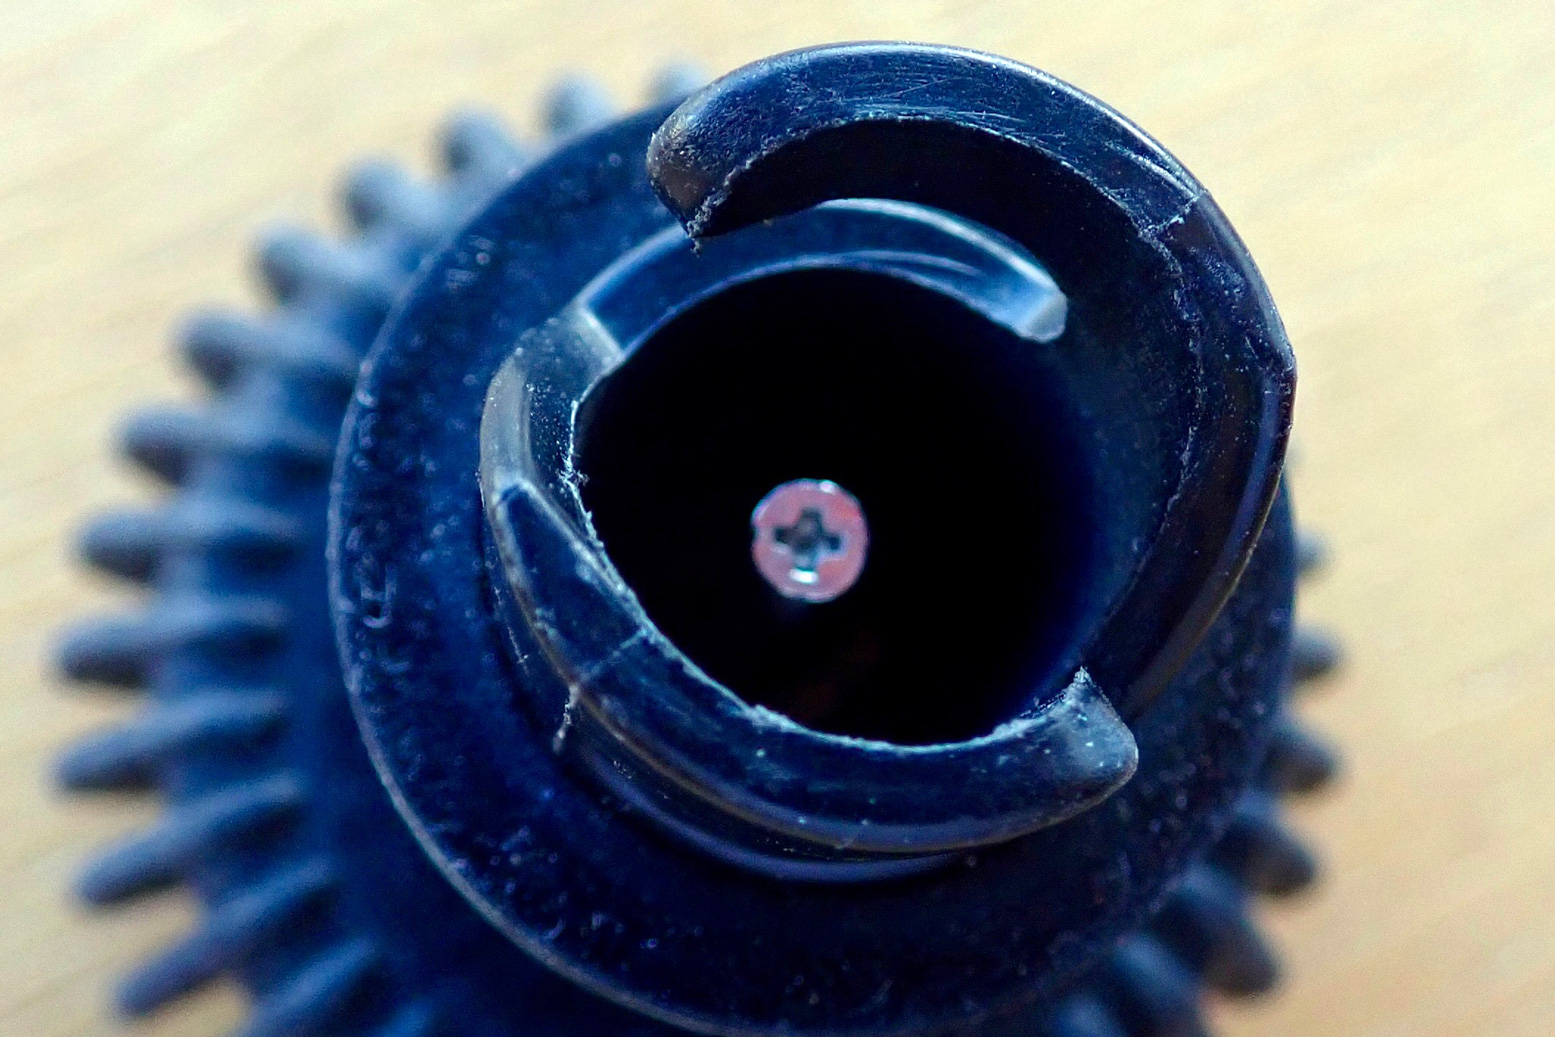
Bayonet nozzles for ‘raft’ valves. Who would have thought there’s something to be said about bayonet nozzles? Well there is. There are two types: plain (below right, Gumotex) and crossbar-peg or detent (left, Bravo). Both need soft spacer washers to fit snugly against your boat’s raft valve, but the small peg inside the green one will press open your valve stem as you connect it.
You will notice a similar peg on car tyre inflation hoses and also on a hand manometer (below). A manometer can’t get a pressure reading without this peg partially opening the valve as you push it on. A nozzle with a peg/detent means that: a: you’re not pushing the valve spring open each time you pump (easier pumping) and b: if your pump has a manometer you will get a constant/live reading as the pressure climbs which is the point of having a built-in manometer. The Bravo one goes from 3 quid; search: ‘Bravo Adjustable HP Valve adapter’. The only drawback might be that you need to remove a pegged nozzle carefully with Push-Push (Gumotex) valves. Normally a little air escapes as you do this, but if the valve doesn’t spring back closed, air will rush out. Turn slowly then pull away briskly; you’ll get the knack.
Pressure gauge (manometer) Until I got a Grabner which has no PRVs but ran a relatively high, 0.3 bar (4.3 psi), I never bothered with a pressure gauge (manometer, below) and just pumped up by feel. A lot of people do this. Since then, I ran a Gumotex Seawave and fitted PRVs to all chambers. That meant I still didn’t need a pressure gauge to get the right pressure; I simply kept pumping until each PRV hissed: the boat was then at operating pressure. My Seawave 2 was left stock (no side PRVs) so I have got into the habit of keeping a Bravo manometer with the K-Pump Mini and checking the sides at each paddle when I top up. I have checked this manometer against the floor and it measured 0.25bar which matches with the PRV rating, so I think it’s pretty accurate. Try and get a model with a range of no more than 1 bar (as below left) as that is the range you’re working in. At the moment, Sea Mark Nunn sell it in the UK.
Bravo manometer: from 13 quid and accurateAdjustable screw/peg to push open the valve
With high-pressure DS IKs, you probably want a pressure gauge as the boat will perform best at the right pressure which may be higher than you’re used to.
Packraft Pumps
Packrafts used to be inflated with a featherlight airbag which came with the boat. A nozzle on the bag screwed into the boat’s valve and you scoop air into the bag (easier with a breeze) and ‘bear hug’ it to cram the air into the boat. It’s takes about ten scoops and two minutes to inflate a boat this way, then unscrew the bag nozzle and quickly screw on the valve without losing too much air. Next, you used to top off by mouth on a separate twistlock valve: the firmer the boat the better it rides. In the video below (speeded up x 15) from walking up to a beach with my paddle in my pack, to loading up and paddling away took 8 minutes.
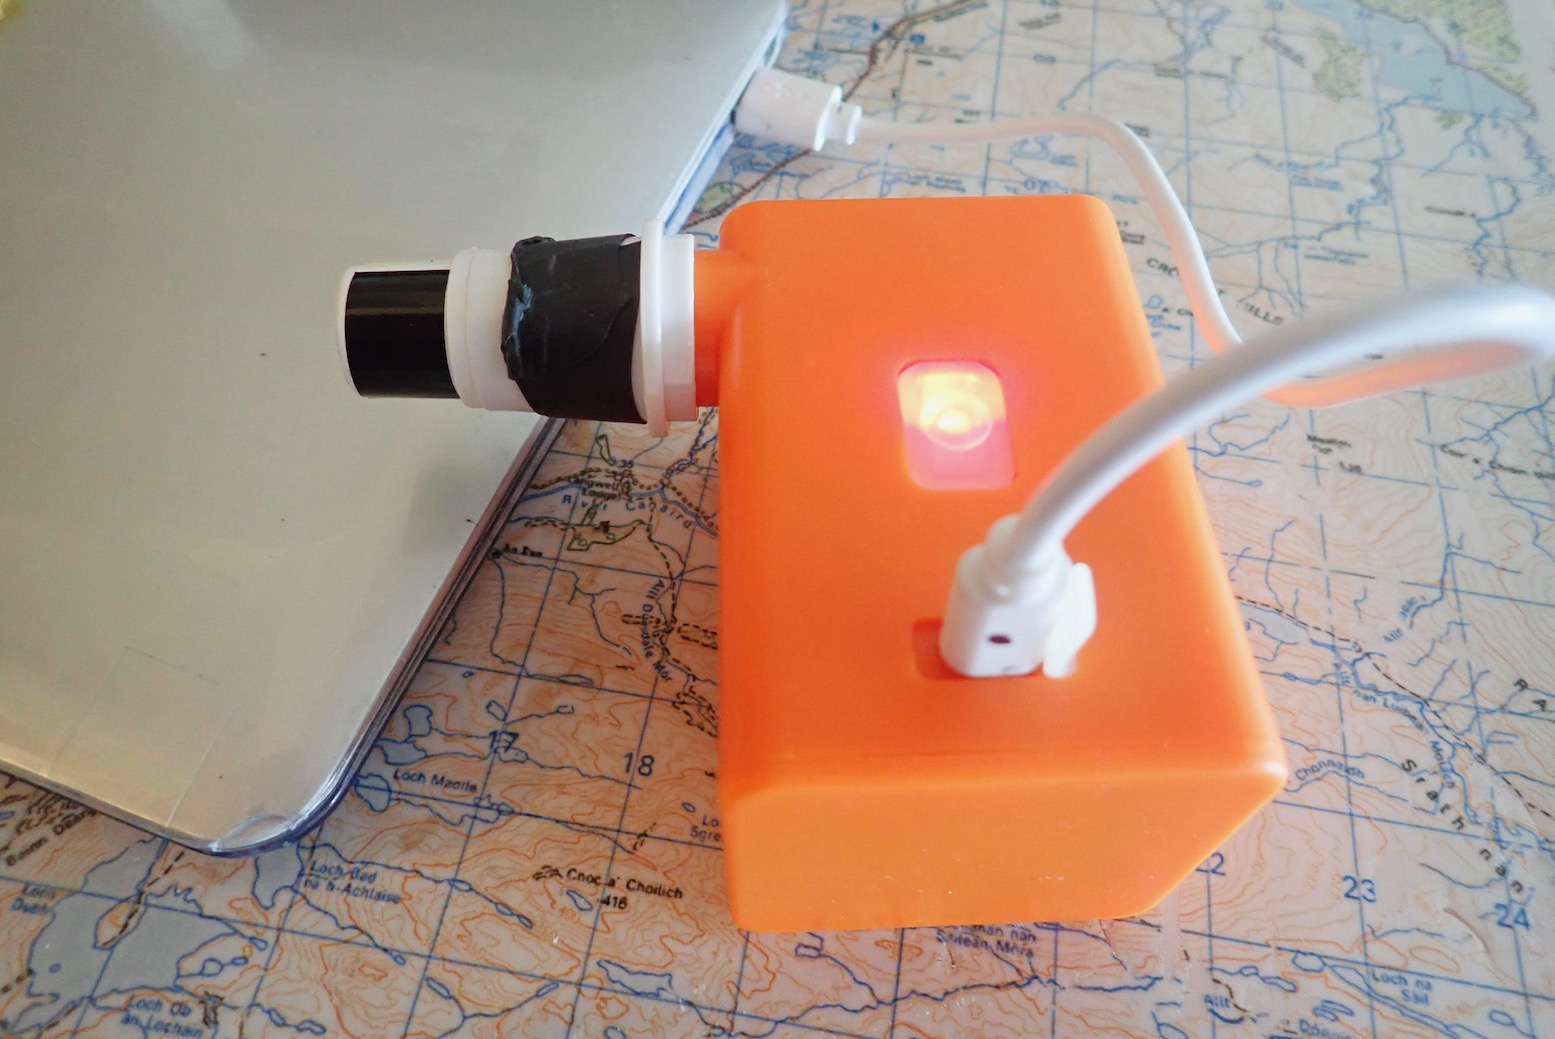
Things have moved on. Most packrafts now have a single one-way Boston valve which tackles initial inflation and topping up to a firm pressure. Inexpensive and tiny rechargeable electric pumps (left and below) now effortlessly do the initial job of the air bag, once you fit the right adaptor. Flextail minipump reviewed here.
Mini electric pump
And for those who don’t have lungs like Luciano Pavarotti, once aired up a light and compact mini handpump (left) will get the boat good and firm. Firm boats paddle better, and like IKs, a packraft that feels firmly inflated by hot ambient air on land will go soft once cooled in the water and will need more topping up.
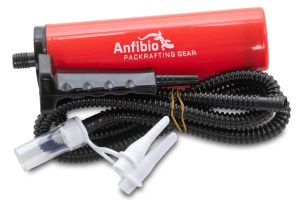
The Anfibio pump above is an adapted eBay balloon pump with an added hose so you can top-up on the water, if needed. It also differs from eBay cheapies in that the handle now unscrews from the pumping shaft to make it less prone to snapping in transit (as I found with the earlier version). With a Flextail and an Anfibio pump you’re packing good to go, but I always keep the original air bag plus a short section of garden hose (for topping up; below) with my boat in case either pump fails.
Note: a good packraft should hold air for days at a time, but don’t leave it fully inflated and out of the water in the hot sun. The air inside heats up and expands, pressures rise and the seams will get strained and may rupture.
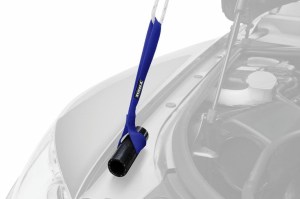
Michael S from BC came up with a good idea for securing stuff, seats or thigh straps to the floor of your IK without resorting to the faff gluing on D-rings – something that takes application and the right glue to do well. He suggests the cavity formed between the floor and the sides when you pump an IK up can be used to jam in short tubes attached to tape loops. Example left is a Sea Eagle Full D-S, but I know Gumotex and other IKs I’ve owned have a similar space along the sides.
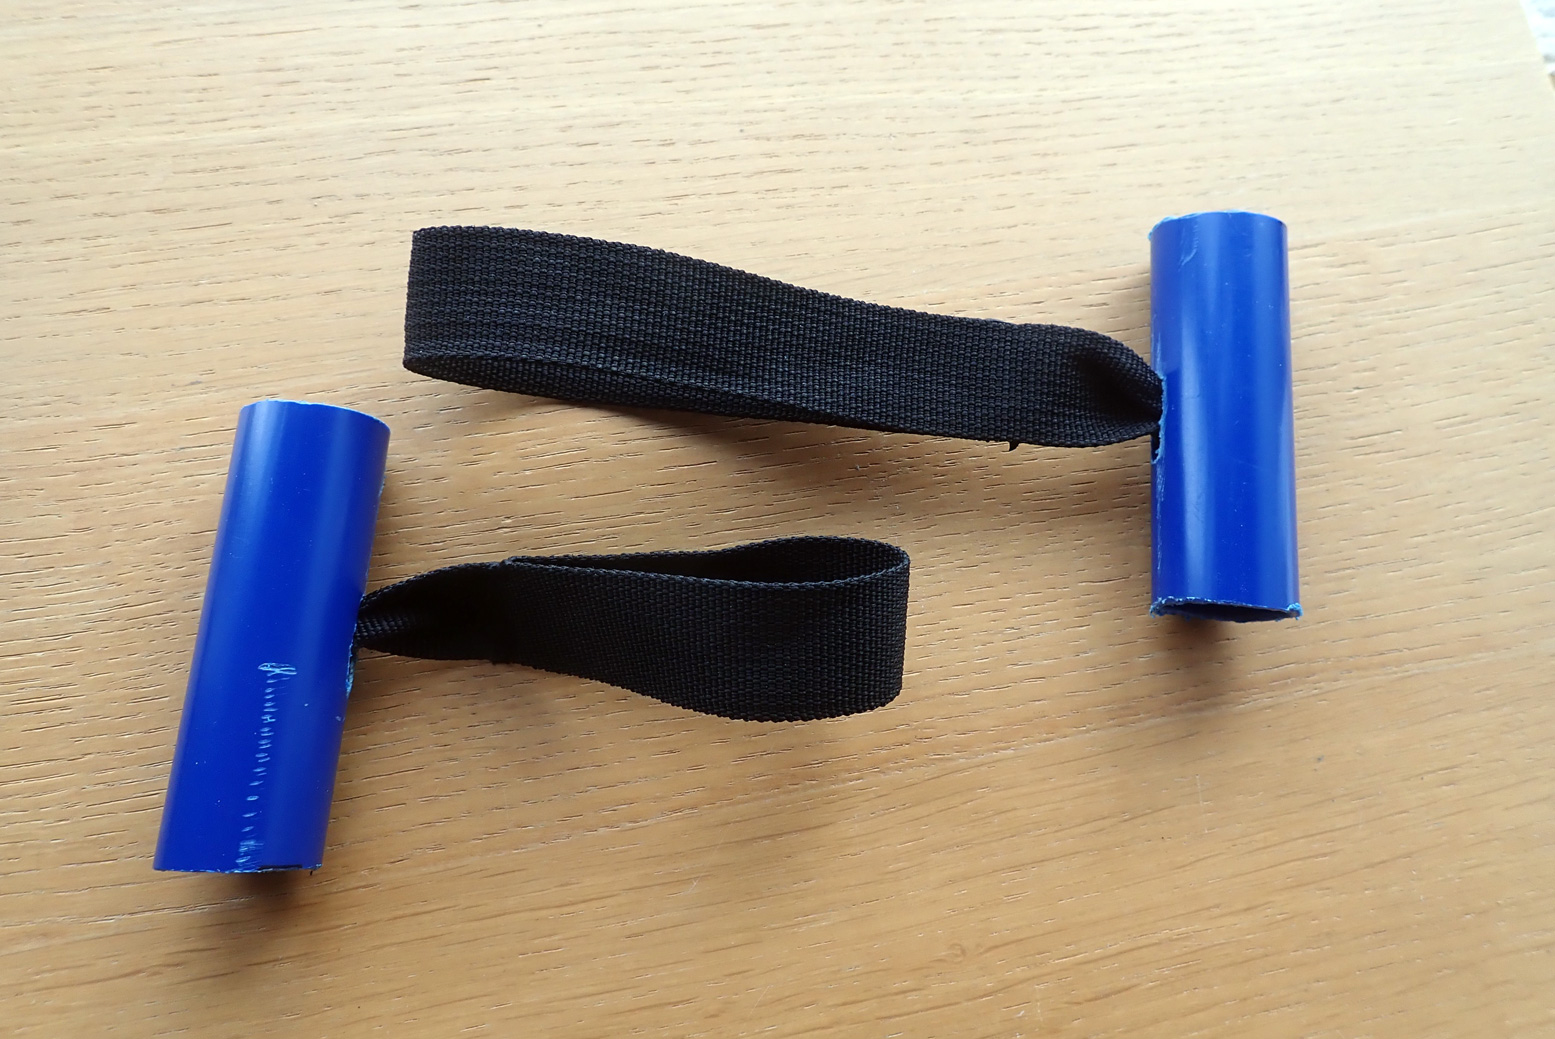
Pictured below are some Sherpak Quick Loop tie-downs which go from $15 a pair on amazon US. You can buy Thule ones for six times as much or search eBay for <Kayak Hood Trunk Tie Down Loops> sent from China for 7 quid. The idea is you shut them under your car’s bonnet, tailgate or doors (right) to help lash on stuff including boats.
But they could also be lodged in an IK’s floor/side cavities as you pump up, and of course can be positioned anywhere and slid forward or back. It’s possible the 1-inch diameter tubes shown may be too small and pull out, so make your own using larger conduit from a hardware store, or just a shore-side stick and washed-up rope. Below: I made my own. To be tested. Neato mosquito as my Kiwi mate used to say.
Performing my cutting-a-kayak-in-half trick gave me a long overdue chance to see exactly how they’re put together, as well as other stuff, like why it was failing and how well certain glues stuck.
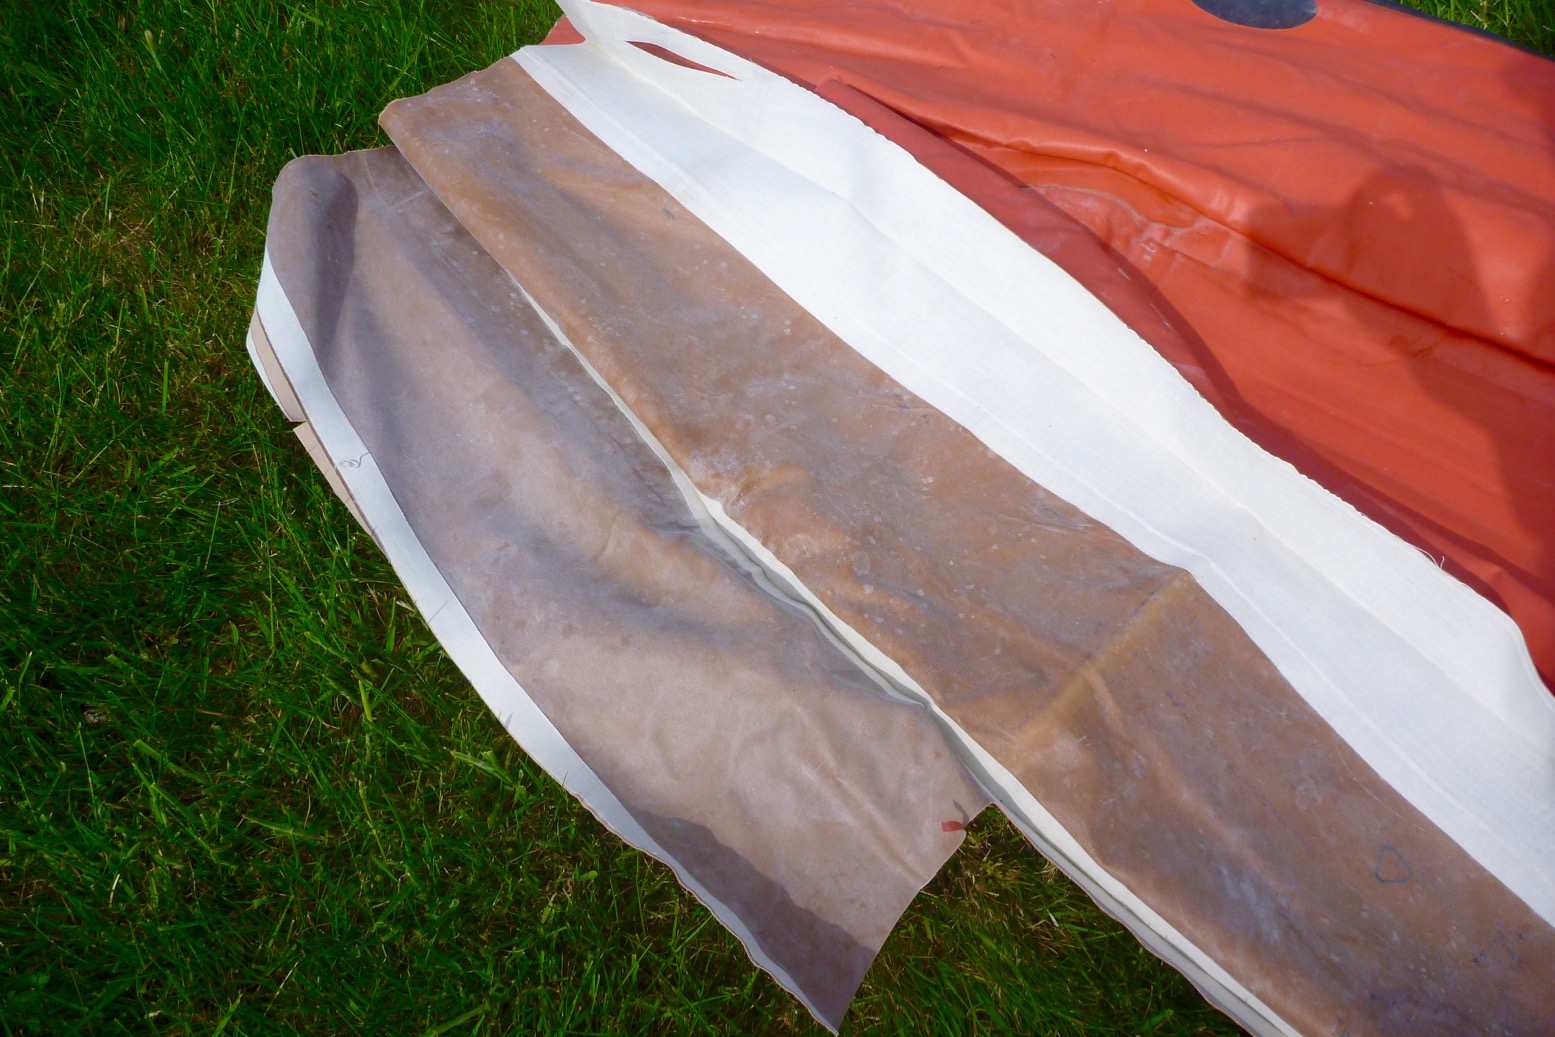
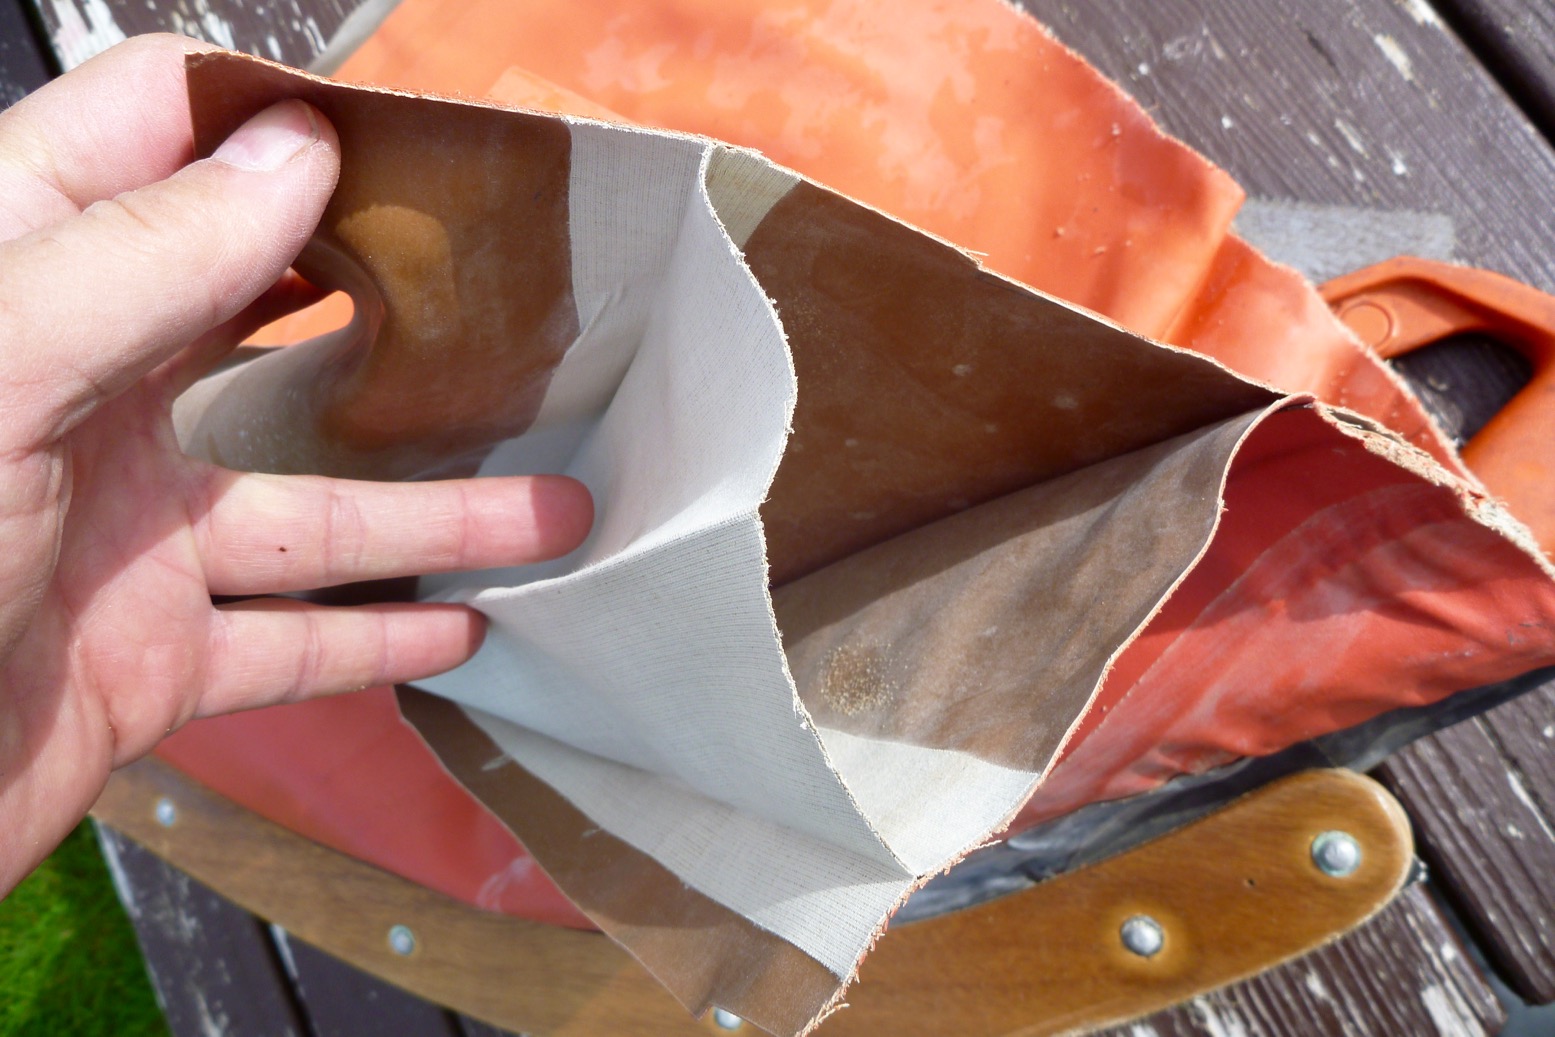
The neoprene inside I used to assume it was the same coloured coating inside the boat as out; it’s just simpler. But of course, the diagram left is clear: what’s outside and what’s inside an IK hull is not the same stuff. There’s no need to waste UV-resistant hypalon coating (or colouring or that matter) inside the boat’s benighted chambers. All it needs to be is the same durable and airtight coating, and neoprene – the brown rubber-like coating left – does that fine. I bet I’m not the only one to mistake ‘neoprene‘ as simply that closed-cell sponge used in wetsuits or laptop sleeves. In its solid form it’s a durable synthetic rubber, but I presume lacks the full-on UV resistance of hypalon which DuPont invented shortly after.
I-beam floor As mentioned here, an inflated vessel will seek equilibrium by attaining a rotund form, be it tube or sphere. A flat inflated plane such as an airbed or an IK floor needs to be a series of parallel tubes unless it’s just a non-inflated sheet, like packraft- and white-water raft floors. So this is an IK I-beam floor (above): probably the same tough core of nylon or polyester scrim, but without the impermeable hypalon and neoprene coatings of the exterior panels. Note the pre-folds or creases to help the Semperit pack flat. I imagine modern IKs do the same, but it all explains the necessary attention to detail which makes ‘tubeless’ IKs like this so labour intensive, compared to ‘bladder’ designs like Aire.
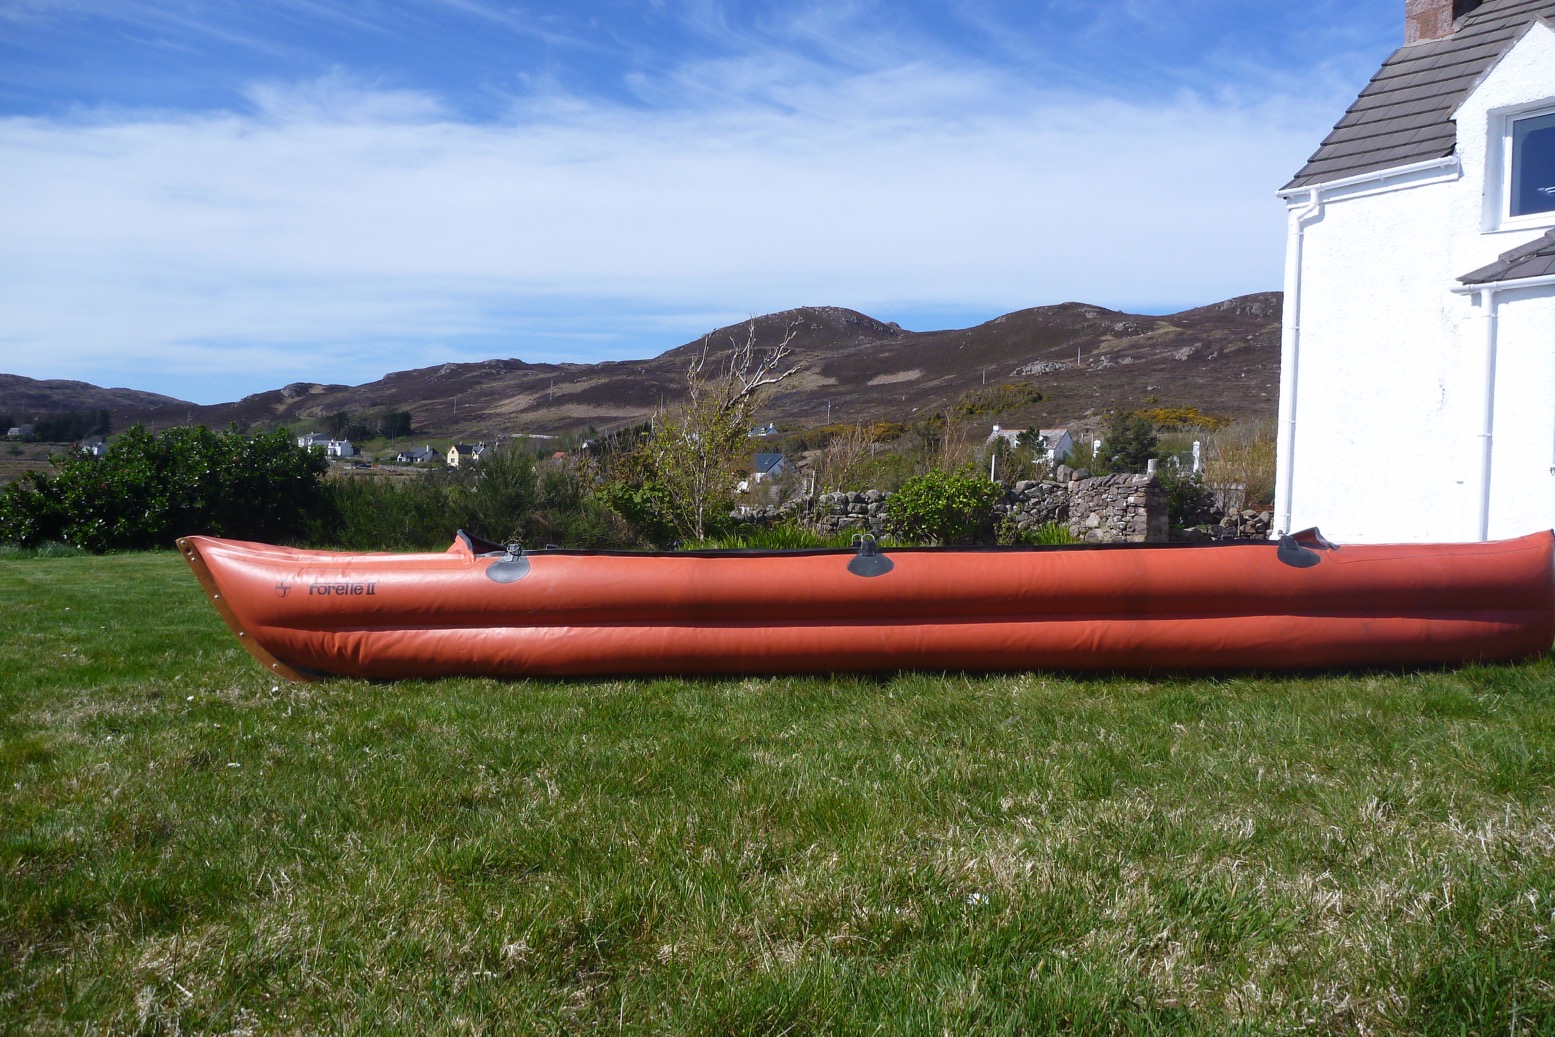
Twin side-tube IKs like this Forelle, the Incept and Grabner Holidays, have two smaller tubes one on top of the other, rather than one fat side tube like my Seawave (below, red) or Amigo. It gives the same buoyancy, more freeboard (above water height), a slimmer profile (more speed) and more volume inside (easier loading). The red Seawave below is 82cm wide; the Semperit is 72. It makes the boat look a whole lot better too and overall, because it’s also as stable, I’d say it’s the best design for an IK, but it also needs I-beam sections to constrain the two side tubes.
I can’t say I could suck air through the scrim easily, but I’m pretty sure it’s porous – I didn’t find any transfer holes to allow air to flow between adjacent tubes – they might be a weak point. When an IK like this is over-inflated (or left in the sun) and has no PRVs (none on the Semperit), it’s this scrim which either tears apart, most probably at the T-join where it’s glued to the neoprene. I tried tearing sections of scrim by hand; impossible where it was uncut, but as soon as you nick it with a knife it would tear quite easily, like thin cotton cloth. This fabric was at least 40-years-old and had one or two patches of mildew, but was still tough and the whole assembly of the boat has held together amazingly well over the years.
Where mine failed Inspecting the fatal second leak alongside the earlier repair, it seemed air was pushing through where two sections of I-beam scrim butted against each other. Perhaps the old coatings stretched differentially here or were just worn out. It did look like the hypalon was simply flaking away. I could have fixed that leak but, as mentioned, another would probably pop up whack-a-mole style somewhere else, quite possible while at sea in either my- or a new owner’s hands.
Glue test I repaired the big original ‘L’ tear with a 5″ round patch of hypalon and two-part glue (above and left). I then patched a down-to-the-scrim scratch under the hull with one-part Bostik 1782 (left). I used the same glue to repair the initial new leak inside (bubbling water, above).
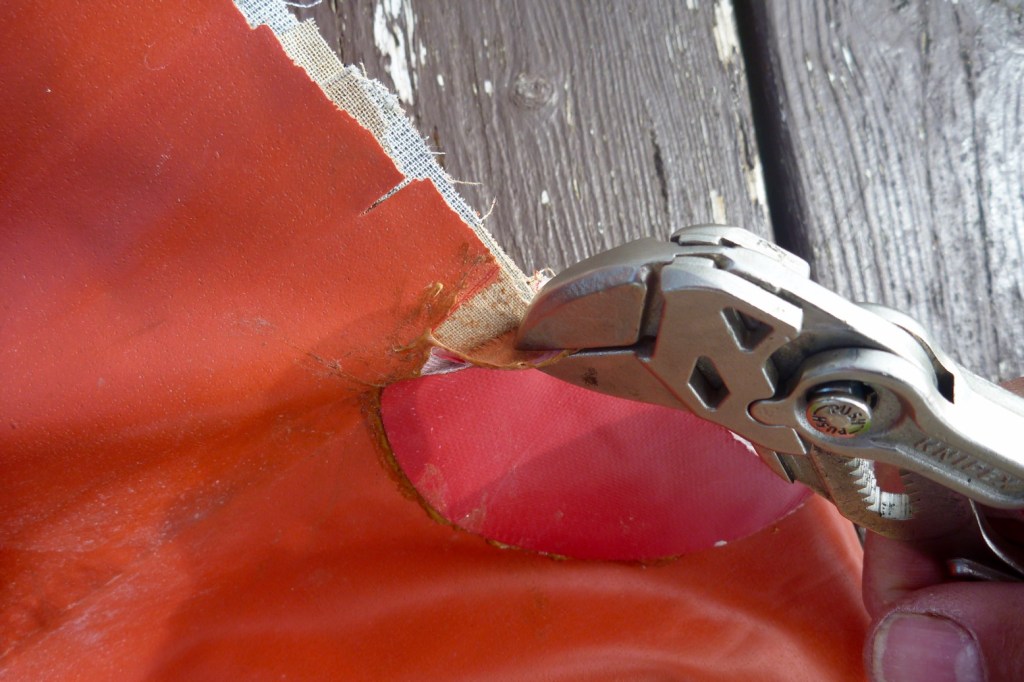
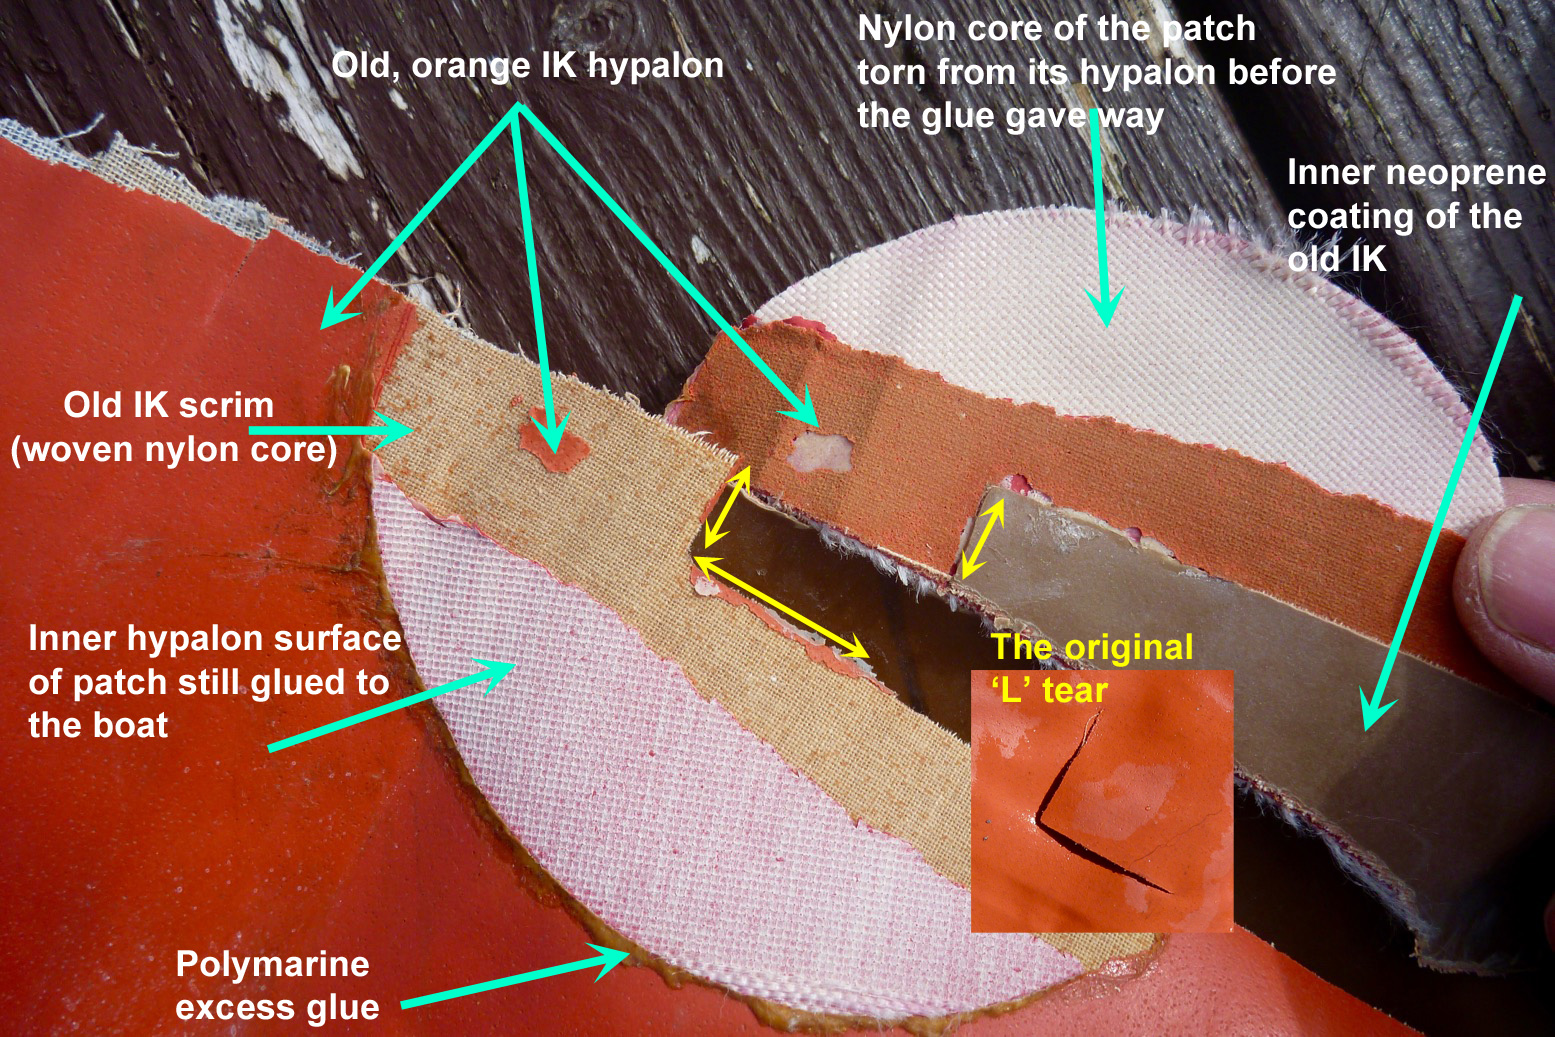
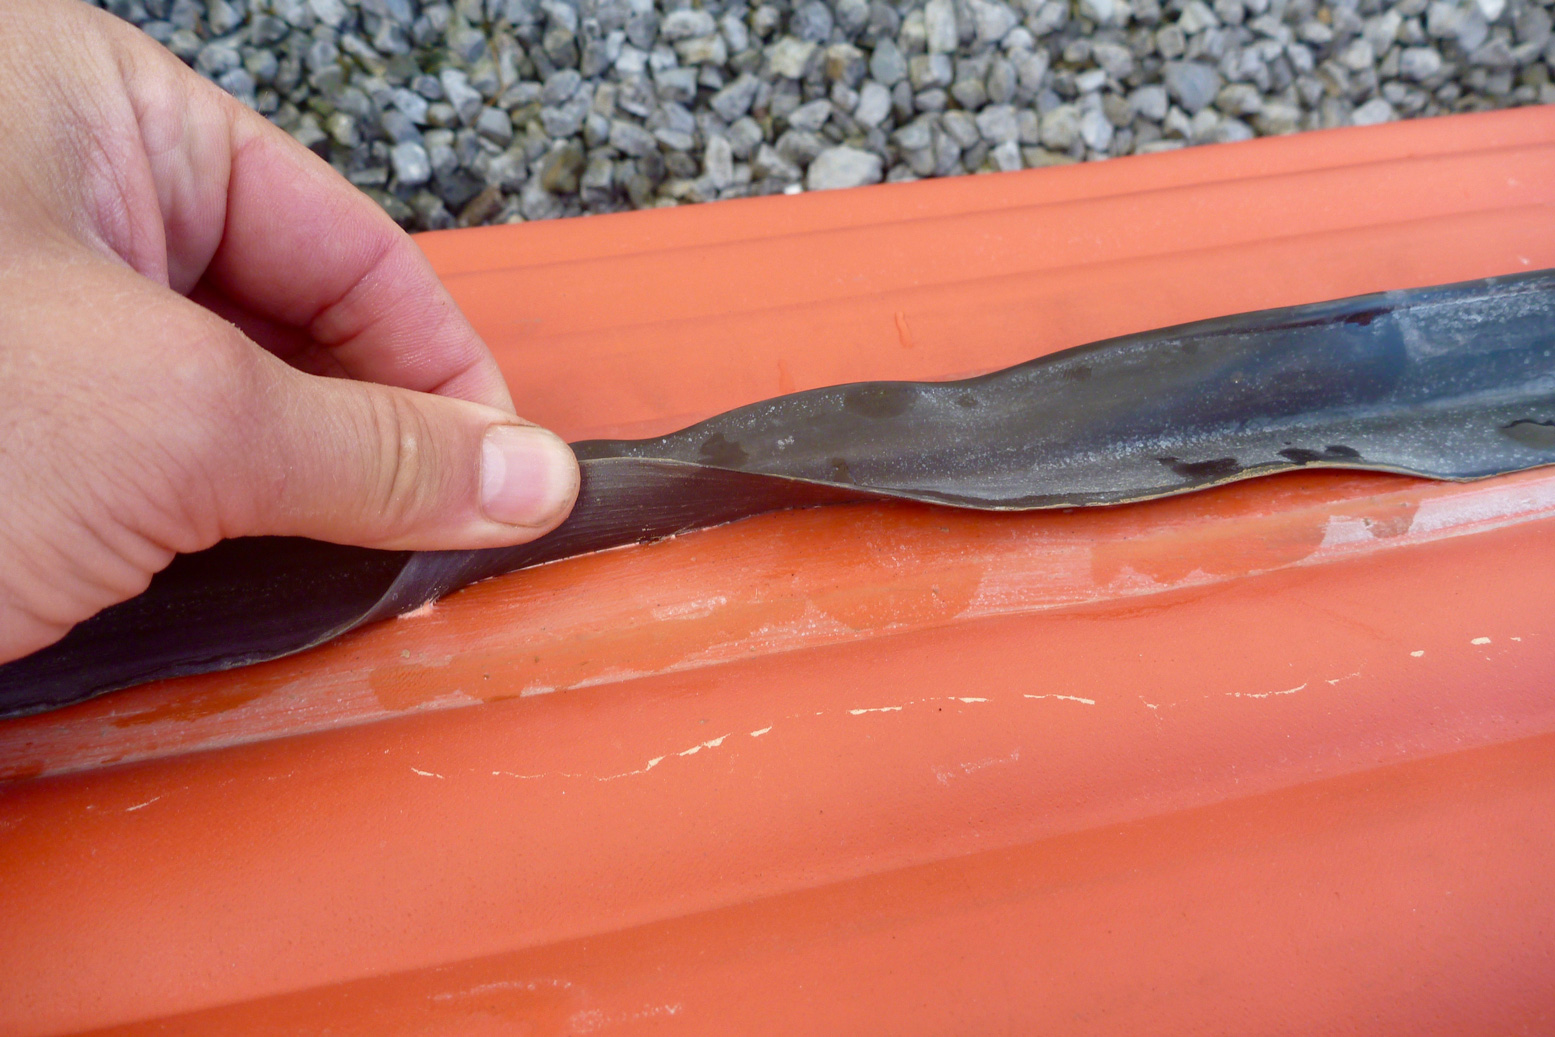
Although I’m pretty sure they’d have lasted, I could easily pull off the Bostik patches by hand. Pulling off the big round Polymarine’d patch was another matter. It just so happened I’d sawn through the round patch but, only once I got some pliers under a lip (above left) was I able to separate it from the hull. As you can see in the big image below, either the ancient orange hypalon coating of the IK, or the newer red hypalon of the patch separated from their respective nylon cores – the glue’s bond was stronger than the actual hypalon coatings, new or ancient.
I get a bit lazy about having to faff about with two-part glue, and I also wonder if I ever guestimating the 25:1 ratio correctly. But as you can see, this stuff sticks. If you absolutely, positively want things to stay stuck or sealed, use two-part adhesives. I still don’t know if the second part curing agent merely speeds up the drying process, or is chemically integral to creating the very strong bond. I’d think it’s the latter, otherwise why bother.
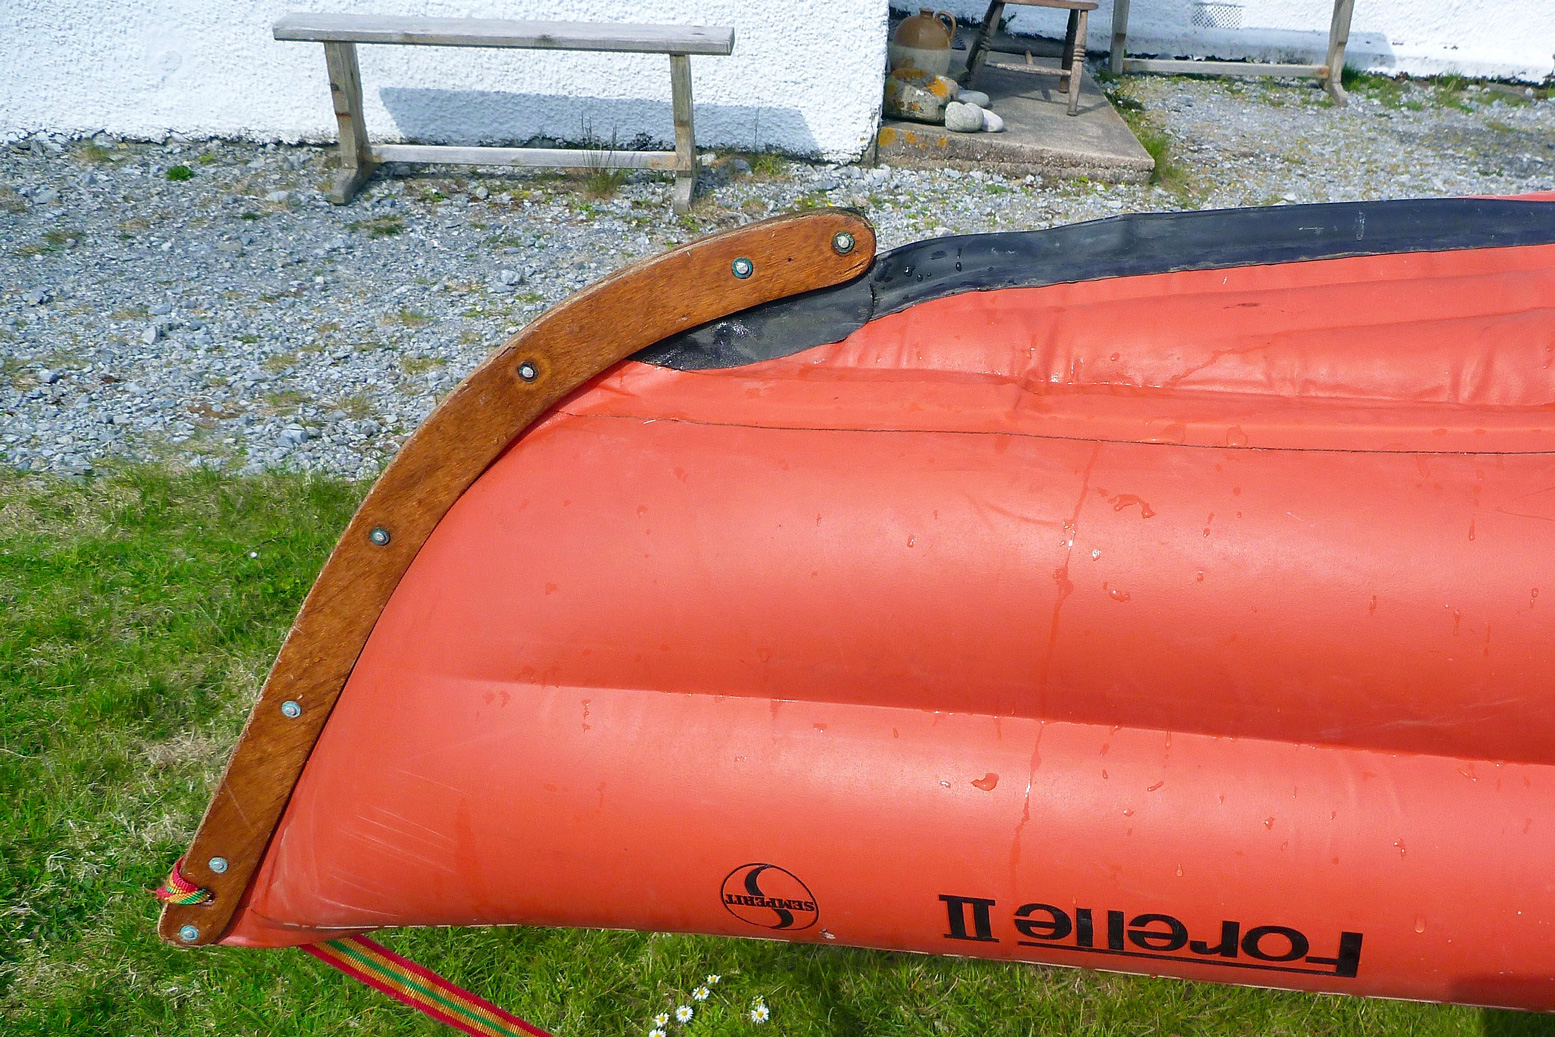
Other stuff The distinctive marine plywood bow has lasted fine – no warping at all and the rivets are still intact. It may have been an early design solution to easily joining the three sections of the hull in a nice sharp point, though they managed that join easily enough at the back. Maybe it was as much for protection and a frontal tracking aid.
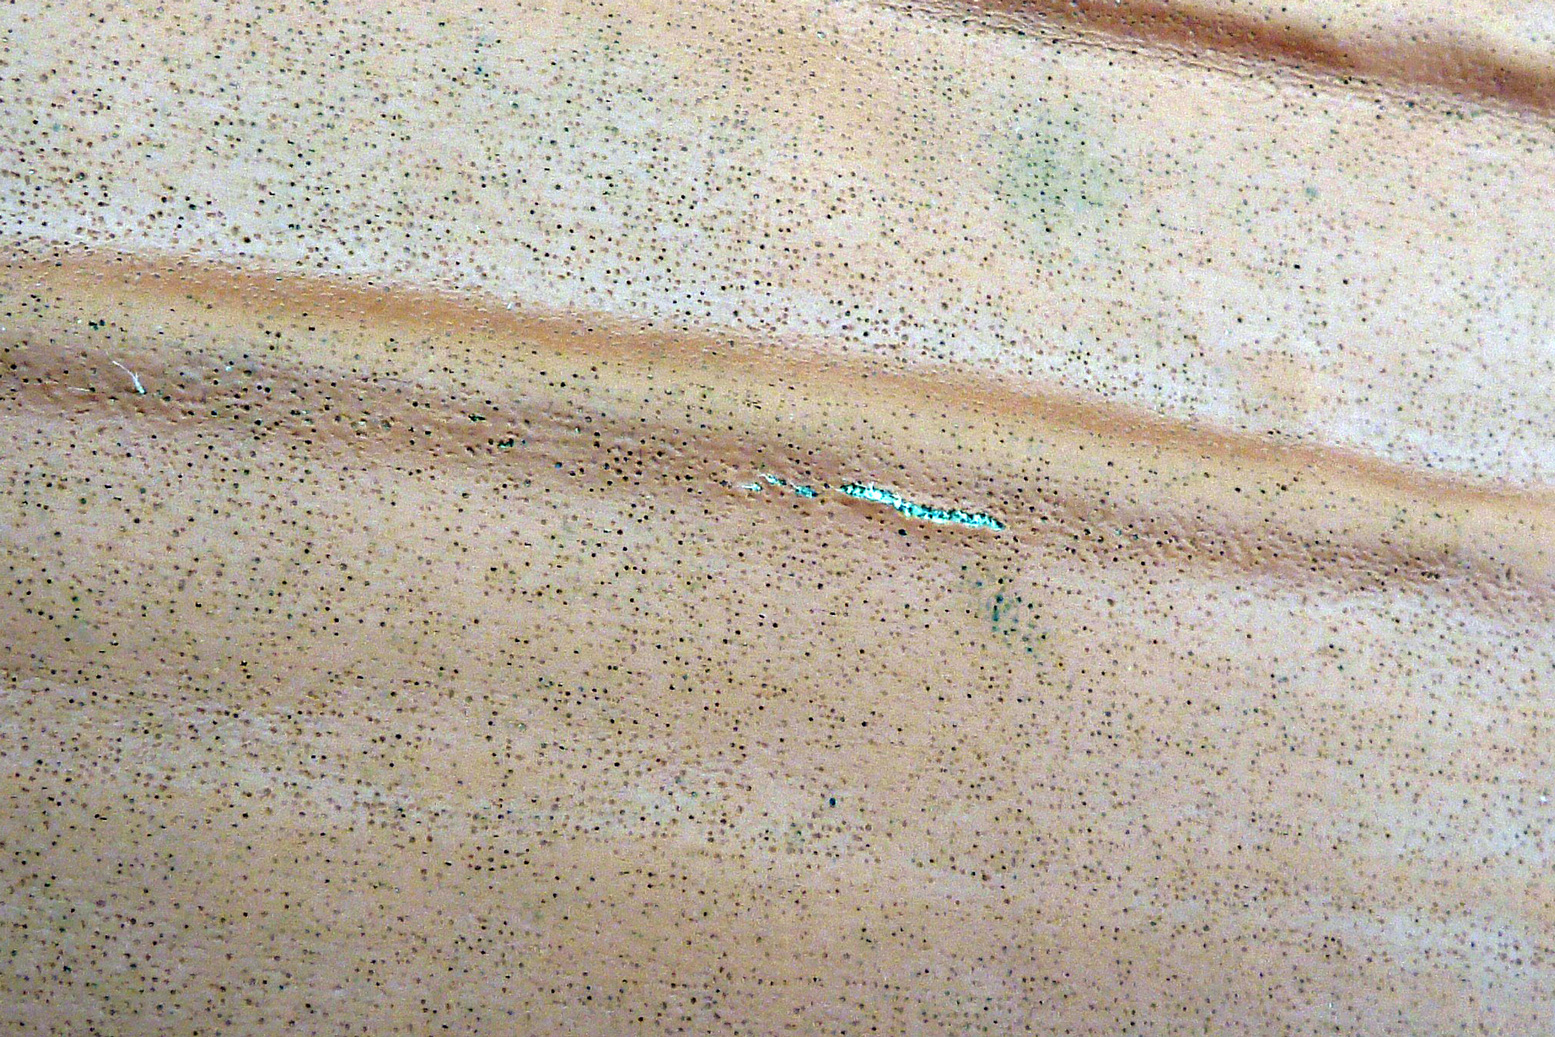
A couple of days after trying out the Semperit I noticed a scratch on the hull bottom (left) so decided to pre-emptively patch that with Bostik 1782 (less faff than 2-part). It looked like an old scratch which had opened up by reusing the boat. I reinflated a day or two later, but a few days on noticed the floor was flat. I pumped it up again – air was hissing from a crack in the hypalon coating inside the boat, more or less under the seat (below; colours enhanced for clarity).
This seemed a bit odd. The boat hadn’t been over-inflated or left in the baking sun, and there wasn’t any obvious rubbing in the two hours I’d used it, though I suppose this is a high-wear area and an old boat.
I suspected general, age-related delamination or entropic porosity. The outer orange hypalon coat can be rubbed or scratched down to the fabric core, as with the hull scratch I’d just repaired. But inside should be an airtight layer of neoprene. There’s no way of checking that without open boat surgery. To be honest, it’s what I half-expected from a 40-year-old IK, which is why I’d kept the refurb and expenses to a minimum. I suspect sudden use after many years possible neglect had accelerated decay. I see the keel-strake is coming away too, as are some other black patches holding the rusting D-rings.
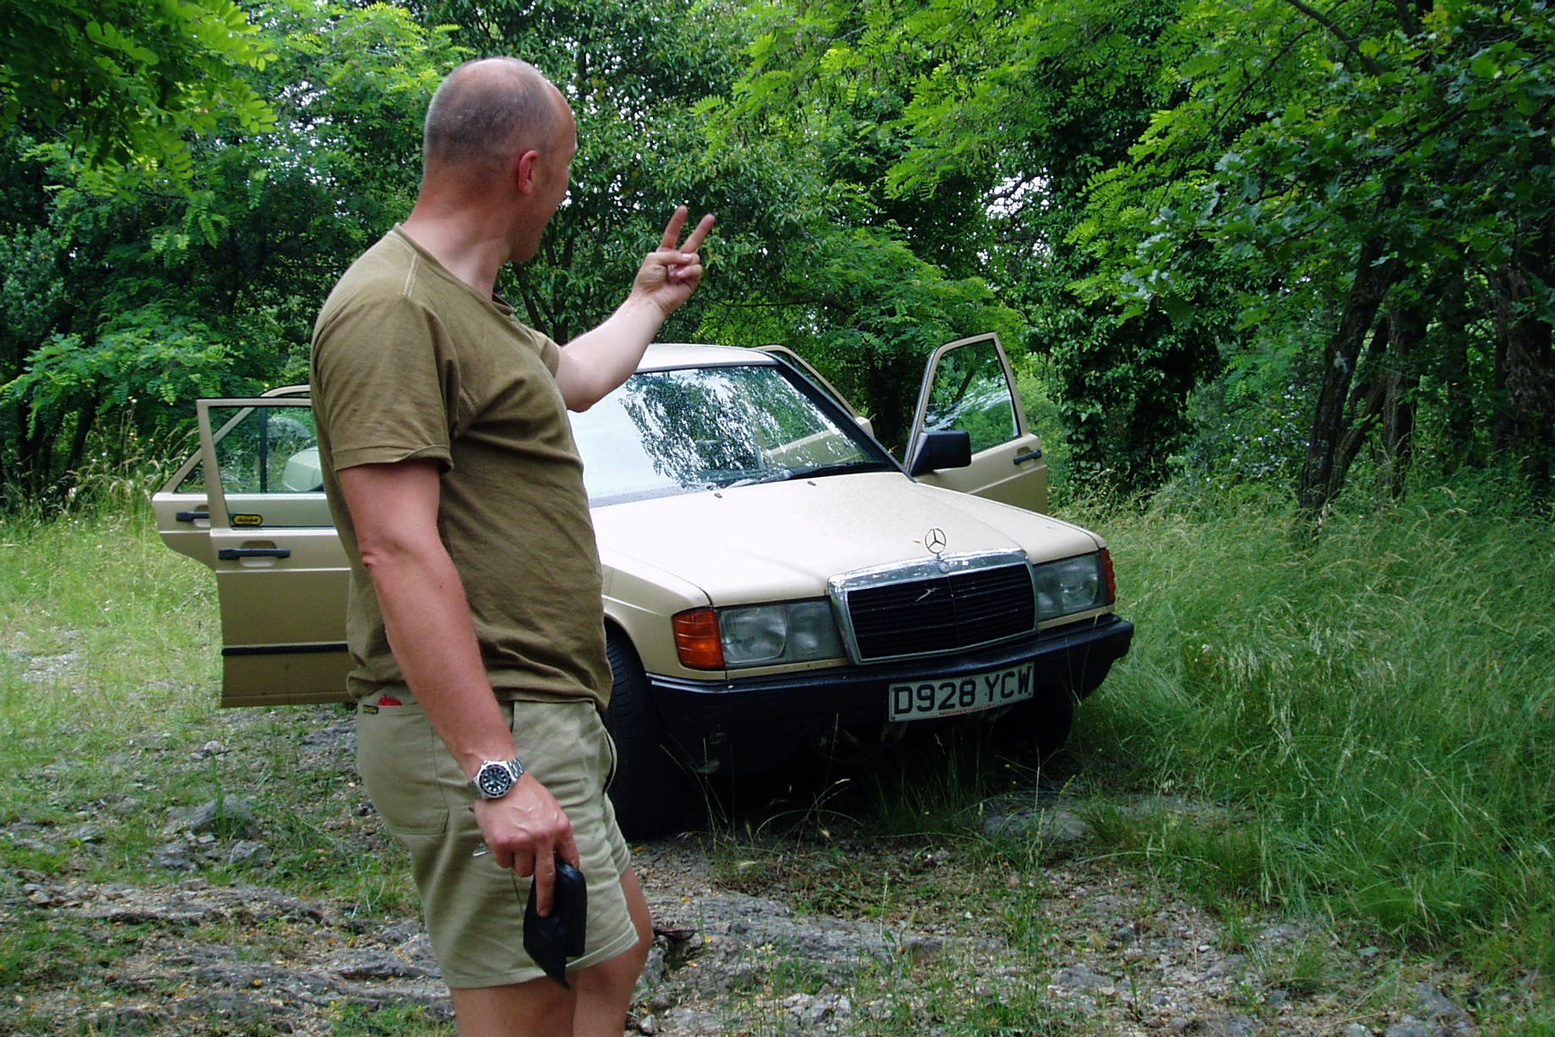
I’ve experienced similar deterioration when buying old vehicles for long trips. They seem like a bargain and have a solid ‘they-don’t-make-’em-like-they-used-to’ reputation. But reviving them, or just asking them to perform as they once did, can lead to a string of failures until it’s just not worth it (left). Much depends on how they’ve been maintained over the years. I recall writing in one of my books (or maybe on here): “you can’t give your old gran a pair of trainers and expect here to run a marathon without having a heart attack“.
I patched the wear-hole with more 1782, reluctant to waste good two-part PolyMarine. I pumped up and filled it with water: all good, but an anomalous perforation somewhere else can’t be ruled out. That’s another thing I’ve learned with old cars and bikes: you replace the clapped-out engine then the clutch goes; you replace the clutch and the gearbox goes; you replace the gearbox and so on… The strain of refurbishment gets passed on to the weakest point, and when that’s repaired, to the next weakest point. An IK will get you to shore on two chambers, especially if it’s just the floor that’s gone. I had that once with the Incept. Out with your pals on a warm summertime river that’s no drama. Elsewhere, alone with the wind picking up; not so trivial.
Years later I learned PolyMarine make SealFlex – a latex sealant (right) to revive old inflatables, PVC or plastic. You pour some in each chamber and roll the boat around for a couple of days. It costs £26 posted for 500ml – possibly worthwhile on your cherished RIB; not so sure on this old IK but had I known of it I may have given the old Trout a pint’s dose. After that you’ve got to know when to call it a day, and that day may have come. It might be fine for a guest or a rec river boat, but I don’t do so much of that nor have space for more stuff than I need.
A few hours later the floor was soggy – this time it had let go a few inches up from the recent patching. Up to then I’d been considering putting it back on ebay with a clear semperit caveat emptor. But then I decided sawing it in half would be more fun and educational. I always wondered what exactly an I-beam floor looks like. More here.
No doubt about it; since flogging my much-used Sunny in 2011, followed by a flawed experiment with a Feathecraft Java, I’ve become spoiled by high-pressure IKs like my fast Incept K40 (based on the Forelle’s design), the brick-hard but slower Grabner Amigo and my current lightly modified Seawave. Just 25-60% more pressure makes all the difference, especially once the boat gets usefully long.
I only had my K-Pump Mini to inflate the Forelle after its repair and mods. I’d hand-pumped it up as hard as I dared but was probably a bit too cautious to not over-stress the old trout. Getting in I was reminded of that uninspiring slackrafty squidginess. I should have topped it up after putting in the cold water, but anyway there’s no easy way to accurately check the pressure off lilo plugs (I tried jury-rigging my manometer). Presumably in the 70s the idea of using tough, one-way rafting valves on IKs hadn’t been thought of yet.
In this under-inflated state and with a slight breeze, tracking away from a headwind was tricky, though I knew that new boats require a quickly acquired knack. As expected, the crumpled keel strip didn’t really do much, perhaps that’s why the Forelle 2 came with a rudder mount. As you can see there’s some taco-ing (folding) going on below me – and this was before lunch! Without a skeg or a rudder such sagging won’t help good tracking either.
My over-pressure caution was understandable, but thinking it over, I decided the Semp was under-inflated. What this boat needed was a better pump. A couple of days later a £10 Sevylor stirrup pump turned up (I left my super-duper Bravo kite pump down south) and I whacked in what felt like Sunny pressures. With the position of the lilo tubes tucked under the stern cover, and the need to yank off the hose adaptor while pinching the tube to stop air escaping, and jam in the lilo plug, it’s a bit awkward. These plugs really do grip/seal well.
That’s another great thing with running calibrated PRVs on all chambers: you just pump away until they hiss and the boat is correctly inflated while being protected from over-pressure. No need for manometer faffing.
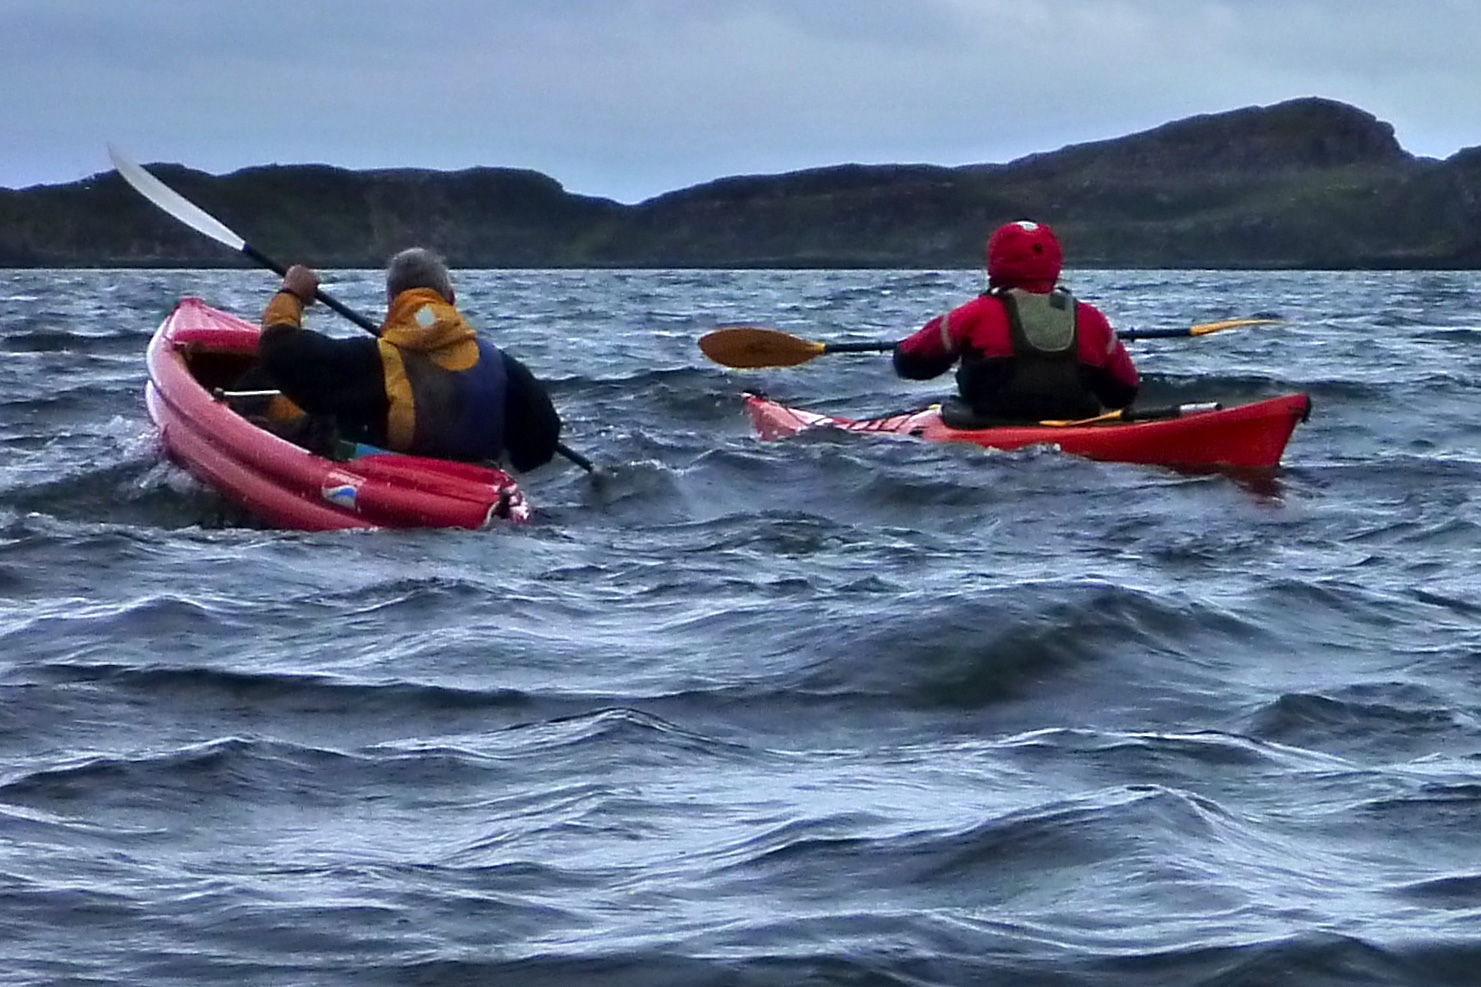
Here in the Summer Isles the reliable May sunny spell is about to end. It’s been great for solar panels with strong afternoon easterlies, not so good for day-long IK-ing. Suilven mountain even caught fire. Yesterday, before it picked up we nipped out in the Seawave to Eilean Fada Beag (below) and listened to the birds. By the afternoon it was blowing hard.
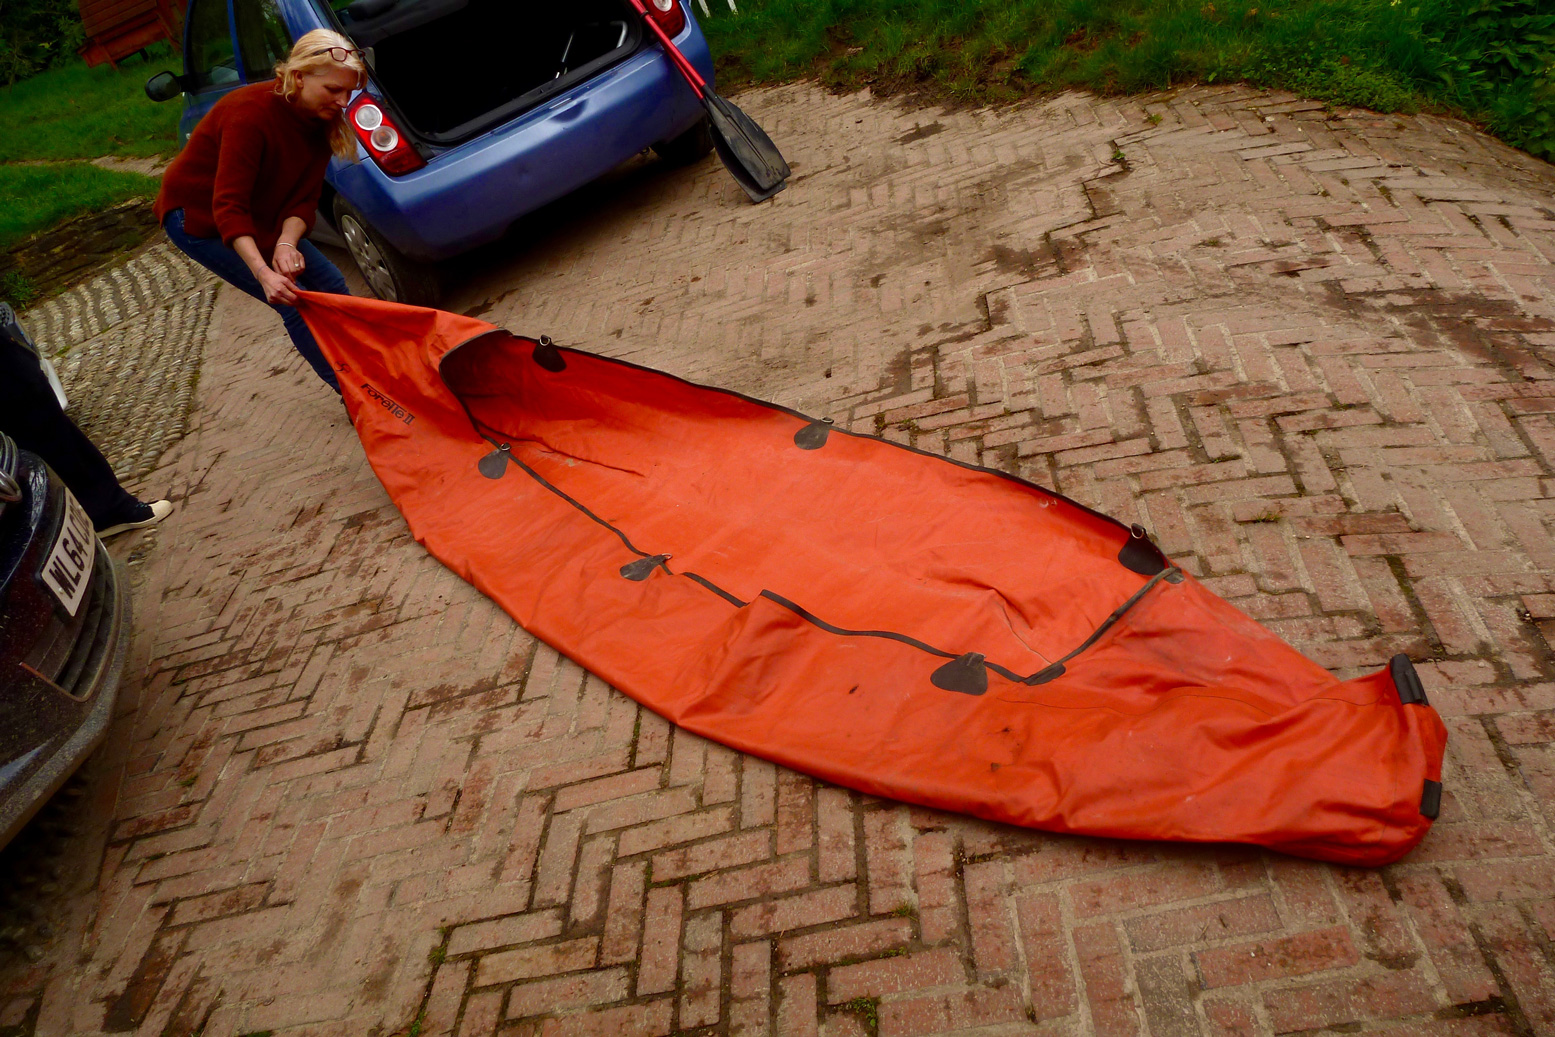
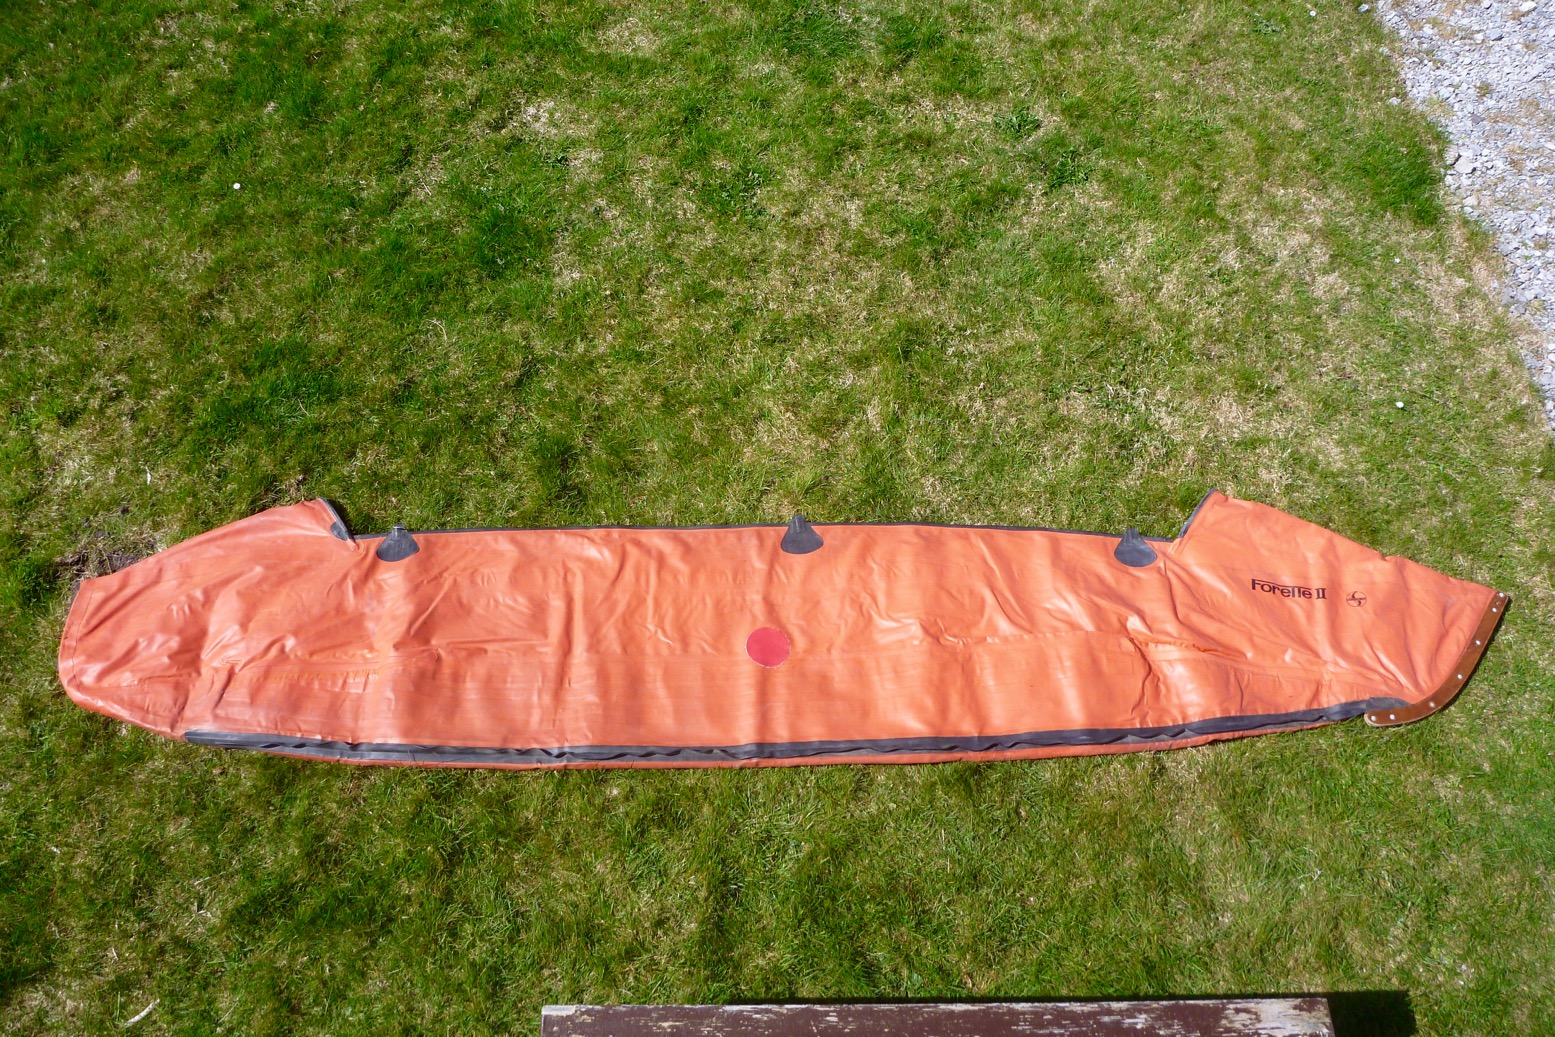
High time to patch up my latest IK: an old Semperit Forelle 2 I picked up in Cornwall. The boat was sold with some classic paddles which went straight in the bin, as well as a big tear in the side (right). Plan is to patch that hole, then see if it still holds air.
Semperit is an Austrian tyre manufacturer who’s still in business. Afaik, their IKs were a bit of a short-lived rubbery diversion in the 1960s. If my 40-year-old boat has no other more awkward leaks, I’ll rig it up and take it for a spin. But first, I scrubbed off a couple of decades of crud and let it dry.
I wondered about sewing up that L-tear before patching it – the Forelle’s hypalon seems pretty thin, but decided to just slap on a 5-incher. I’ve glued on loads of accessory patches but have never actually had to repair a hole in a hypalon IK in all these years. So I took note of the NRS repair video here: rough up hole and patch: wipe clean with solvent; apply two coats of glue and when knuckle dry apply the patch and roller the living daylights out of it.
Watching that vid, I saw they used a much better tool for pressing down patches; an ash-handled Sealey TST15 tyre patch roller, unless I’m very much mistaken. The knurled metal wheel embedded in the wooden handle can lay down much more pressure than the wide plastic lino roller I’ve been using. Just before I did that, it occurred to me stray glue may squeeze through the tear and glue the insides together. Don’t want that nein danke so, with no better ideas, I stuck a bit of paper in there. Seems to have worked.
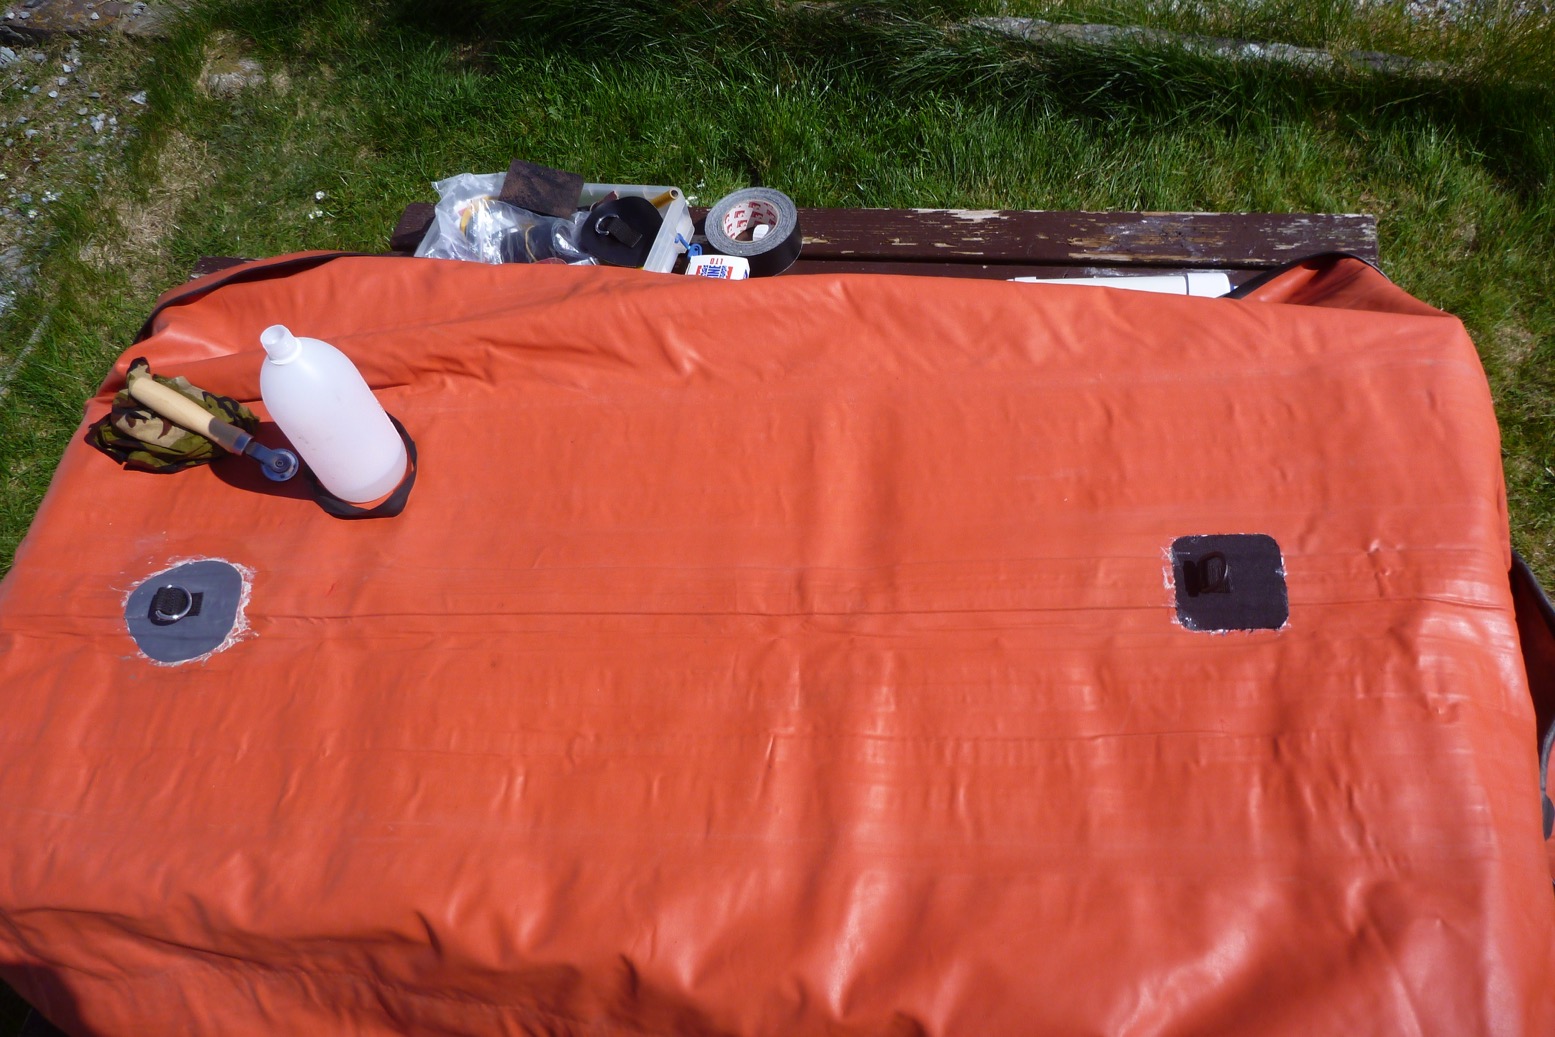
With glue left over, I thought I may as well stick on couple of floor patches for a seat base and a footrest tube. As these are non-critical fittings I used any old D-rings I had: a woven nylon one and probably a PVC. I’ve glued PVC to hypalon before for other fittings.
With them in place I couldn’t resist rigging up the old Trout with a rope-and-pipe-lagging backrest, an old Alpacka packraft seatbase; a drainpipe footrest tube and a lead. All stuff I happened to have in my IK box of bits or found in the barn among the rat droppings. I jury-rigged the K-Pump for nozzeling but haven’t pumped it right up to 2psi as I’m letting that big patch cure for a bit.
Looking round the repaired boat I see it has rudder mounts; not sure I’ll need one on a 3.56m boat. There are six D-rings on top of the double side tubes but they don’t look like they’ll take the backwards strain of a fabric backrest Forelles came with wooden backrest bars, (like Grabners who took over Semperit) and which I’ve found prone to bending when used with a firm footrest tube.
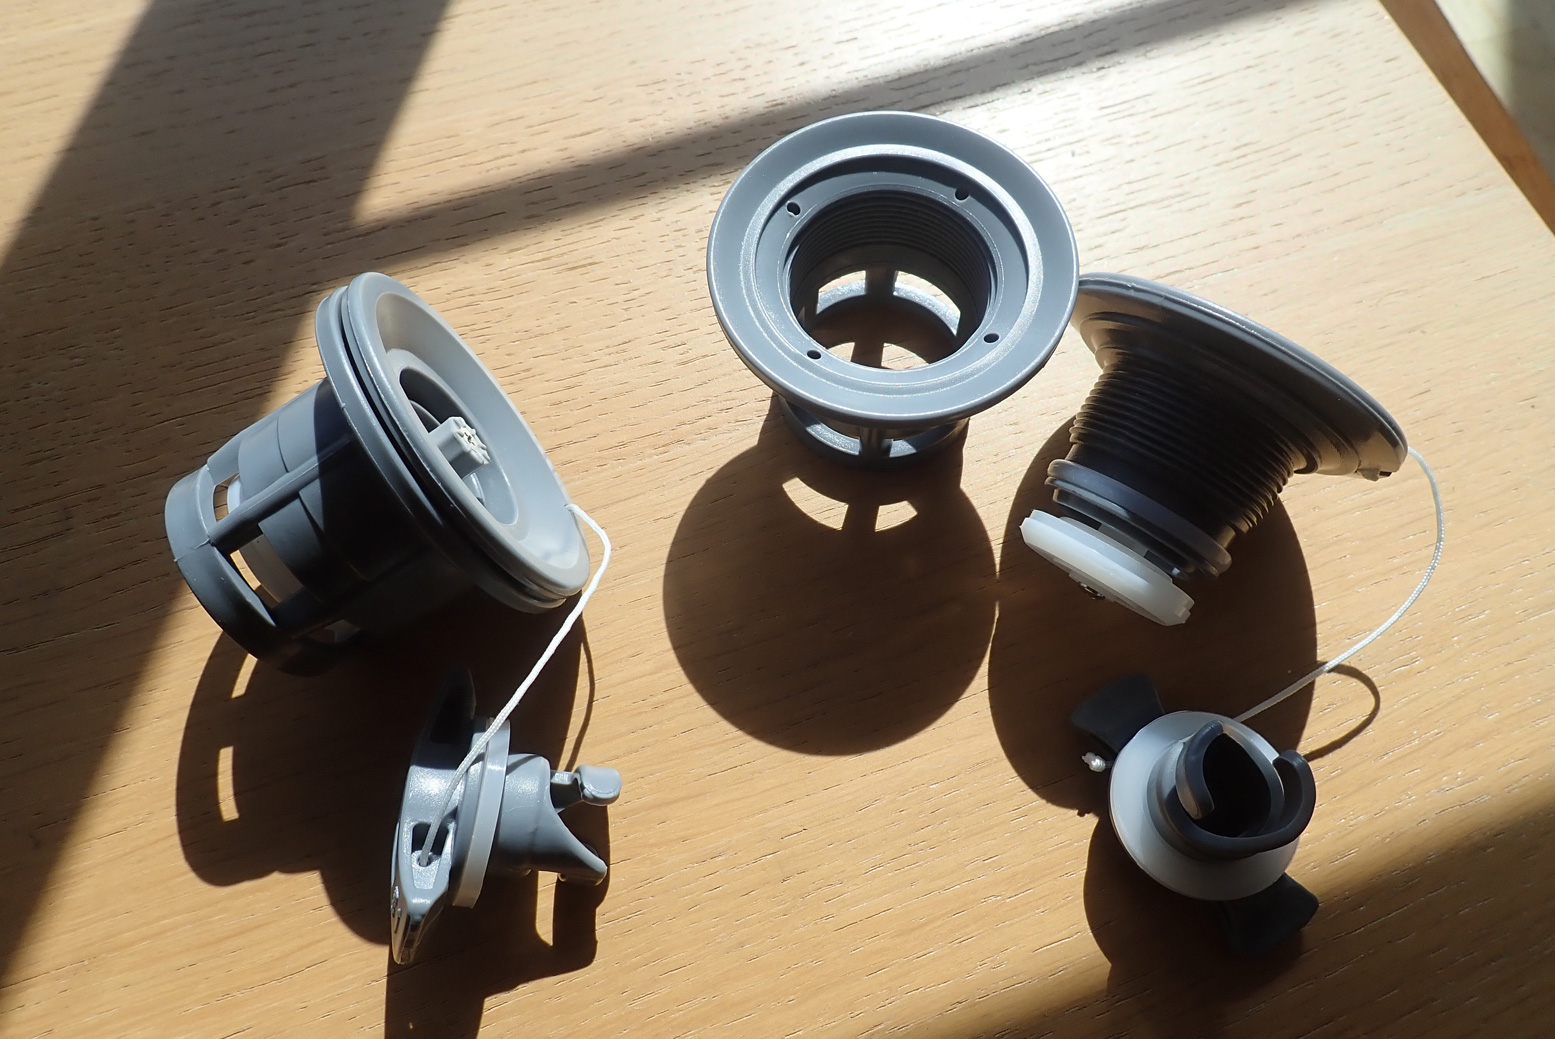
There’s also a squished up full-length keel strip along the bottom. If it works for tracking it will be nice not to have the usual skeg-grounding aggro in shallows or on land. But maybe that keel will slow down turning which is why they have the rudder attachment? We shall see. With twin side tubes the Forelle is just 70cm wide – that’s <28″. But with a thin floor and me sat low in the high sides I’m sure it will be stable enough. Gumotex still use them for their seats, but the ‘lilo plugs‘ on the three chambers are a bit of a faff for getting a good charge of air.
If the Semp proves viable, I may replace them with proper IK valves. Or I may just leave them as they are. Three £15 Gumotex valves + a £20 PRV will cost the same as the boat, and the lilo plugs can be regarded as their own ‘total loss’ PRVs – when the boat gets too hot they pop! And anyway, there’s no room to fit a big IK valve in the floor as the tubes are too close together. Knock-off Halkey valves go for 7 quid; I might stick a couple in the sides and leave the lilo plug in the floor.
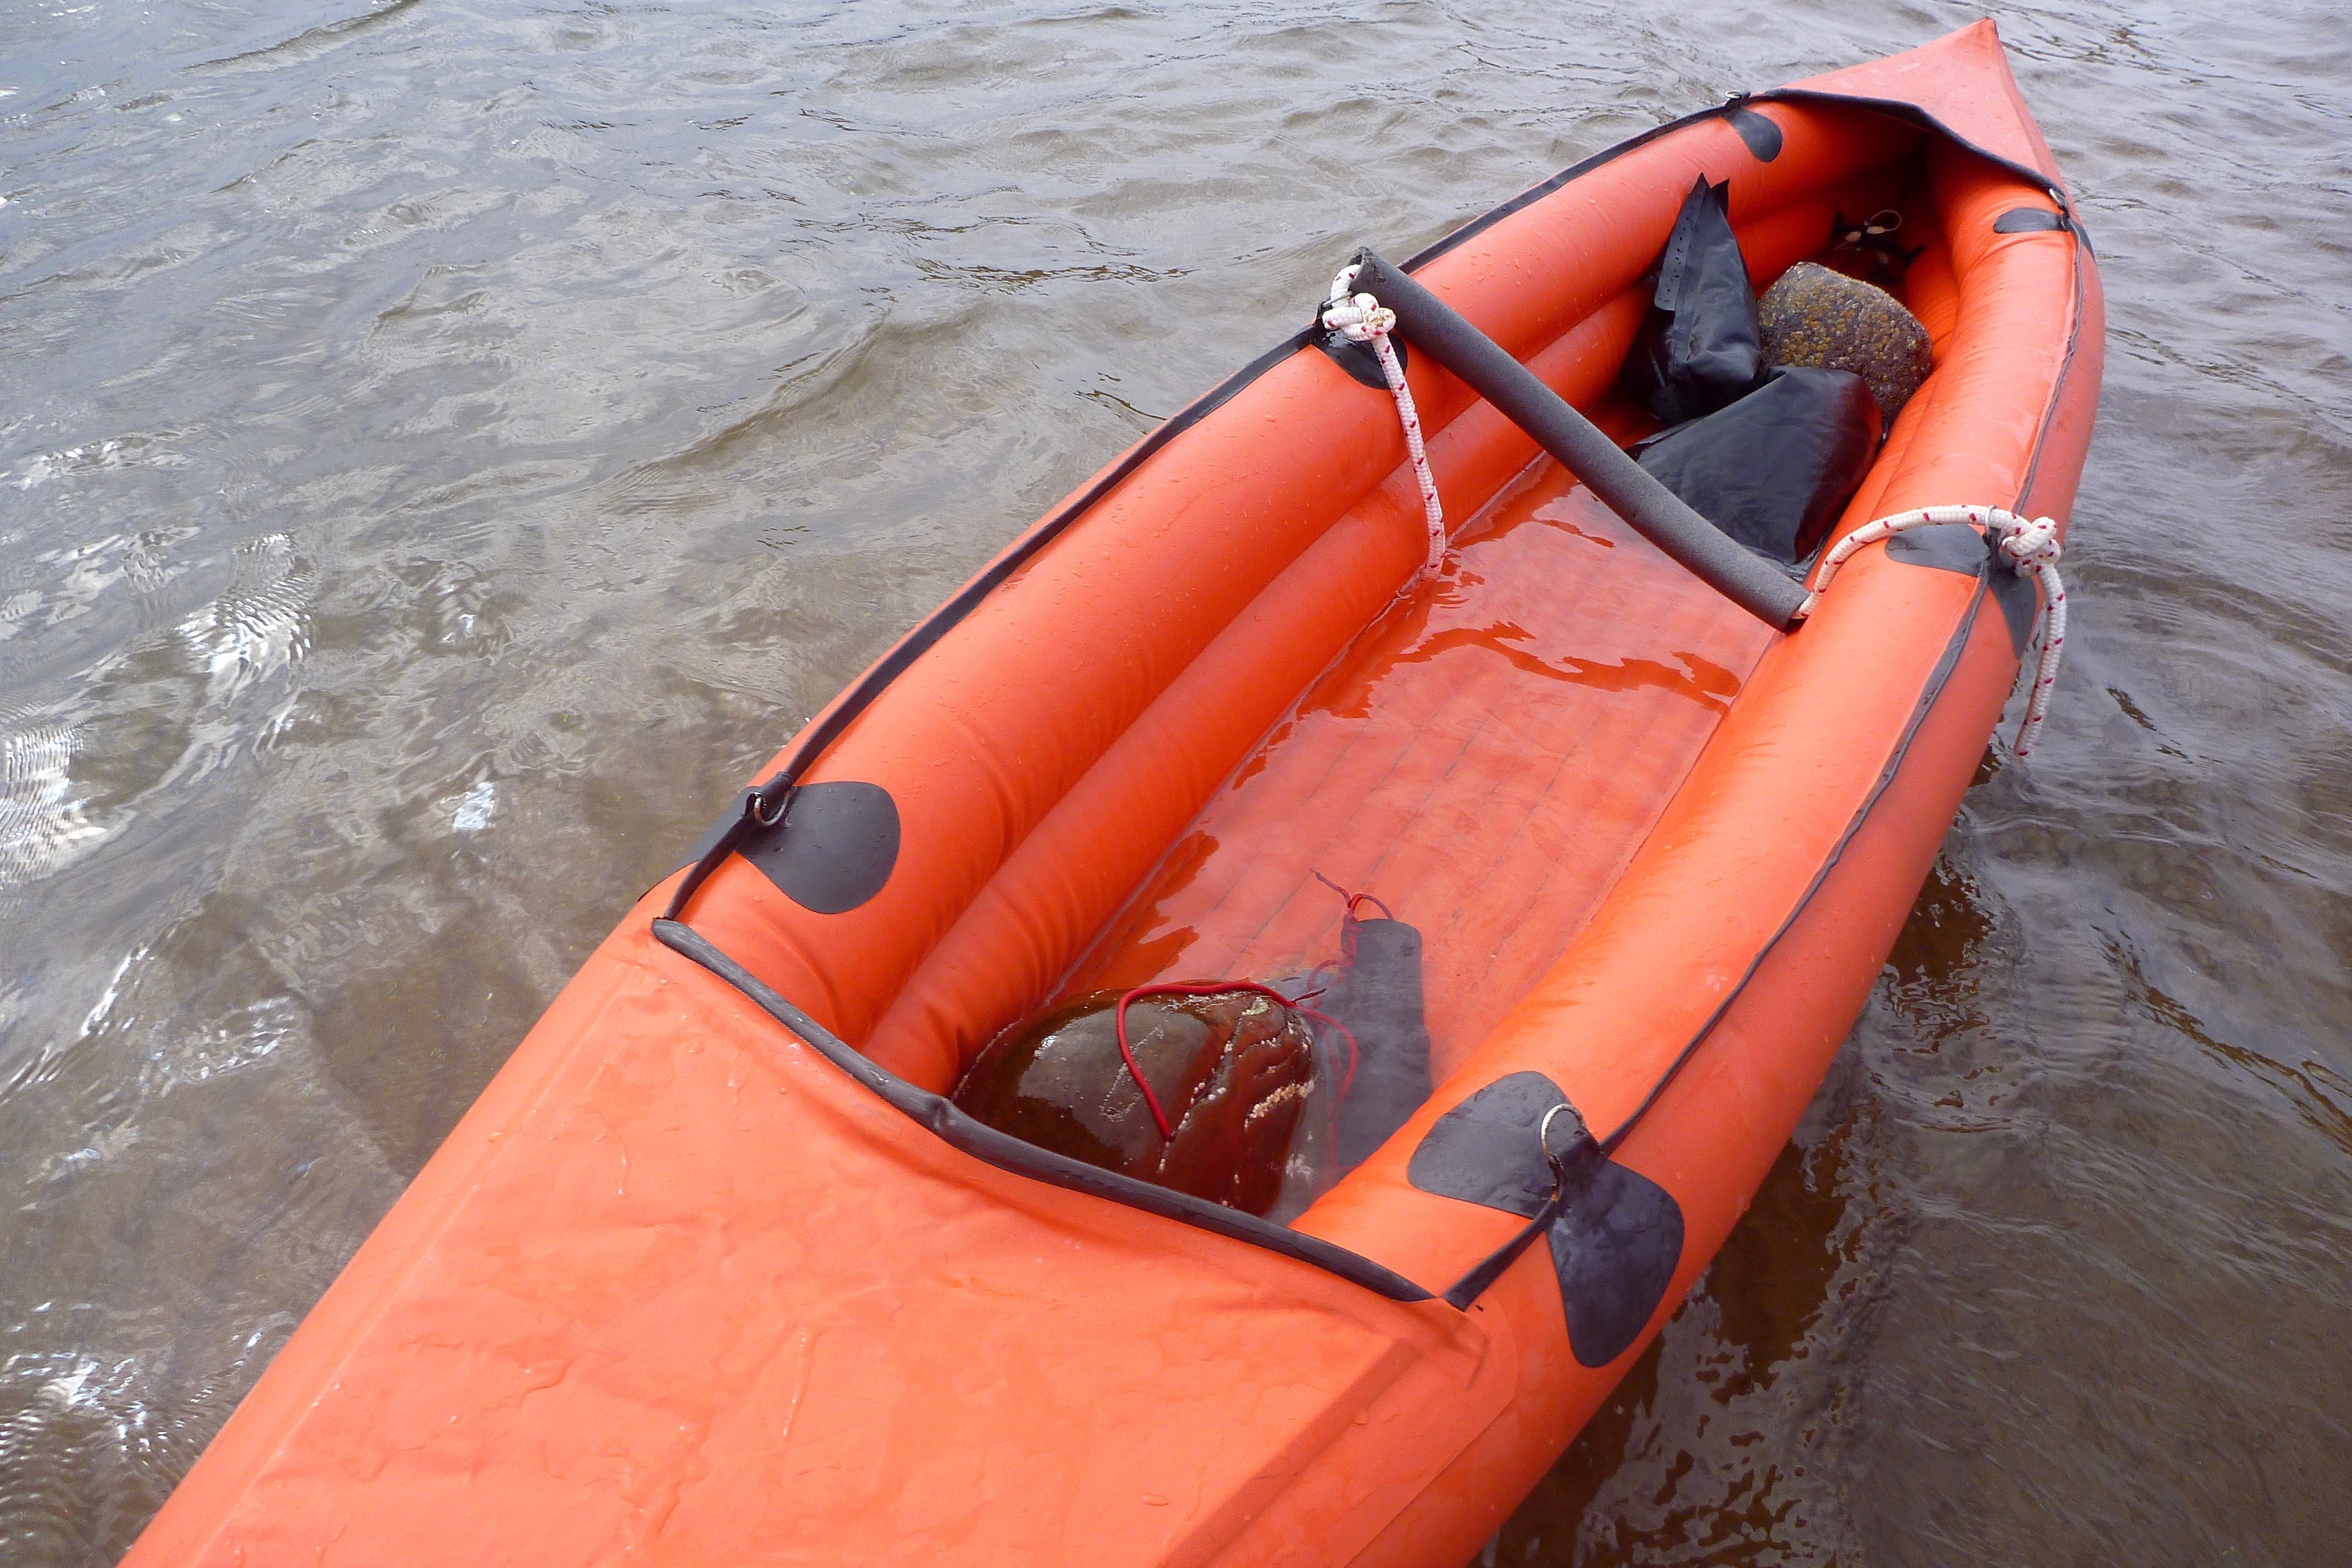
I put it back in the barn with my other restoration project for a couple of days. When I came back it was limp but not draped over that cabinet like a wet pizza. I pumped up and it stayed firm enough, though I’ve forgotten how mushy an 0.2 bar IK feels. It reminds me why I seriously took the idea of trying to increase the rigidity of my old Sunny before getting other IKs. At the beach I filled it with water and stones – no obvious leaks, (or so I thought). A testament to 40-year-old hypalon and glue.
Have to say too, once pumped up, for an IK the old trout is not bad looking. I think the discreet upsweep of the bow, that plywood ice breaker and slender twin tubes make it look a lot less of a bloat than some. Sea trials to follow.
Whatever you read here, as much as anything, choosing an IK with a deck is more about personal preference than function.
Most inflatable kayaks are like canoes and have no deck. A few like the Gumotex Framura and Swing, or the Grabner Explorer and Decathlon X500 and some Advanced Elements have fixed decks. Others like the Kokopelli Moki or Gumotex Seawave (flashing above) have optional zip-back or velcro decks.
Above, a yellow Incept K40 with a zip-back deck, the one and only time I used it like that. And later, when I bought my Seawave (above left and below) I got the optional fully removable deck thinking it might be handy. I tried it once, took some pictures, never used it again and sold it.
Other optional deck IKers have said the same: nice to have the option but never actually use it. Both these boats needed fibreglass or alloy spars to support the deck from below and keep it convex to make water run off. It all just adds to more stuff and set-up time.
For me, one of the big attractions of an open IK is it’s so much easier to hop inand out – even from deep water you can easily crawl back abroad which makes it safer. It’s easier to pack or unload the boat (below), as well as dry, clean or work on it. Any touring luggage will surely be in dry bags anyway and better touring IKs have plenty of attachment points. Best of all there’s no need to faff about with spray skirts and cags to match, and I find it’s so much more agreeable to paddle in the open air and not feel hemmed in. If it’s cold or inclement, I wear a drysuit.
If you come from hardshell or folding kayaks you might think a deck’s a good idea, but length-for-length hardshells are heavier, less stable and less buoyant than IKs. All that means they slice through waves better and sit much lower in the water so need to allow water to wash over the decks. Also, with a hardshell, knee blocks on the underside of the front deck are crucial in the way the paddler interacts with their boat, creating a solid connection for bracing or pivoting against the swell. For better or worse, raft-like IKs are wider and less tippy. Using thigh braces and a solid footrest (below) is about as close as it gets to improving that ‘sat on a log’ IK feeling; you can’t realistically brace your knees under an IK’s fabric deck.
IKs sit higher in the water than a hardshell and swamping only occurs in rough seas or white water, especially in less stiff, low-pressure boats, as I found with my Sunny in Western Australia (below). Rough seas aren’t really suited to IKs, at least not alone, and full-on white-water IKs like the Gumotex Safari, Hyside Padillac or the NRS MaverIK have self-bailing floors so what comes over the sides drains away. But even an unbailing IK will still float when full of water (as I also found in WA), so a bailing pump (left) or more simply, a sawn-off plastic bottle scoop (left) are handy things to carry if out at sea for a while.
The ability to roll is an important skill if using a hardshell in rough water, but you’ll need taut thigh straps and quite a hip flick to roll a typically wider IK, with or without a deck. In an IK, if you capsize you just fall out then flip the boat back over if necessary and crawl back on. With a fixed deck IK that becomes much more awkward (below), just as it is in a hardshell without help, as we found one wet weekend. Solo, a paddle float is essential. Without one I couldn’t do it – and that was practicing in nice calm conditions (below). In dire straits I’d have unzipped the K40’s deck to get back in. About the only thing I do miss with a deck is somewhere handy to mount nav aids, cameras and other useful stuff in front of you. I get round that with a pfd with pockets and Peli box or a waterproof packbag between my knees.
Update 2019: I’ve not used my MYO rudder since I made it in 2016 and sold it with the boat in 2020. Partly because I’ve only done day trips predicated on nice weather, but also it’s all just more faff and clutter, not least the lines and footboard. As explained earlier, for multi-day trips you must deal with the winds you’re given so a rudder is a good idea. But even then, you only notice your relative lack of speed (due to sidewind paddling correction) alongside others. Alone, you’re as fast as you are [grasshopper]. Rudders are not about steering as they are on powered boats; in a kayak they’re about enabling efficient, balanced paddling on both arms by compensating for the boat’s deflection by side winds.
While waiting for rudder bits to turn up, we went out for an evening paddle round Eilean Mullagrach. It was pretty calm but at no point did I think, ‘Darn, I wish I had a rudder’. When it came to turning corners we just paddled hard or dragged a blade and round we came. But the Seawave rudder project carries on like a supertanker with a jammed… rudder, if for no other reason than it’s fun to experiment and a rudder can also work as an articulated skeg when locked out – something I may look into when it’s all done.
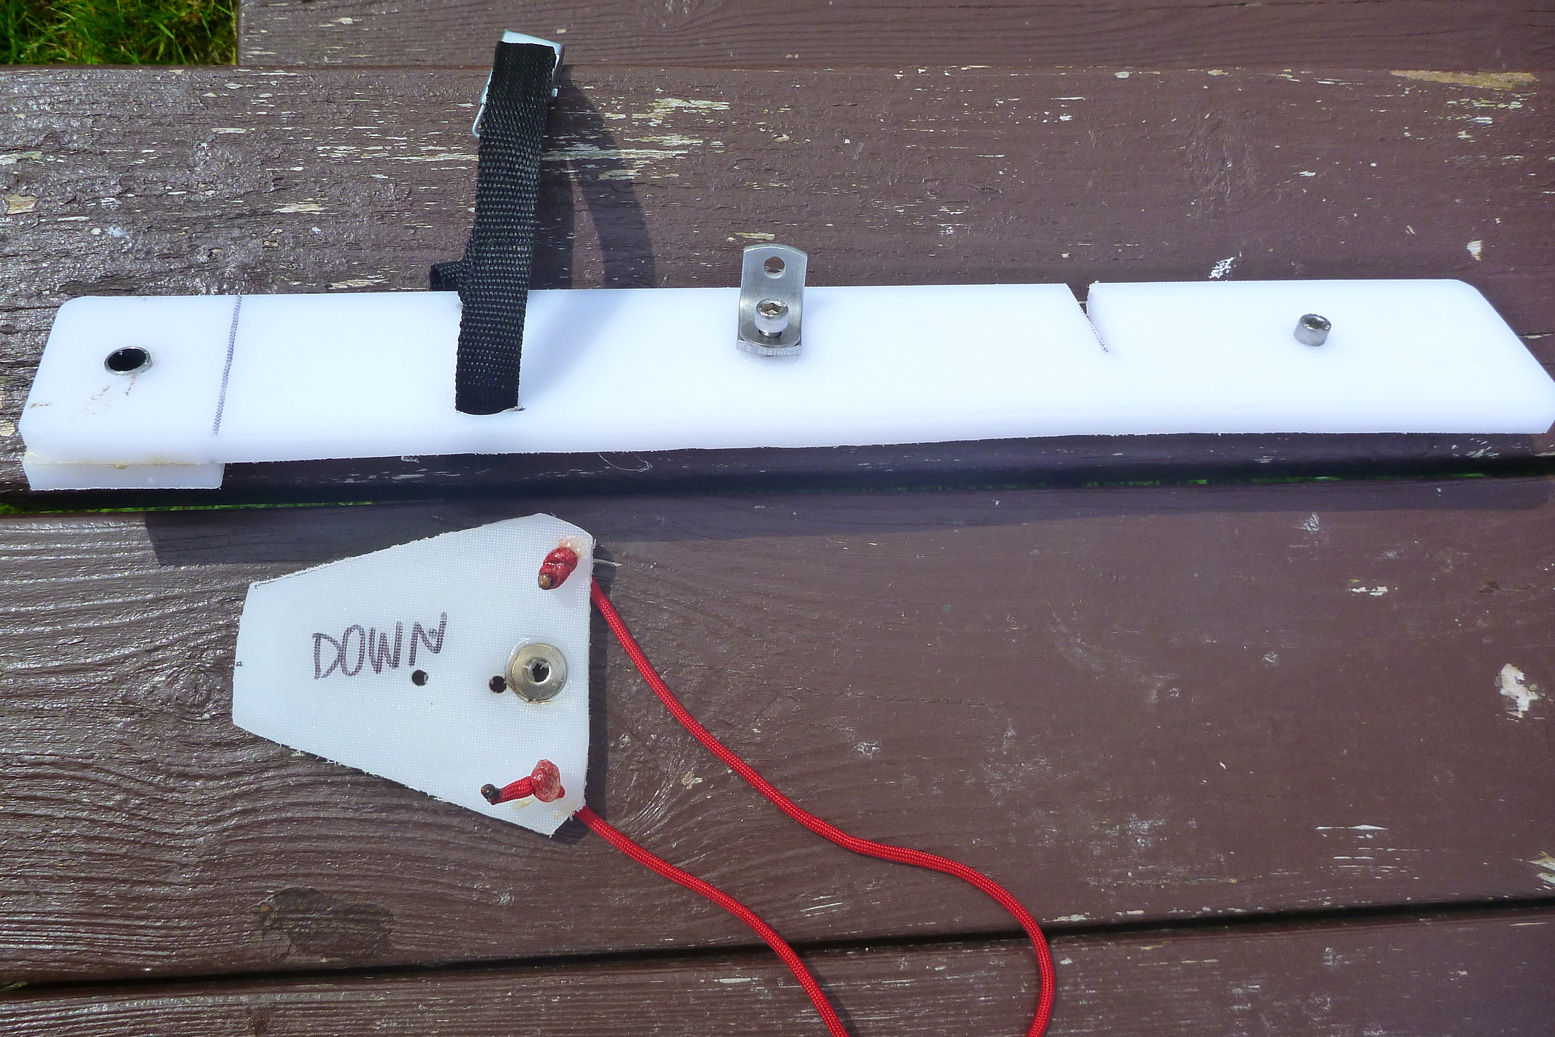
Ironing out the flaws with the prototype added up to attaching it more securely at the back and making the pedal board out of something more responsive and durable. By coincidence, all these components can be sawn from a single piece of 450 x 300 x 12mm LDPE chopping board (above) which costs from £8 on eBay in a range of colours. This is 50% thicker than the smaller board I used on the prototype plate so doesn’t need doubling up and gluing to make it rigid.
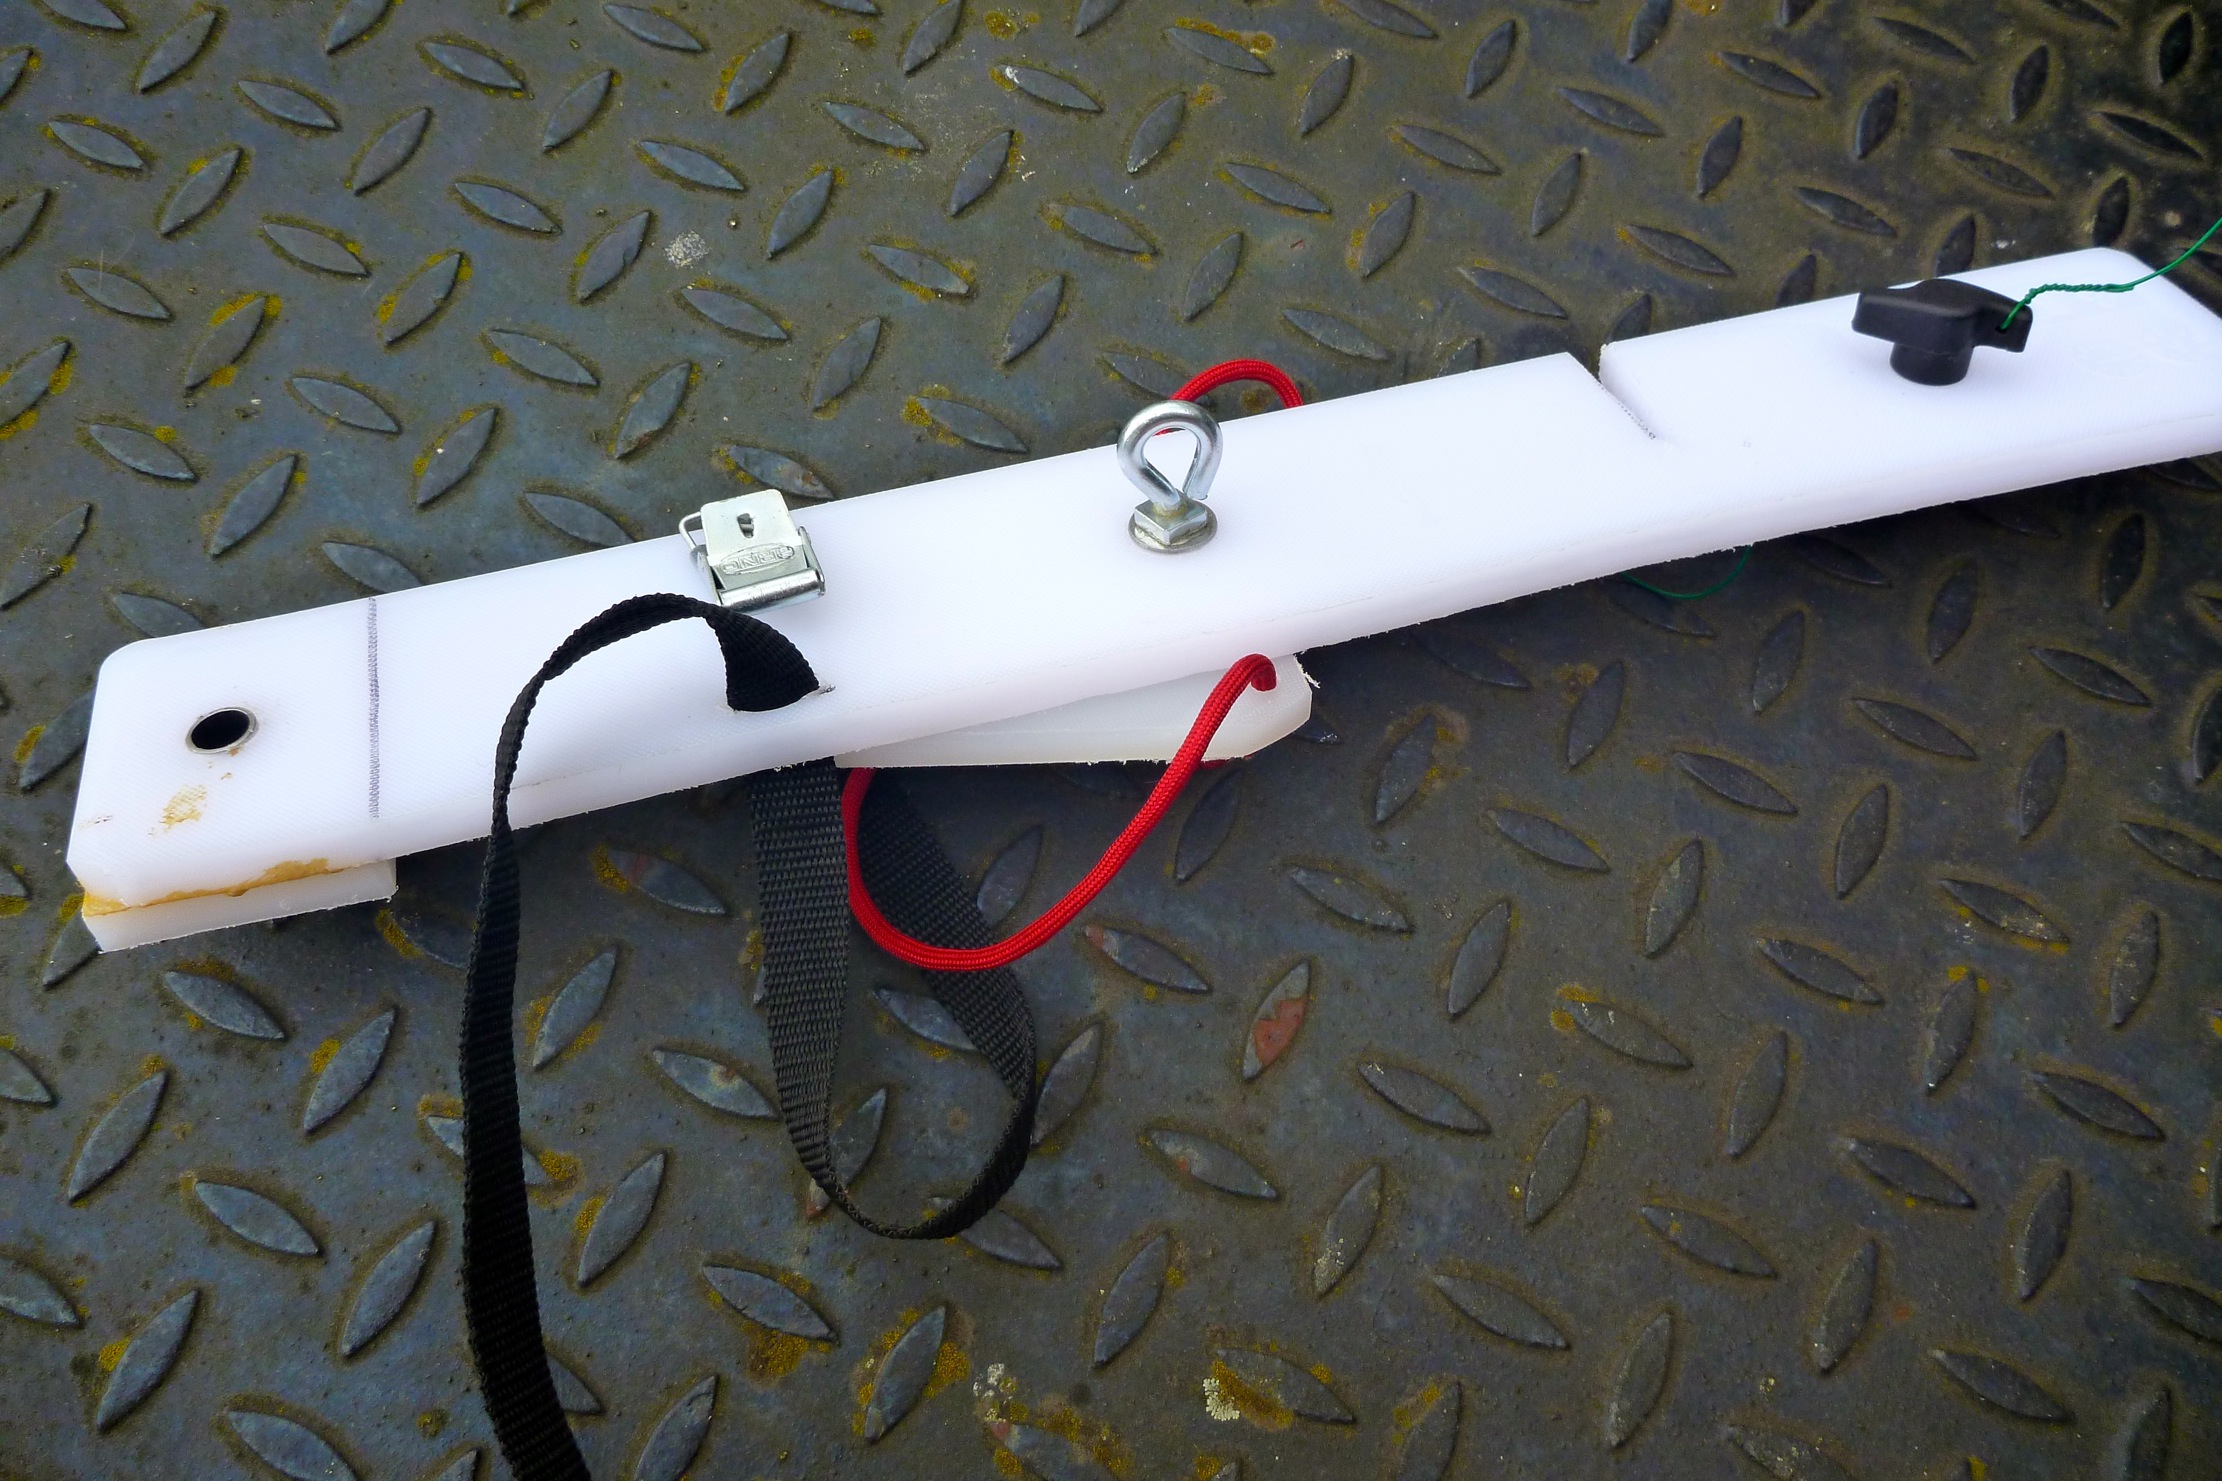
At the back I slimmed the rudder plate right down to a simple strip of 65mm x 450mm, glued a block on the end to better support the gudgeon swivel pivot sleeve and added the crucial second fixing under the portaging handle (above left). I also added a triangularish screw plate underneath (left, with red cord) so it all sits snug in the stern. With the hardware and saddle strap that now adds up to 306g (the rudder unit weighs 450g with its running lines). Even though it’s slimmer than the proto plate, it weighs about the same because it’s now 12 mil. But looks a whole lot neater.
The pedal board is from the same slab but uses stainless hinges, not zip ties. I’m reminded, you’re constantly making small adjustments as you paddle so pedals need to be as taut and responsive as possible. Once I’d trimmed the board and pedals a bit (left), with hinges it came in at 660g. The board and maybe the pedals could have been made from 8mm if there was some to spare – but an 8mm board wants to be ~450mm wide to sit snugly in the boat’s side channels. Like the rudder, the pedal board will be subject to strong forces in heavy seas so also needs to be solidly jammed in. Meanwhile, I noticed the floor-laminate prototype board (right) gained nearly 15% in weight after getting wet – a sign it won’t last long. Still, it made a good template.
I do wonder if something like the Grabner rudder pedal bar (left, similar to Gael’s old H2) would be much lighter, as solid and as effective as my board. It costs €70 plus €30 for a pair of Zoelzer pedals. I can’t really see how I could replicate that alloy footrest bar – out of copper tube filled with resin perhaps (like this motorbike rack)? It’s held securely in place without fittings by being jammed in the channel cavity between the floor and the sides (like my board), but a check with Gael advised me against it. As it happened, I’d pretty much decided the same mid-test run (below). A sliding ally bar plus seawater isn’t a great combination and might bend or break, or the pedals snap. I know the ally backrest bar on my Amigo wasn’t up to it and Gael’s backrest broke (though it was ancient). My plastic version may weigh double but should be solid. Interestingly, just as a bag of clam cleats turned up to make a quicker way of fine-tuning the rudder pedal lines from the cockpit, I see left that Grabner use them – a good sign.
The weather here’s about to crack and then we’re moving south, so in a rush I took the revised rudder plate out for a test with the creaky waterlogged pedal board. Heading towards Horse Island tidal passage, I didn’t need a weatherman to know which way the wind blew: from the WNW at about 12mph.
Initially, the boat needed constant small corrections to maintain a course, and there was some stiction, hopefully down to the zip ties on the soggy pedal board. I tried a few tight turns and marvelled at the control and how sharply the boat swung round like a pedalo. The rudder plate is now as rock solid as anything fitted to an IK can be. Again, I consciously tried not to correct with my arms, just my feet, which were twitching regularly.
At Horse Island I was way too early to pass through the passage, but as it was probably my last paddle here till next year, I decided to head for Badentarbet. Turning north, closer into the wind the micro corrections were no longer needed and the boat ran as if on a skeg, but without arm corrections. I’m pretty sure paddling 20–30° off the wind would have required arm steering, but I just hacked away towards Rubha Dunan on the mainland as the wind increased. When I tried a bit of downwinding, protracted rudder juggling was needed to keep the back-end in line.
I passed through a channel on the headland and the NW wind got steadily stronger so crossing the bay to the beach seemed to take ages of effort. By now the small corrections I’d been making were no longer necessary, perhaps something had bedded in, the knots had tightened up or, like riding a bike, I’d just got the knack of minimal rudder movement to keep the boat on track. But upwind paddling is comparatively easy so I tried across the wind, now running over 15mph, and a bit more downwinding which gave me that unsettling Ningaloo feeling. This must be the weak point of a buoyant, windprone IK (especially when unloaded), and maybe all kayaks and canoes too. The chop was only a foot high but were there a swell of a metre or more, the rudder would be briefly lifting and the stern sliding. I wonder if in such conditions a combination of rudder and skeg (which is always submerged) might be a way of limiting weathercocking? Or perhaps just more practice is required. There’s also another solution that might arrive here in time to try out.
As I neared the beach the wind was hard in my face but I realised I was actually on good form, unlike on the Tanera run with the prototype. So I hammered away with all I had until my strake hissed onto the sands. Paddling hard is all helped by my brilliant, bent-shaft Werner Camano paddle, no less than ten years old this summer. It still clips together with a satisfyingly ‘clunk’ and has very little play. If it ever got lost or abducted by aliens I’d buy another without hesitation.I was glad I’d got stuck into a longer test run than planned, and am now confident my MYO Seawave rudder is in the ballpark. Hopefully, the new pedal board will complete the job.
Total weight: 300g rudder plate + 450g rudder + 660g pedal board + ~100g rigging = 1.51kg (3.3lbs), or < 10% of the boat’s weight
For about £200 posted I could have installed a 2016 Seawave rudder kit, but from all the images I could find at the time it was unclear exactly how it secured at the back – there must be their version of an unseen triangular underplate, but even then it’s still a stressed-out single point attachment. My additional under-handle fixture eliminates any chance of pivoting.
And the plywood Gumotex footboard (right) appears to sit loose and seemingly will also pivot on that single strap. Production versions may differ and let’s not forget that adding all this complexity also adds a risk of breakage or damage. The simplest solution is usually the best, but the 160-g skeg will always be clipped in the boat as a back-up and a Seawave is controllable (if much slower) with no tracking aids at all. It’s worth remembering: a rudder isn’t about day-to-day tracking, it’s about maintaining a course when the boat gets pushed about in stronger winds. In such conditions a skeg is essential and a rudder is an improvement, as explained here.
On the beach, prior to lugging the boat over seaweed-clad boulders, it took only 30 seconds to unclip the rudder mechanism from the plate to pre-empt stumbling and damaging it. Since then I changed the rudder plate mounts with tool-free knobs and an eyelet (above). When rolling the boat up it was best to pivot the rudder plate around the drain hole 90° to pack better.