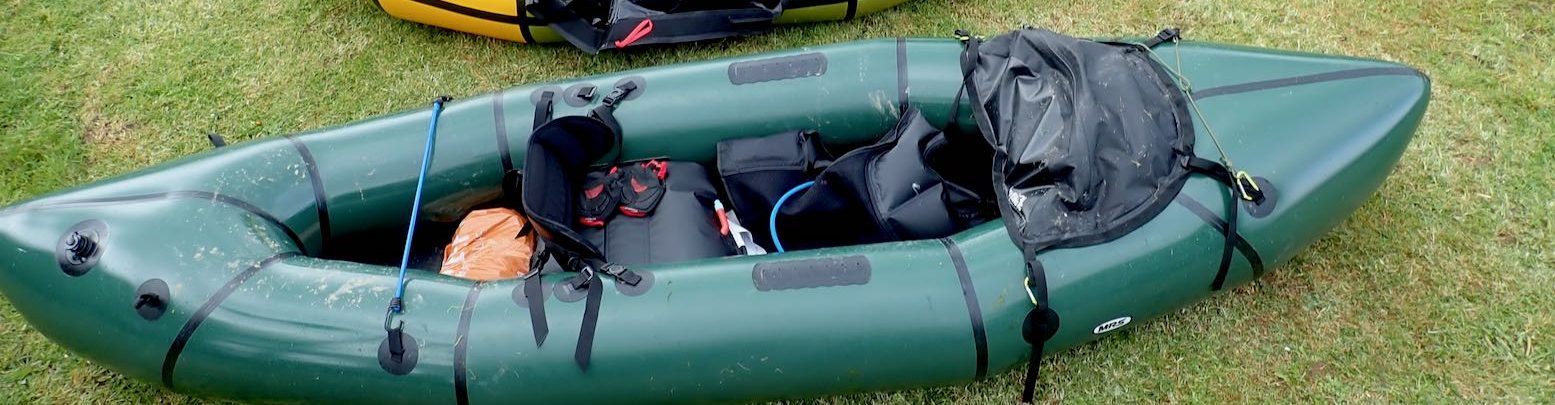
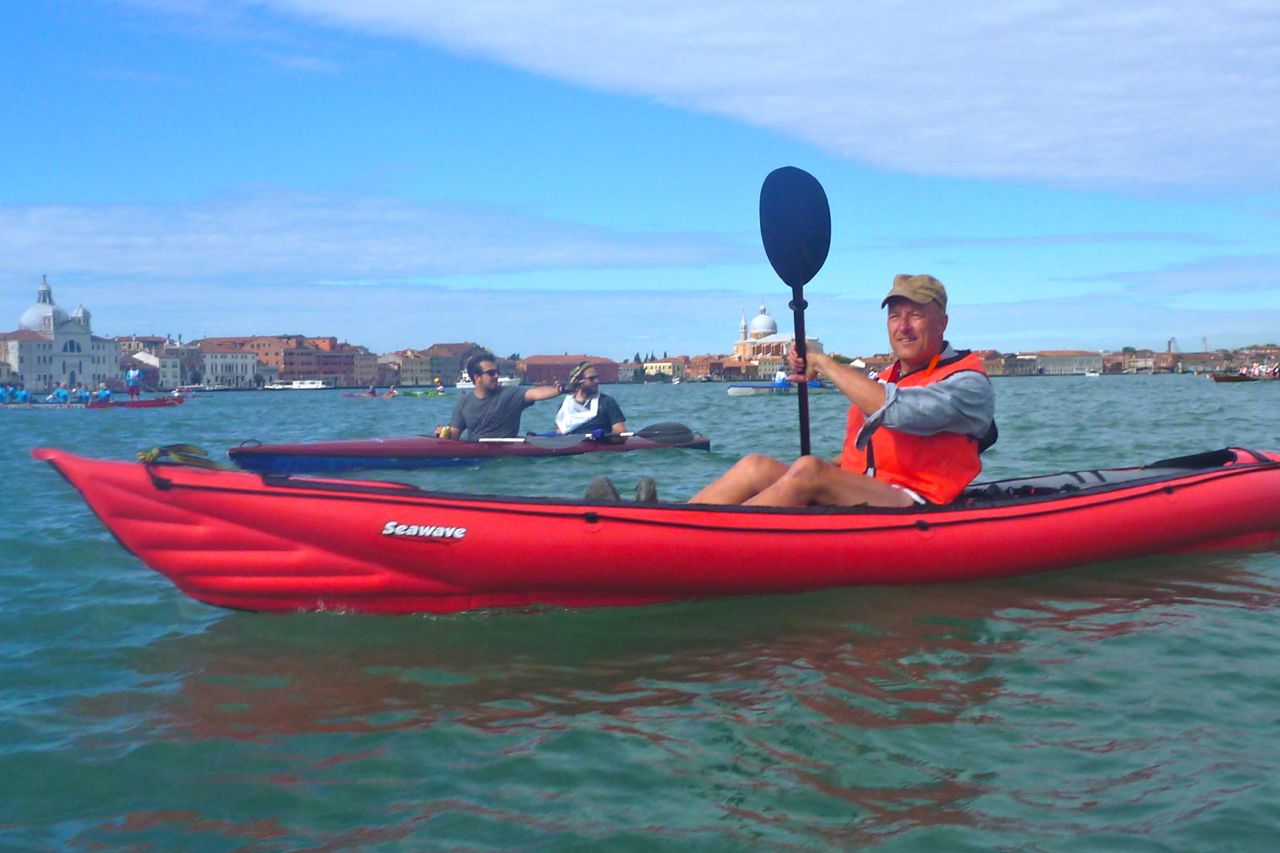
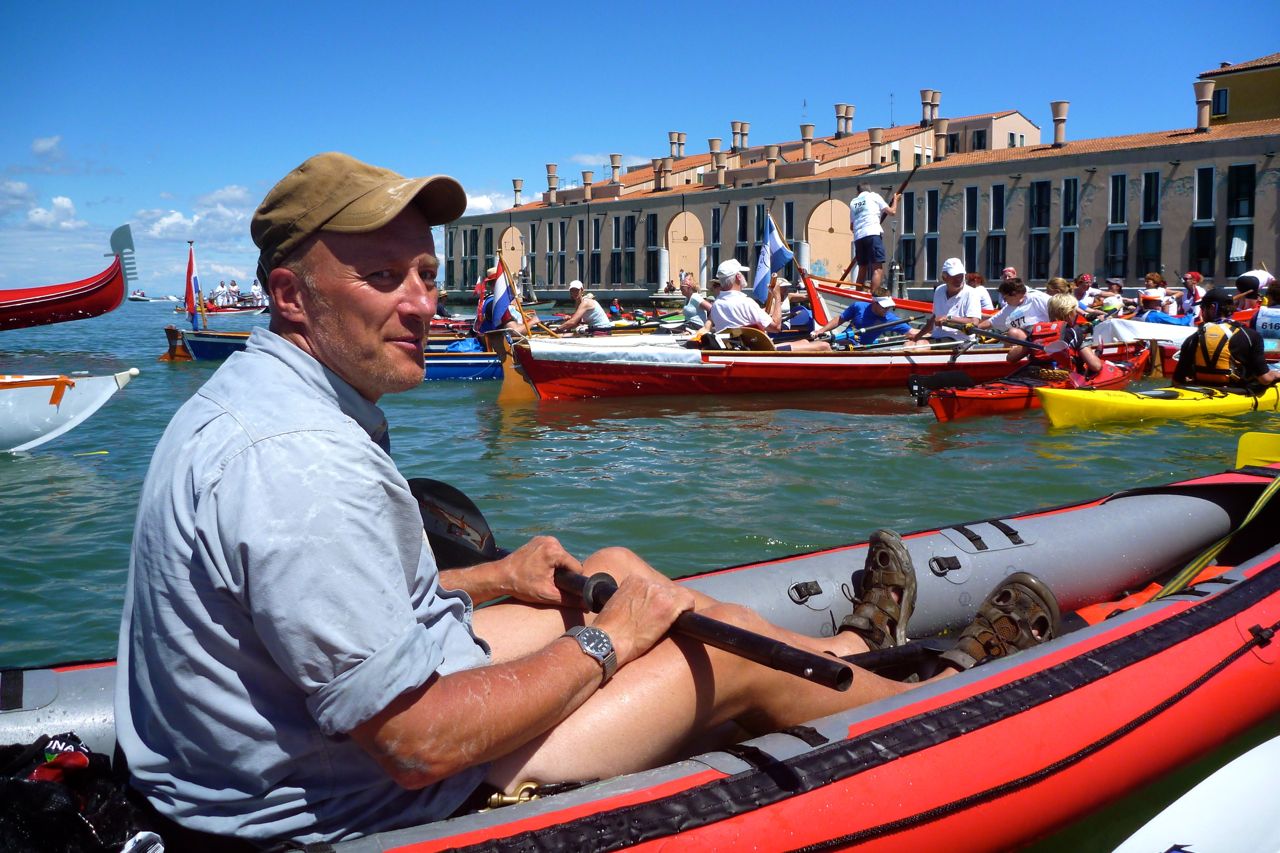
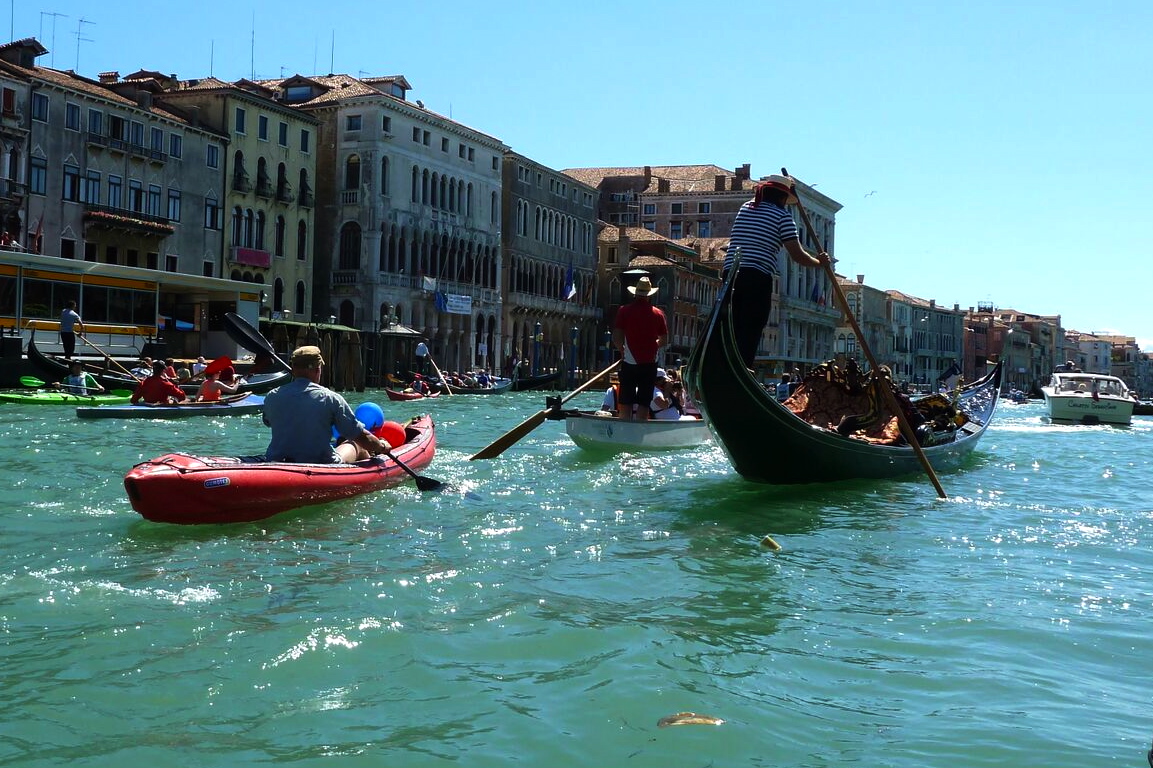
I’ve had the Seawave a few months but paddling in Venice last week was my first proper outing. Venice lagoon was pretty calm on the day – there was more wash inside the Grand Canal from the vaporetti water taxis. It may have been calm but some 34kms without a river current and some tidal flow is still a pretty good outing.
It was an opportunity to try my high pressure modification. I’m running 35% more pressure in the side tubes (4.8psi as opposed to the advised 3.6) but have fitted PRVs (pressure release valves) rated at the higher pressure to prevent the boat getting damaged if it gets hot. Full story on how I did that here.
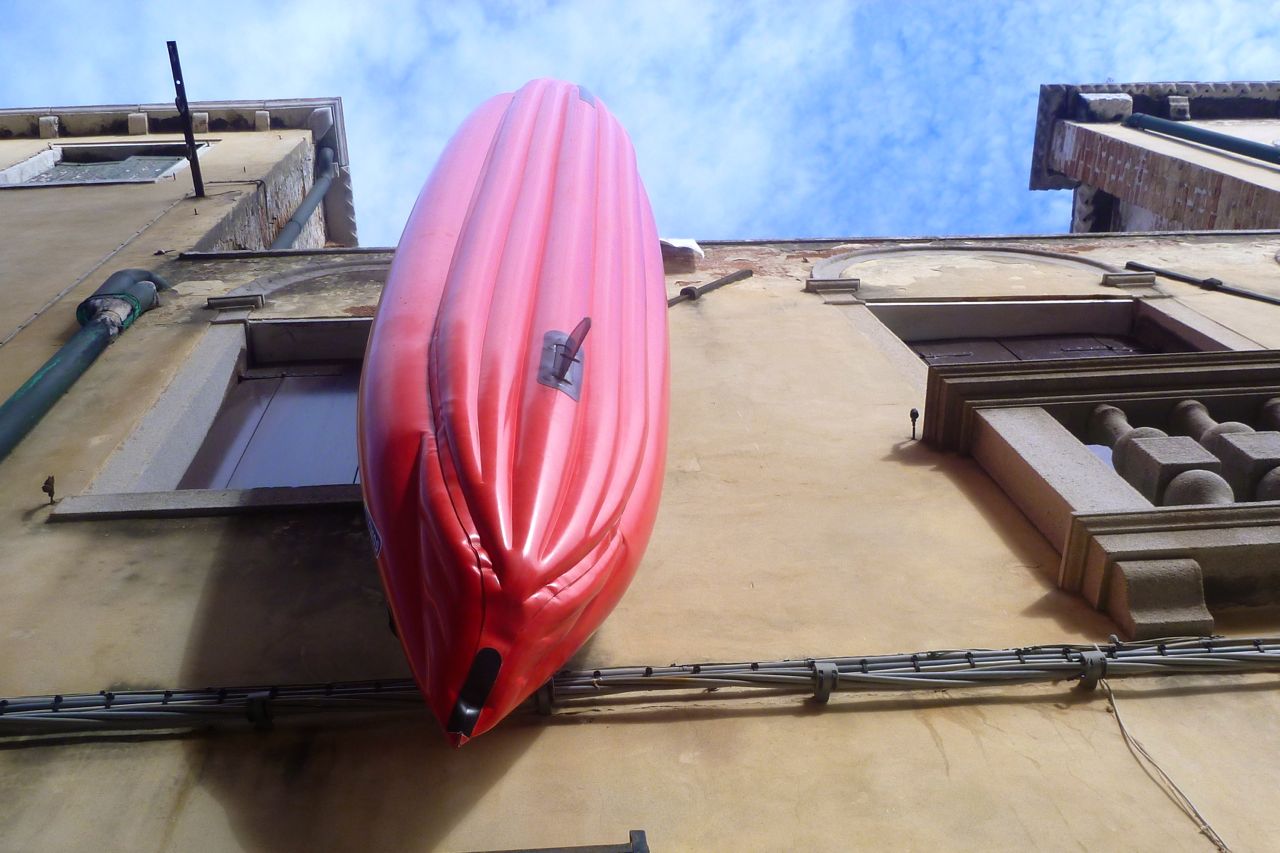
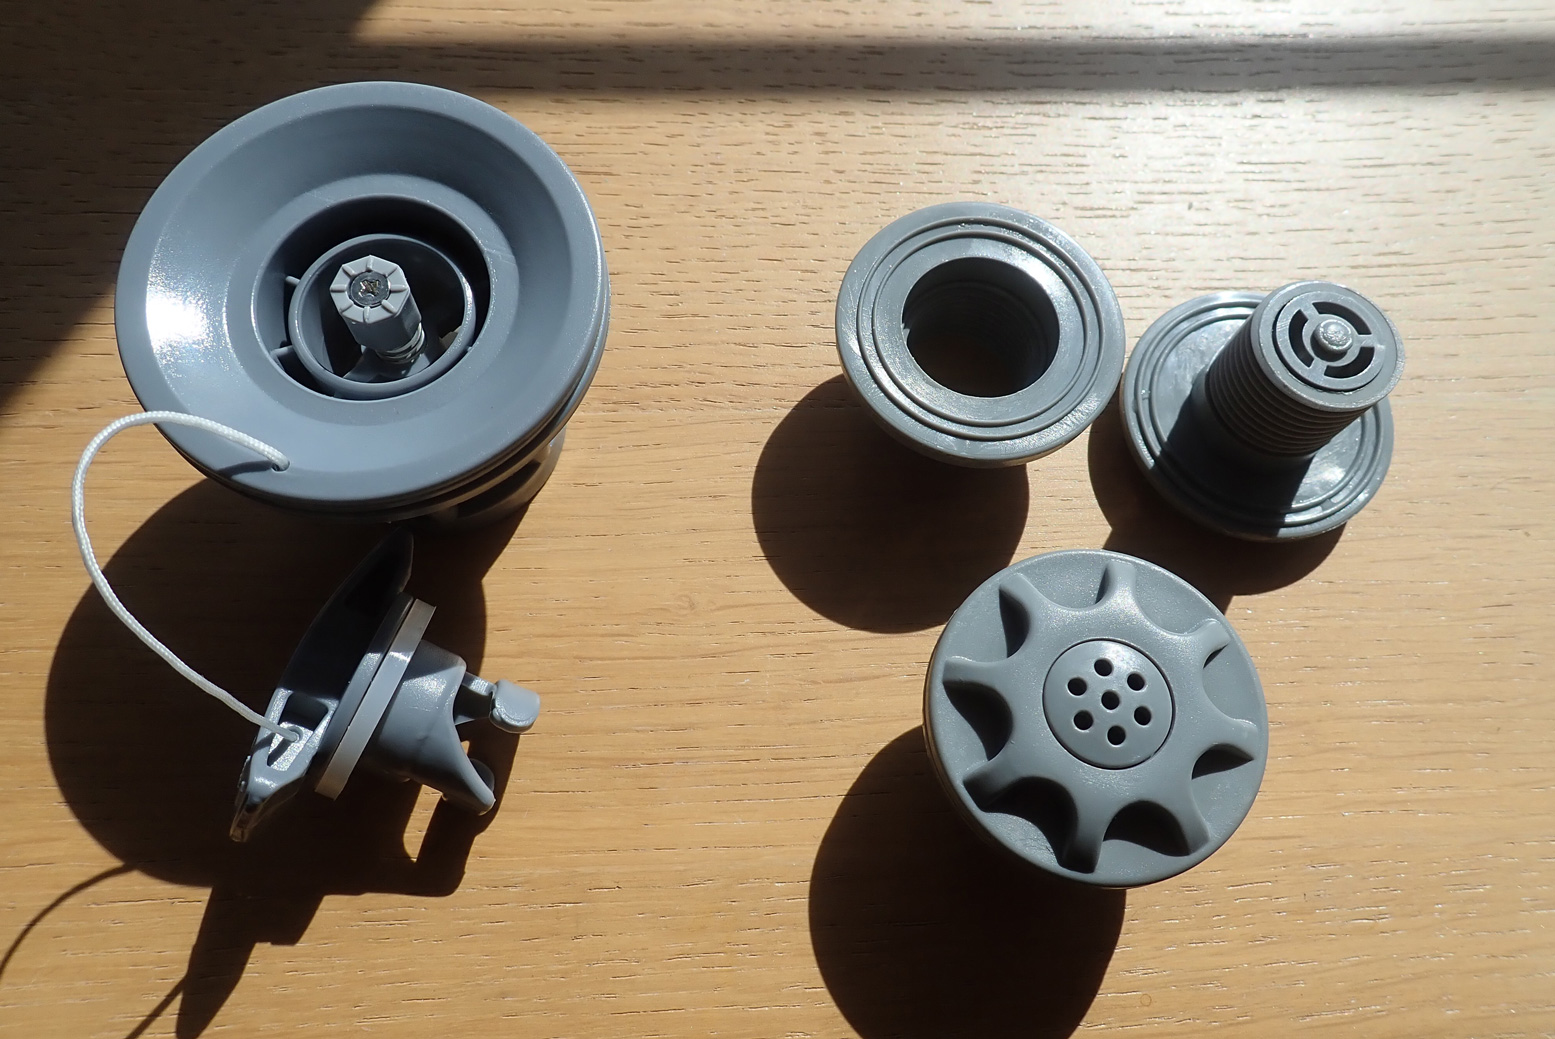
It took about 15 minutes to pump up the Gumotex with the compact K-Pump (left) but before we lowered it down to the canal (above) it went flat. Oh dear – did I do something wrong? Turns out one side-chamber inflation valve (not new PRV) was leaking. I unscrewed it, blew at it, put it back and it held all day. Probably just a bit of grit, though that’s never happened to me before.
My impression was the high pressure sides made the Seawave faster and more responsive – well it’s bound to, isn’t it. Returning to the apartment I didn’t feel like I’d paddled 21 miles, though I can’t say I was full of beans next day and my hands were swollen from using my 4-piece paddle (easier on Easyjet) instead of my bent Werner Camaro. I found it easy to keep up with Steve in his big yellow Kahuna and even found myself passing the odd hardshell sea kayak or double folders. On earlier trips in the Amigo I couldn’t catch the Kahuna. All those benefits might change in windy or choppy conditions, though there’s much to be said for an IK’s stability when things get gnarly.
So three cheers for my Seawave HP. The short terms gains of high-pressure sides are not so elusive, of course. What remains to be seen is if running the boat 35% over the factory-advised pressure affects durability – ie; did I go too far choosing the PRV setting. I doubt it as poking the sides felt very much like my previous 2psi Gumo kayaks on a hot sunny day. The sides being less in the water will always be prone to getting warm and tight but have no I-beams to get stressed like the floor. Those boats never suffered so I’m sure the Seawave can hack it.
My Gumotex Seawave was a well spec’d IK for my sort of coast-hopping and occasional touring, especially as it was factory rated to run at a higher-than-usual 0.25bar or 3.6psi (Gumo normal is 0.2). That means greater rigidity which adds up to less longitudinal sag caused by paddler weight (who, me?!) . And of course a better g l i d e. My previous Amigo and Incept both ran an even higher 0.3 bar, and it’s said that this Gumotex can also be pushed to that sort of pressure on the side tubes without risking damage. Factory hull pressures are set on the conservative side to limit warranty claims.
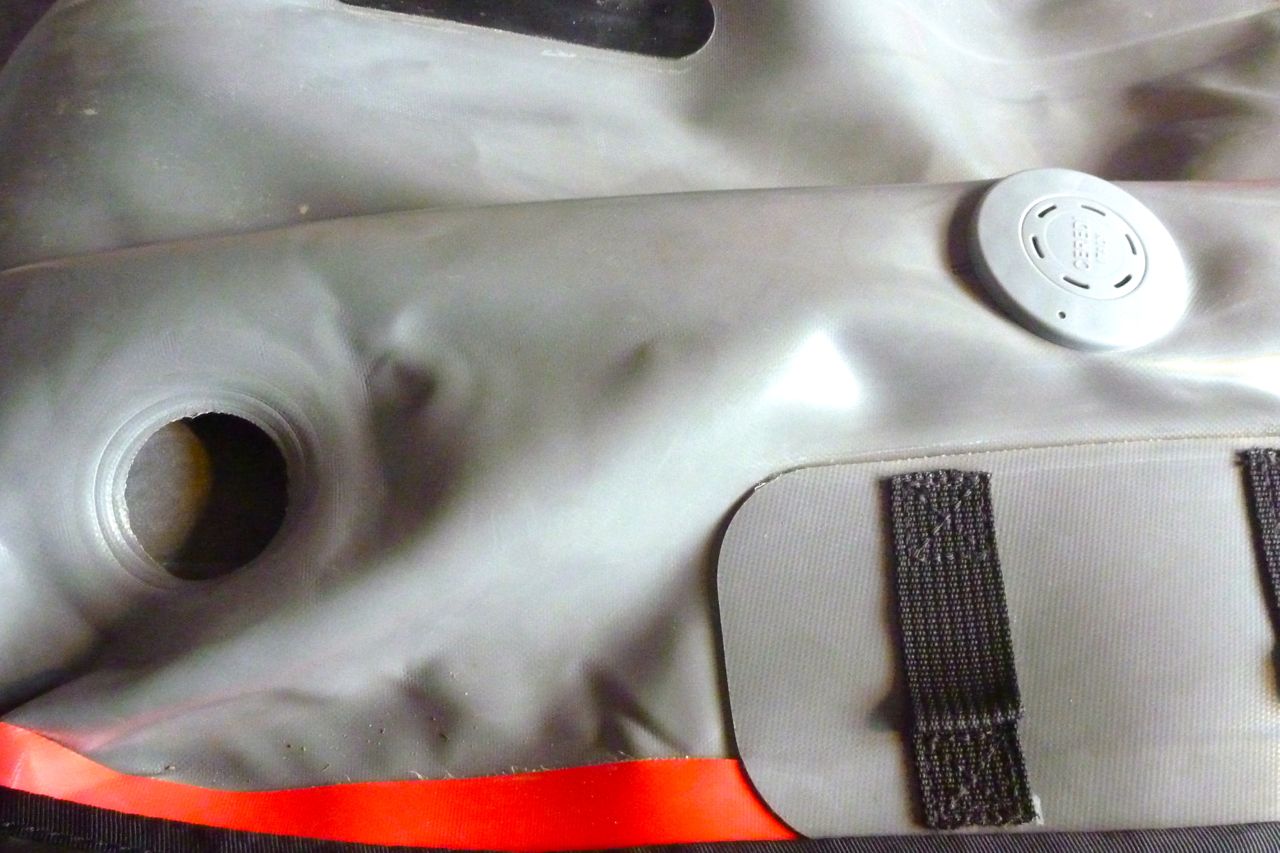
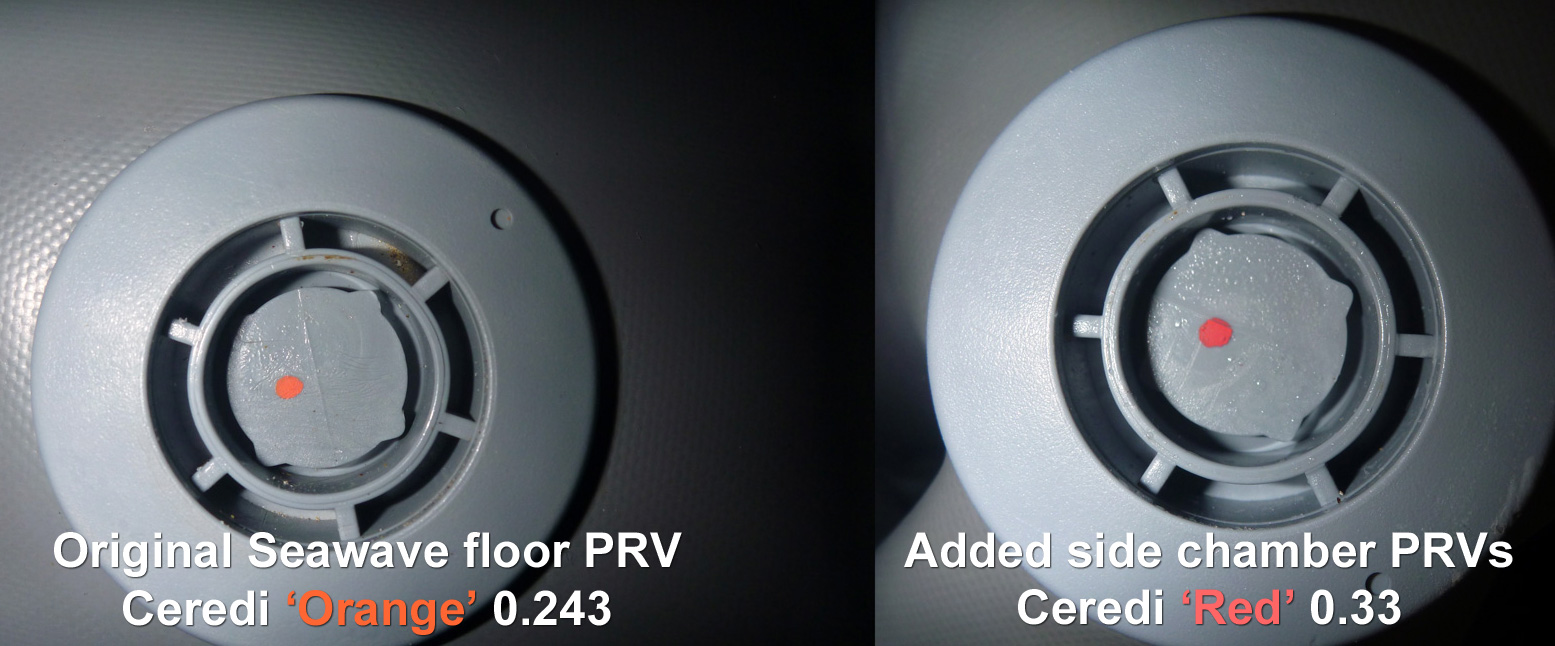
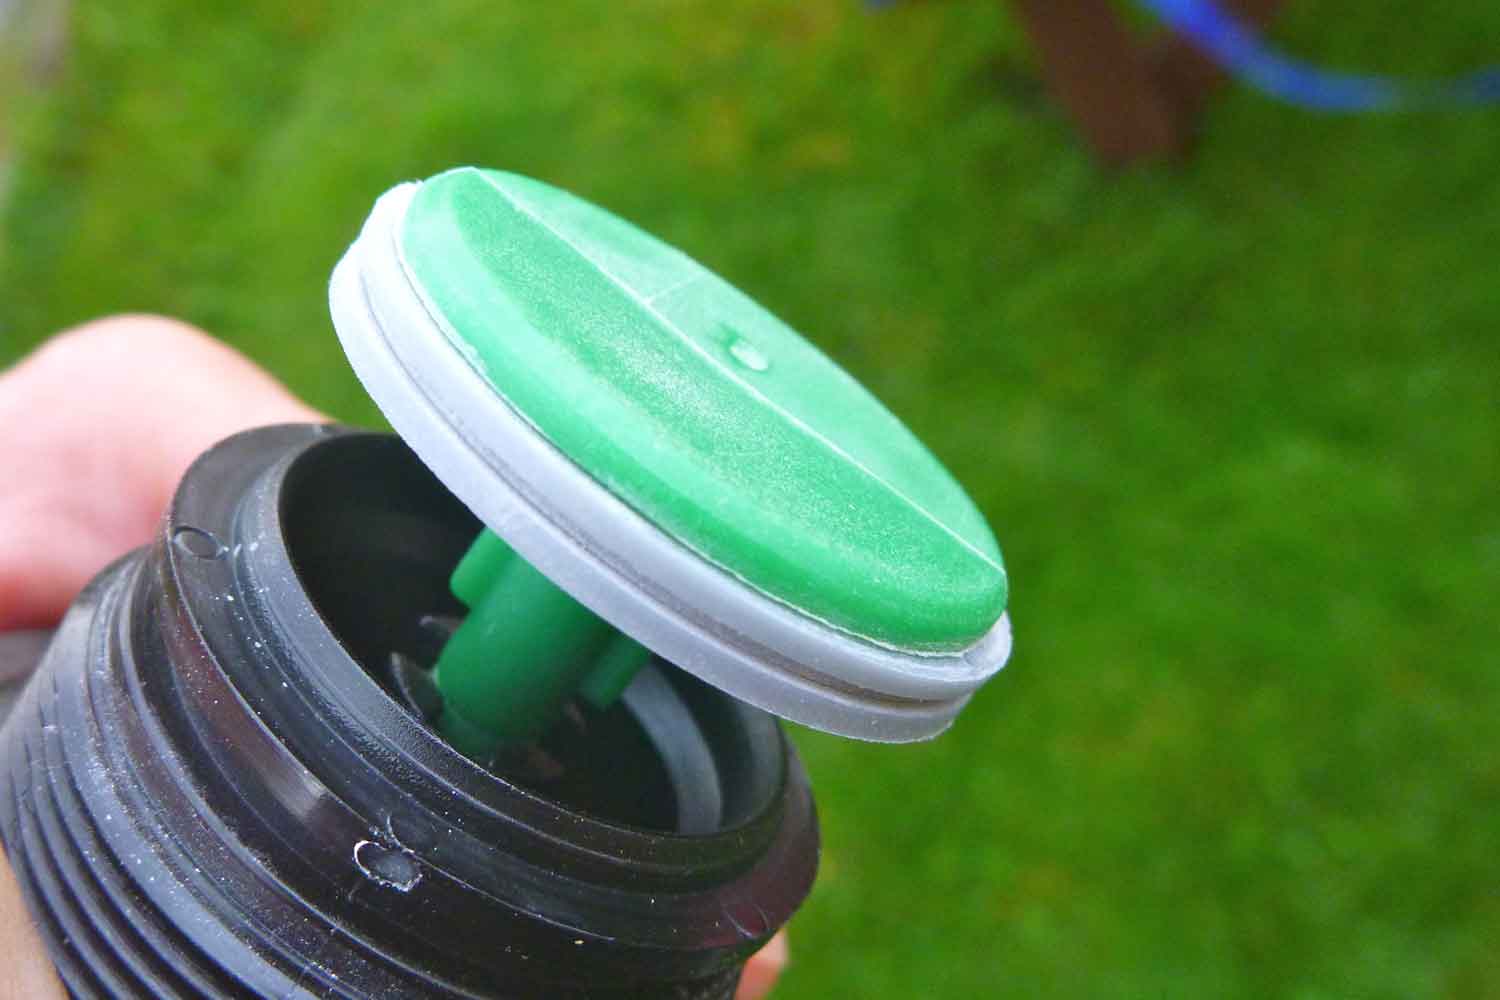
Like all the Gumboats I’ve owned, the more vulnerable I-beam floor chamber has a factory-fitted PRV set at 0.25bar/3.6psi (confirmed below). PRVs are important here as if an IK gets hot (typically out of the water on a sunny day) internal air pressure can increase to the point where seams might rupture. If separation happens to an internal I-beam in the floor it will balloon up and becomes irrepairable. I would not meddle with the factory-set PRV on an I-beam floor. As we all now know, the answer to I-beam floor limitations is drop-stitch technology – effectively zillions on ‘I-beams’ spreading the load over the entire area which enables much higher pressures.
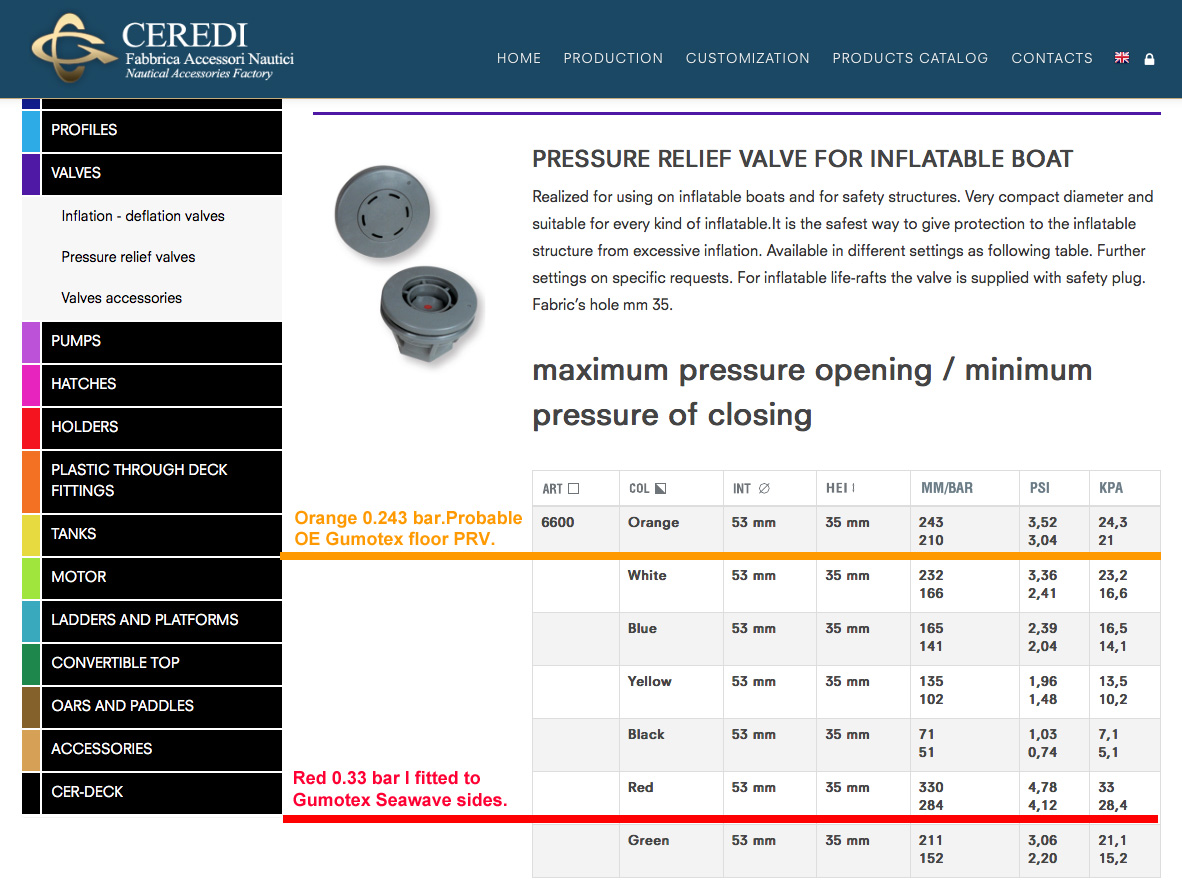
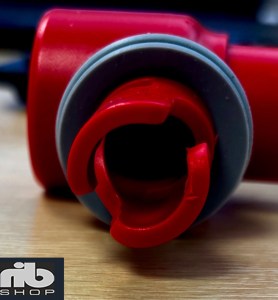
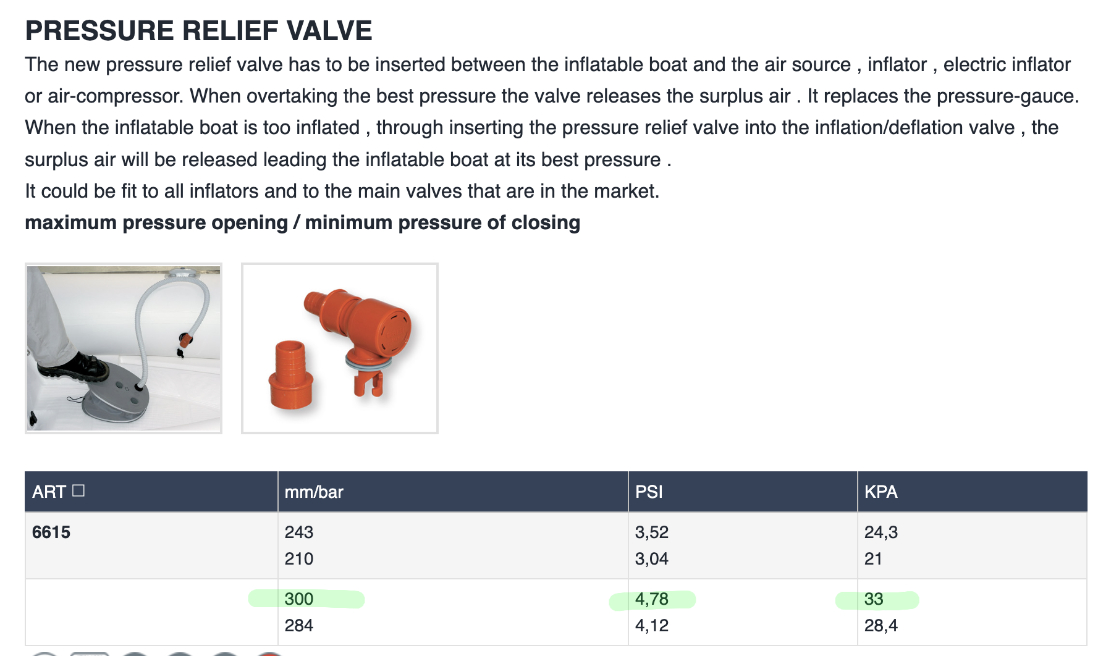
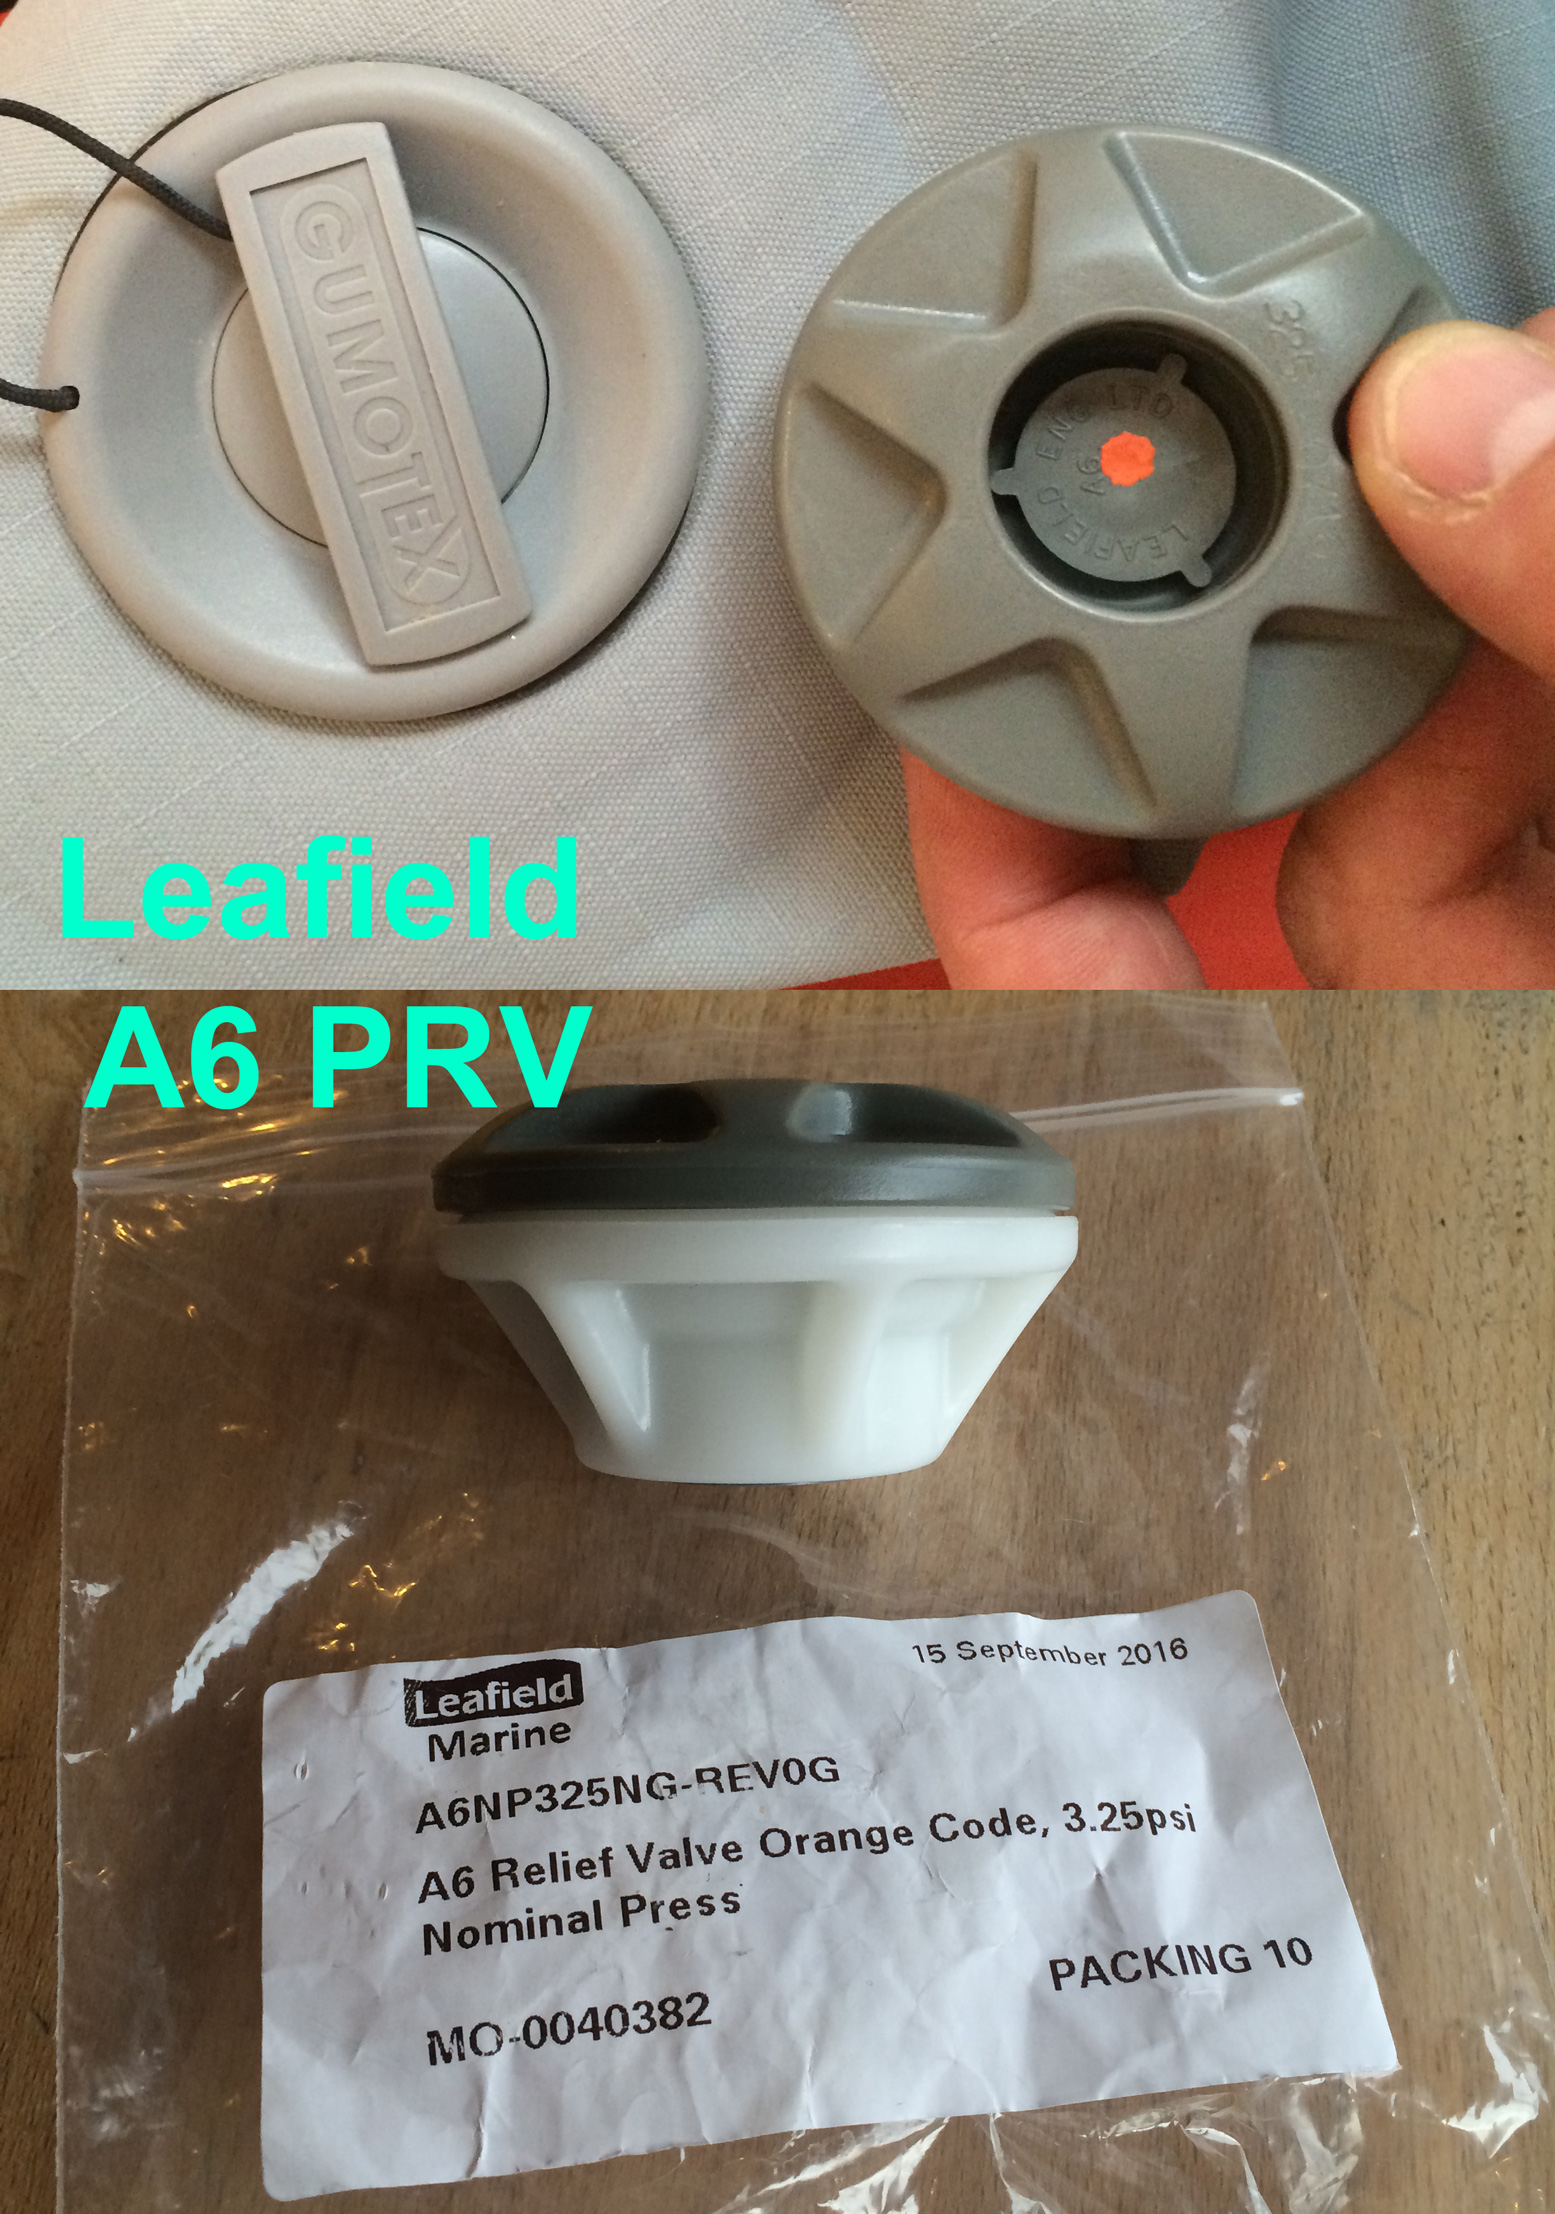
In a discussion with a French Gumtexer, he suggested that Gumotex use the same orange dot 0.243 PRVs in all their boats, irrespective of the stated official rating which is either ‘0.2’ like most – or ‘0.25’ on the Seawave. He sent me a photo of his 2016 Palava floor PRV (left) – orangey-pink, same as my Seawave and classified by Ceredi as 0.243. Officially the Palava is a ‘normal pressure’ 0.2 bar canoe. Upshot? Your Gumboat’s floor may be rated at higher pressure than you think or is officially stated. You’d assume then that the tubed sides can easily handle at least as much pressure. Then again, in the table below, Ceredi state the orange PRV will open between 0.21 and 0.243 so perhaps 0.21 it is and we all just need to calm down a bit.
PRVs use springs set to purge air before pressures reach structure-damaging levels. Then again, my Amigo had no PRVs at all so you assume Grabner were confident their floor construction was solid enough to handle occasional neglect. But I’ve been caught out before and always try to ensure a boat remains in the cooling water when moored up on hot days – even getting up to splash the sides as they tighten up like a drum.
Like most IKs with single side tubes, my Seawave had no PRVs as the tubular profile can handle higher pressures better than the flat, ‘lilo’ floor. However, if you’re planning to run the side tubes over-pressure as I am suggesting, that could be risky. The answer: fit PRVs in the side tubes – just like my old twin side tube Incept. That way you can safely leave you IK out of the water in the tropics, go and hike up a volcano (which might be described as ‘the planet’s PRVs’) knowing that all three chambers will harmlessly purge any excess pressure. Sure, when it all cools again back in the water the boat may be saggy, but better a quick top up with your K-Pump than pulling bits of shredded Nitrilon out of the palm trees. Ideally I was looking for a PRV set at a reasonable 33.33% over the factory figure of 0.25 bar – i.e.: something around 0.33 bar or 4.8psi.
I admit that the colours look pretty closebut it’s pinky-orange for the OE floor and red for my 0.33s
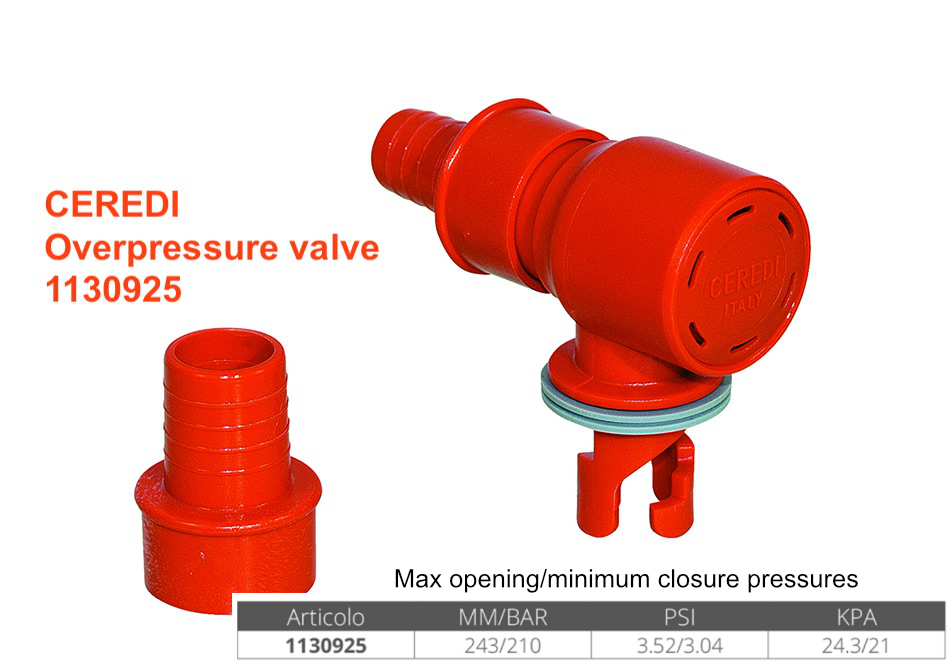
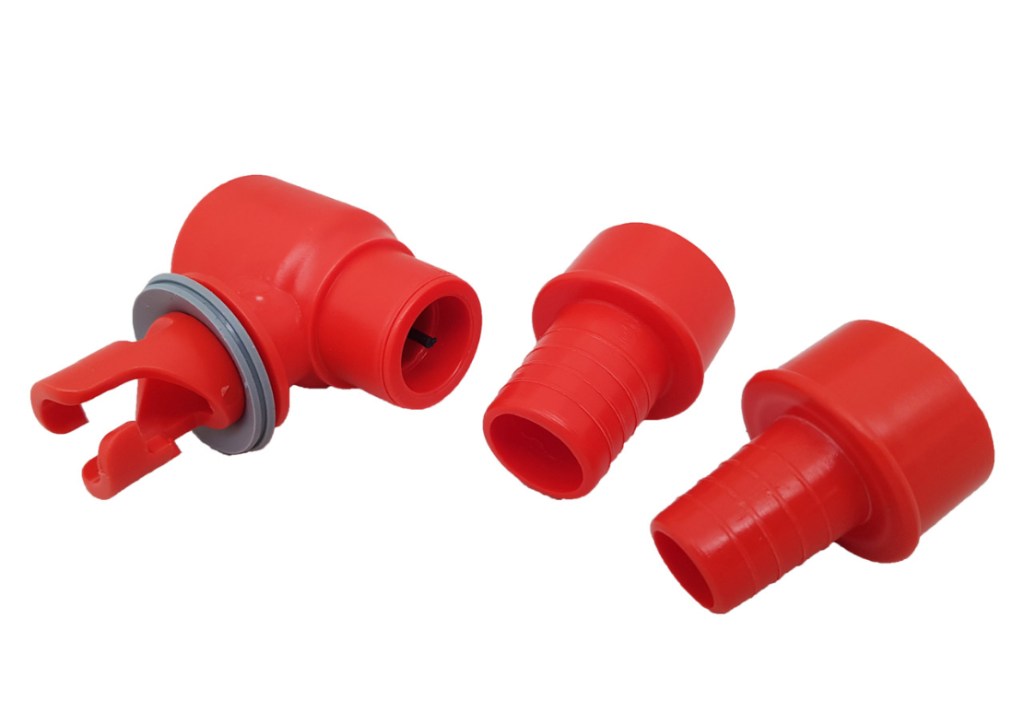
Well-known IK valve-makers Leafield and Halkey didn’t make anything matching my needs (or don’t sell to individuals). The Seawave’s valves are stamped ‘Ceredi Italy’ and once I managed to track them down online, I saw the same Ceredi 6600 PRV series came in options including Red 4.78 psi / 0.33 bar, (above right). In the UK they were a special order via IBS and cost £42 a pair + post.
Ceredi prices too steep for you? On eBay I bought unbranded ‘4psi‘ PRVs from China now £8 a shot and delivered in less than 2 weeks. Note these are smaller than your Ceredi and require only a 25mm hole. The back nut will easily fit through the inflation valve hole, once you remove that. I pressure-tested the valves I received and they stood up to the claim: More here. Search eBay: ‘Air Safety Release Valve Kayak’.
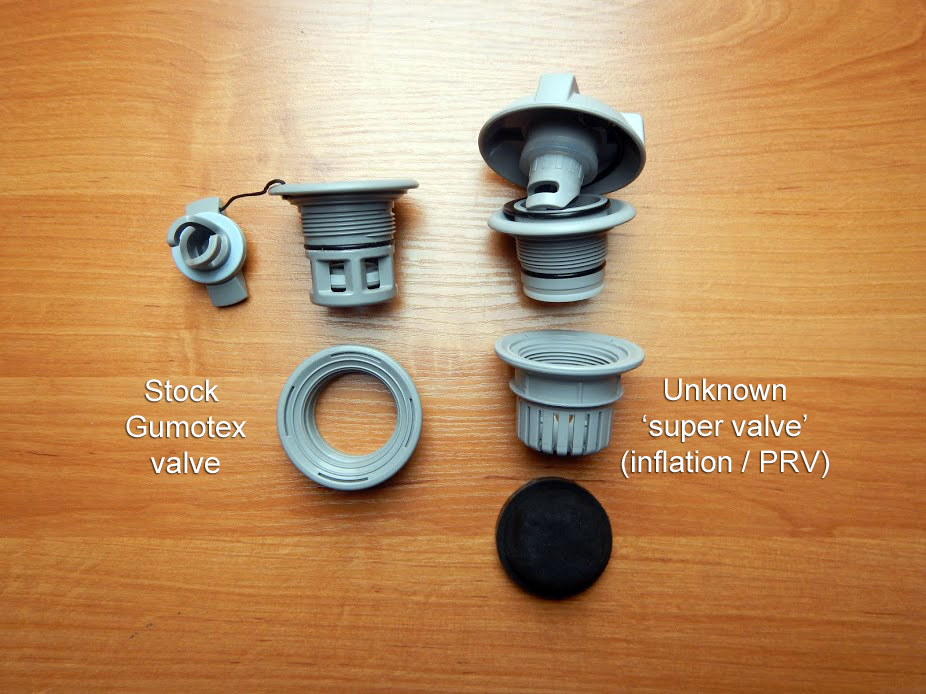
As you can read from Adam’s comment below, there is – or more probably was – a super valve which combined both inflation and pressure-release duties which means you simply replace the stock inflation-only valve. No need for extra holes to be cut. His link no longer works but I tracked it down to here; the Bravo Super Valve – that’s Bravo as in the Italian branded Chinese-made pumps we all know and love. But there is no mention of a super valve on their valve page anymore, nor in their catalog.
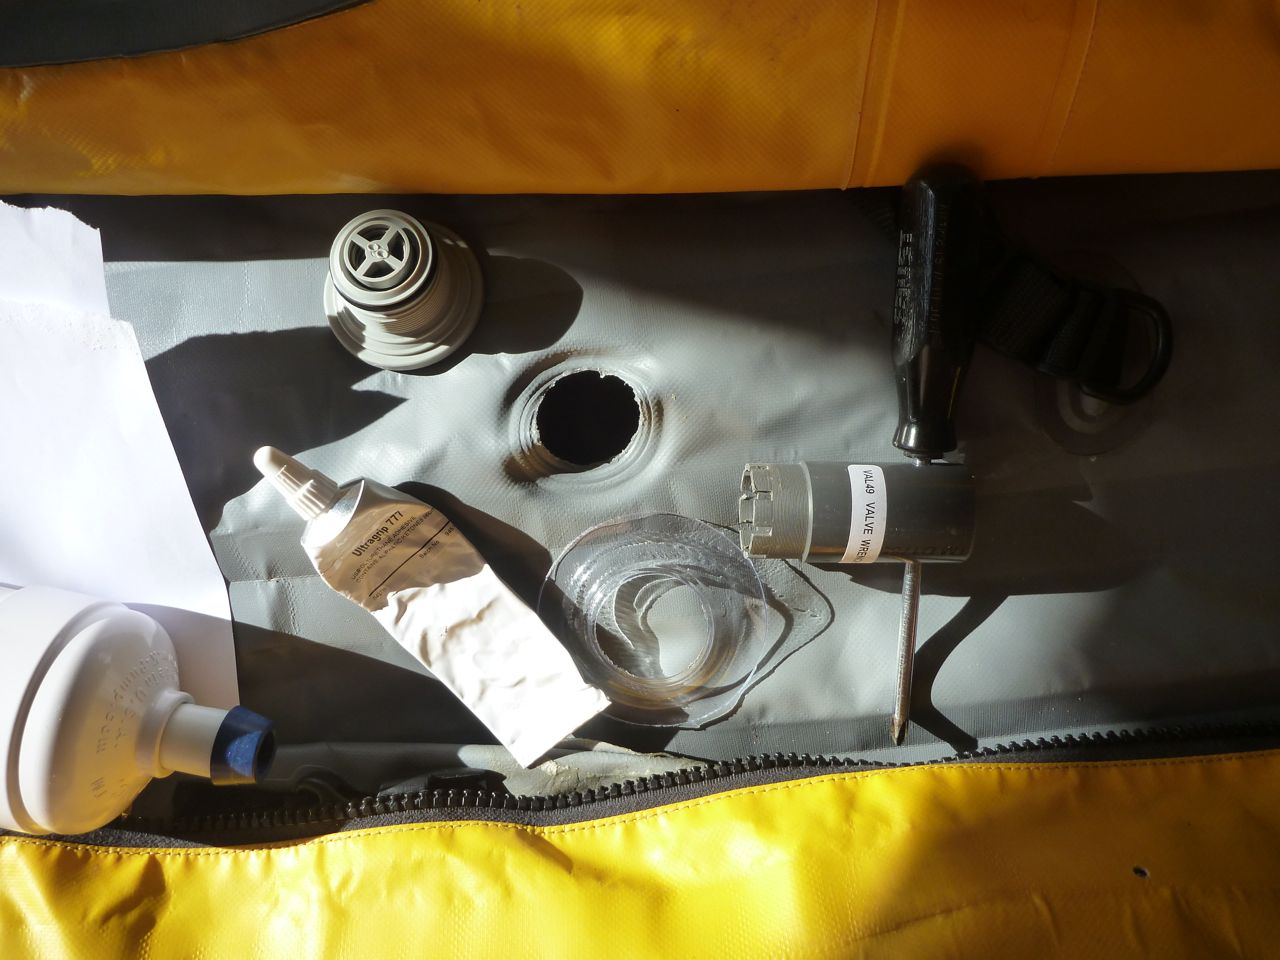
Fitting the Ceredi red dot PRVs
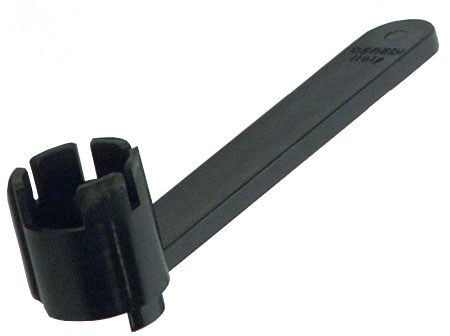
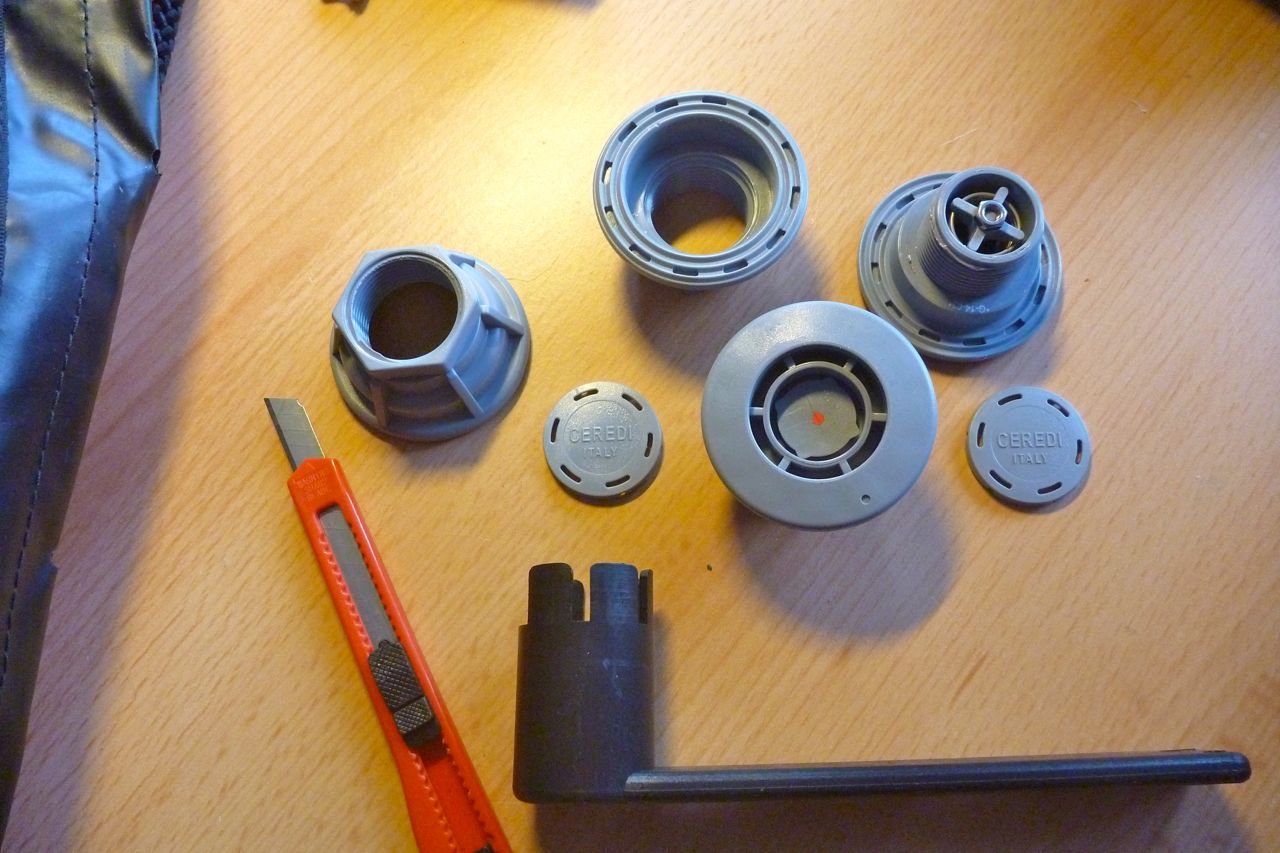
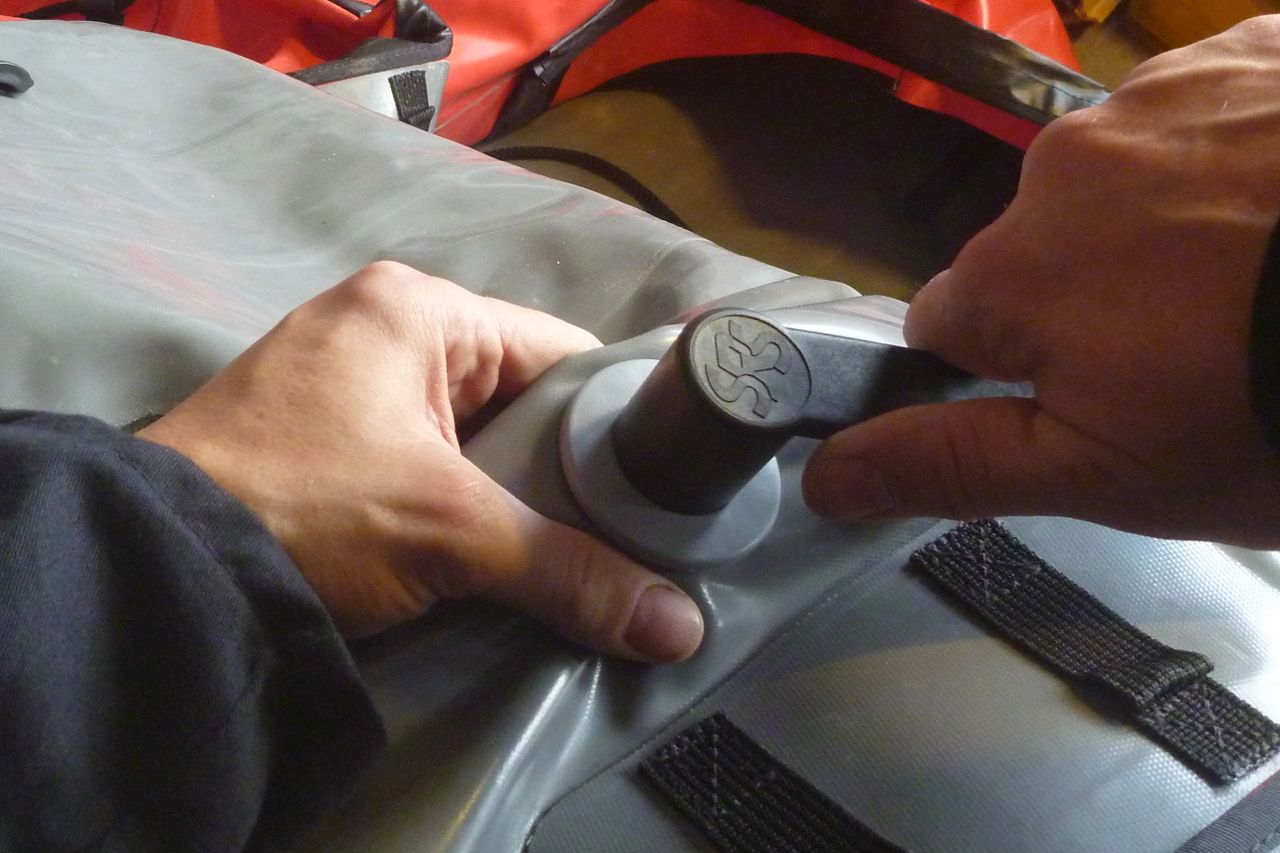
Tools and time needed • Gumotex push-push valve removing tool (fits Ceredi PRVs also). Right; £12 on ebay • Narrow-bladed knife or scalpel • Water pump/lock channel pliers • 30-60 mins
Short version • First, remove the side chamber’s inflation valve with the tool. They can be extremely stiff. If you can’t undo it, maybe think twice before going ahead. Or try silicon spray grease of 303 protectorate to lube
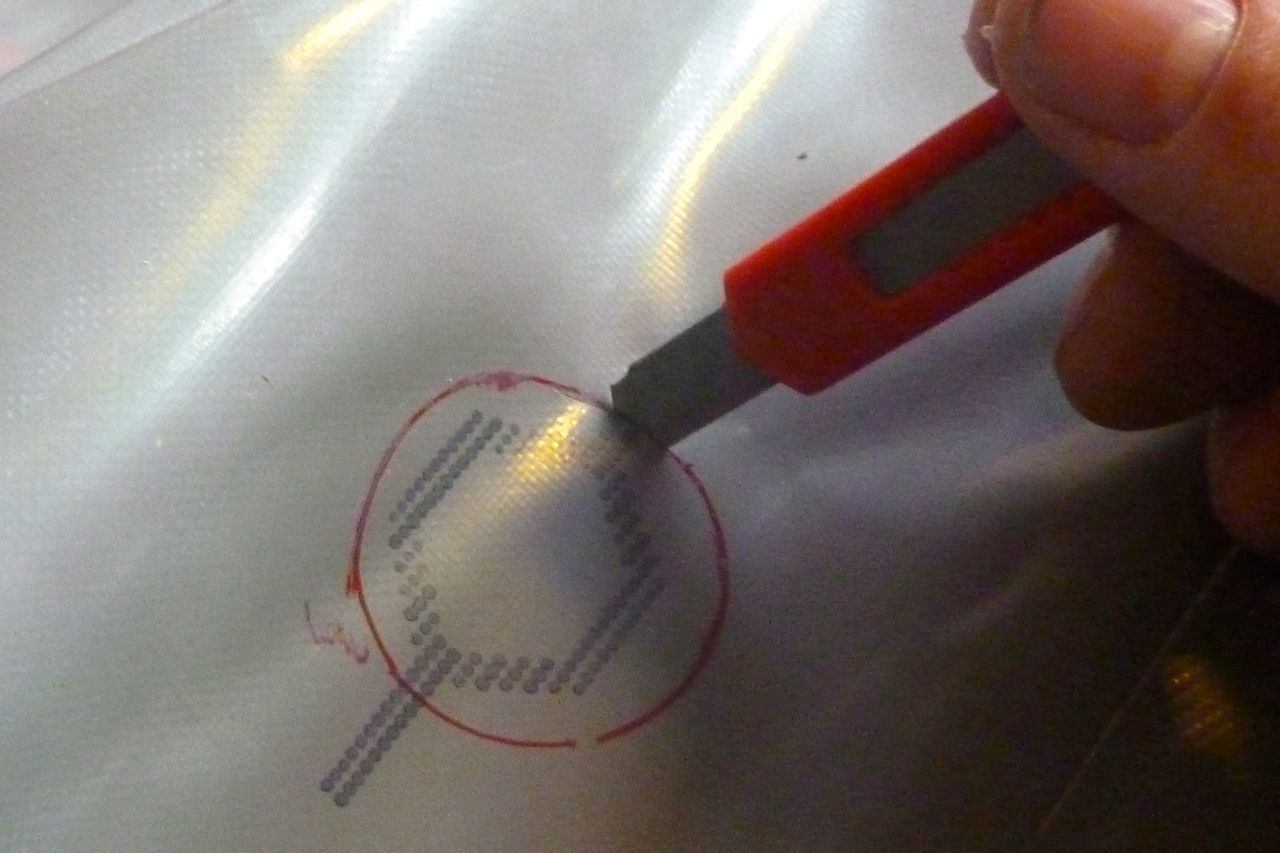
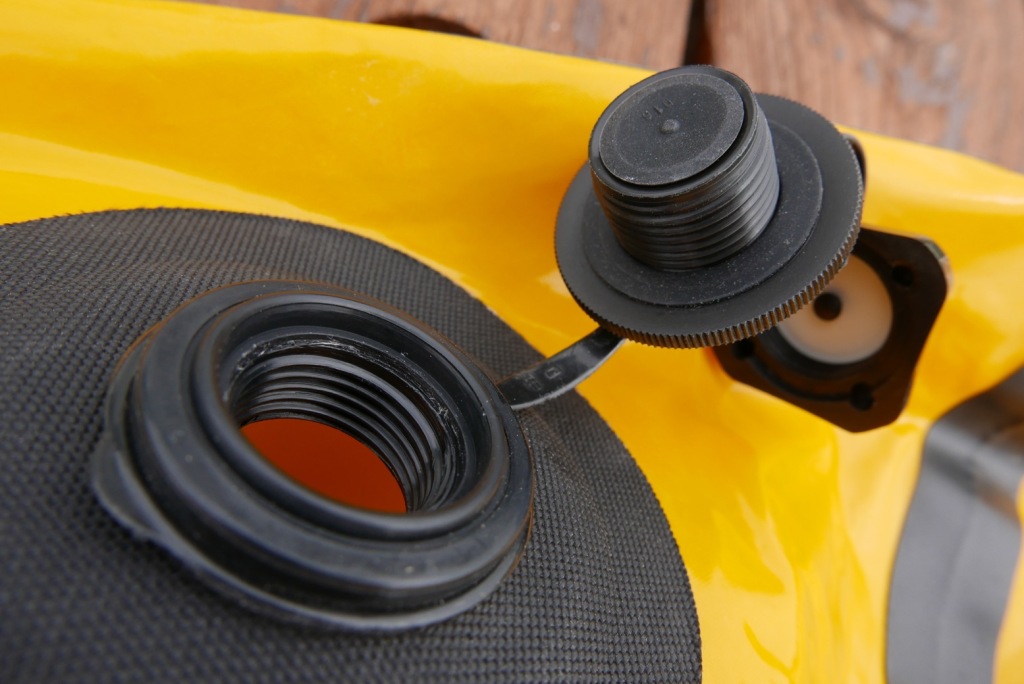
• Choose your spot, mark and then cut a 37mm hole in each side chamber. The Ceredi-suggested 35mm was not enough.Or fit the smaller, unbranded mini PRV (~25mm hole); see above. • Squeeze the PRV’s threaded back collar through the bigger inflation-valve hole, shuffle it over to the new PRV hole and loosely screw on the external part of the PRV by hand • Reassemble the inflation valve and tighten both valves with the tool • Fit push-on caps to the PRVs • Pump up and check for leaks. Maybe retighten some valves with the tool
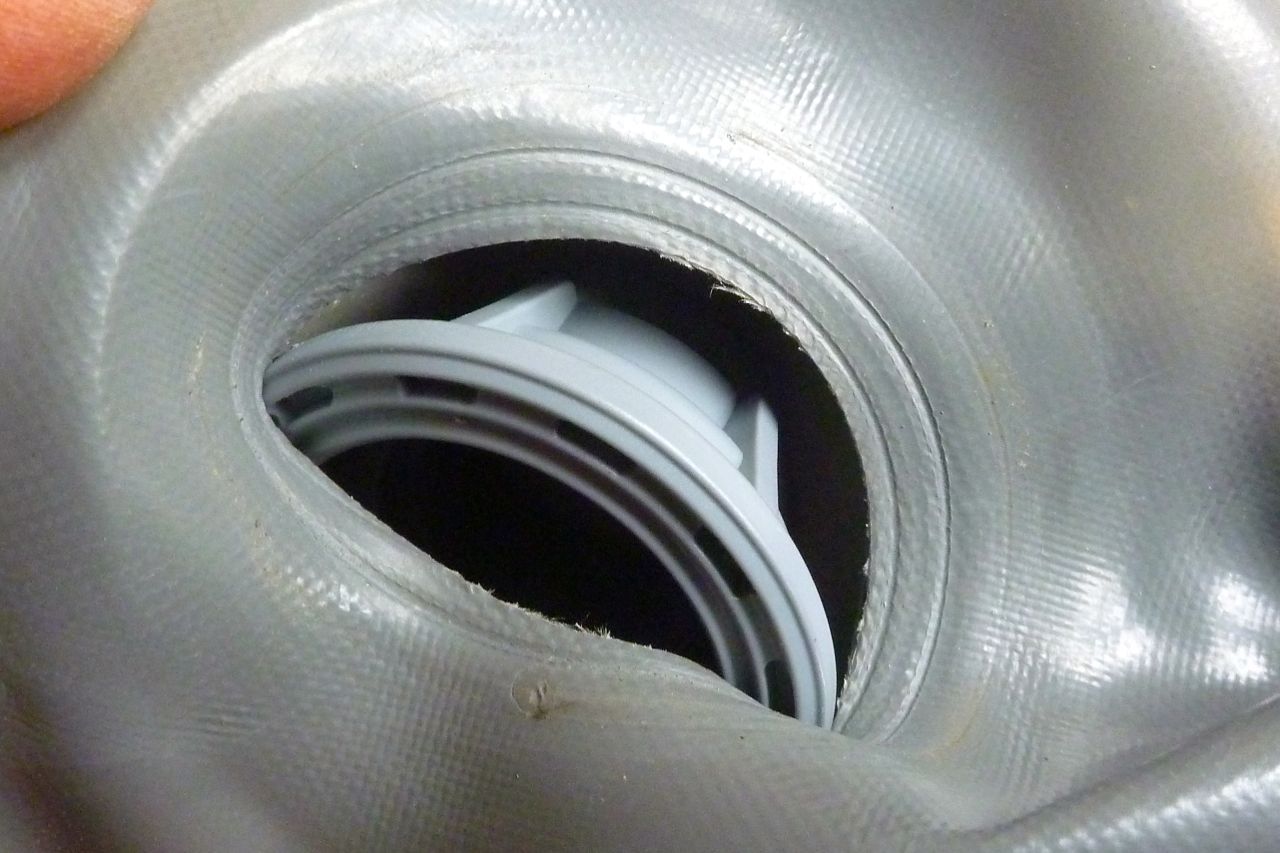
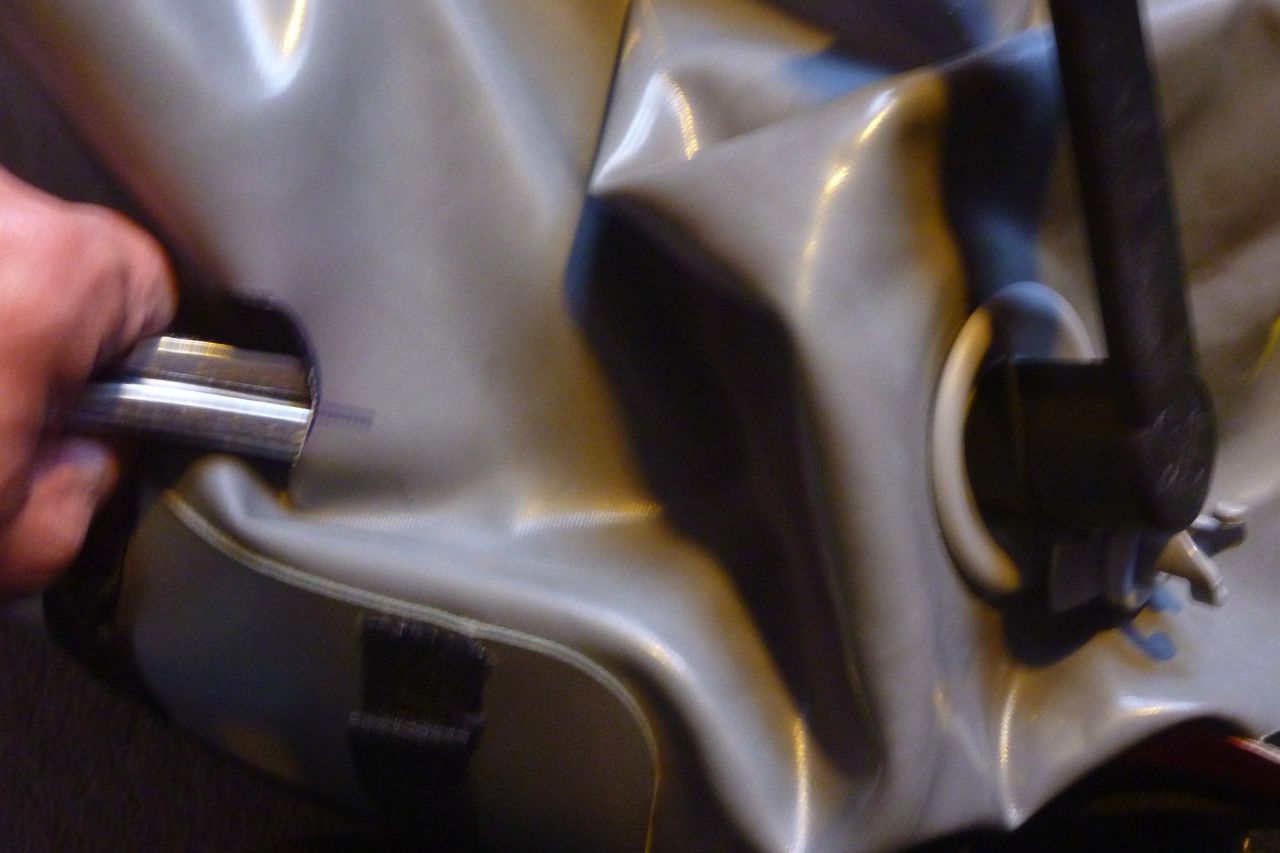
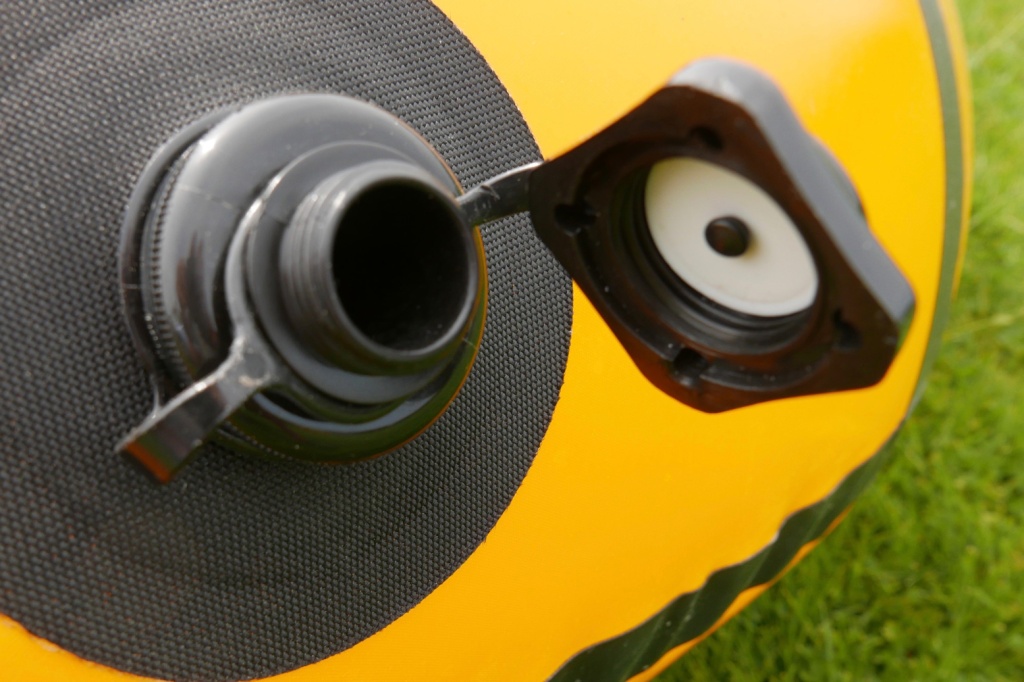
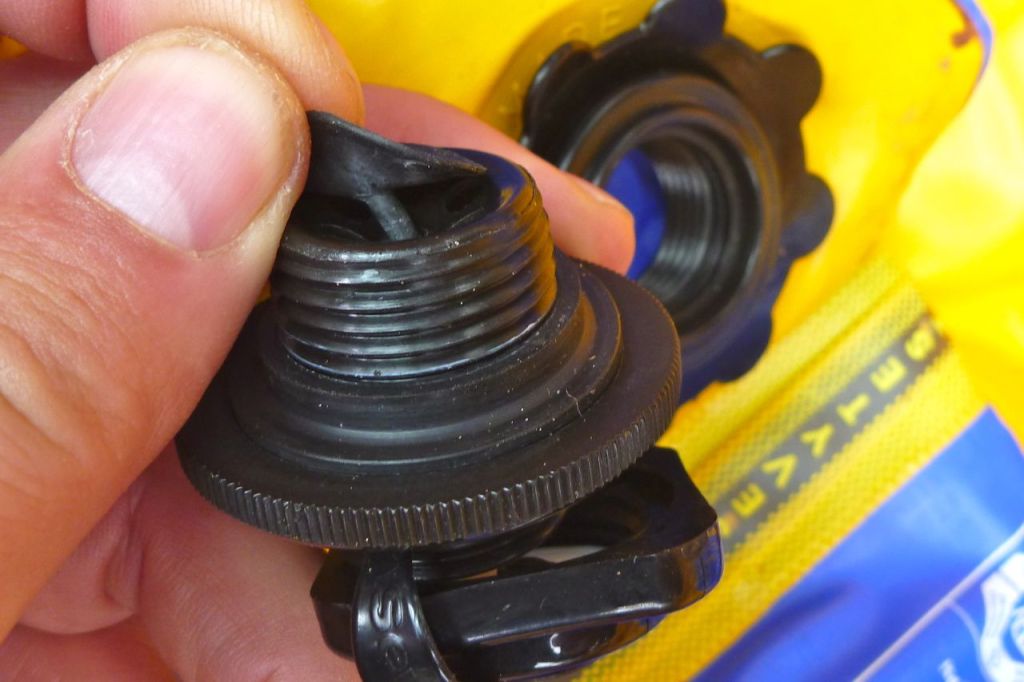
Long version I chose to fit the PRVs close to the inflation valves and at about the same level. There are mysterious markings on the inside of the Seawave to aid symmetrical positioning (Pic 2, below). I used a narrow-bladed knife and of course took care to gather up the hull skin so I wouldn’t inadvertently puncture the other side of the side tube. I assumed the 35mm hole would be big enough to take the back nut. When it wasn’t I was a bit flummoxed. Now I had a gaping hole in my boat, but no way of getting the back of the PRV inside the boat without performing a Caesarian on my Seawave. Luckily two brain cells dropped into my Hadron Collider and it occurred to me that once removed, the nearby main inflation valve’s hole might be bigger. And it was – just. One stock push-push valve was extremely hard to undo. I wondered if it had been glued in or that the plastic valve removal tool would snap (you can buy a metal one for loads more). When the other side undid with less effort I knew it had to be possible.
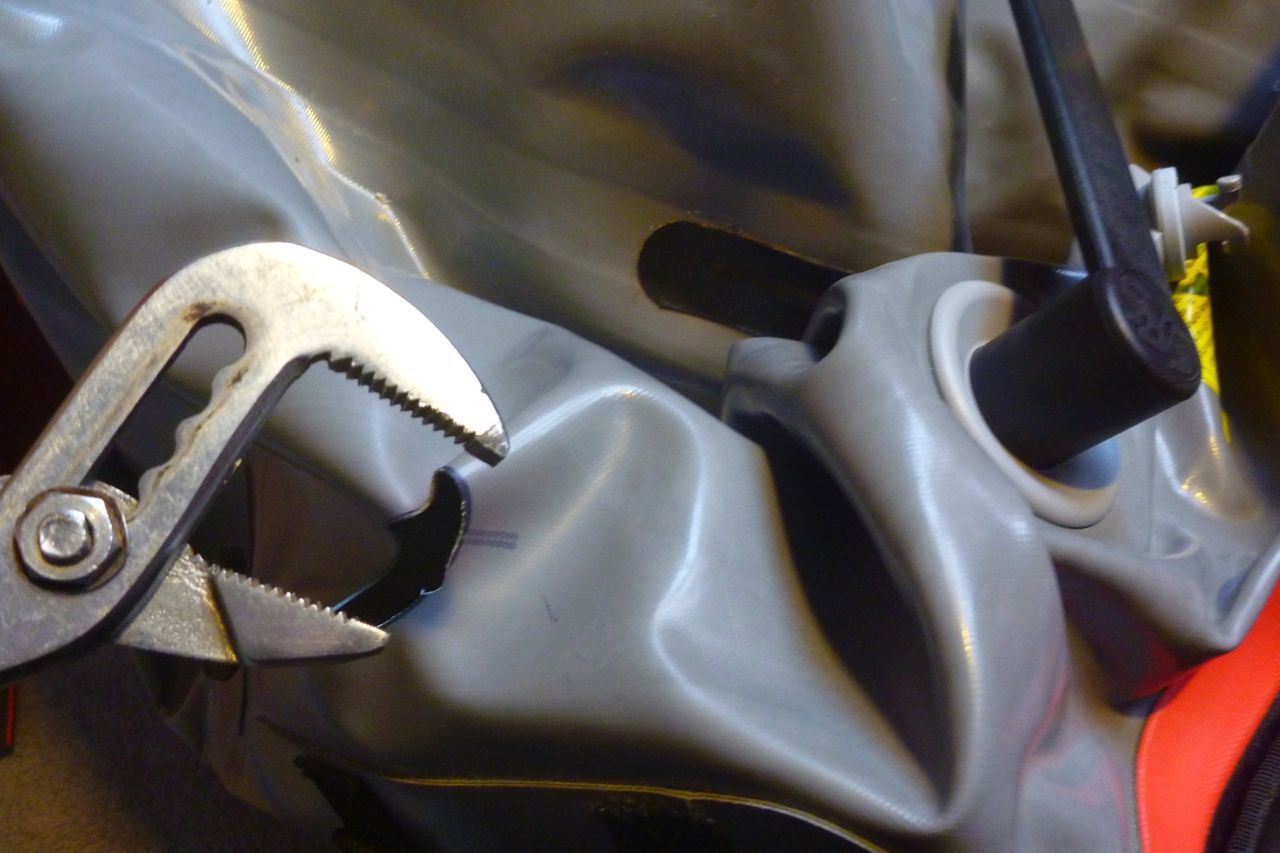
Another problem is that the internal collar or nut is only 10cm deep (pic 4, below) and so was hard to grab through the hull fabric. Until I realised this, I was grabbing the inside part of the outer valve body which screws through the collar from the outside. Trying to ‘unscrew’ the valve body from itself is like trying to pull you head off – eventually the valve tool would break. Another ‘Higgs boson’ moment came over me and I realised that by chance the two valve holes were close enough for me to get some water-pump pliers in there, grab the back collar and finish the job (pic 6, below). After that, no more problems. One thing I noticed while doing all this was the unseen protective patch on the inside of the hull opposite the inflation valves to limit wear and rubbing between valve body and hull when the boat’s delated. Nice touch, Gumotex ;-)
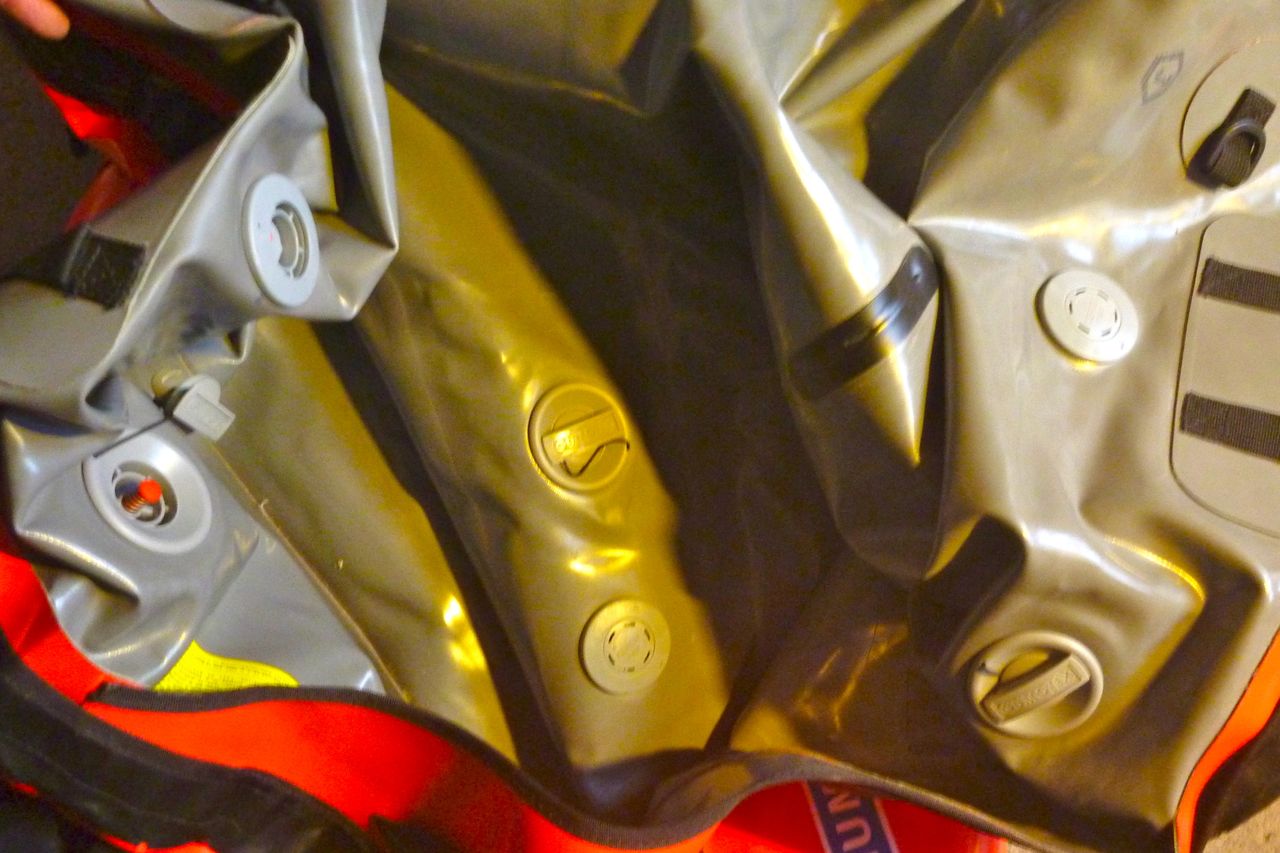
I did all the valves up as hard as possible with tool and hand, and in four more years had no problems. On a hot day in the sun I can hear the high-pressure side PRVs hissing away. The gallery below shows the job in chronological order.
The bits you need. Note the adjustment nut, top right. Didn’t spot that originally.Incision, but the right-sized 37-mm hole is too small to pass through the ’35mm’ PRV back collar37mm hole is better, but still not wide enough to pass through the inside ‘retaining nut’ of PRV assemblyYou need to remove themain inflation valve (it’s hard to grab the inside part by hand). Then the PRV back nut just squeezes through main valve hole and can be shuffled along towards the new holeHolding the PRV back nut in place to tighten is hard by hand. So pass pliers through the main valve hole…… to clamp onto the back of the PRV assembly. This is why it helps to cut the PRV hole close to the main valvePRV done. Now replace main valveClamp them all upPRVs as far as the eye can seeSmall leaks after reassembly test: retighten all valves
Now it’ll be good know that should I doze off as the tide ebbs away, I won’t be rudely woken by an exploding boat. Another side benefit of doing this is that you’ll never need to use a manometer (pressure gauge) again. You simply pump up all three chambers until they hiss and you know they are at full operating pressure.
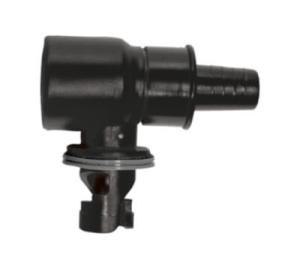
PRV inflation adapter hack In the comments below you’ll see Nikola suggesting the idea of using PRV adapters (below) on the side tubes. Normally you’d fit one to the end of your pump hose to fill up a boat to their pre-defined purging pressure without needing to refer to a manometer. It’s a handy gadget.
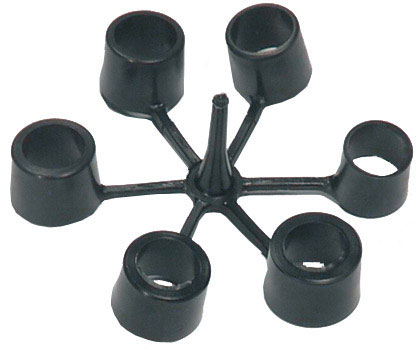
No valve opening peg
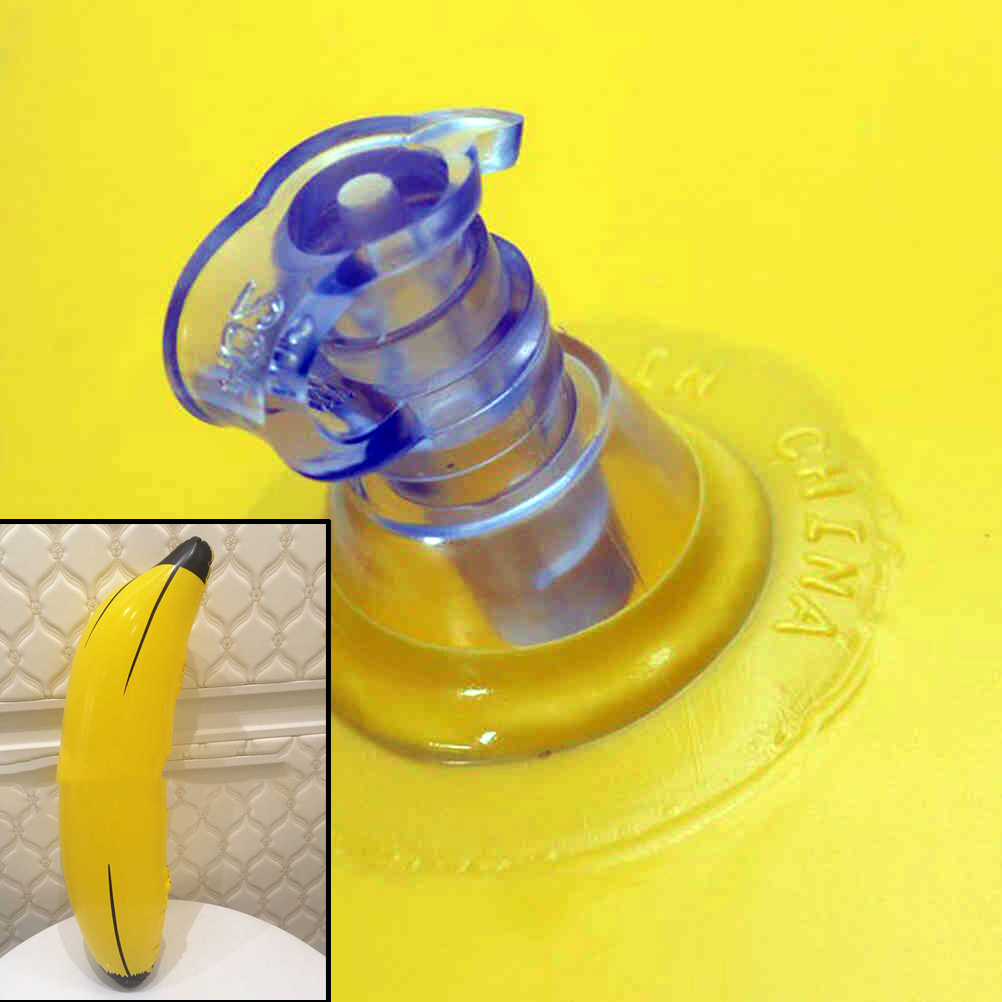
However, this would not work as a dynamic PRV fitted to a boat. Before attaching the PRV to you valve, you’d first need to block off the open end where the pump hose attaches. That’s easy enough. But to get a ‘live’ reading of the actual hull pressure (like a manometer) the 6615 must have a central peg/screw (picture) to open the boat’s valve it as you bayonet it on. The image left shows that a 6615 doesn’t have such a peg. Used as intended for pump inflation, there would be no need for it. So the hack won’t work because the boat’s valve must be open, and as soon as you do that the air rushes out as you try and clamp on the PRV adapter. The only way to make a 6615 work as an on board PRV would be to have some sort of one way valve on the inlet; not something that could be easily and reliably bodged. It’s worth remembering you don’t want some flaky PRV playing up midwater and dumping a side tube’s air. Better to cut proper PRVs into the hull as described above.
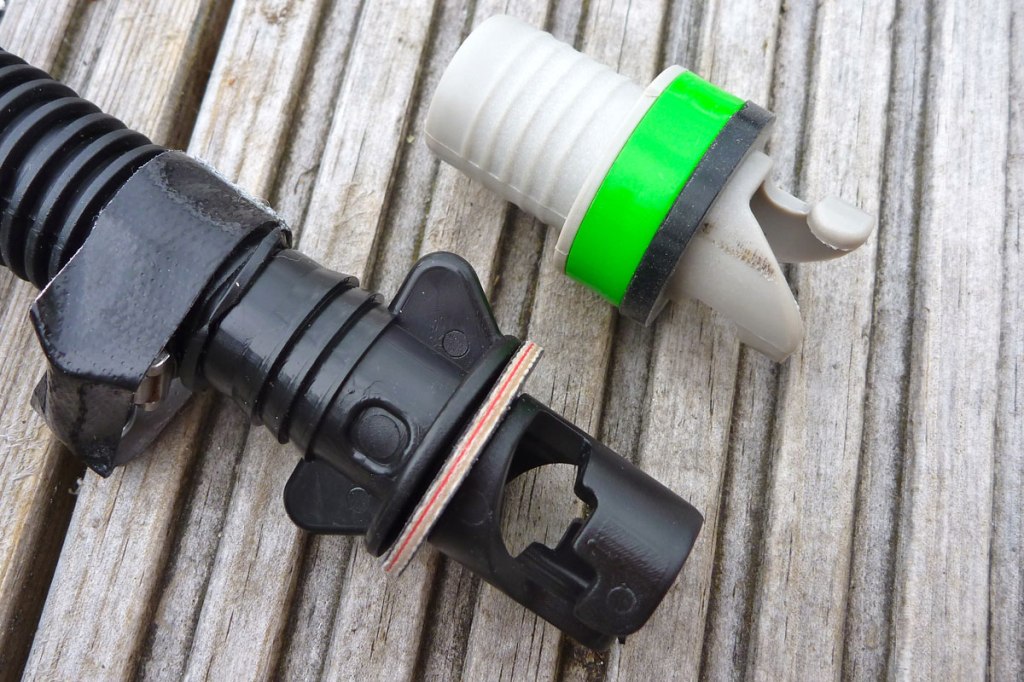
However these adaptors are very useful for inflation and the 6615 Ceredi nozzles come in two ratings and cost just £12 in the UK. The lower rated one is the same pressure as a Seawave: 0.25 bar/3.5 psi. You could also use this one to over-inflate a 0.2 bar factory-rated boat, like a Gumotex Twist by 25%. The ‘300’ version (in green above) is less easily found and rated at 0.3bar/4.75psi, the same as the red-dot in-hull PRVs I fitted to my Seawave. If you can’t track the 6615s down, try the similar black Grabner inflation relief valve which is also rated at 0.3 bar, but, like everything Grabner, is double the price of the Ceredis.
I took the K40 out across the bay for the first time since Ningaloo last September. As mentioned earlier, Australian UV being what it is, it did look pretty good after being rolled up for months. I put that down to lashings of 303. But it still went a bit flat in the few days between pumping up and paddling. Maybe I pumped it up on a hot day.
I topped it up in the water at Old Dornie, had a quick look for bubbles, took the pump with just in case, and set out back to Badentarbet beach. It had been calm for days and an ankle-high swell wafted along with a spring tide about to top out at about 3.5 metres. I passed the old ‘Wasp Factory‘ (left) still intact, and dithered a bit about crossing to the island, over-conscious about how the boat was moving on the currents that would barely push a wet paper bag. In the end, Tanera Mor got close enough, and after a couple of minutes paddling I trailed the rocky shore of red Torridon sandstone for a while before heading back across the bay. I found out later that the day before a boat tour had spotted a pod of half a dozen orcas (ropey video – start at 1:40 for the best action) right here. Someone suggested that because it’s been so dry, the salmon can’t get upstream to do their thing so have backed up along the shore where the killer whales come in for a feed. Video still below, more pictures here and see footnote.
With no dorsal fins towering over my head, I crossed the last mile over the bay with the rudder up to remind myself it was do-able. The K40 took a bit more finesse and occasional hard yanking to keep in line, same as with the old Sunny when without a skeg. A smooth, steady style works best but what it really means is that you can’t go as fast; pull hard to escape from a killer whale’s jaws and you really need your feet and a rudder to get you back in line.
As my taxi came down off the hill I passed a cheerful buoy bobbing around. Stowing the paddle and using the buoy as a marker, I noticed how quickly I was drifting back on the unseen tide, but as always, with the water and wind moving against you, you get much more of an impression of speed which is satisfying. Battling the not so agreeable tail winds off Ningaloo last September, I lost my faith in the K40 a bit, but here on a calm Highland evening, the Tasman slipped along, just as it always did.
We climbed up onto Ben Mor (right) the other evening, from where I was reminded just how close Ullapool seems from a couple of thousand feet above sea level. Looking out over Loch Broom, with one arm you can pat the Summer Isles, and with the other dab the lighthouse at Rubha Cadail (Rhue), south of Isle Martin and Ardmair (left). It’s some 13 miles or more, but with a get-out at Ardmair if need be, it would surely be doable within in the span of a tide, then to catch the afternoon bus back.
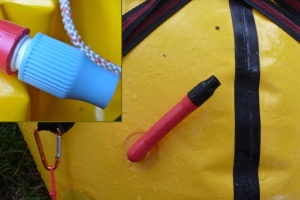
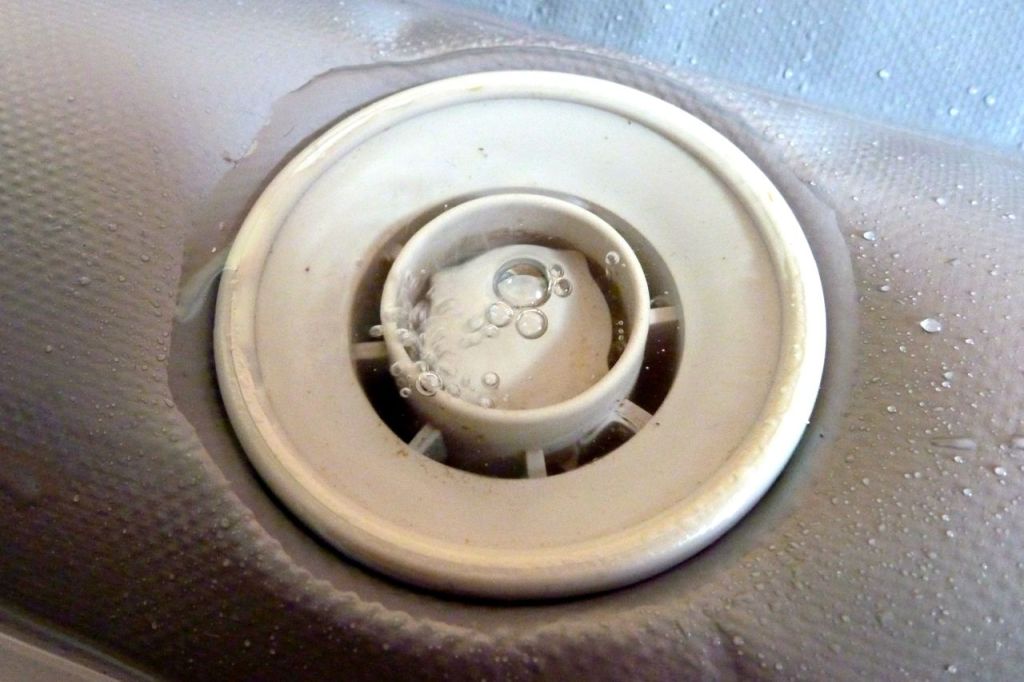
A few days later I decided my boat did have a leak in the floor somewhere. I hoped it might be a bit of easily expelled grit in the PRV and not the hull delaminating in some hard-to-get-to corner. I filled it up like a paddling pool and sure enough, it was fizzing from around the edges of the PRV (right). It took a bit of tracking down with Google (the menuless Incept NZ website is not the best), but it seems the cap needs prising off and the valves cranking down once in a while with a Halkey Roberts valve tool. Seeing as it’s not been done since new, that makes sense, so one’s on order and will hopefully do the trick. I never had to do that on the Gumotex Sunny in all its years, but the Incept does run a higher pressure and is a faster boat because of it. A day after I wrote this, over breakfast we spotted a huge pod of [probably harbour] porpoises coursing across the bay. They’re not so unusual and half an hour what looked like up to 20 of them trawled a line to an fro off the shore of Tanera Mor, presumably hunting or feeding. This is the best the zoom could manage on a murky midsummer’s morning.
With three months on the coast of northwest Scotland lined up for 2011 I was looking for a more seaworthy boat than the Sunny or making the Sunny faster (see this and this). Two weeks watching the weather blow through September 2010 showed it changes a lot up there. First from the east then the west, it blew at up to 50mph so when it’s good you’ve got to drop everything and get out there. But if it changes on the water while most probably paddling alone you want to be sure you can get back fast and not have to jeopardise making progress by either bailing in a frenzy or struggling to re-board. Well, that’s the way I see it. In Shark Bay, it didn’t take much of a swell – maybe a metre – to fill the Sunny up every 20 minutes or so. I’d hook onto Jeff’s tandem and they paddled while I pumped. And that was the warm Indian Ocean not The Minch, off the North Atlantic. It’s not like I’ll be setting off for St Kilda every weekend to pick up half a dozen gannet eggs, but either a deck or self-bailage is needed to be able to paddle alone around there with security. As you do, over the previous months I gone through periodic frenzies of internet research. A hardshell SinK was never in the running. I don’t like being jammed in those things, they’re awkward to transport and would need getting rid of after. Plus I can rent a decent sea kayak locally. Instead, I wondered about the other extreme, an SoT; very popular with the rec paddling masses who may not know a hard chine from a Chinese burn, but have a whole lot of inshore fun nevertheless. Most SoTs are wide enough to do the Can-Can while wearing flippers and come in awful ‘explosion-in-a-paint-factory’ colour schemes.
The angler-oriented models are less hideous and I narrowed it down to an Ocean Kayak Prowler 15 (above left) or OK’s slimmer Scupper Pro (above). One went on ebay for just 300 quid while I was thinking about where I could store it. They say an SP is from the same mould as an RTM Tempo (left; 24kg 4.5, on 67cm) and their Disco (below right; 23kg 4.3, on 65cm) looks pretty good too for a plastic sea clog (the shape I mean – not the colour). Fast I imagine, easy as a bike to get on and off, but might require suiting up too often to be fun without getting chilled. Either of these would be a lot of fun if I lived in Florida or the Aegean. Not so sure about northwest Scotland.
So according to my calculations that left a folder, and for me the pick of the bunch has always been Feathercraft’s Big Kahuna (left; 4.5m x 64cm; 16kg – 14′ 9″ x 25″; 35lbs) featuring an extra big cockpit for creaky old men who can’t bend like they used to could. Feathercrafts are expensive and the marked up price new in the UK is so far beyond the pale to give them an admiring cachet among paddlers. I missed one in the UK for £1800 then tracked down another in Hawaii with every last option plus a few extras for £2200. I could have brought it back and then sold it in the UK for what it cost after 3 months paddling.
It then turned out matey down the road had a Big K so we went out for a spin on the local, freezing river this week. Moreaboutthat here. Short version: the BK would be a flaming good yak that could be left assembled for the duration and wouldn’t get turned away by security at the Sea Kayak Christmas Ball. On the scungy Medway it took a bit of turning in my clumsy hands but tracked fine, glided smoothly and weighs only 16kg; easy enough to portage on the shoulder. But it still has that unnerving SinKiness I don’t like and is a bit awkward to get out of – well for a spaz like me with a dodgy shin and who’s used to IKs you can fall into drunk. The Feathercraft would have been a lovely boat up in the Isles, but has the same re-entry issues as any SinK. The way I see it, if it’s bad enough that you tip over, getting back in and staying upright long enough to pump it out is going to take some luck alone. Until I learn how to roll a kayak I don’t fancy that at all. Nevertheless, I was all set on buying the slinky BK as it would cost me nothing once sold on and doubtless have been a pleasure to behold. Then Gael from SSKT slapped me out of it and pointed out that Incept from NZ will be selling their decked K40 IK in the UK next year – and without a usual horrendous UK mark up (Knoydart take note…). UK distributors Seakayakoban tell me they have a demo in stock now with the next delivery in March for around £1500.
The K40 is similar to the Grabner Holiday II which might be classed as one of the original twin-side beam IKs which begat the Gumotex Seakers I and II. The solo Seaker 1 (left; 4.8m x 75cm – 18 inches more than a K40 and 3 inches wider) is officially as expensive as the K40, though has been going at half price ($1500) from Innova in the US. A fellow IK blogger recently got one. At just £1000 that’s a great price, but the problem is the deck is fixed (packing and drying issues, IMO) and it manages to weigh no less than 33 kilos/73lbs according to the Gumo.cz website (US distributors Innova claim 60lbs/27kg). Whatever it is, I had a chance to buy a used Seaker from Czecho a year or two back for just £800, but pulled out when I appreciated you can’t take a boat that heavy on a plane too easily, nor haul it too far.
Readers have occasionally emailed me about decking a Sunny. It could be done I suppose by gluing velcro or a zip onto the sides or maybe some understraps, or even an elastic-edged canopy, like fitted bed sheets. How good will that look if I was left to do it?
It’s actually something that might be a little easier to achieve with a semi-decked Gumo Helios II (above left) were it not for those ghastly sewn-in seats they have. In fact I see Grabner offer such a thing with their Helios-like Explorer II (right; 5m x 75cm) as part of the €600 accessory package. Nein danke.
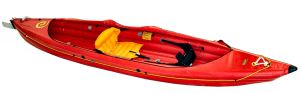
So, the Incept K40 Tasman Like Gumotex, Aire, NRS and the rest, Incept seems to be an established raft manufacturer who’s turned to IKs. The Incept K40 Tasman (4.3m x 69cm; 17kg. 14′ 3″ x 27; 37lbs) seems to have been refined since I last looked at their website at which time there was no UK distribution that I could see. There seem to have been at least two other versions but this one looks the most complete by far and following this investigation I bought a K40. I don’t know about you but for an IK, that picture below is of a pretty good looking boat. I do wonder about the 27-inch width, being used to the 30-inch Sunny, but at 30-inches I cannot imagine ever tipping out of a Sunny short of getting crossed up against a rock or branch a couple of times. If I measure 27 inches across my lap, it looks just right as long as you’re sat low. The simple answer is of course to go up to Oban for a demo.
Just like the Alpacka the K40 has a deck that zips across to one side to roll up for sunny, calm days. We like that about IKs; it keeps the legs tanned and makes packing, drying and, if necessary, draining the boat mid-water so much easier.
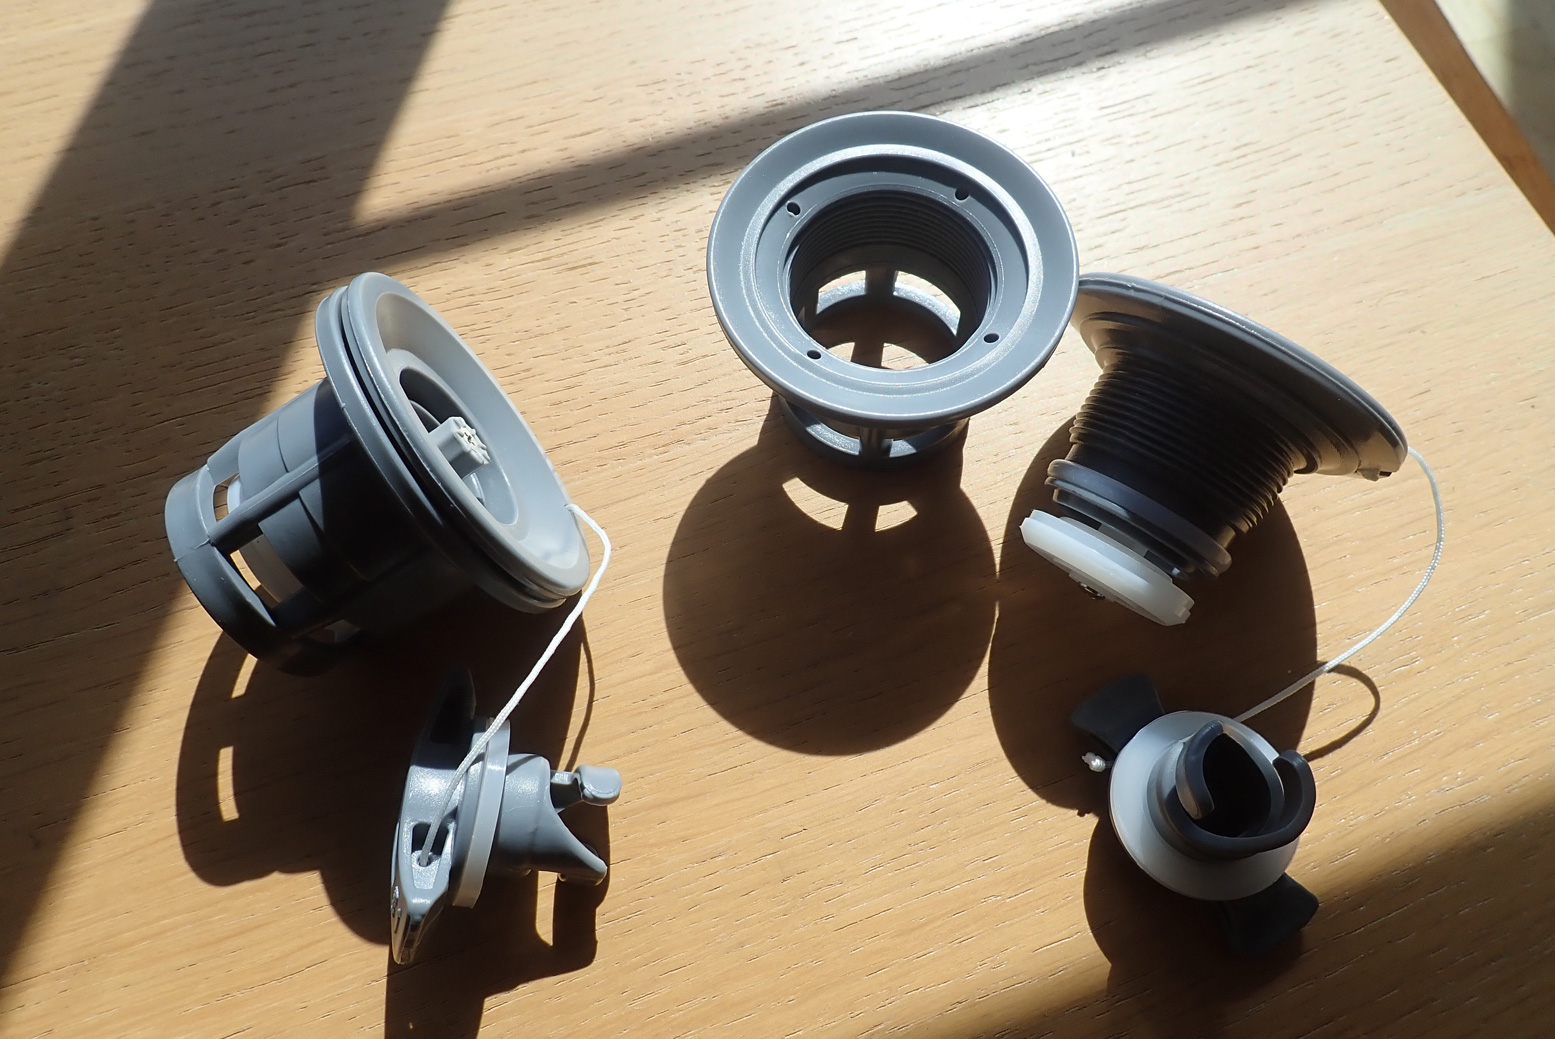
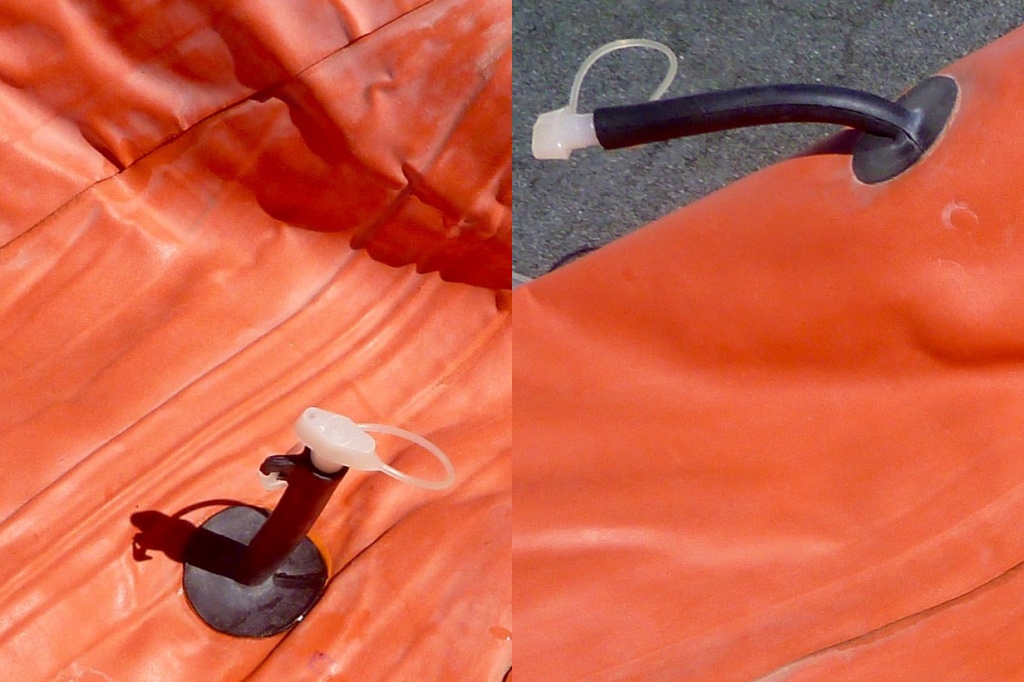
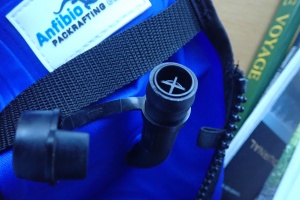
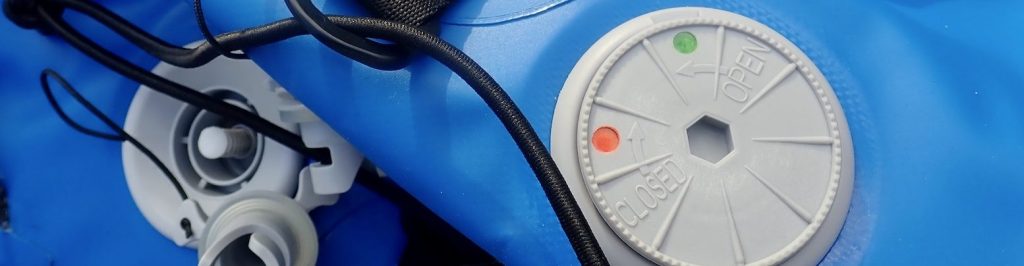
The hull is composed of three I-beamed chambers with twin-beam sides to help give its 14 feet better rigidity. The Sunny had round, single chamber sides which, although they get nice and taut on a hot day, the boat still flexes with the swell or even just with my weight in it. With I-beam chambers the K40 features pressure-relief valves on all three chambers including the sides rated at 5psi which are out of the water. This reduces the strain on the welded I-beam seams but it’s possible that some air will be purged through the valves as it expands in the course of a hot day. For this reason I see that Incept recommends carrying a small, top-up pump (right) as can be seen on the deck of the kayak pictured above. With it, you can re-pressurise the boat for maximum performance, and this can be done on the move as the valves (grey) are right there in the cockpit (the sidewall PRVs are behind the seat). The twin beams also add up to less width (69cm or 27 inches – 3-4 inches less than my Sunny) and so more speed – although re-entry may be harder and all without – I hope – making it too tippy. It’s got a rudder because those high sides may catch a crosswind at times. Scoffed at by Brit sea kayakers who use boats that have hull profiles designed to turn when leaning out (very odd if you’re a motorbiker!), with a rudder you can paddle normally across the wind and use the rudder to correct the tracking.
A rudder will be good for sailing too. The boat also comes with a neoprene spray deck, a handy K-Pump and even thigh straps to enable control across a swell, better core muscle work-outs I reckon, and even eskimo rolling. In fact my boat came with no spray deck, no straps, no strap fittings (though there are markers), but it did have a K-Pump. Thigh straps are one thing I missed on a Sunny, more for the efficiency of paddling effort against the torso, than balance and control of tippiness (not a problem with that boat outside of hurricane conditions). While getting the drum on the K40 I came across this videoof a Kiwi guy who did an NZ South Island coast-to-coast over a fortnight. That is, upstream from the Tasman Sea, tough portage to a pass, then paddling down to the Pacific. (Ain’t these guys heard of packrafts!) His less driven mate came along in a 100-year old wooden replica boat – they were engaged in a historic C2C re-enactment using old and new craft.
It’s actually three, short videos of two guys having a little Kiwi back country adventure. Have a look at the K40 in action on vid II at 2:20. Many times on the rivers and seas you’ll see how a relatively modest waves wash over the deck of the K40 – a Gumo Sunny would be a brimming paddling pool at this point. And again the vid reminds me of the advantages of an IK when it comes to bouncing off rocks and general abuse that would hurt a hardshell or loosen the joints of a taut folder like a Big Kahuna.
The best inflationvalves for an inflatable packboat aren’t the bungs you find on an airbed or an old Semperit. Nor the thin, twist cap stems off a Feathercraft Java or an old Alpacka. What you want are one-way valves. Like a car-tyre valve, one-way operation as well as a secureseal are the key, so what pumps in doesn’t push back or escape when you remove the inflation hose. Found on cheaper IKs and packrafts Boston valves are simple and effective for lower pressures. More below.
What I call raft valves (left) like Halkey Roberts, Leafield suit higher pressures and are needed for dropstitch panels. In America they’re called ‘military’ valves. With raft valves you either push and twist the button clockwise to lock open (deflating). For pumping up, push lightly and turn anticlockwise so the button springs back up to seal. This closed ‘button up’ position is the best way to transport an IK too. To lose a little pressure (say, the boat is getting hot in the sun) just jab the valve core button, same as on a car tyre.
Many raft valves are now ‘push-push’ (graphic left) which work like a clicking biro so are even easier to use. I always refit the cap seal straight away to keep water and grit out of the mechanism.
Two raft valves. On the left the collar goes inside the hull, the valve body screws into it tightly and the dust cap goes on top.
I’ve found these valves reliable on all my IKs, although this Gumotex 410C owner didn’t. Once in a while – or after the boat is new – you may want to check the valve is screwed tight against the fabric with the valve spanner, right. They’re also useful for removing the valve (or a PRV; see below) should it play up.
When it comes to inserting the inflation hose, a simple push-fit plug as shown below left can work; just jam the adaptor into the valve body and it usually stays in place while pumping. It looks cheap but on a Gumotex at least, works fine. With higher-pressure boats like Grabners and Incepts and some Gumotex (as well as dropstitch boats), the jam-fit can blow off so you’re better off using a bayonet fitting (below right) which won’t pop off as pressure builds.
Low-pressure valves for packrafts
Alpackas and even Feathercraft used to use crappy, soft plastic twist-lock oral stem valves (below left) which you could never be sure were done up just right and which didn’t take well to pump nozzles.I suppose they were a step up from blow-up airbed plugs (below) which are still found on cheap IKs.
Retractable one-way flap valve. Annoying to delateLilo plugs: Ok for seats, crap on a hull
Now best used on inflatable seats and the like, they’ve been superseded by similar one-way stem valves (below right) with a light spring closure easily openable by lung pressure. They’re a bit trickier to deflate: you have to depress the ‘X’ with a finger while squeezing out the air. The one below right is actually on a buoyancy vest.
Twist-Lok: OK for seats and old packraftsSpring valve one-way for higher pressure
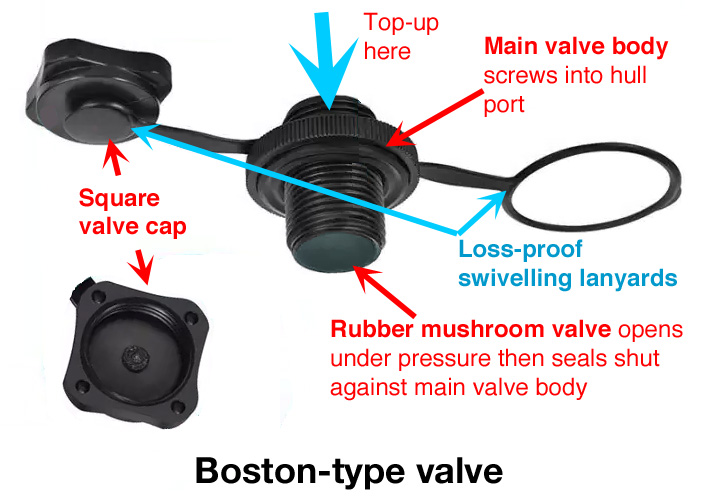
Boston valves is a generic name for a one-way valve long used on cheap IKs as well as slackrafts and have now become common on packraft hulls. Note they’re widely copied and not all may be identical, like well-known branded IK valves. The square top cap screws onto the round valve body which itself has a knurled edge to easily unscrew from the hull port (below right). Here you attach your air inflation bag or open to quickly dump the air when rolling up.
Inflation: top cap removedRubber ‘mushroom’ valveDeflation: unscrew valve body
Ideally suited to low-pressure boats like packrafts, they use a simple rubber ‘mushroom’ valve on a stem (above middle). Once the main valve body has been screwed back into the hull, unscrew the square cap to finish the inflation process by either topping off by mouth or with a hand pump.
A one-way Boston-type valve eliminates the need for the old separate stem valve and the whole assembly has swivelling plastic lanyards so nothing drops away when unscrewed.
Pressure release valves (PRV) for some IKs
I’ve learned the hard way to be careful and not let an IK get too hot when out of the water. On a hot day you can feel the more exposed sidetubes tighten like a drum. This of course happens to be good for rigidity and paddling efficiency but isn’t good for the seams or an I-beam floor or the sewn seams of a cheap shell&bladder IK.
Oddly, not all Grabner IKs have PRVs which means…… faffing about with pressures on hot days.
The floor tube on my old Sunny had a pressure release valve – oddly it’s something rarely mentioned in the specs, even on current Gumboats. It’s there to protect the I-beam floor which could rupture inside under pressure (I-beam floors explained here). The valve is set to purge (open) at a certain pressure when the air inside heats up, expands and pressures rise. With Gumotex it is 3psi or 0.21 bar. It means an IK can feel a bit soft on a cool morning following a hot day; don’t worry, you don’t have a leak, it just purged some air when hot yesterday and in the cool air make sit a bit soggy. A quick top up is all you need to do. The handy thing with a PRV is that it makes a good guide to how hard you ought to pump up the other chambers of the boat without PRVs when you don’t have a pressure gauge. At whatever pump effort the floor PRV starts hissing, that’s the same or a bit more pressure to put in the side tubes which usually don’t have PRVs.
As mentioned, the air in an IK can also get cooled, for example when pumping up on a hot day and then putting the boat in a cool river: a normal scenario. Cold air contracts (loses volume/pressure). Because you want the boat to be as rigid as possible, after initial inflation it’s worth topping up again once the boat is in the water; splashing helps cool the sides. Topping up, or tempering as it’s called, optimises rigidity and with long, 2psi boats you need all the rigidity you can get. Conversely, pumping up your boat in sub-freezing temperatures then putting it on water which actually ‘heat’ it up, though this is a much less likely scenario.
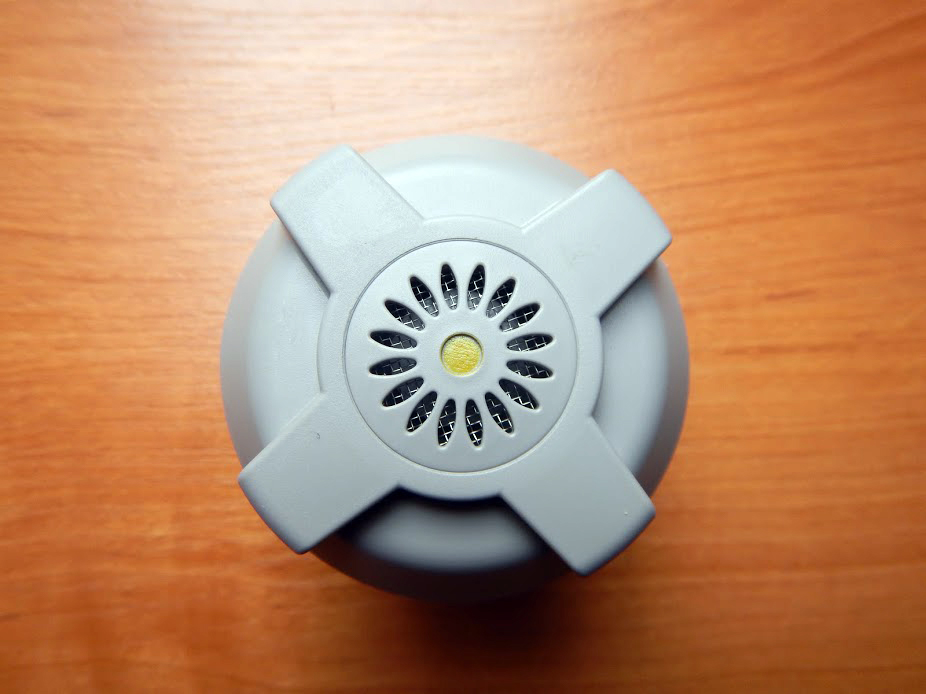
A PRV purging correctly
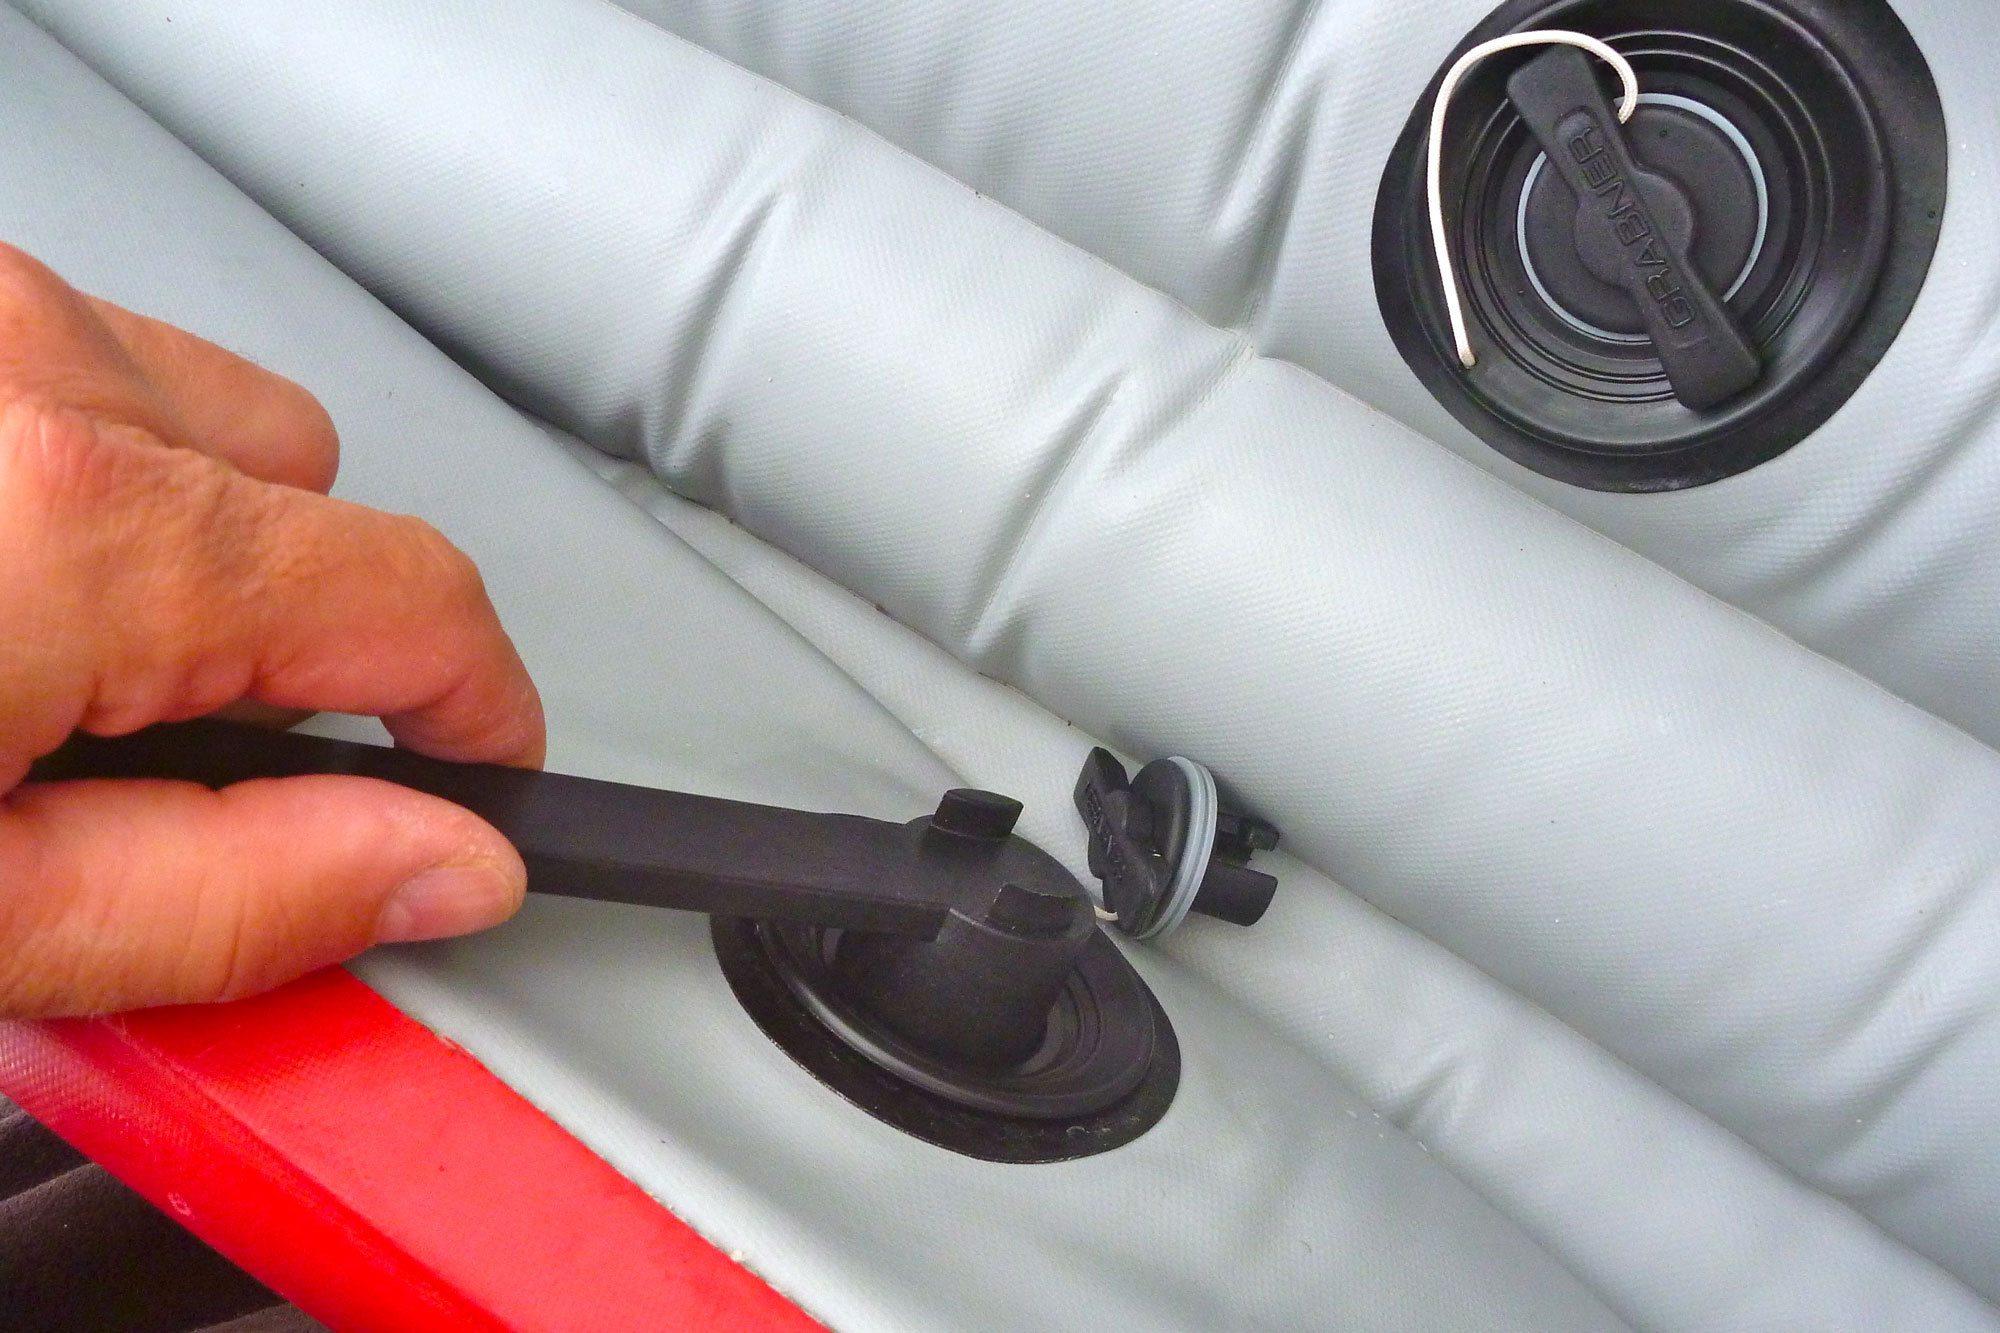
PRV leaking from the sides not through the valve. Needs tightening with a special tool; a common necessity with hastily assembled new IKs.
My higher pressure Incept K40 had PRVs on all chambers which meant you could confidently leave it in the Sahara and it would safely purge then feel a bit soft once cooled down back in the water. Picture above: Incept PRV test with the protective cap removed and purging correctly through the centre. Below: a PRV being resealed after leaking from the edges (left). This was because I failed to check tightness after buying the new boat, as recommended by the manufacturer. (My Gumotex IKs never needed such tightening or checking in years ownership.) I ended up also fitting sidetube PRVs to my Gumotex Seawave to run higher pressures and the be able to leave it pumped up and out of the water for months at a time. Like any valve, PRVs can leak due to grit on the seal or a weak or sticking spring. Grit is not so unlikely when you think they can’t have a cap and have to sit on the floor of an IK, with water and sand occasionally swilling in and down into the body. Try removing the cap and blasting it out with air and maybe give the spring a squirt with 303 (UV protectorant). The best thing is to remove the PRV with the same valve tool, inspect and clean the sealing surfaces and reinstall.
Oddly, my old Grabner Amigohad no PRVs at all and neither do the latest Holiday models and a few other Grabners, even though all run higher than normal 0.3-bar pressures. One presumes Grabner are so confident in their construction they’re not needed, despite the warnings above. It should be included with the boats, but if your pump has no gauge, Grabner do pressure relief adaptors to fit on the hose (left) which purge at 0.3 bar, so dispensing with faffing about with a handheld pressure gauge. It’s a good idea.
My current Zelgear Igla 410 has closeable 0.25 bar PRVs on the twin I-beam sidetubes (below). The separate DS floor runs twice that pressure but has no PRVs. I find it’s actually quite handy to ‘lock in’ the air during cool transits or when getting into the water. When the paddle is over I open the PRVs which hiss a bit back down to 0.25 bar. I leave it like that until the next paddle when I top everything back up.
Lockable PRVs; quite handy actually
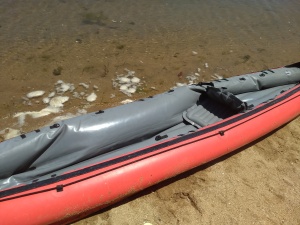
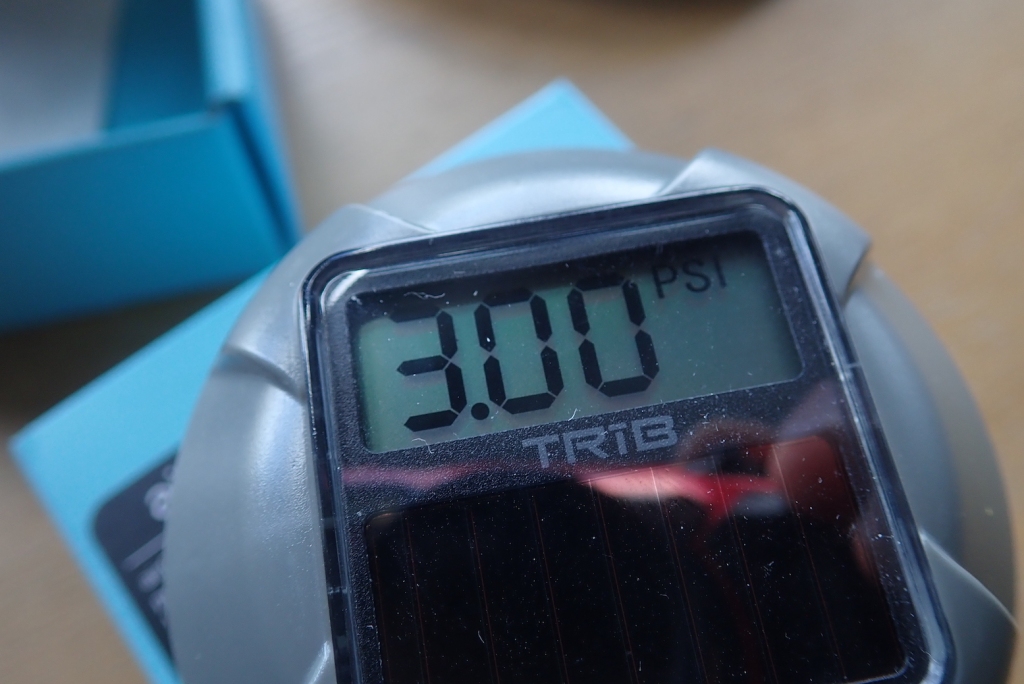
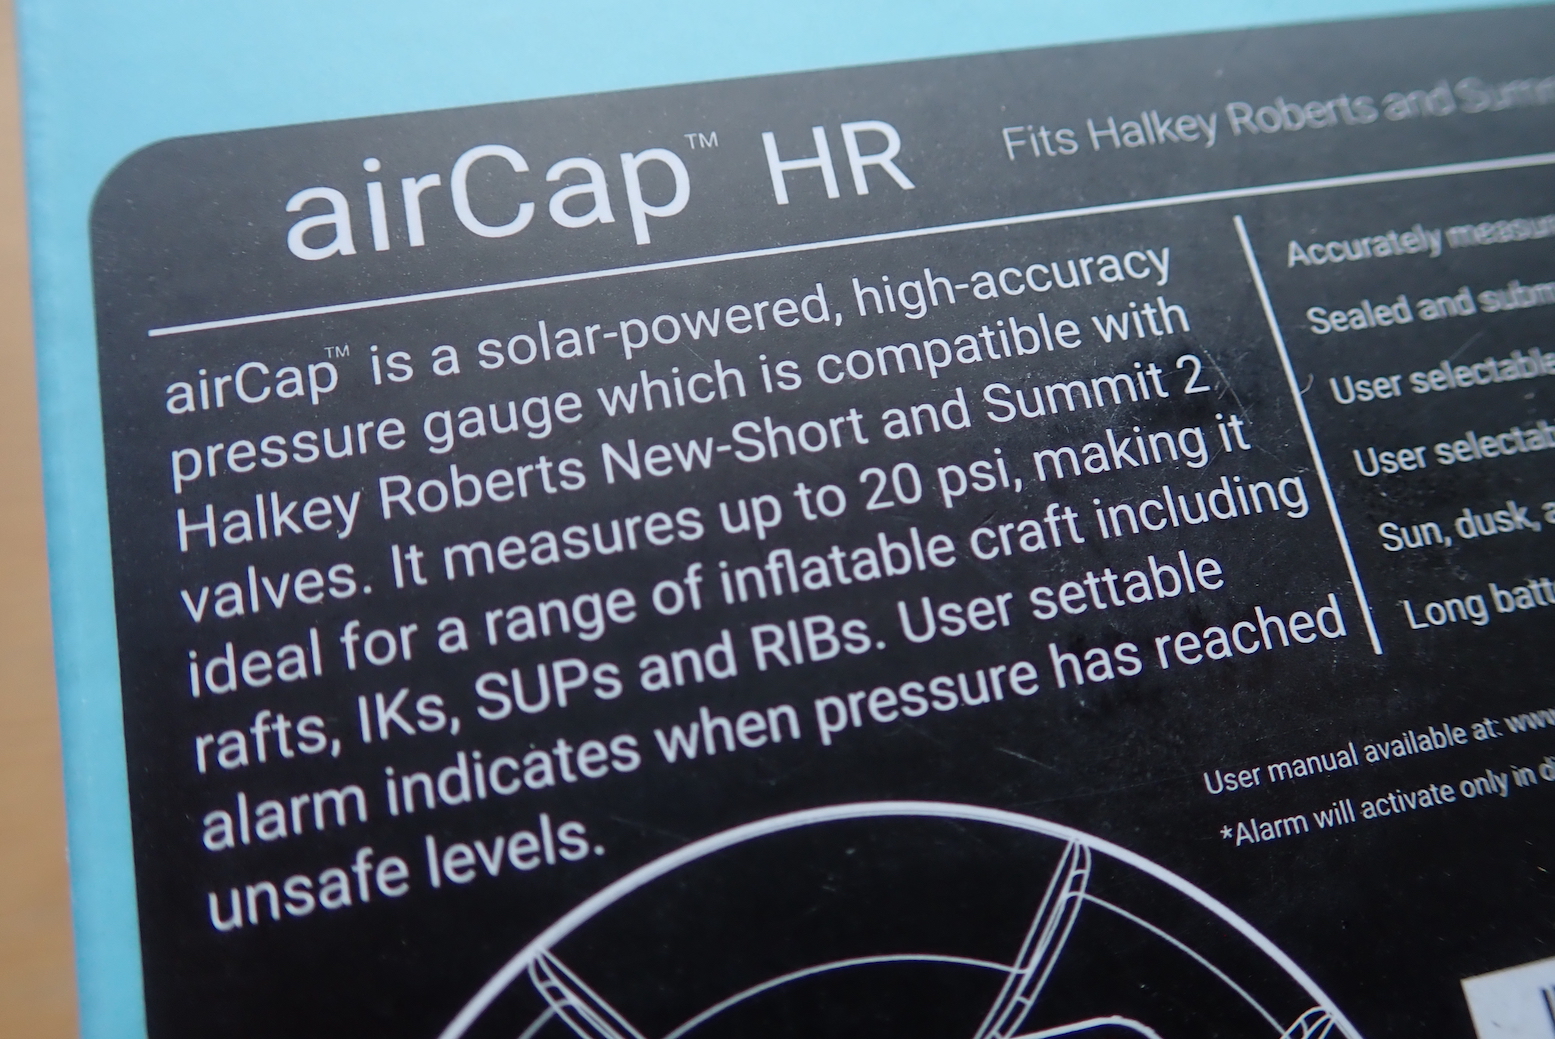
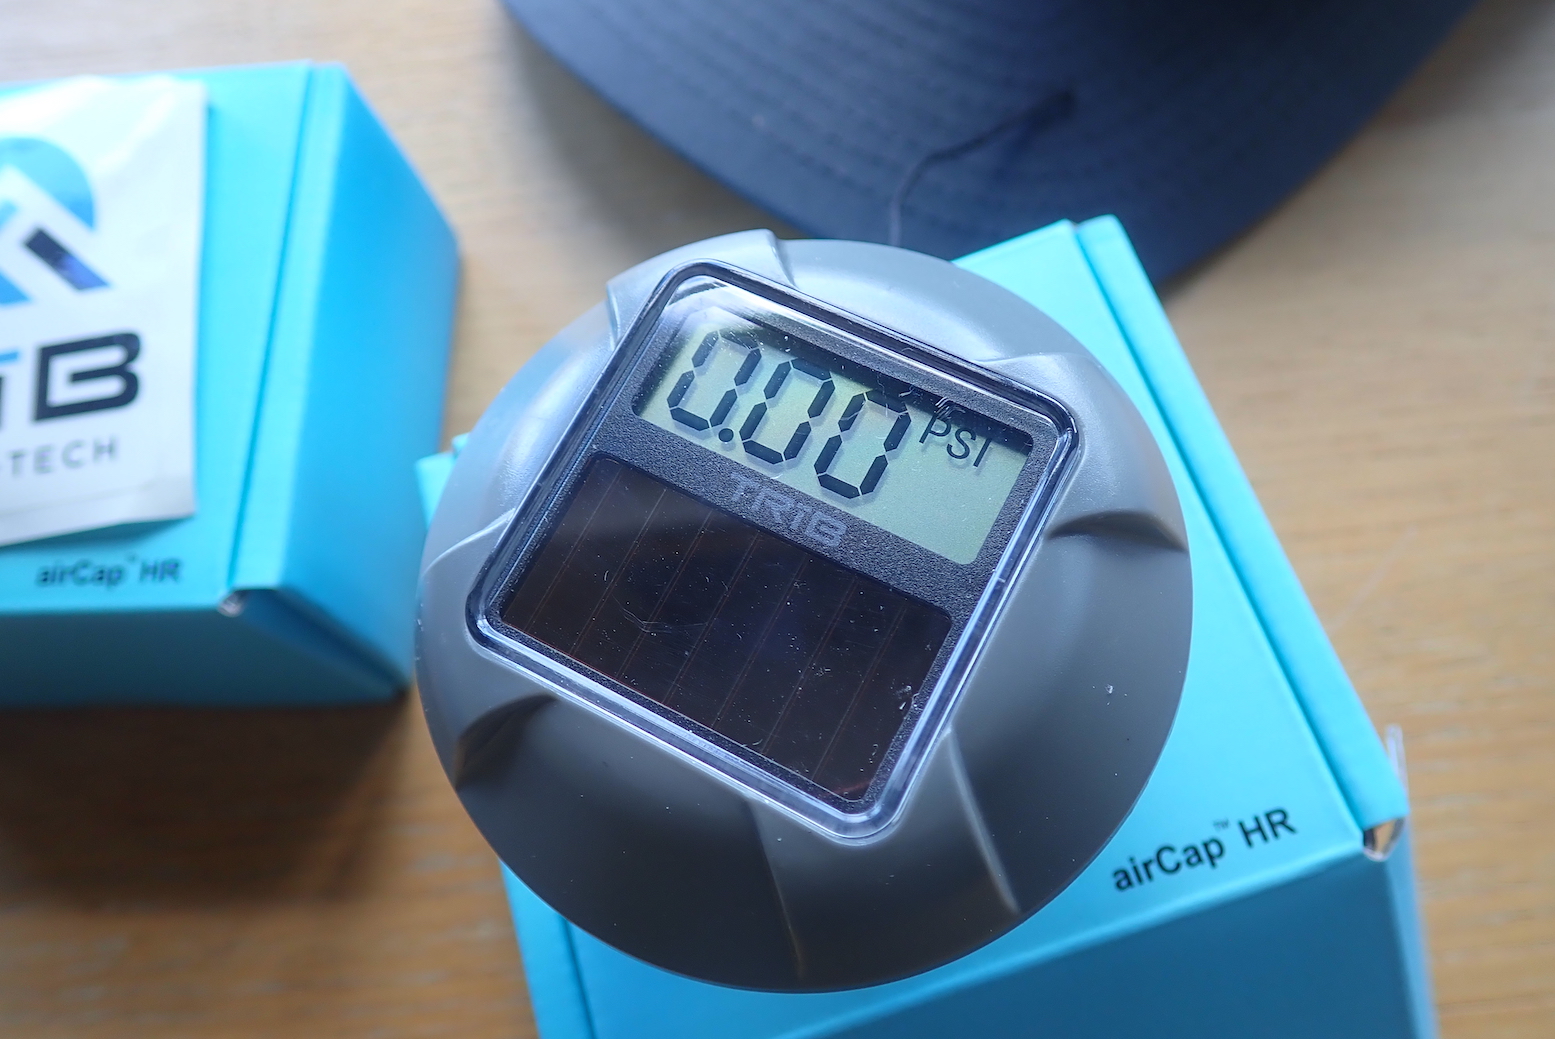
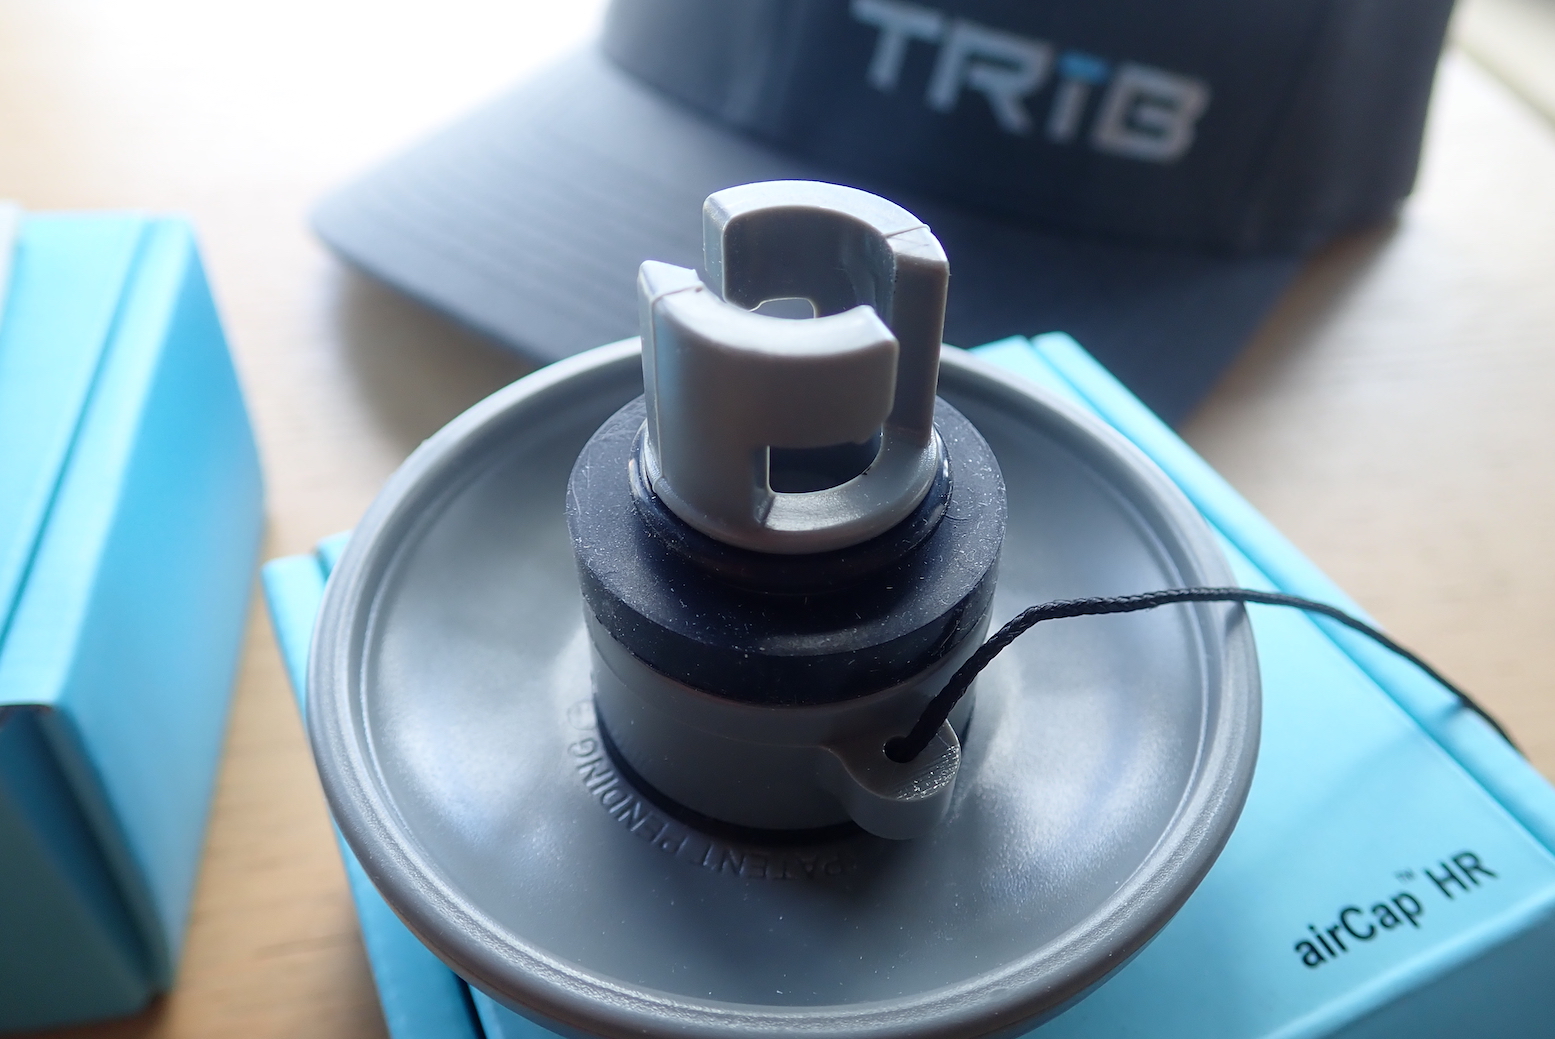
Another good idea are TRIB airCap live pressure monitors so your boat doesn’t end up like the Seawave left (actually an unexplained internal rupture while in the water). These TRIB solar-powered gadgets replace the valve cap on bayonet-type inflation valves like Halkey Roberts or Gumotex. One fitted securely an LCD display displays your pressures in psi, kPa or bar, a bit like TPMS for cars and motos. And like TPMS, you can even set a bleeping alarm at anything up to 20psi / 1.37bar. You need to make sure the seal is good and air is not slowly leaking out, but you can also use them as simple digital pressure gauges: twist on, measure and remove. Once fitted, you can watch as pressure drops after you put the boat in the water, and then seeing it rise out on a hot river bank. If I kayaked in a hot country (ie: not the UK) they’d be a simple alternative to the faff of installing PRVs. TRIB airCaps cost $40 in the US and the same in £s in the UK. The ribstore sells them.