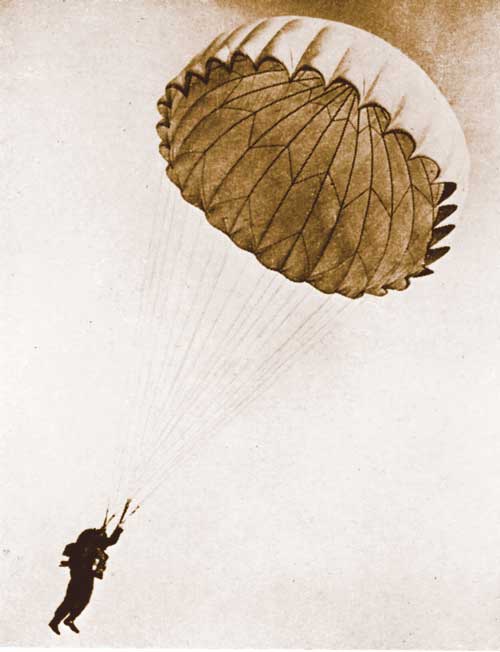
Some people place a rubber cap on the paddle shaft and use it as a walking stick. This application makes me nervous about damaging the paddle shaft.
Luc Mehl, The Packraft Handbook
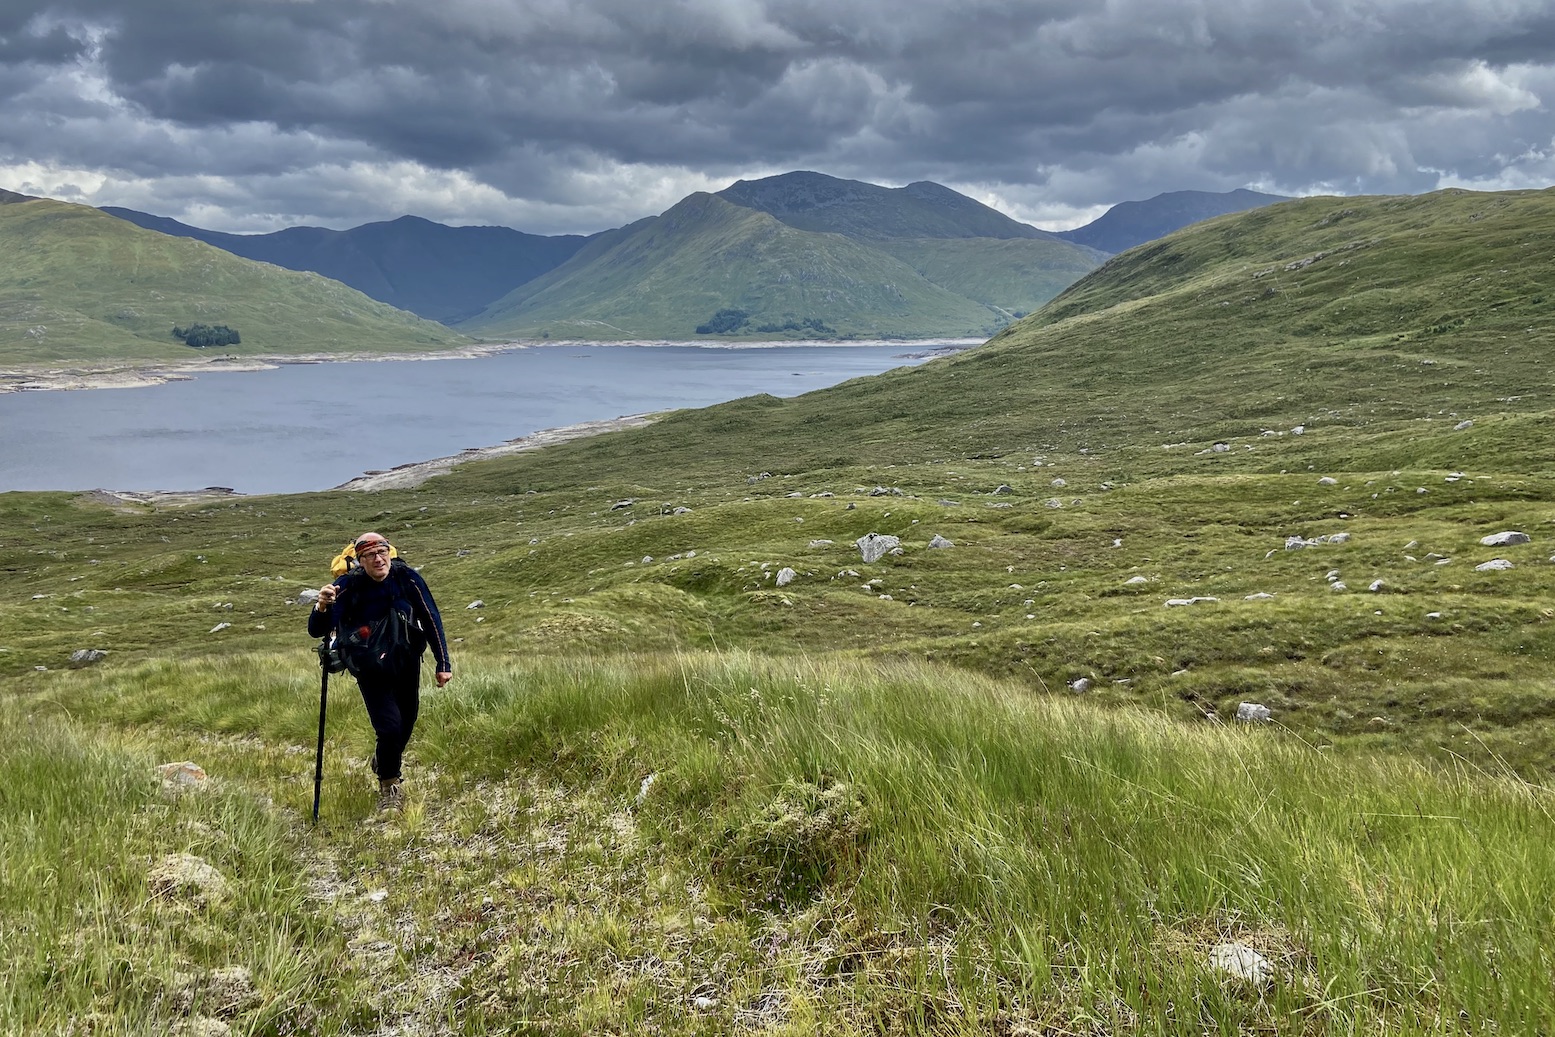
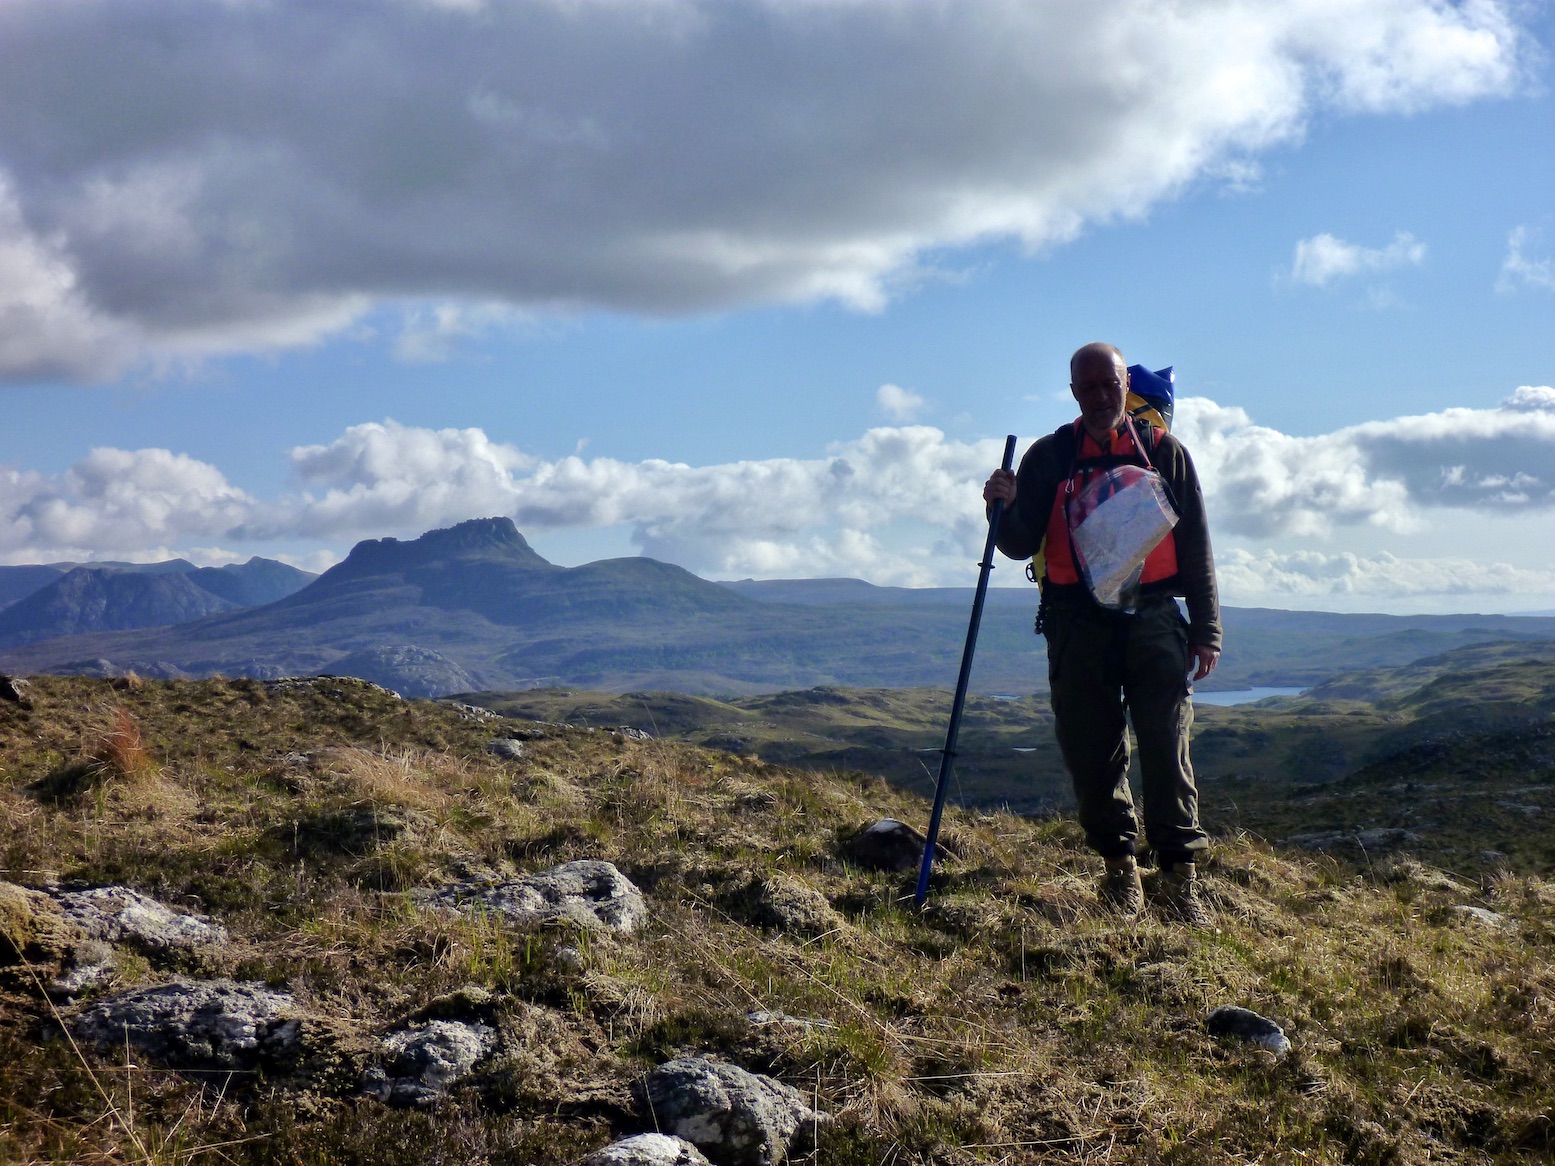
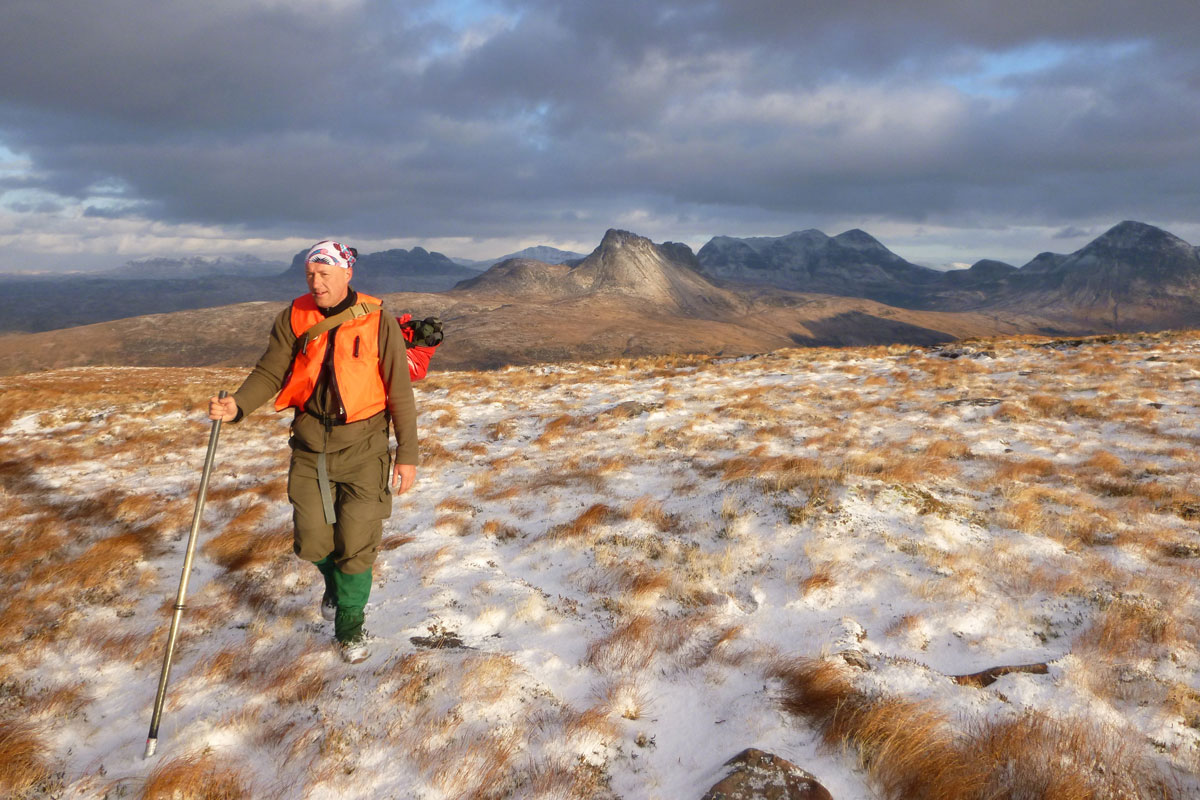
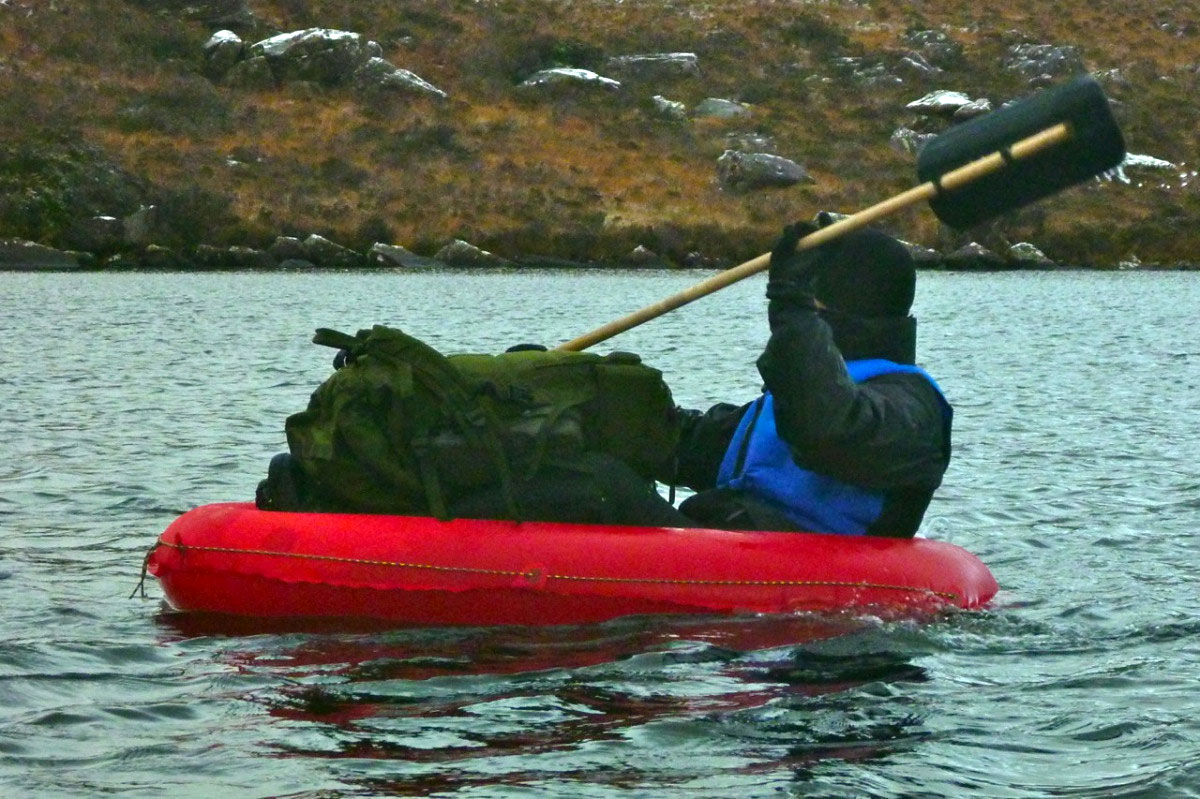
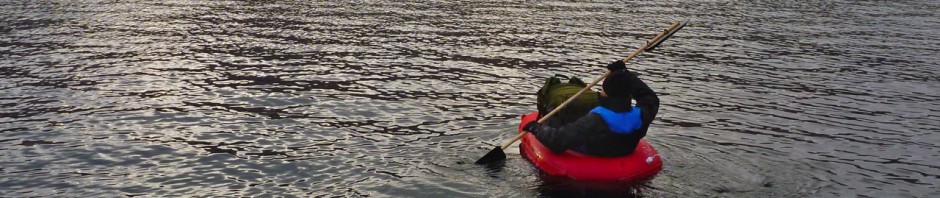
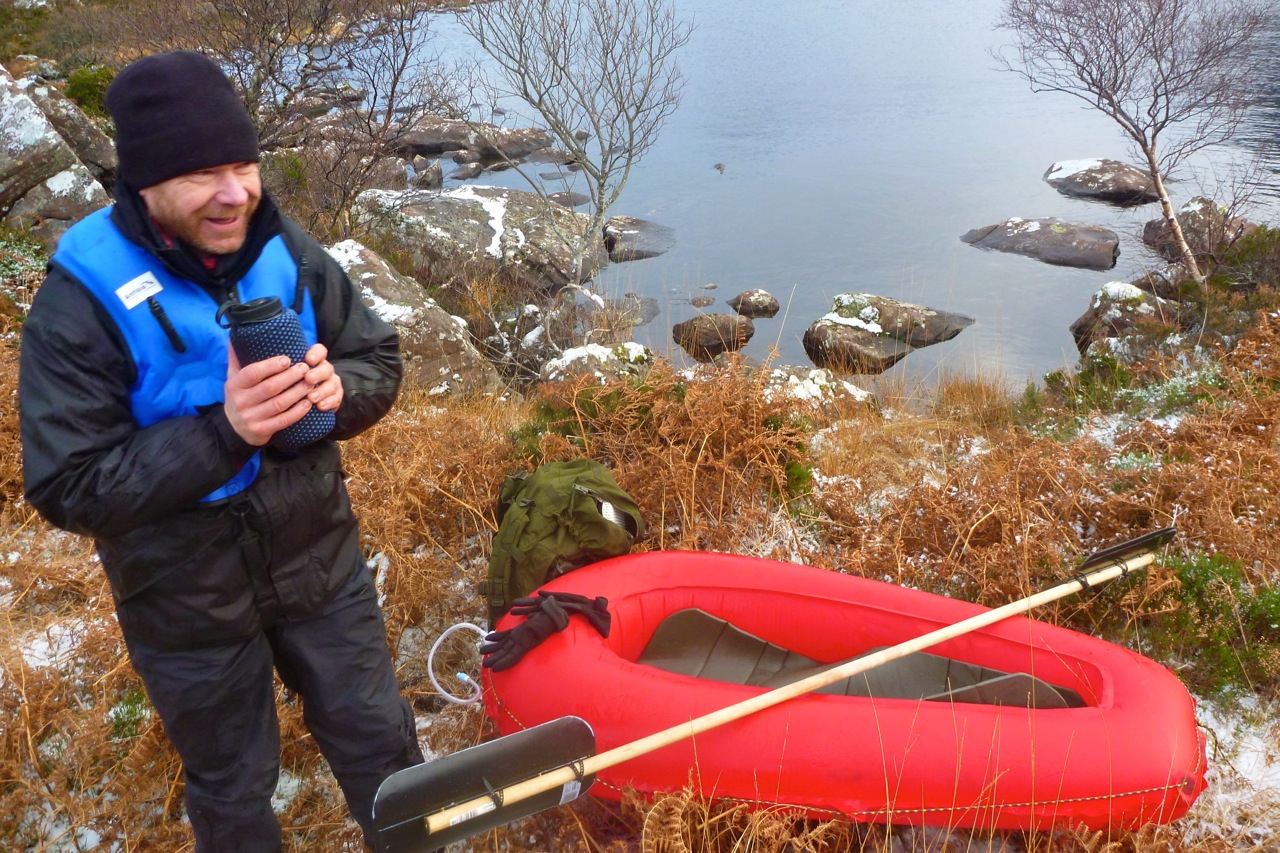
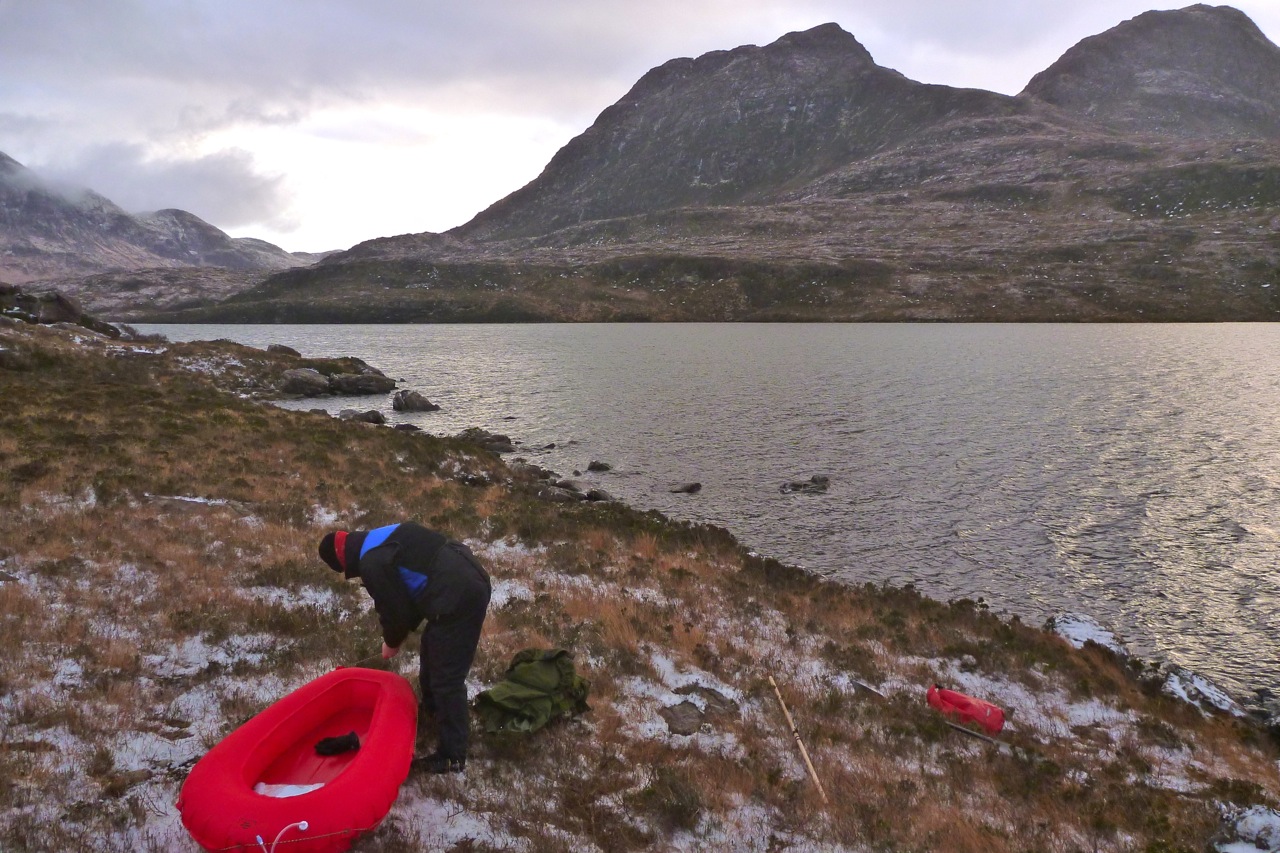
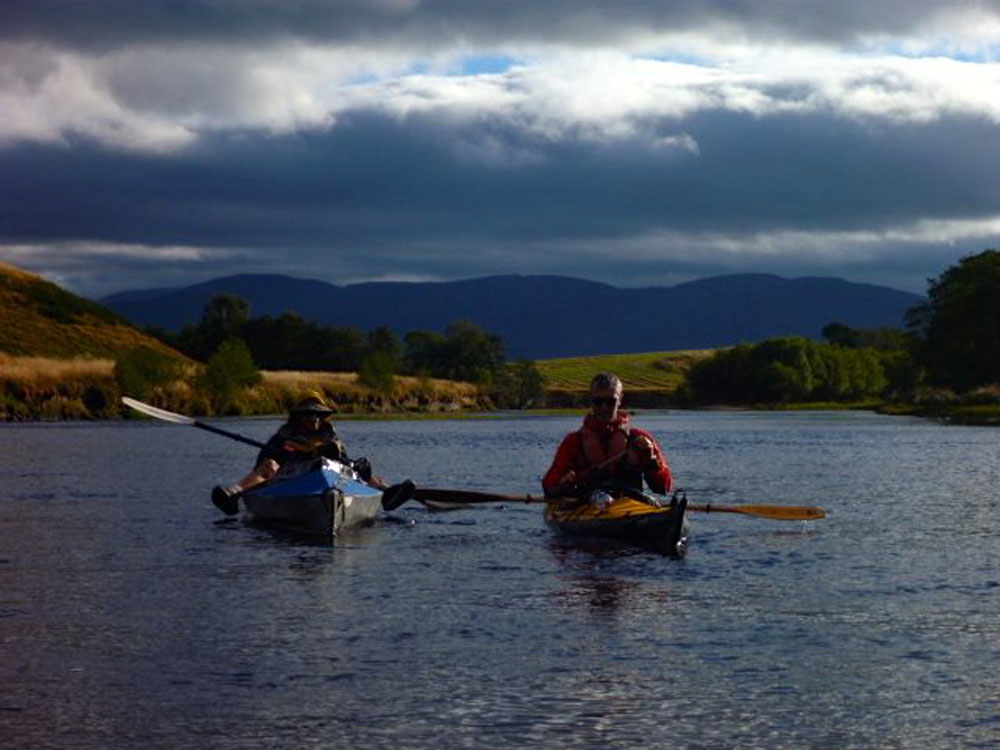
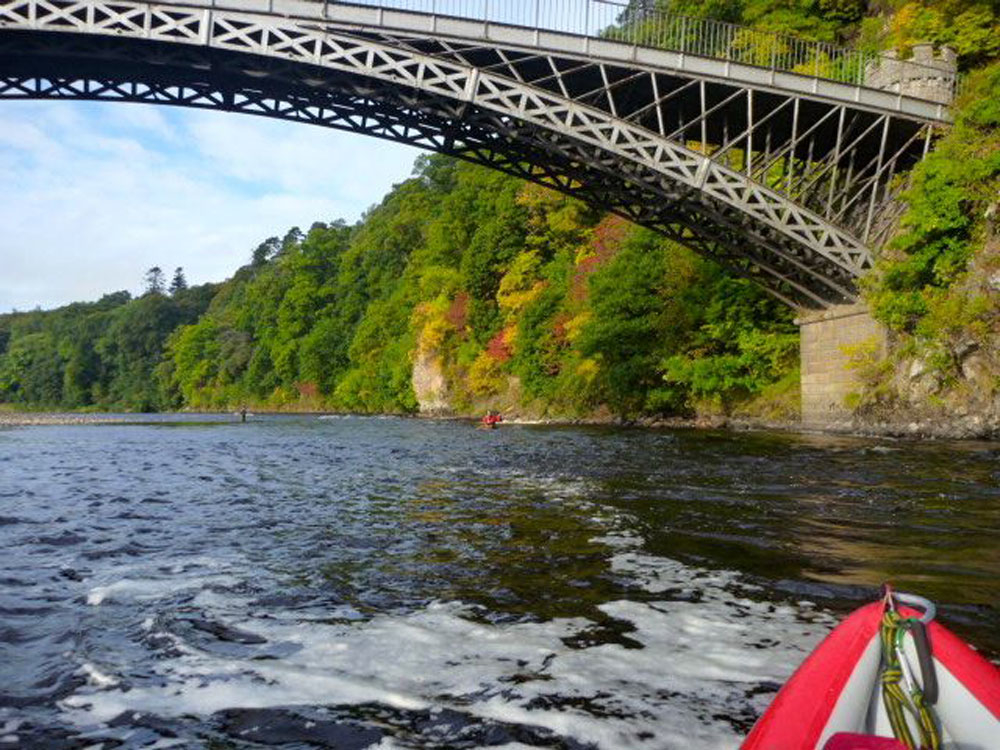
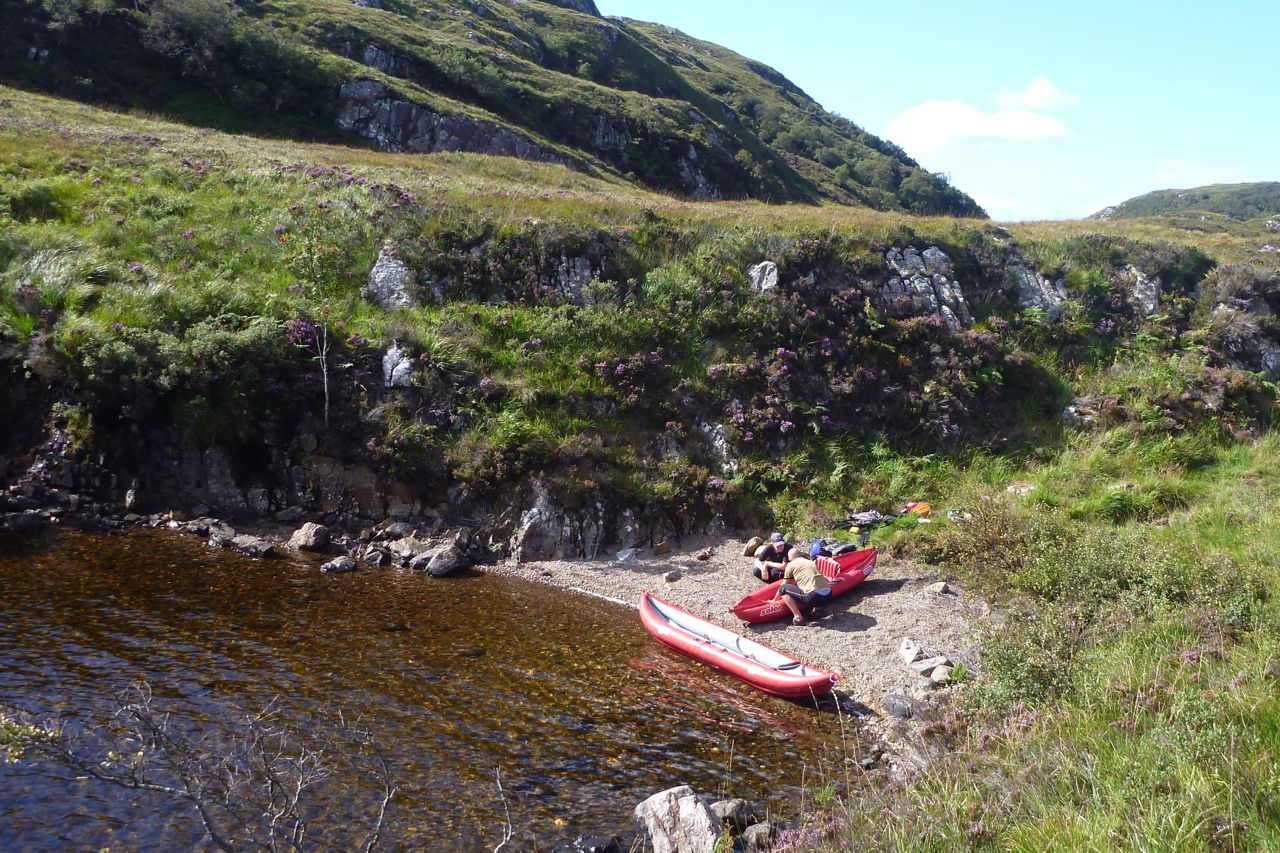
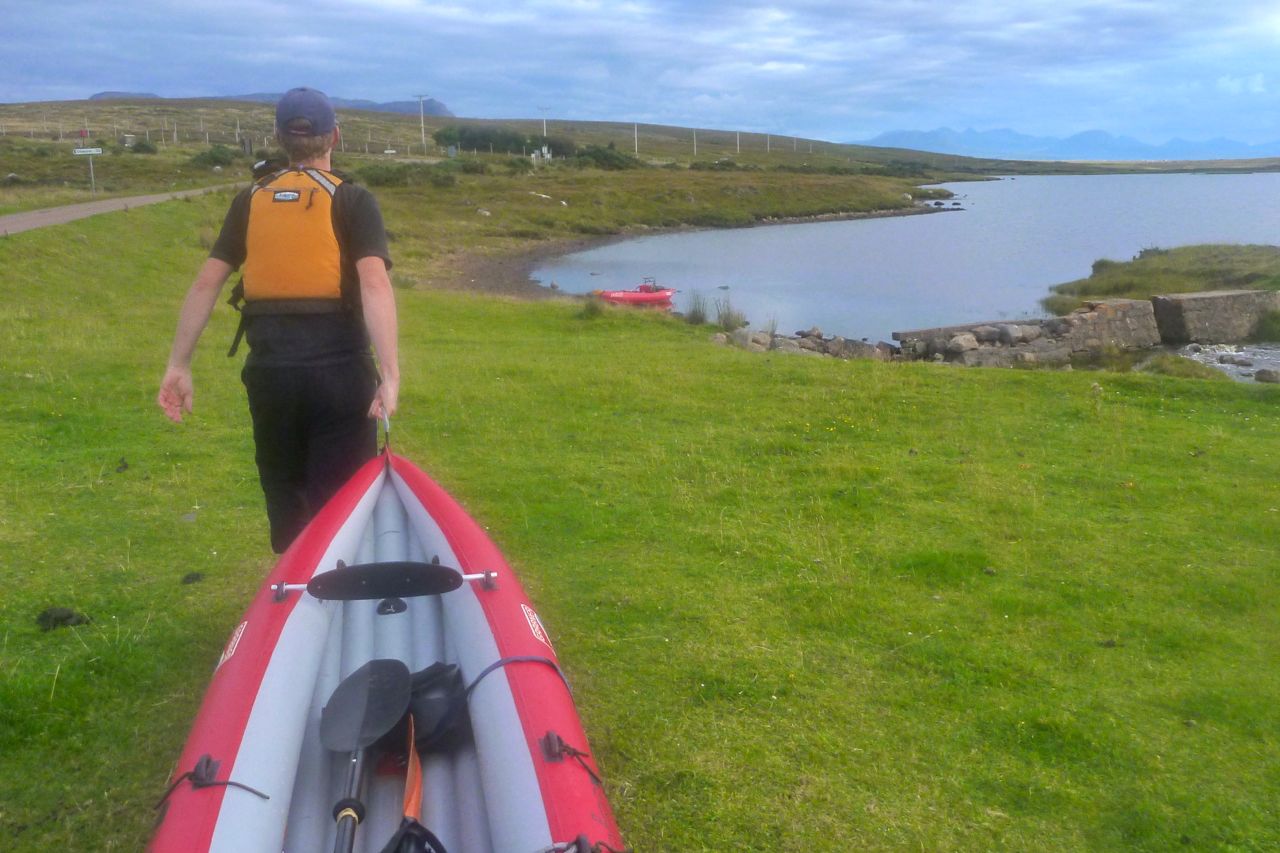
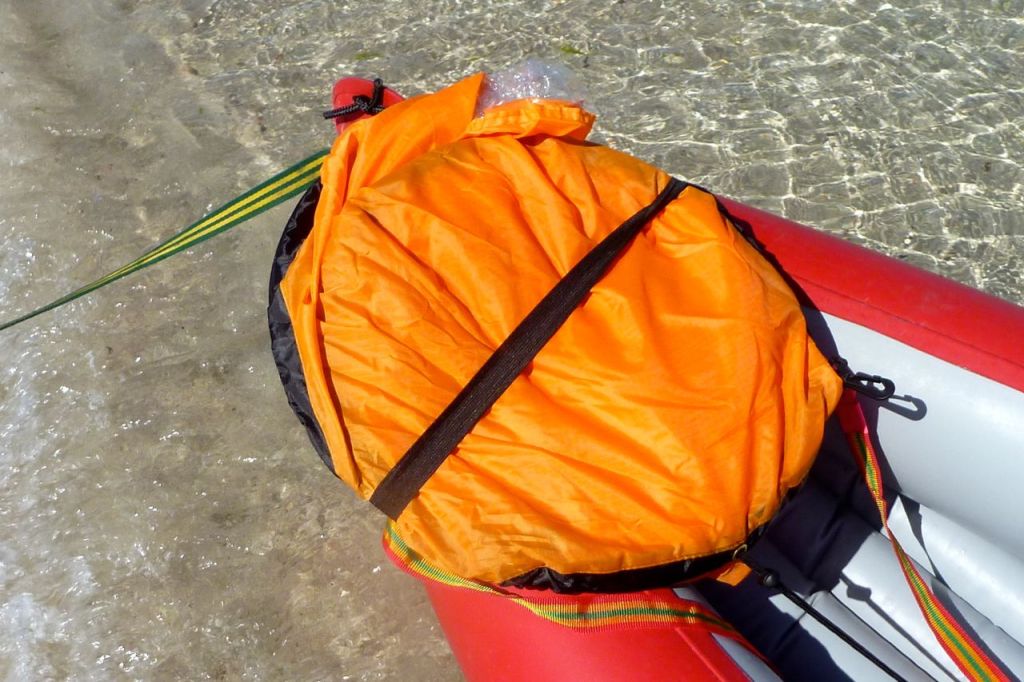
Packstaff in Scotland
No one’s ever asked me how to make a packstaff attachment for their four-part paddle, but I’m going to tell you anyway. After nearly two decades decade, I’m still a big fan of my idea for traversing rough terrain with heavy loads (above).
What’s so good about packstaffs? Well, they’re a great way of converting your light but strong paddle shaft into a light but strong walking staff that’s stronger and longer than too short trekking poles or hefty camera monopods, both of which are useful on the trail, but largely redundant on the water. Not needed on flat ground, staffs help you trek uphill and down dale with the same benefits as trekking poles, spreading the load off your ageing kneesto your arms and chest. And when hauling a full load, they help with balance, reducing the effort need in your core for self-correction. I‘m sure my legs have felt less tired after a full day of loaded packstaffing in the hills. Why not just use some trekking poles like a normal person? I tried them once years ago and can see the benefits, but it’s just more gear and I actually prefer using a longer single staff in one hand, while maximiusing gear functionality on land and water.
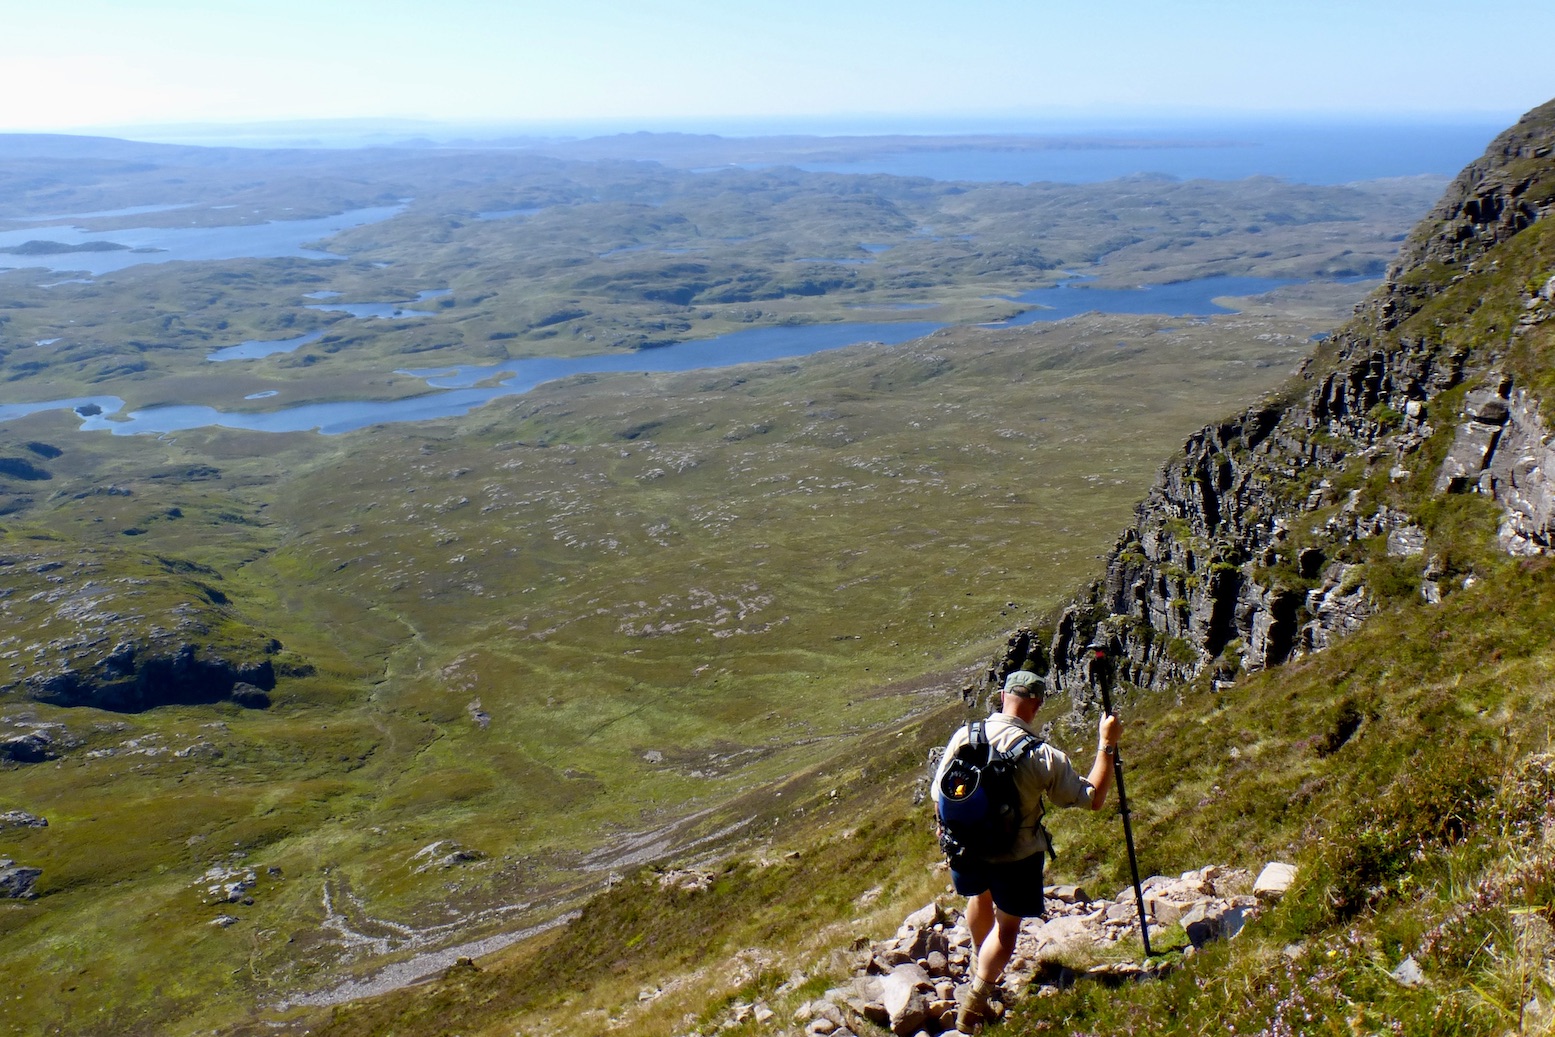
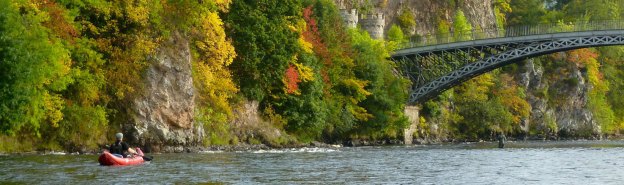
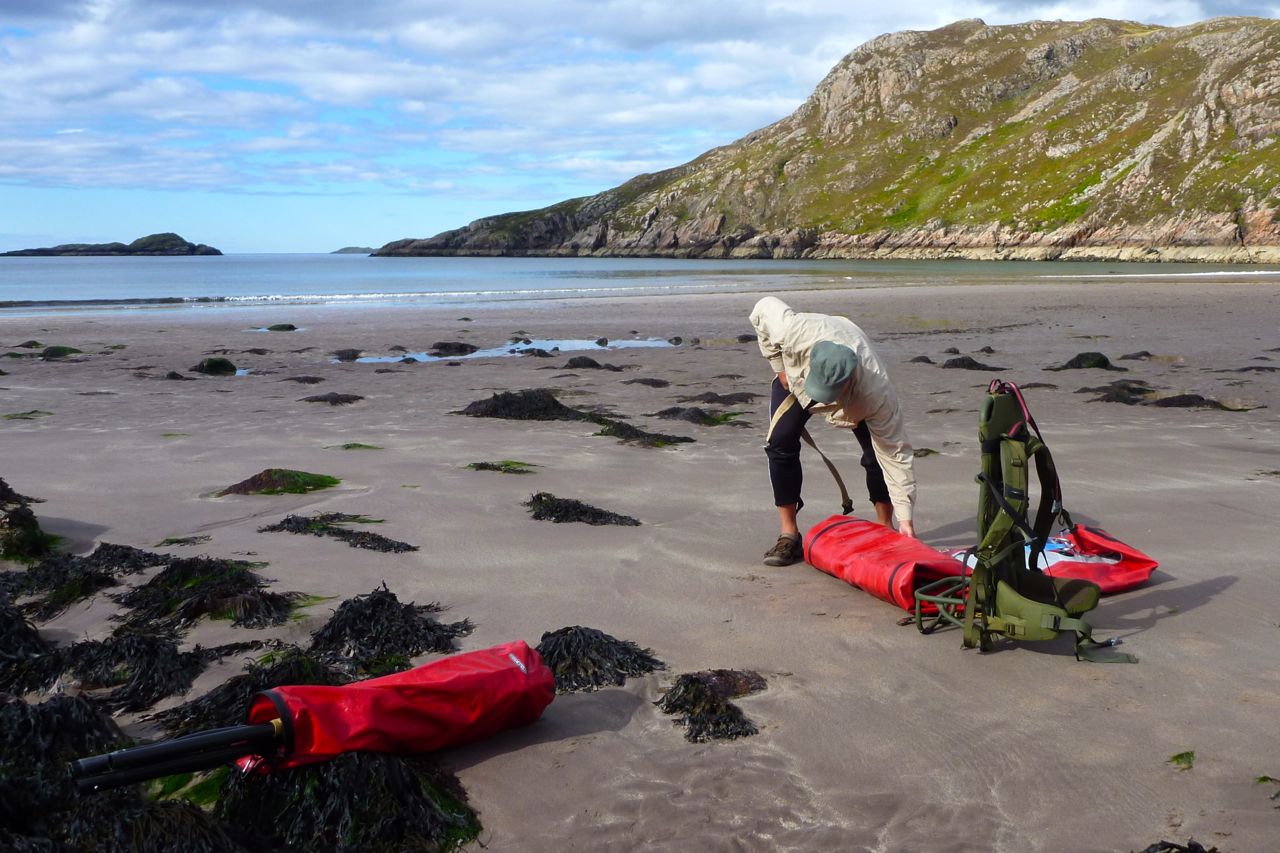
Packstaff in Turkey
A longer packstaff can easily support your weight as you inch downhill with a heavy backpack pushing you forward. A cheap telescopic trekking pole would collapse, or sure feels like it might, same as a repurposed monopod. Like any long staff, they’re also handy for prodding bogs, fighting off killer Turkish mastiffs, just like tubmen in the old days, plus help with vaulting narrow streams and ditches or fording stepping stones in a bid to keep the feet dry. Again, a lightweight walking pole may not be stiff enough to do this. An MYO packstaff nib weighs 200g, costs next to nothing, and works with any four-part paddle, like my old Aqua Bound Manta Ray. There’s even a bloke on ebay who’s partly copied my concept. See bottom of the page on how to simply convert an Anfibio Vertex Tour by sawing off the end of a canoe paddle handle of one section and using the other canoe paddle handle section.
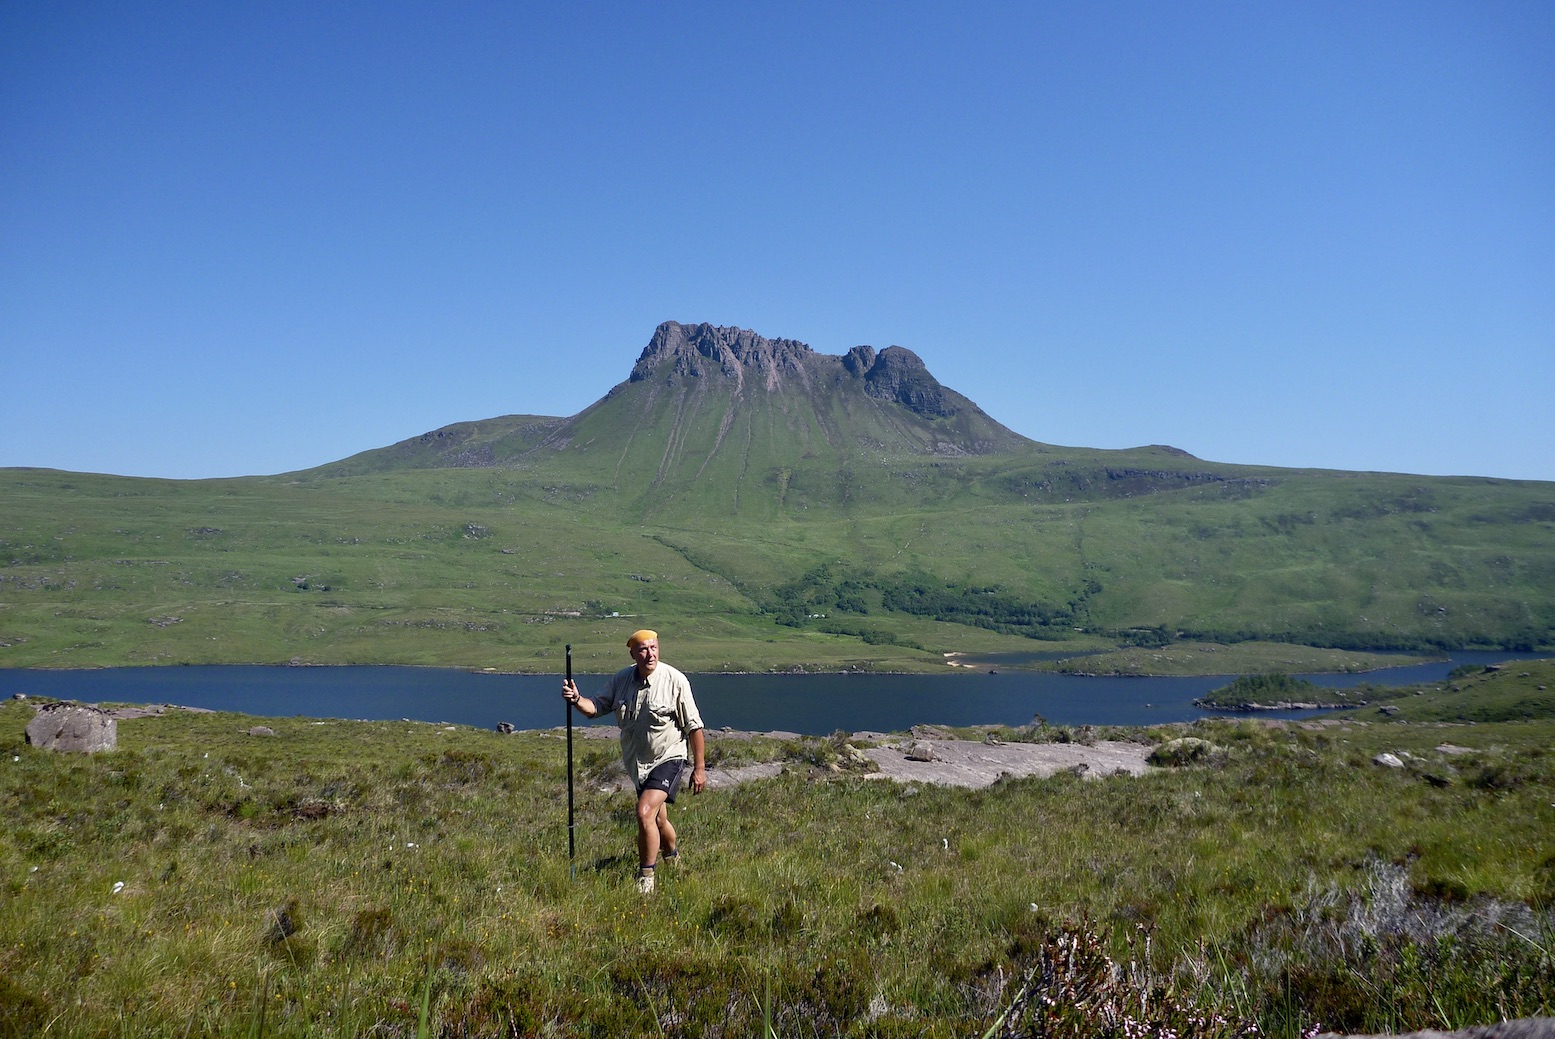
Packstaff in Mauritania
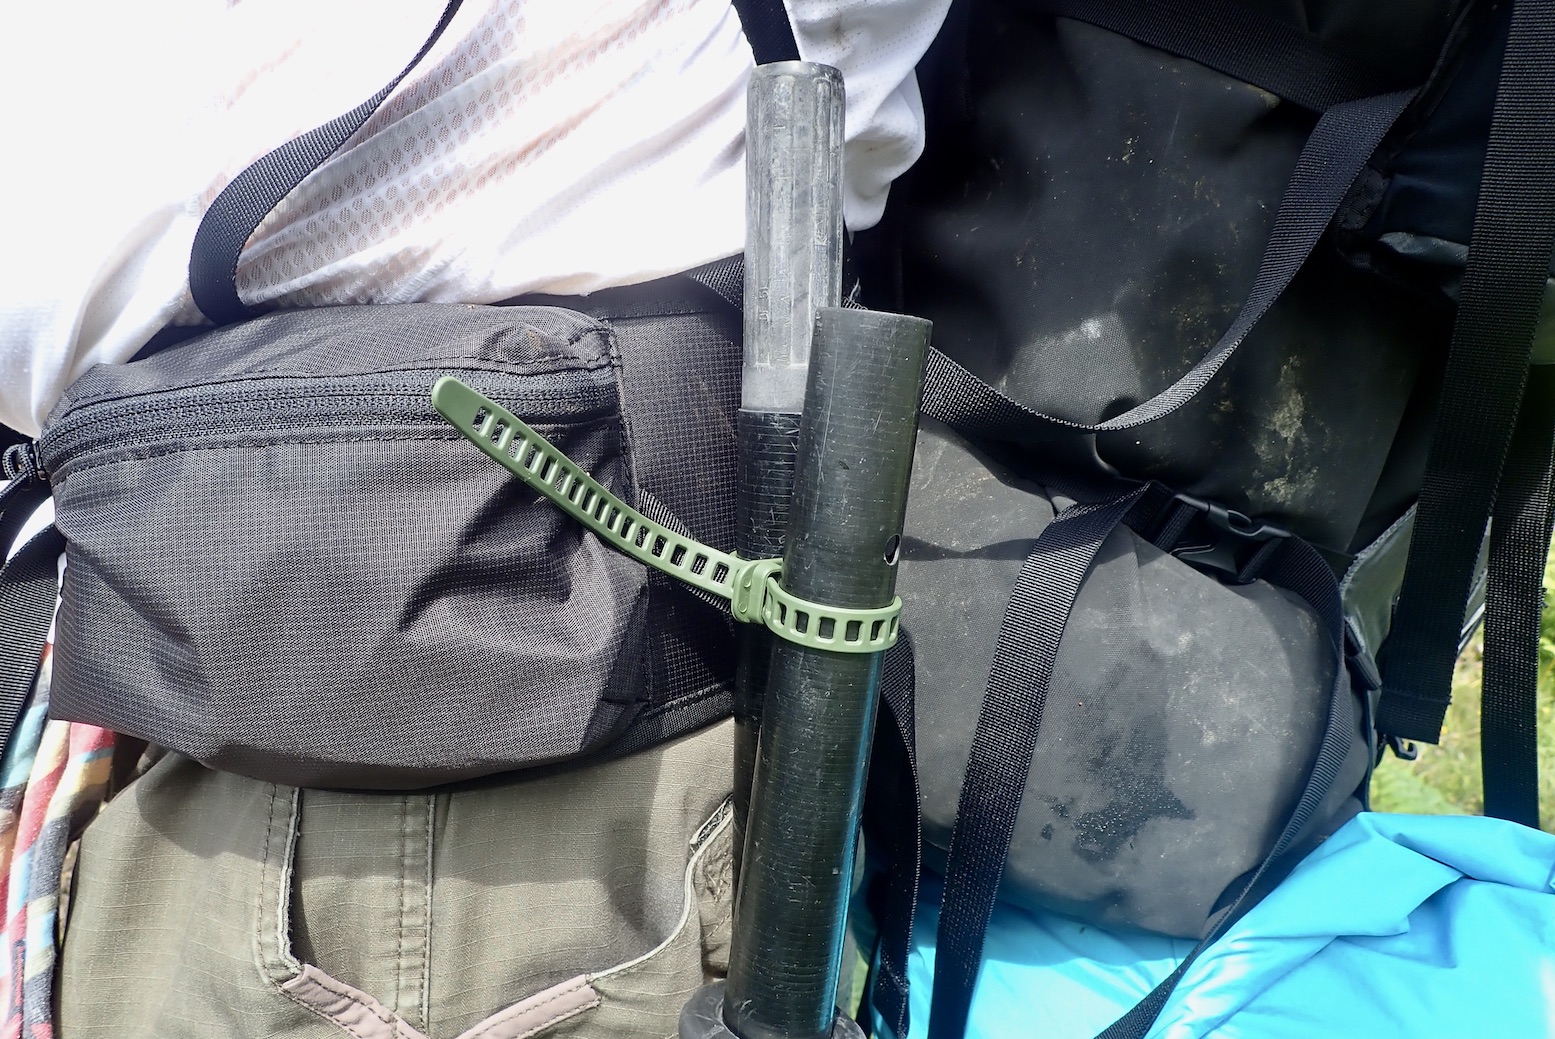
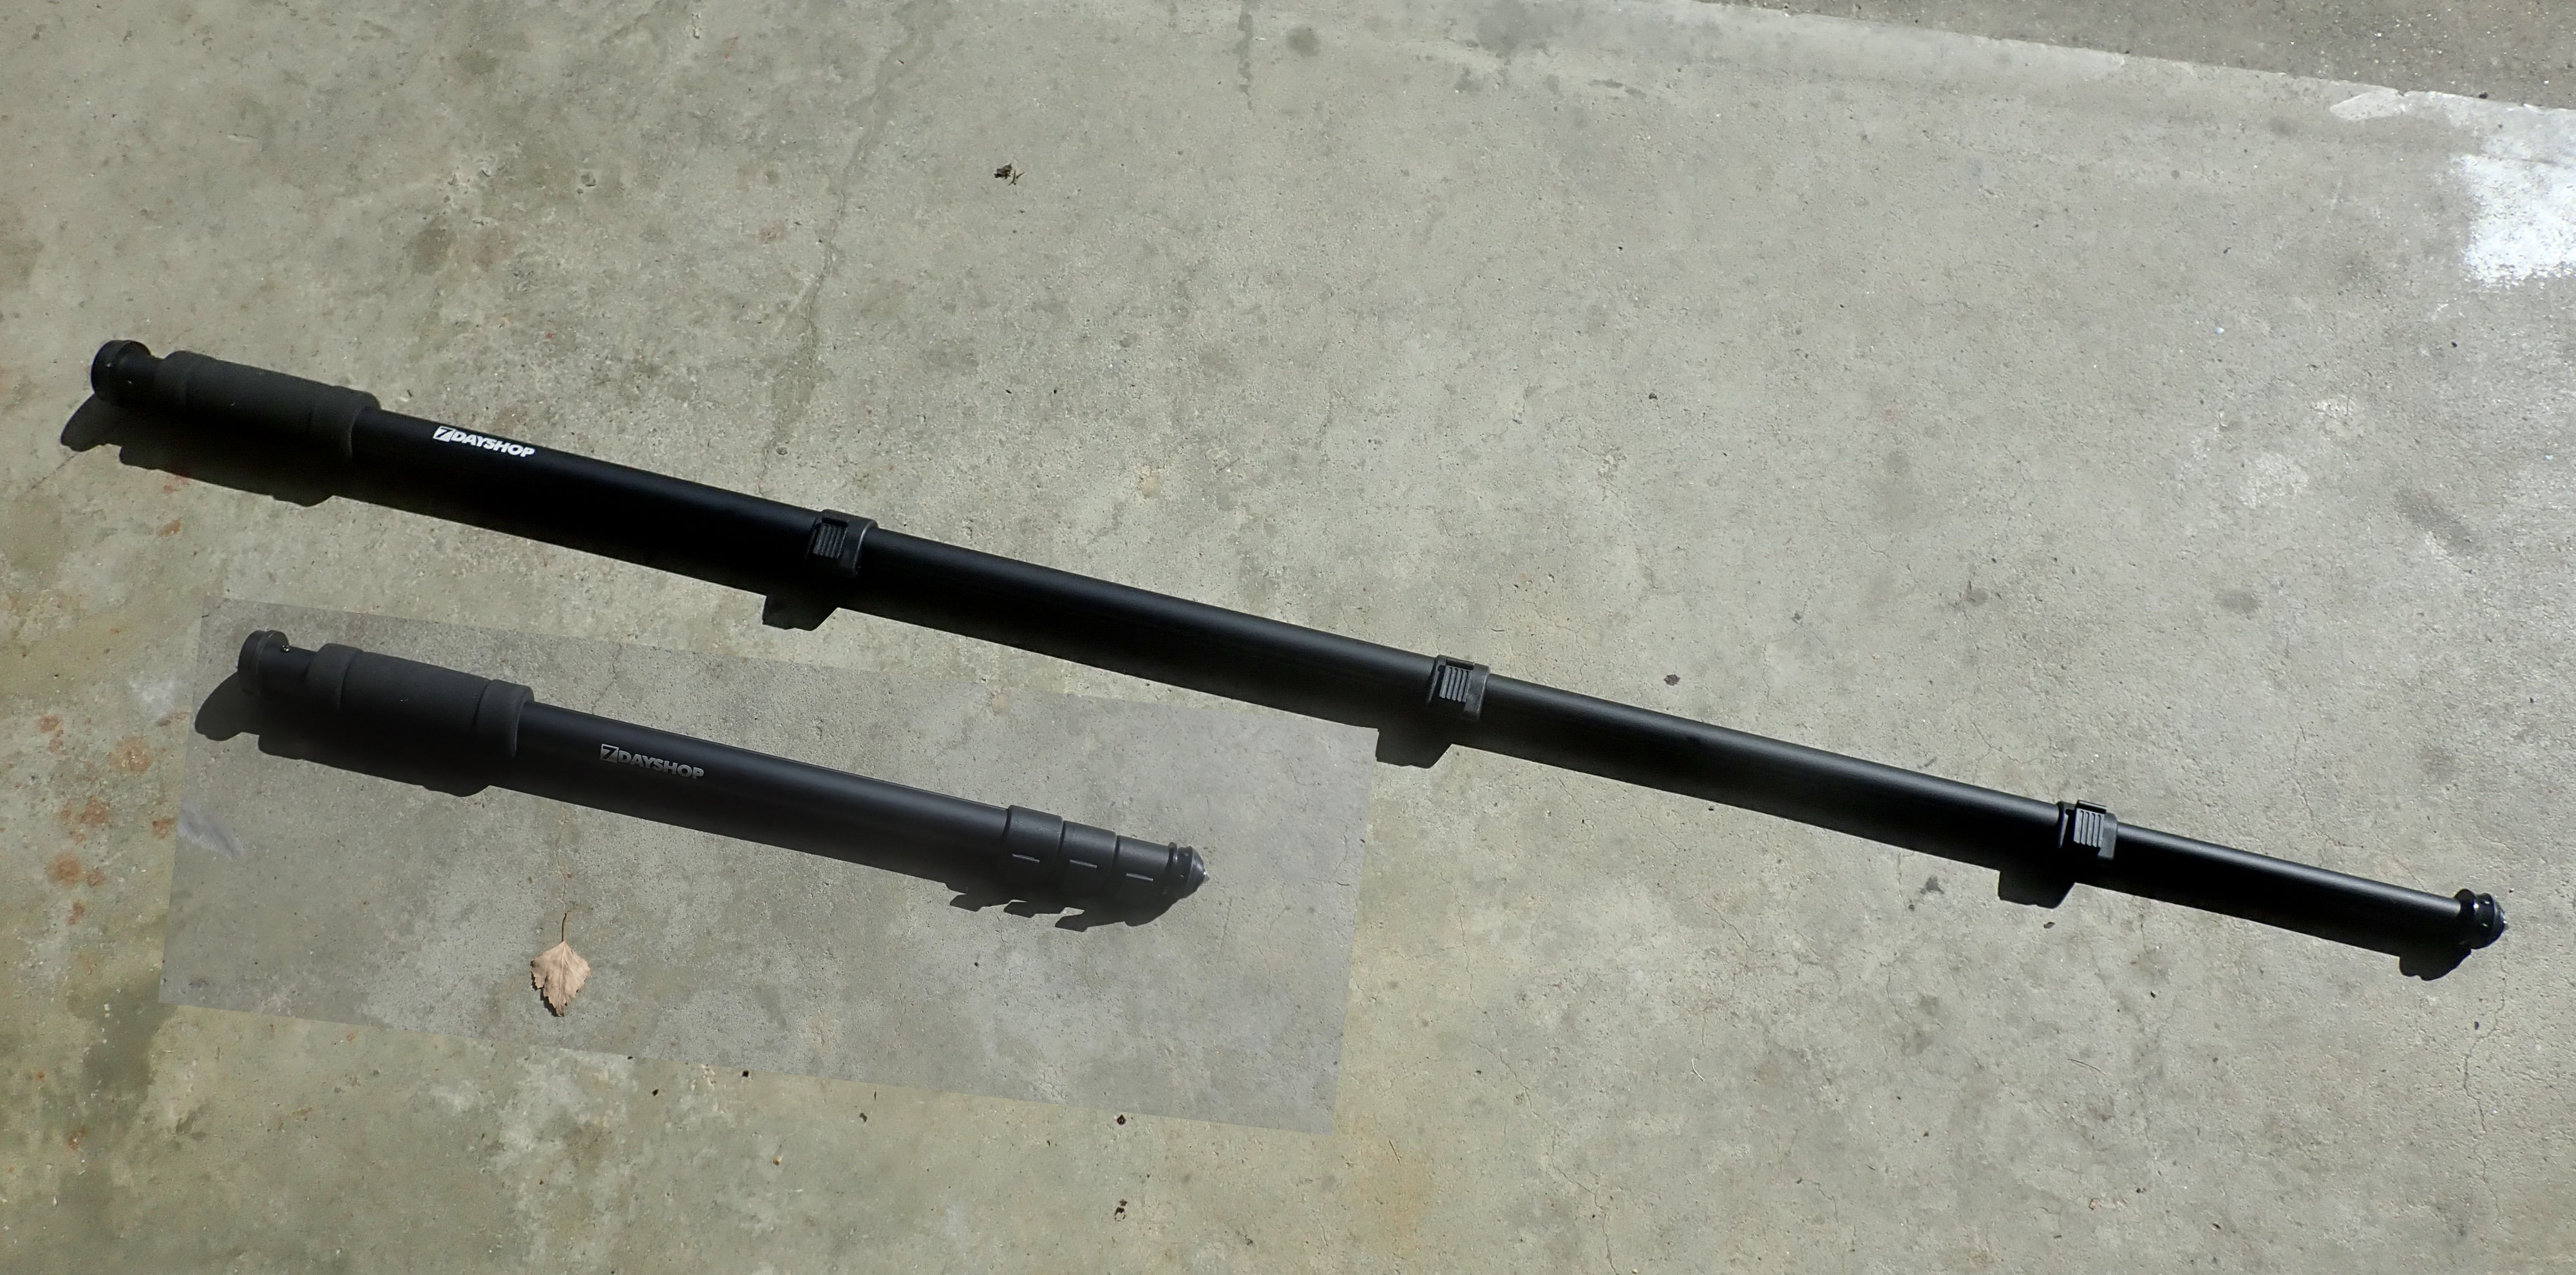
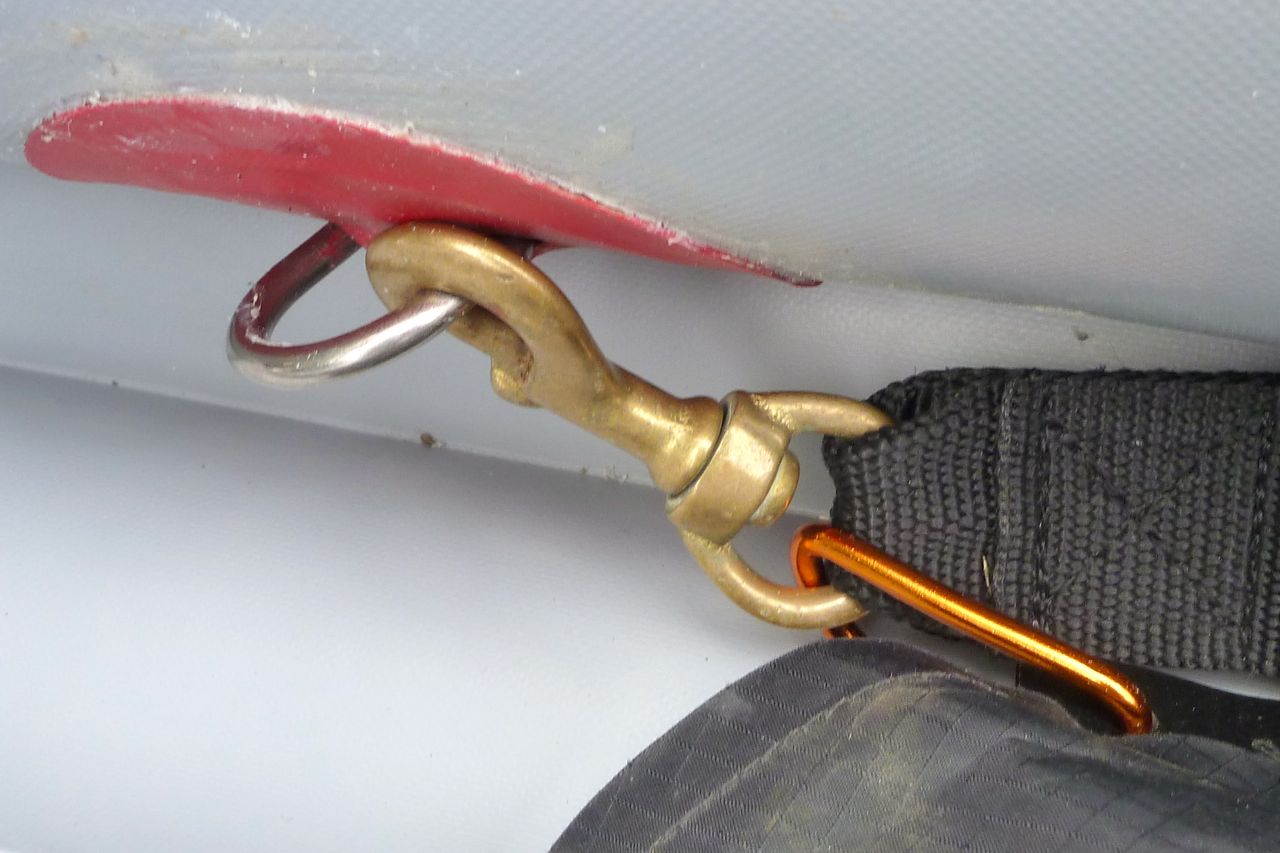
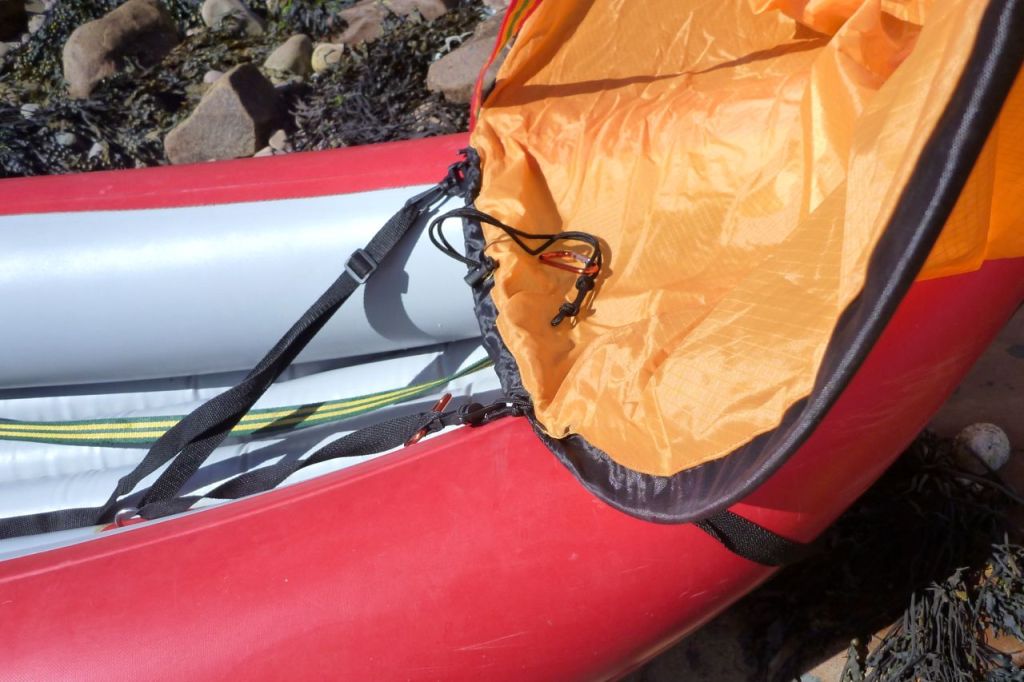
Find a bit of tube that’s close to the right diametre to slip into your paddle where the blade goes. My blue tube was from some cheap paddle that came with a long-gone slackraft. Add tape to make a snug fit, if necessary. But not so tight that you risk jamming when wet. Drill a hole at a point where there’s enough overlap to make the assembly strong, and then fit a spring clip. I bought a pair on eBay for a fiver, though you can buy cheaper pressed out ones for less. As it happens it turns out my Aqua Bound uses cheap pressed clips. You may not be able to find the typical 7-8mm buttons to fit the AB files. I settled with 6mm. This spring clip is easy to fit and a big improvement over my previous ‘slip-on’ nib which got sucked off in bogs.
Match up the overlapFit spring clip into blue nib6mm button in 8mm hole
Collar is important to take loads off the button
Next, line up the two holes or fit the spring clip and add a collar. You don’t want the nib’s striking force impacting on the clip’s button alone. I sawed a bit of old fibreglass kayak shaft which was a tight fit on the blue tube, so split it then glued it on. That glue didn’t work so well so I added a couple of rivets. The collar also protects the end of your paddle shaft. The actual end ‘nib’ is currently a black plastic screw section. Stuff and glue in a bit of cork or other blockage in your nib end (right) to stop the tube slowly filling with mud or stones. The nib weighs 137g.
All up my packstaff weighs 213g. The AB paddle is 890g
Using the packstaff with an open shaft at the top, I sometimes worry that stumbling onto that shaft at face height could take an eye out. With a canoe T-grip (below left; fiver on ebay) you can press comfortably on the staff coming down a hill, and it also acts as a handy hook. Mine had to be ground down to fit. It weighs 78g with a 6mm SoftTie to attach it to the nib during transit.
When you don’t need to carry the packstaff you can stick it under a shoulder strap, but I find it slips out. So better to break it down to two parts and slip it under a belt or similar loop. Again, I find the double-loopable SoftTies handy for this, and the loop stays on this paddle to make a handy paddle leash attachment using the mooring line when sailing or in rough open water.
Packstaff 2 In 2022 I got an Anfibio Vertex Multi Tour 4-parter so sold my old Aqua Bound Manta Ray 4P which weighed about the same. The Multi Tour comes with two canoe handle sections to make a pair of canoe paddles. I can’t see myself canoe paddling but figured there must be a way to convert these pieces into a Vertex packstaff. Sure enough there is. Use the canoe paddle add-on handle with the clamp on the end and the section of paddle shaft also with the clamp, then saw the handle off the plain canoe handle section. You now have a three-part, length adjustable packstaff. Jam whatever nib you think is needed onto the thick carbon-plastic end of the sawn-off handle. The whole thing weighs 400g, and the advantage of length adjustment between 100cm and 133cm, which may have its uses. Annoyingly, in a noble bid to reduce excess gear I sold the Vertex and kept the Wave. I’ve since found an unused alloy, telescopic camera monopod that’s as long, weighs 370g, a bit less than the Vertex set up. It’s clearly not designed for packstaffing so I’m not sure it won’t slip under heavy loads. We shall see.
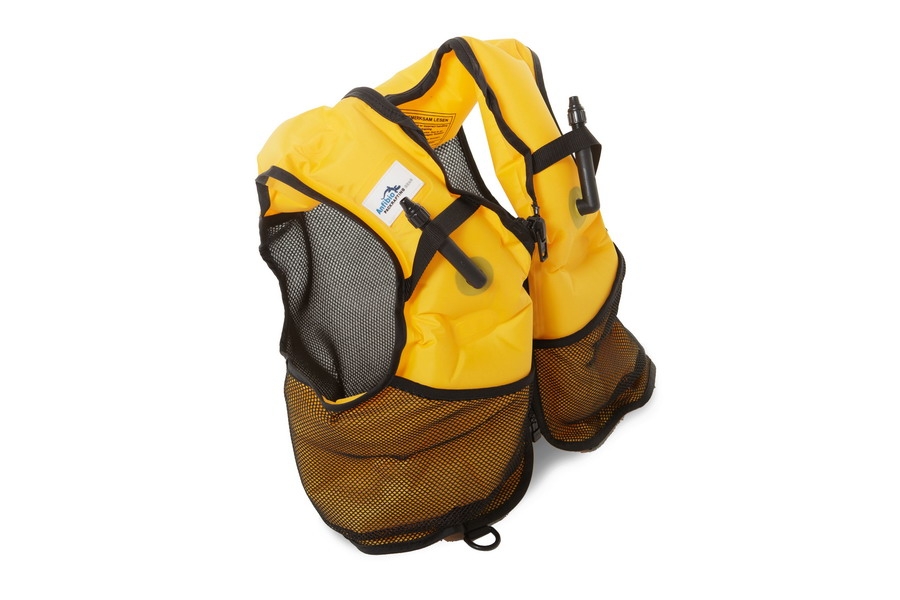
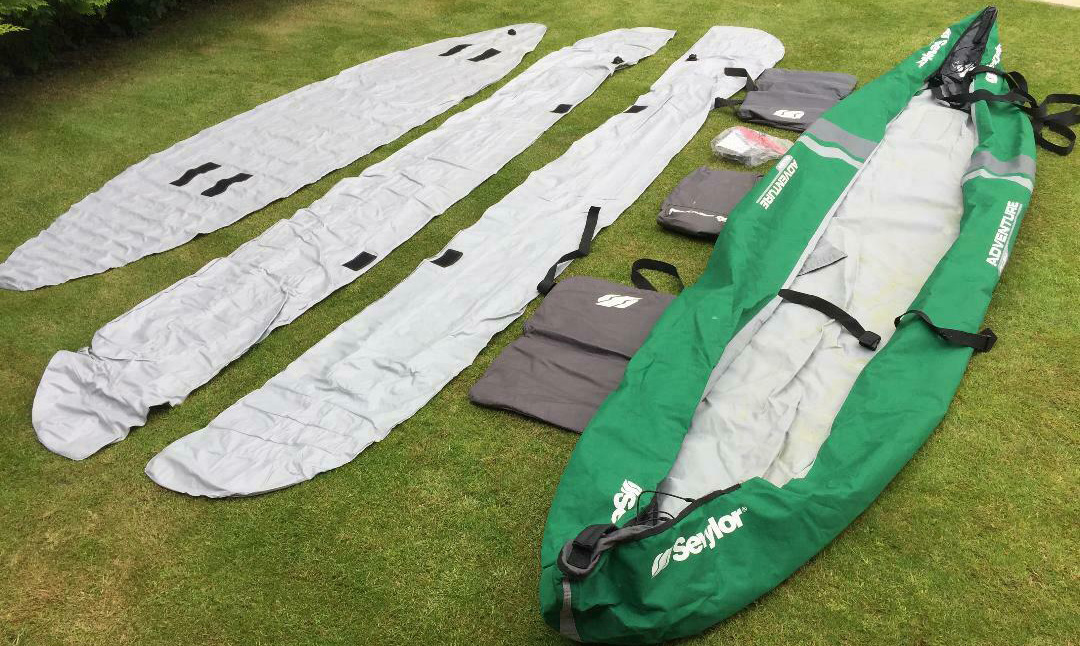
Back in 2015 the Packrafting Store in Germany sold us a couple of pre-production Anfibio inflatable packrafting vests to try out. These came without the big mesh pockets, unlike the current production item, left. Called a Buoy Boy, an ‘inflatable jacket’ or buoyancy aid is all they claim to be, not a PFD, far less life jackets. They don’t even claim to have the rescue/harness elements suited to white water recoveries, as found on better PFDs. A warning label inside spells it all out. Instead, your Buoy Boy bad boy is just a compact, unobtrusive buoyancy aid that’s well suited to sedate packraft touring.
You clip the waist clip and hook the strap under the crotch to stop it riding up, as can happen with a regular PFD, then zip up the front. Our prototypes had two ‘push and blow’ valve tubes inflating the two chambers (three breaths each). These chambers don’t cover the lower back which is composed of a thick, stretchy mesh below the inflated collar (left), so avoiding that inelegant ‘pushed-up PFD’ look in your packraft. The rear collar around the neck might even float you unconscious, face up, like a proper life jacket, but that would be a happy coincidence and despite the appearance, it is not a design element.
We weren’t even planning to take our regular PFDs on this mid-winter trip, so a compact option came in welcome, especially when a late-night boat ride required them. Best thing: it’s unobtrusive to wear deflated, doubling up as a high-viz vest whose benefits we also appreciated when road walking in the Scottish mid-winter gloom. We even inflated them while walking in freezing conditions to act as extra insulation, while at other times the Buoy Boy will be less hot than a regular PFD; another problem I’ve found when foam PFDs and paddling in 25°C+.
Weight is from 340g to 400g for a Med/Large. My ‘M/L’ was a snug fit once fully inflated over all my mid-winter clobber (I’m normally 42″ chest). A great bit of kit that I can see becoming my regular day-tripping BA, especially when I have to wear one due to regs rather than need to due to conditions.
Update. I used my orange BBoy proto just about all the time as most of my paddling is flatwater and it’s great not to feel cluttered. I bought myself a larger L/XL with horizontal valve straps and very handy large frontal mesh pouches just what was needed. Unfortunately it was black – I prefer brighter colours for safety and photos. Now in 2018 colours are blue (S), yellow (M/L) and black or yellow (L/XL) – hooray! A roomy Large on me weighs 450g with crotch strap. Price is €99. More details and photos here.
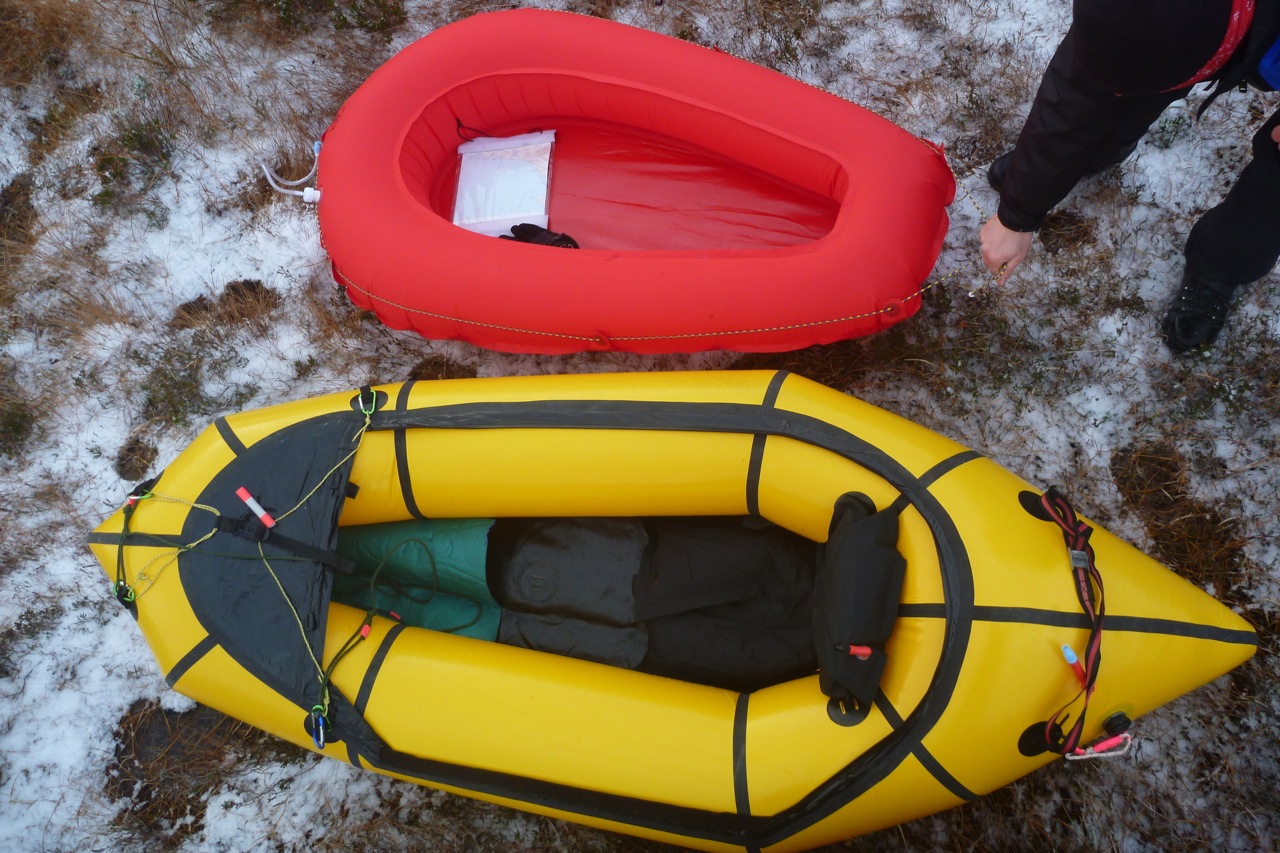
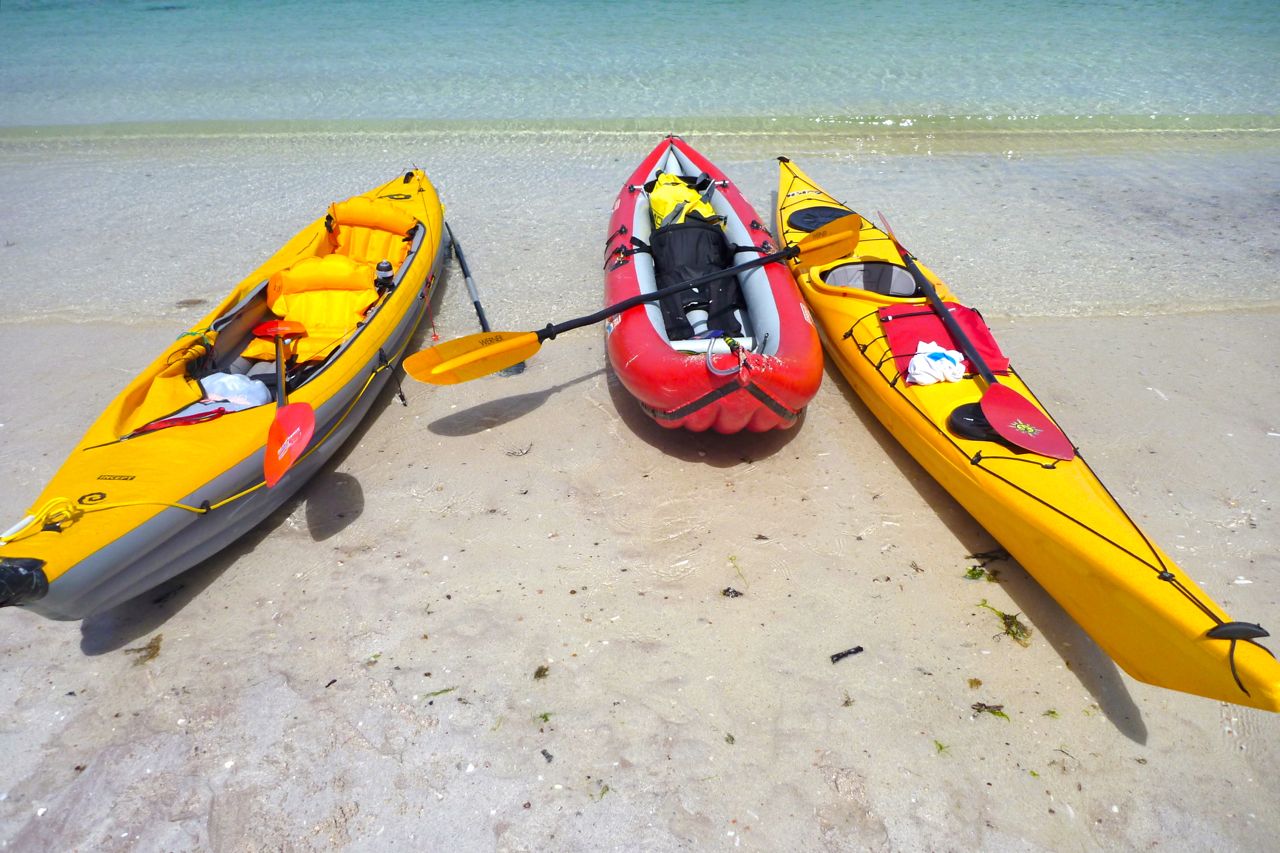
At a verified 670g (23.6oz) including an added grab line, Supai Adventure Gear’sFlatwater Canyon II ($300) must be among the world’s lightest and most compact boats. Before a winter storm blew our plan off the map, the trip we’d lined up in northwest Scotland was ideal for the Flatwater: short crossings saving lengthy overland detours or risky deep wading, but no extended or exposed paddling.
Fabrication Examining the deflated raft, it became clear it was composed of just four pieces of flat material: the top and bottom ‘rings’ which define the hull shape, an inner hull wall joining the top to bottom, and the floor fixed under the completed ring. You could almost make one yourself.
No fabricdetails on SAG’s website, but the Packraft Store states: ’75 denier polyester with single, innerside urethane coating’. This whole denier thing can be a bit misleading, the raft fabric looks and feels similar in thickness to my MSR Dromlite water bags (right) made from 200 denier, PU-coated Cordura (nylon?), but the Flatwater polyester has what looks like a reassuring ripstop weave (visible below left). And as we know from our studies in IK hull fabrics, polyester stretches less than nylon and so is more suited to inflatable boat applications than compact water storage. Where the seams overlap on the outside edge they’ve included seven reinforced tabs (above left) to use as attachment points (a weak point on my non-ripstop Dromlites, even with an eyelet). The floor is made of the same weight fabric and shows what look like ‘spot welds’ along the inch-wide seam (middle).
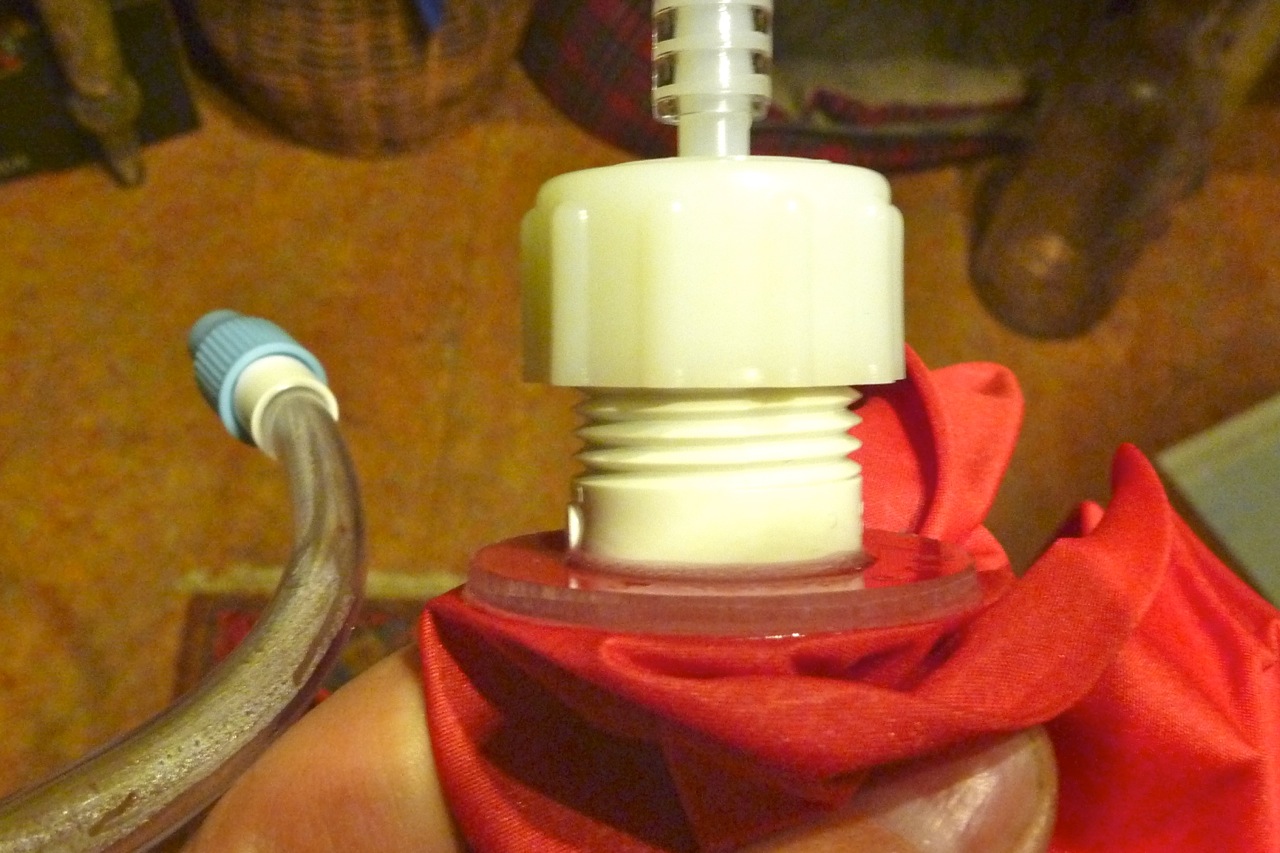
That’s it, apart from a big threaded inflation port onto which screws a white cap fitted with a 18-inch hose topped with a blue twist-lock valve (left). You blow the boat up by mouth (took me about 45 breaths) then top up to operating pressure with the twist lock, like on an Alpacka. But unlike a pre-Boston Alpacka, the long hose means you’re able to further top-up from the water where inflatable boats initially sag as they cool. Plus you could potentially manage a slow leak the same way.
The hull form tapers and narrows towards the bow to resemble a blunt wedge, similar to old Sevylor Trail Boat (right). Like all packrafts and even slackrafts, the added buoyancy (tube diameter) in the stern counteracts the mass of the paddler’s weight. There’s no seat and a new boat comes with a repair kit with full repair instructions on the SAG website.
Some of my measurements (checked several times and now confirmed by the Packrafting Store) vary greatly from those still posted on the SAG website many years later in 2020 and which had their Canyon over 10% bigger, inside and out. Even if they’re factoring in ‘paddler squidge’ making more room inside by pushing on the hull, that won’t make the boat seven inches longer.
As for buoyancy, SAG originally quoted ‘250lb’ (now a more realistic 200lb or 90kg). Robin briefly paddled the raft with his pack which we thought added up to about 100kg. That felt like the limit once a light breeze came up the valley, and required gentle paddling to avoid too much cyclic bobbing and possible swamping.
With the weight; the Store states 633g, SAG quote 24oz (680g). As mentioned, with a grab line and traces of dirt, our boat comes in at 670g on the IK&P calibrated kitchen scales (left). I won’t quibble over 40 grams; to be able to paddle across a loch in a boat weighing less than my trousers is quite something.
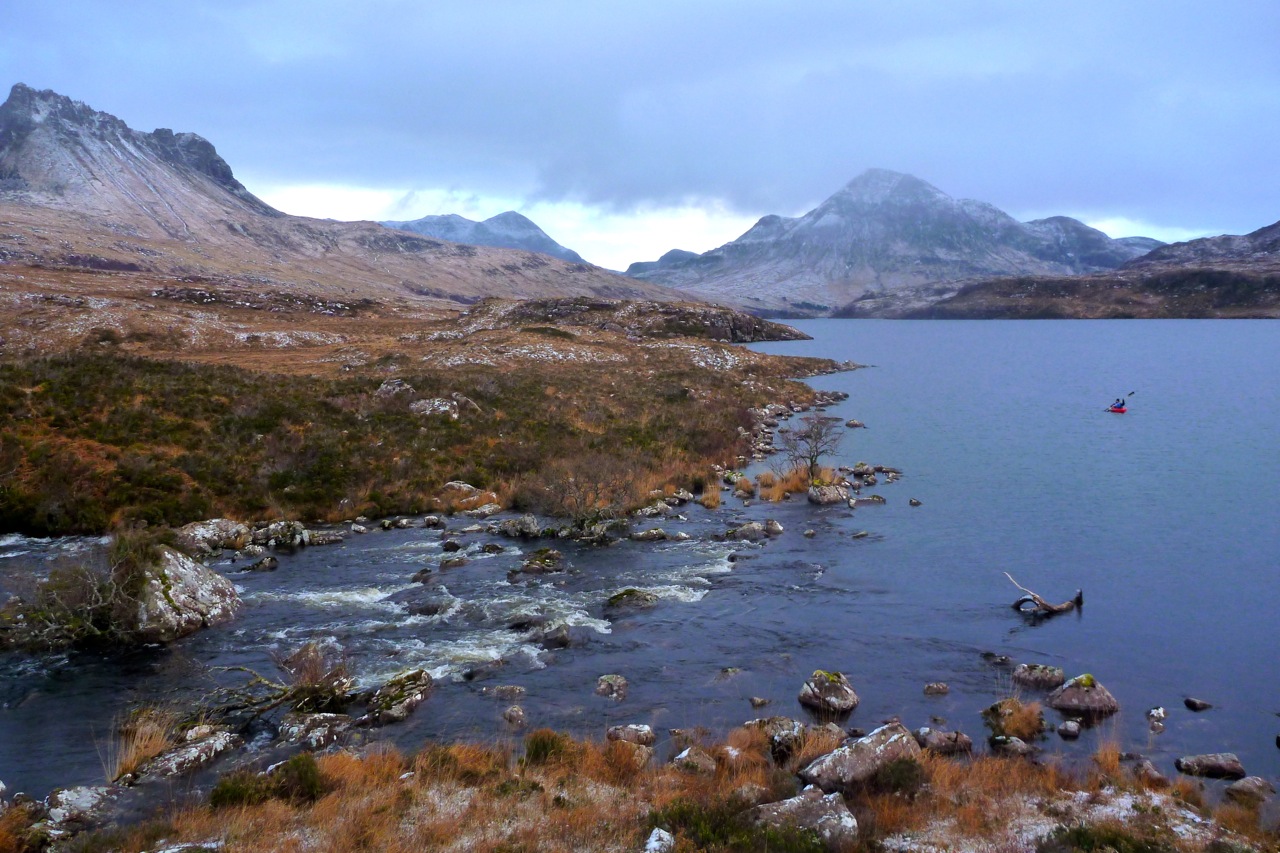
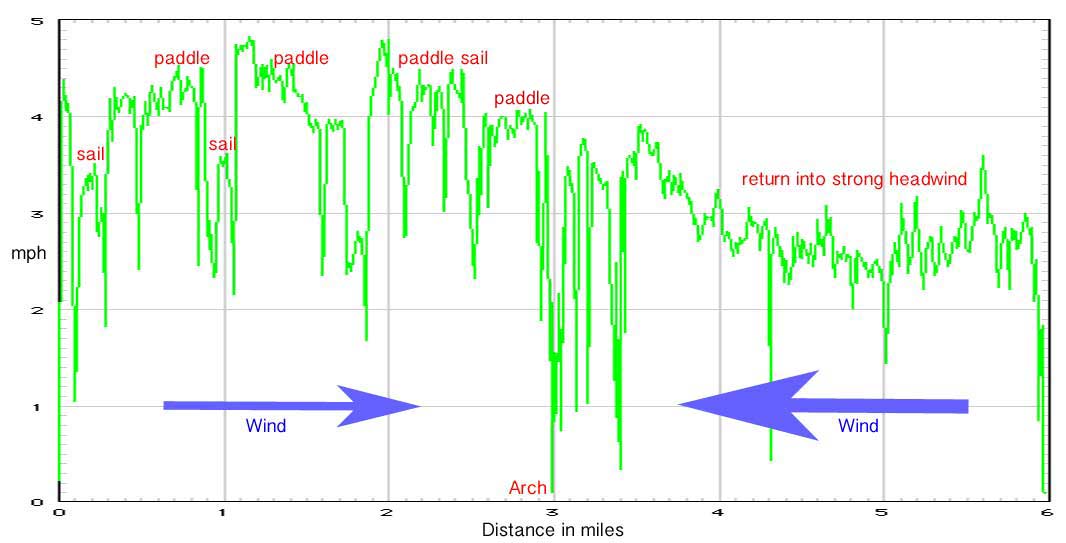
On the water The air was calm but temperatures were close to freezing as we set off to cross the eastern narrows on Loch Lurgainn below Stac Pollaidh mountain. We’d originally planned to come over in the other direction from the Culnacraig shore, but the storm which went on to wreak havoc across Britain nixed that plan (story here). So today we were just taking a 10-mile day trip with a short paddle, from Stac car park southwest back to Altandu.
I tried to get directly over the two boats to get an equal perspective but I still think this shot makes the Supai appear a little smaller than it really is. I make the Yak ~42% longer.
‘Fragile and small’ had been Robin’s first impressions after Sven from the Packraft Store in Germany sent us the raft to evaluate. Robin had recently upgraded to a couple of Gumotex Twist IKs so may not have been impressed by the Supai’s thin fabric. I had more faith in that, but as for the size, I too anticipated that SAG had cut it a bit fine with the Flatwater II, even if it lived up to their motto: ‘where every ounce counts’.
Down on the loch shore, even with a helpful breeze to fill my Yak’s bag, inflation time for both boats was actually the same, although by the end of it Robin was staggering around a bit. As Tim Evans found on his trip, other inflator bags can be adapted to avoid passing out.
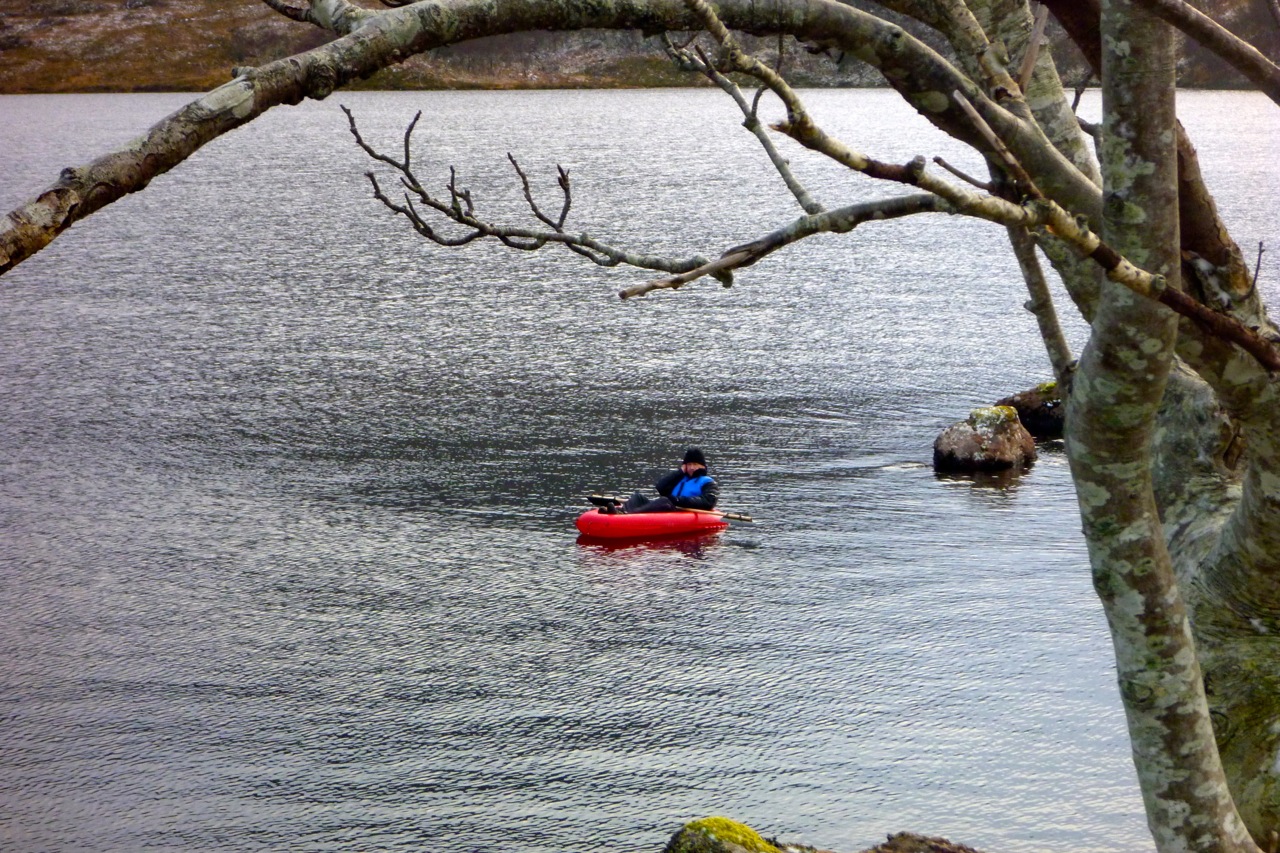
Now, laid alongside my Alpacka Yak (same width but 66cm or over two feet longer), to me the Flatwater’s proportions rather too closely resembled a slackraft I skinned from a Sevylor pool toy a year or two back. I knew that with my weight of about 100kg in gear, I’d be pushing this boat’s limit. Without a drysuit I didn’t want to risk it.
It took some prodding to get packrafting newb Robin (80kg + clothes) in the Supai and I’m not sure I blame him. A sudden move could see the stern dip down and douse the butt. After fitting his closed cell mat to keep warm and protect the thin floor, he set off for a quick spin and soon realised there wasn’t so much to worry about. Paddling gingerly with his home-made paddle (a broom stick, two sawn-down buckets and zip ties) he did a few loops while learning to control the annoying yawing you get with short packrafts and slackrafts, as well as managing the less welcome bobbing which might amplify into a back-end pour over. Yawing keeps the speed down which may be just as well. Start paddling too fast and the bow will rise with a corresponding drop at the stern when slowing down, again risking a pour over in wavy conditions.
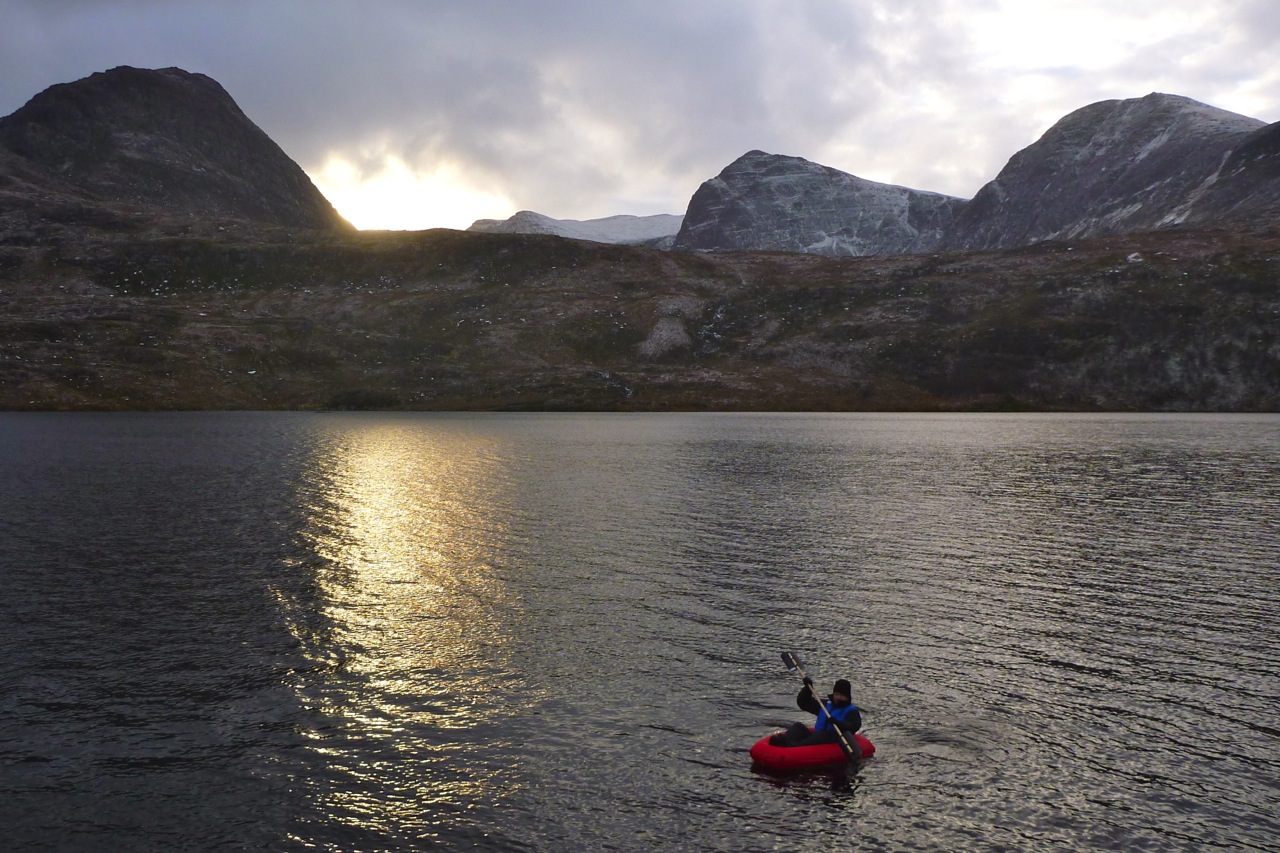
Having established he wasn’t going to sink with all hands, I lowered Robin’s 10-kg pack onto his legs then hopped into my Yak. The pack’s added frontal weight should minimise the Supai’s yawing – at least that’s the effect on my Yak. But it’s well known that first time in a new packraft, especially a short one like the Flatwater, paddling efficiently is an acquired knack. Our extra chilly scenario (not helped by his experimental B&Q paddle) meant that Robin couldn’t really relax or bomb around in the Supai. (I tried his B&Q but soon sent it back as it brought in unwanted splash all over my boat). A gust rolled up the valley, rippling the loch’s surface, adding further to the feeling of anxiety in the Supai. From my PoV it looked like the stern was more than half sunk at times – and half sunk on a round tube makes pour-overs all the easier. I skimmed over to the other side and got out to get some long shots and was reminded yet again what a great boat my Yak is. No worries about getting in clumsily, sudden winds or carrying Robin’s pack. Sat here a day earlier when a gale was ripping through at an average of 35mph and gusting to twice that, it may have been a different story, but my long-bodied, yaw-suppressing, high-sided, tough hulled Yak inspires confidence, even without the spray skirt.
The price you pay is weight and bulk. Ready to paddle, at 3.1kg with seats, heel pad, pack attach and lead,plus other straps and some mini krabs, my boat is 4.5 times heavier than the Supai as tested, and even more bulky when you add in the blow bag, skirt and repair kit: the red bag shown right.
Robin slowly waddled over to the south edge of the loch and got out with care before pulling the plug and rolling it up. As on any inflatable, the floor is vulnerable and we discussed ways of getting round this. One problem is the Supai’s floor glues to the hull ring above the lowest points in the hull tubes which means the undersides of the hull are actually lower than the floor (until you sit in it on the water). Using a thicker floor panel won’t eliminate all possible wear. Robin is a versatile home-fabricator (as his B&Q paddle proves) and we decided the least invasive way of protecting the entire underside – hull and floor – would be to string a sheet of whatever you like from the peripheral half-inch hull seam (the seven reinforced tabs not being quite enough to do the job). No messy, irreversible, crease-inducing gluing required, just a line of holes along the seam plus a drawstring. Pre-emptive protection is something I’ve done to my Alpackas’ ballistic nylon floor and although it won’t look too neat, a floor sheet would enhance the less robust Supai’s undercarriage, despite a weight penalty.
Our conclusion He may have got used to it over time, but the Supai felt too skimpy for 80-kilo Robin. Ill-dressed on the day and over-fed in general, I didn’t even try to get in. Build quality is great and the fabric I could live with; it’s much better than slackraft PVC and the extra care needed in handling is well worth the weight saving over an Alpacka. Factoring in experience, company (support), weather conditions and operator weight, the Supai felt right on the limit. Initially you’re reluctant to paddle normally for fear of swamping which could turn exponential. Alongside a Yak it’s a pretty slow too, although I don’t think that’s a flaw. My Yak is slower than my IK which in turn is slower than … As long as it makes progress, a boat is as fast as it is.
Alpacka’s Scout might be a fairer comparison with the Flatwater II. According to Alpacka stats it weighs 1450g, is 4.5cm narrower, 2cm shorter inside and 26cm longer overall, while costing at least $200 more in the US. That still puts the Supai well in the ballpark on weight and cost.Anfibio’s Alpha XC is another which I’ve actually tried. Although it looks to have been designed for the canyon lands of southwest USA, for the lighter paddler the Supai could a great packraft for less predictable Scottish conditions involving short, flatwater crossings. The negligible weight really opens out the options and means you don’t have to get too fanatical about the rest of your gear which can translate into greater comfort.
I knew this even before I saw the boat, but what I’d love to see is a Flatwater XXL more closely matching my Yak’s (or my) size. I’d happily trade the extra 8cm of width the Supai has at the hips for fatter and higher tubes all round, plus another 10cm added to interior length. It’s hard to think that would add up to much more than a kilo overall, but would reward the portlier or overnight-equipped paddler with a more versatile boat able to deal with dodgier conditions. Let’s hope this is part of Supai’s game plan. * SAG later released the Matkat. Not exactly what I was thinking but we tried that too.
Photos also by Tim Evans who writes:
I got interested in packable boats as I love both walking and being on the water. My first major trip was in an Alpacka Yak from Whistler to Vancouver. I hiked for 2 days, paddled the Cheakamus River for a day (with some easy whitewater), then paddled 24 miles of ocean inlet back to Vancouver. This trip was only possible because of the packraft. Then I bought a Supai and did 35km through a lake system north of Vancouver that included a number of portages. I saw a pair with a canoe which they pushed on a trolley through the portages with 200lbs of gear. It took them hours to go a few km. I did the 4-day trip with 16lbs of gear including food, just to see if it could be done (it can). I could have jogged through the portages with my little boat tucked under my arm. The Supai was a light as it gets, but SLOW for any sort of distance.
Sadly my pics area bit ropey; camera was set on 640px…
We last did the Spey from Aviemore to the sea in 2007 when I still had the Sunny. This time round Michael was in Steve’s old, 19-foot Pouch double, Steve was in his Feathercraft Big Kahuna and I was in the Grabner.Levels were low again, if nor lower, it was the last week in the fishing season but at least the weather was looking good.
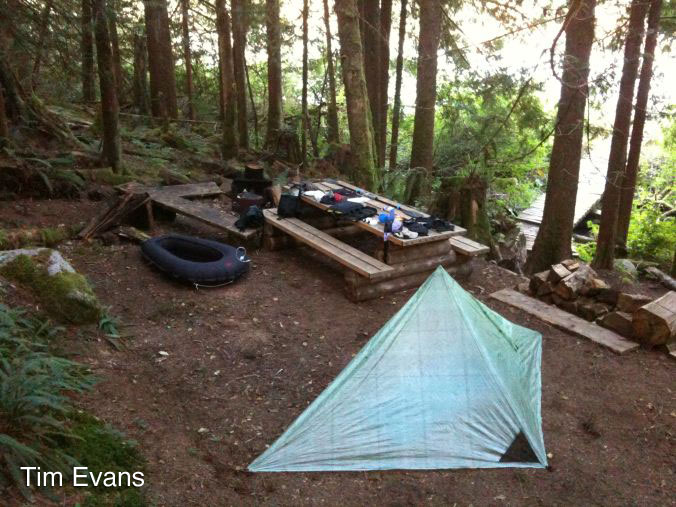
The first day is just 12 miles and not so interesting, with the best views behind you. With the hour-long assembly of the Pouch completed and the van stashed at Spey Bay, we set off about lunchtime. Strong backwinds made my skeg-less Amigo hard to handle and I found myself expending a lot of energy trying to stop the back end coming round. Or perhaps I was yet to learn the knack with the Amigo, having paddled it on the sea with a skeg all summer. After a few hours we arrived at the Boat of Balliefurth bankside camp field and paid our three quid. Dinner was a freeze dried mash up from stuff I’d had lying around for months, made easier to prepare and eat with Steve’s half-hoop Eureka annex tarp.
Next morning was another sunny, late-September day and we were relived to pass the point where one of the Kleppers got disemboweled last time by a submerged, mid-river fence post. On this occasion the boat-killing spike was visible a few inches out of the water. We’d thought about doing the river a week later, when the fishing season was over, but timing put us here now, with the fisherfolk getting their last casts in before closedown. The tension between rod and paddle is an old story in England, but up here is exacerbated by the fact that the tweed and wader-clad anglers are paying – who knows? – hundreds of pounds a day for the privilege of fishing the famous Spey. With that cost comes the use of the many ‘day huts’ we saw on the finely manicured banks, as well as optional instruction from a ghilie. And then three kayaks blunder right through the spot where you’re prize salmon is lurking, like it’s a right of way or something. We did our best to paddle round the back of the many anglers – some ignored us, some grumbled and a few lone ones appreciated it or were able to wave or indicate where they’d prefer you go. Struggling behind one bunch wading in the shallows, Steve got pushed across the current and flipped harmlessly while they just smirked and carried on casting.
Once free myself, I shot off downstream chasing what some said was Steve’s paddle, but within a mile another fisherman said he’d not seen it float past. I walked back wondering how we’d get out of this one, but soon came across Pouch and Kahunaman paddling along. Seems the paddle had got submerged right by the boat, so all was well bar a lost pair of shades. Luckily that morning Steve had fitted his FC ‘sea sock’ – a body bag attached to the cockpit rim which stops the whole boat getting flooded if it flips. It was about that time so once back at my boat we spread out for an early lunch, letting out dew-soaked tents dry as some canoers from last night’s camp passed by.
Aberlour was our destination that evening. We’d managed it last time, even with the ripped Klepper, but it seemed we were even further behind today. As we paddled on, the shallows and rapids piled up and the folding boats were getting a bashing, while I took on a couple of inches of water bouncing through the wave trains. Occasionally, if we misjudged the route we had to wade (left). The famous and actually straightforward Washing Machine rapid was only running a half-load that day, but nevertheless succeeded in giving the inside of my Grabner a full rinse which took a few minutes to pump out. More white-water followed, and still I have to say the Grabner didn’t seem to handle well, requiring vigorous paddle yanking to avoid rocks or get in the right spot. Even in the pools, it still took some concentration to track straight before pulling back repetitive bow draws or momentum-losing stern rudders to keep the nose downriver. I’m sure the very similar shaped Sunny wasn’t so bad.
Barely a mile went by without passing a fisherman. One grumbled that we should whistle as we came through, but that seemed like it would raise more antagonism, though passing them on the opposite bank may have been right on their target area. Trout were jumping for sure, but we never saw anyone actually catch anything. I’m not sure fly fishing is about that. After a while riding the bouncy wave trains lost its shine in the face of the after-pumping required, though the swamping was certainly less bad than the Sunny which was best drained by pulling over and standing the boat on end. The canoers we were leapfrogging were getting knocked about and hung up in some rapids too. Shallow rapid followed shallow rapid while we had the feeling that the ghilies, aware of where boats were late in the day, patrolled the banks to make sure we wouldn’t camp on their land.
The easy white water had kept us occupied so that round dusk the old Victorian foot bridge of Aderlour came into view. We camped on the bank right there, a long day of around 26 miles in about hours. The great thing with camping by the bridge is that toilets, the Mash Tun pub and a Co-op are all just a few minutes walk away.
Restocked next morning and off by 9am, it was a 20-miler to the North Sea, during which time the riverside scenery got a little more interesting, the rapids kept you guessing and so did the fishermen. With no other dramas the breakers of Spey Bay rocked up at around 4pm but, just like last time, no one had the energy to go out and mount the surf.
The old wooden-framed Pouch slipped through unscathed yet again and 70-year old Michael had handled the ungainly barge very well, helped by a rudder. The decks of Steve’s lower Kahuna were often swamped in the rapids but towards the end the Feathercraft sustained a bent alloy member (only $30) plus a small rip in the hull. The Amigo was of course immune to the knocks and easy to hop out of, but I’m again wondering about fitting an articulated skeg high on the stern. A bit like a fixed rudder that pivots up harmlessly as it scraps the river bed, and with a retractable and locking line (again, like a rudder) to pull it up out of the way when you don’t want the back pushed round in a sweeping current. I have an idea and it would be easy to fit.
It’s fun to paddle the 60-odd miles from Aviemore to the sea, but next time on the Spey I’d miss out day one, hope for higher water levels and do it out of the fishing season. It would also be fun to do the sporty Day 2 in the packraft with a skirt. They say the Spey is one of the best canoe paddles in the UK but that just shows how few good, long rivers there are here and why sea kayaking, or short-range hair boating are much more popular. The stony shore of Spey Bay is a bleak place the paddle, but the van was intact and there was a welcome cafe for a sit-down snack before piling the van up to the roof with our packboats and heading south.
It’s understandable to worry that something like an inflatable boat is a bit of a liability when out in the middle of a deep lake, hairing down some white-water or when far out to sea. This is especially pertinent if your only experience is a beach toy made of a thin and stretchy PVC film.
I’ve owned over a dozen inflatable boats and have only had one tiny thorn pinprick in the Incept, age-related fabric perforation on an ancient Semperit and a hole worn through careless transportation in my Seawave.
Once on the actual water it’s hard to think of anything actually puncturing my full Nitrilon Gumotex IKs or the old Grabner. What more often happens is some kind of accidental wear or rubbing when not paddling or during transportation, like the trolley wheels which wore a hole in my Seawave, or the windy tree branch which rubbed (but did not puncture) my Grabner (left). I also snagged my packraft’suninflated floor on submerged concrete once, then added protection to the outside and padding on the inside to stop that happening again.
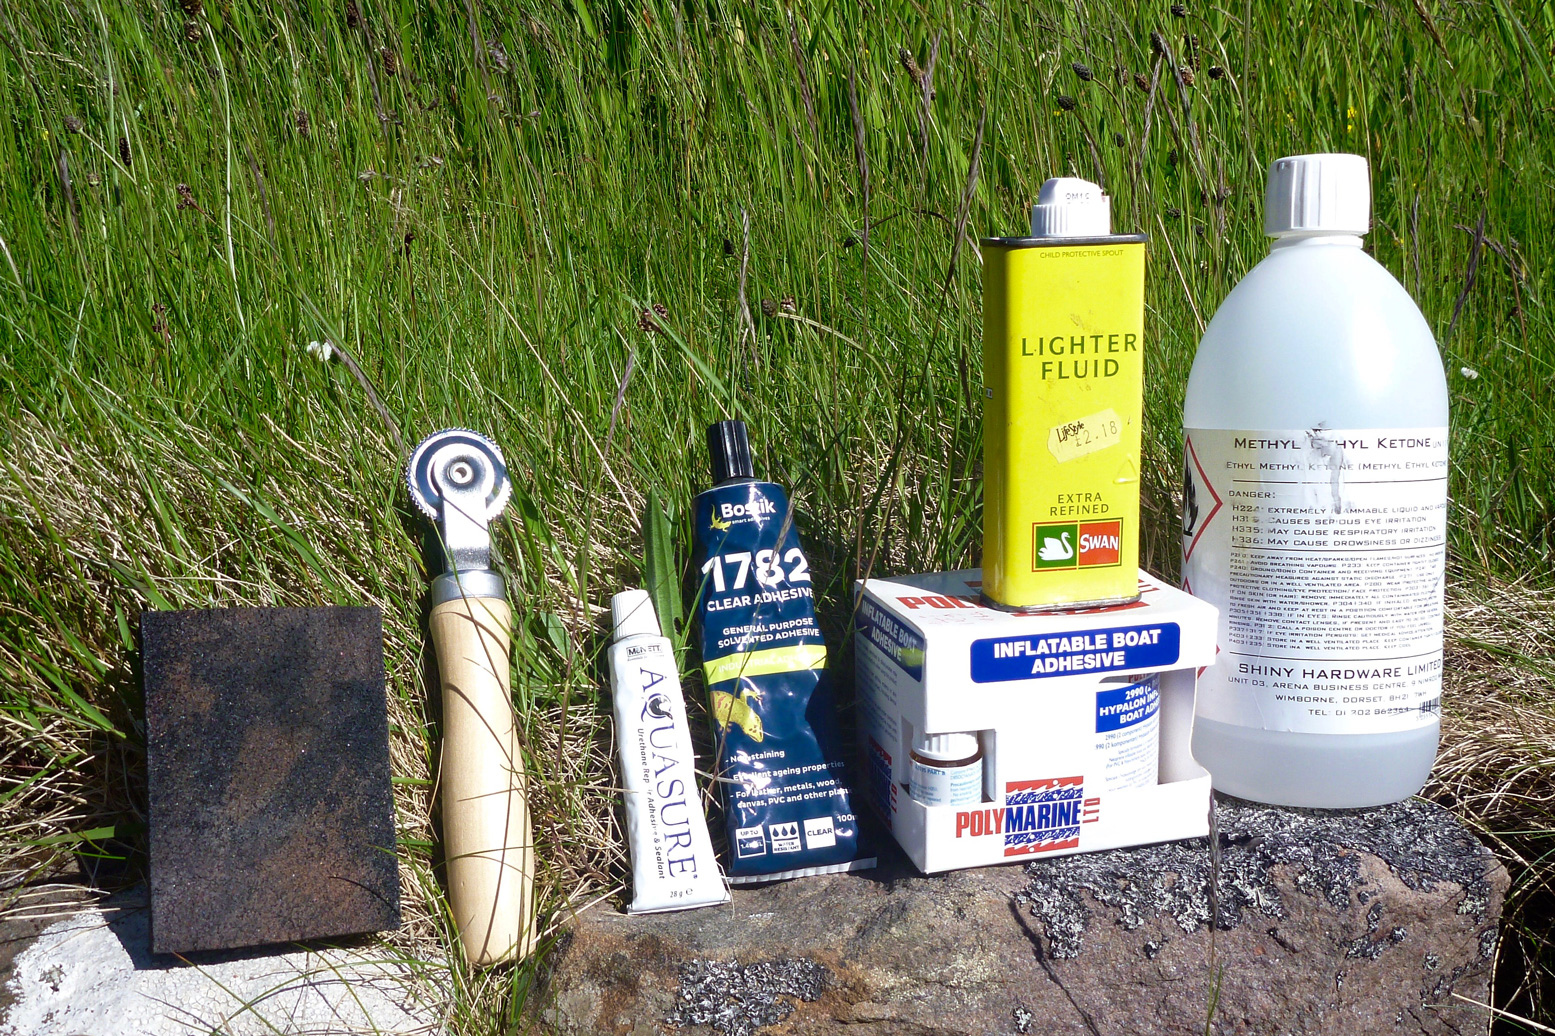
I’ve also travelled with cheap slackrafts that have got ruined within minutes and punctured every other day. You do get what you pay for. So when it comes to glue I’ve learned that preparation and application are vital to getting a good repair: rough it up; wipe it down with solvent, apply the right glue to both surfaces, wait, then slap on the patch and press down hard with roller to achieve a long-lasting bond. More below.
Is your boat plastic or rubber? As explained here, broadly speaking IKs are made of either rubber- or PVC-coated fabrics. Rubber-based Hypalon, EDPM or Nitrilon is much less used now and most with the tubeless construction method. On a boat like this, rough up the surface, clean with solvent (see below), apply the right glue and a same-material patch, all which needs to be done well as the patch is vulnerable on the outside. Or, you can just dab some Aquaseal directly onto a small hole in the hull to protect it from wear, as shown above left (not an actual puncture).
One-part glues I’ve succeeded in gluing on non-critical D-rings onto Gumotex Nitrilon and Grabner EDPM (Grabner), as well as PVC to Nitrilon using single-part Aquasure urethane sealant/adhesive (‘Aquaseal‘ in North America). Allowing Aquasure or similar to half-cure in air for 30 minutes, then sticking together and letting it ‘seal’ to itself is a way of bonding anything – even non-compatible rubber-based Nitrilon to PVC, as I did here. SeamGrip is a runnier version of Aquasure to get into cracks and seams. Though I’ve not tried it yet, British-made Stormsure is the same thing. Apply a thin film of Aquasure to both surfaces; wait half an hour, then bond with all you’ve got.
In the UK you can buy Aqausure in 28g tubes from £6, or 250g for around £24. Unless you have a lot to glue/seal jobs, be wary of saving money with the big, 250-g tube. Give it a chance and it’ll split and harden before you get to use it all, even if it’s effectively over half price. Alternatively, I’m told a good tip is to store it in the freezer once opened.
The other one-part glue I used on my PU/PVC Incept IK, Slackrafts and used recently on an old hypalon Semperit is Bostik 1782, not least because it once went real cheap on ebay.
I can’t say it worked that well on my Incept; two-part adhesive is always better. Even on the slackraft the Bostik softened and shrivelled the thin PVC. But on non-critical applications (D-rings and none-huge tears), 1782 seems to work well on hypalons (rubber is always easier to glue than plastic PVC) and at £10 for 100ml was good value. Plus it’s a nitrile rubber/resin-based solution and I’ve found won’t go off and harden in the tube like Aquaseal often does. It’s my favourite, do-it-all, one-part glue.
For years Gumotex supplied rubbish Chemopren Universal gluing in their repair kits. It looked like the brown rubber solution you’d use on a bicycle inner tube. I tried to use it on my Gumotex Sunny years ago and found it was crap. Back then it may have been me, but I tried to use Chemopren again recently on my hypalon Semperit and it wouldn’t even adhere to a roughed up, MEK’d surface! To be fair, it might have been many years old, but so are my other glues.
The glue that came with my second Seawave in 2020 was a small tube of Elastick (left). It looks like a generic polyurethane do-it-all glue, like Aquasure. It will probably remain unused with the boat until it turns solid. I’d sooner rely on Nirtile-based 1782 or Aquasure for field repairs. Tbe problem with these urethane glues is once you open them or the alloy casing cracks they dry up and harden.
Two-part glue
For important jobs use much stronger two-part adhesives suited to actually assembling air boats as well as making more permanent fittings and bomb-proof repairs. At about £15 posted for a 250-mil tin, PolyMarine 2990 Hypalon adhesive is much cheaper per ml than Aquaseal or Bostik 1782. In the UK Ribstore and Ribright sell similar stuff, and Bostik 2402 is the same but prices vary wildly. Just make sure you buy for Hypalon or PVC. I’ve used it to glue D-rings onto my Grabner (more here), floor patches to my Alpacka, latex socks to my dry trousers and patches as well as repairs to my Nitrilon Seawave and Sunny. It sticks like shit to a s***el.
The trick is to measure out the correct quantity. Above: the small bowl about half full of glue and hardener – about 10cc or 2 tablespoons? – was enough to fit two 80mm D-rings. Each surface: the back of the Ds and the hull, need two applications half an hour apart.
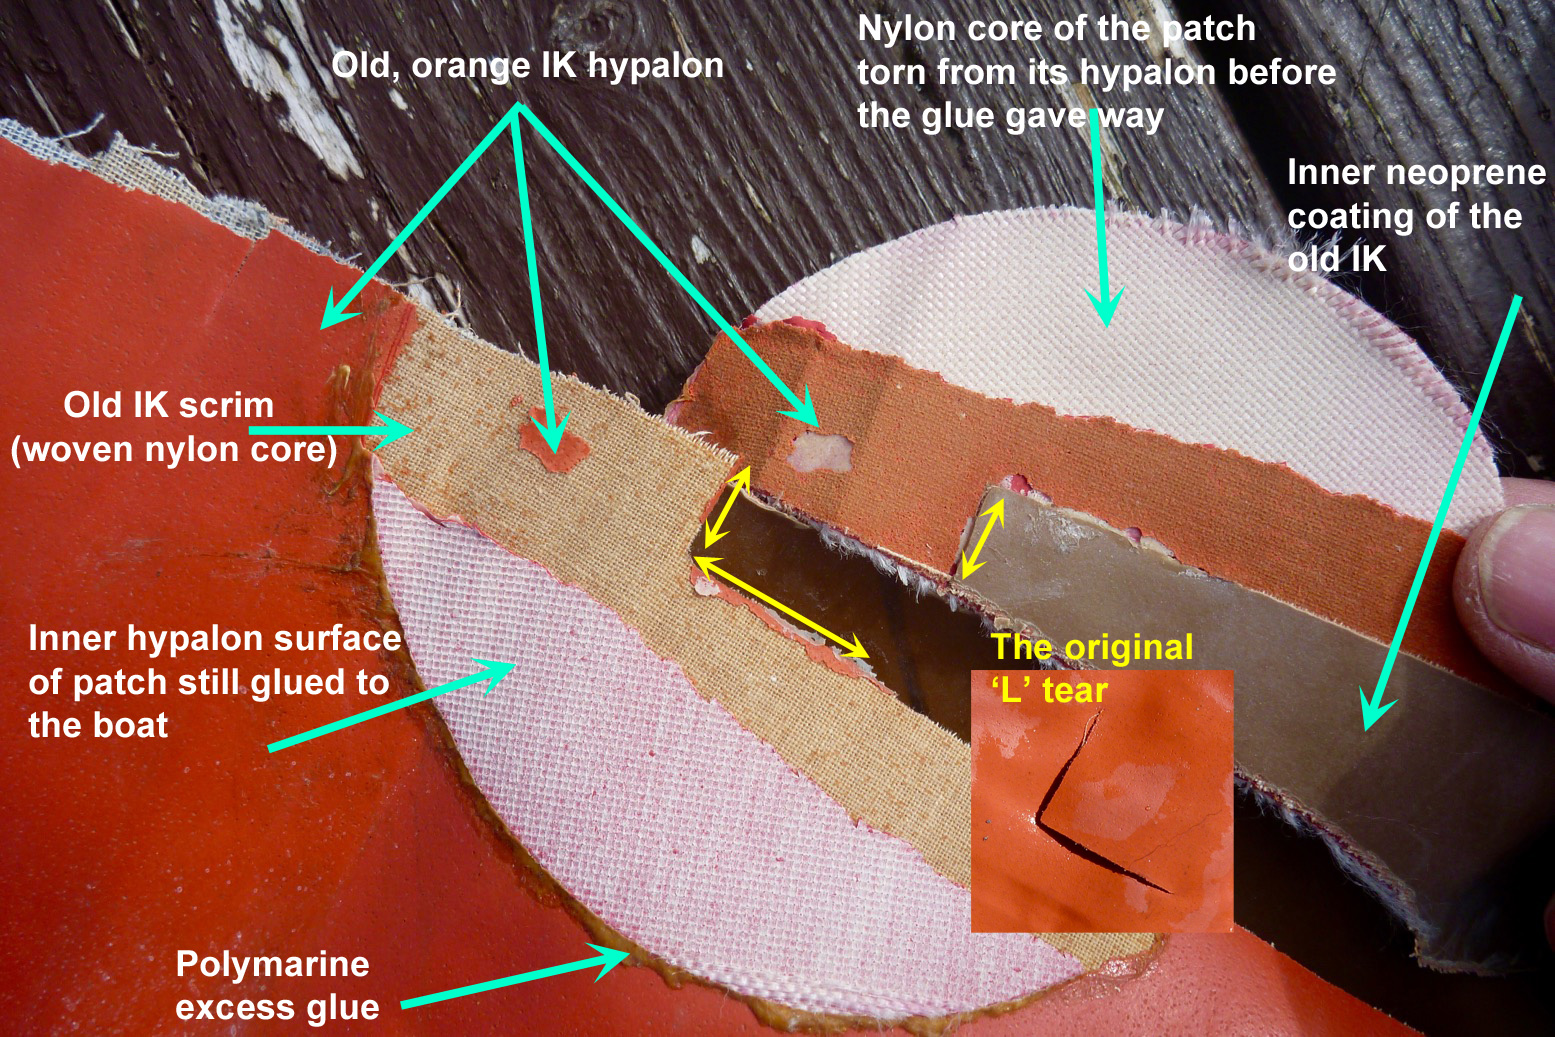
In 2017 when I dismembered an old IK, I was easily able to pull off recent patches glued on with Bostik by hand. But I could only pull off Polymarined patches with a pair of Knipex hydraulic trench pliers and even then, the patch coating pulled away from it’s core (lighter exposed weave below) or the patch remained stuck to the boat and instead pulled off the dead’s boat’s hypalon coating revealing the fabric’s yellowed core or scrim. The two recently glued surfaces could not be separated. They say the mixing of the two components causes a chemical ‘vulcanisation’ and molecular cross-linking which creates a very strong bond. Mixing and applying two-part is a pain, but it works.
Get a good roller
Single or two-part, once you apply your patch, roll it very hard with something like the classic Baltic-pine handled Sealey TST15 stitch roller (left) aka: tyre repair roller used for innertube and tyre repairs. The knurled metal wheel set in a solid handle applies much greater pressure than a wide plastic roller I used to use, and they’re only about a fiver on eBay. Buy one now so you’re ready.
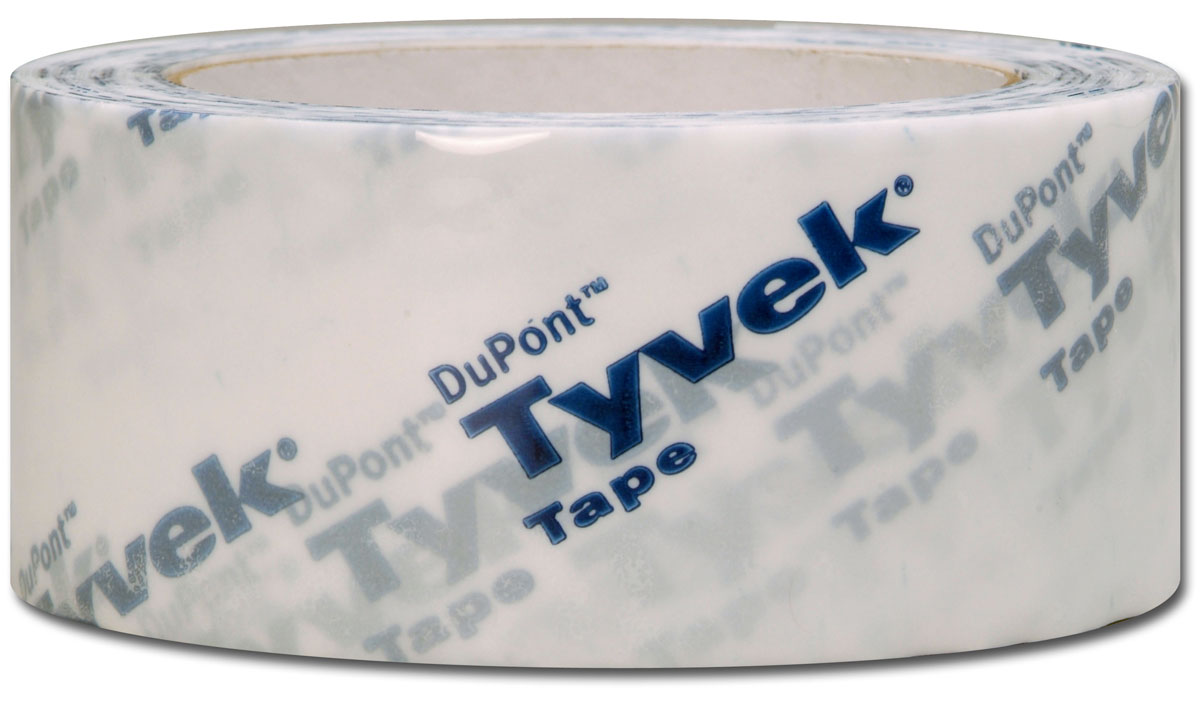
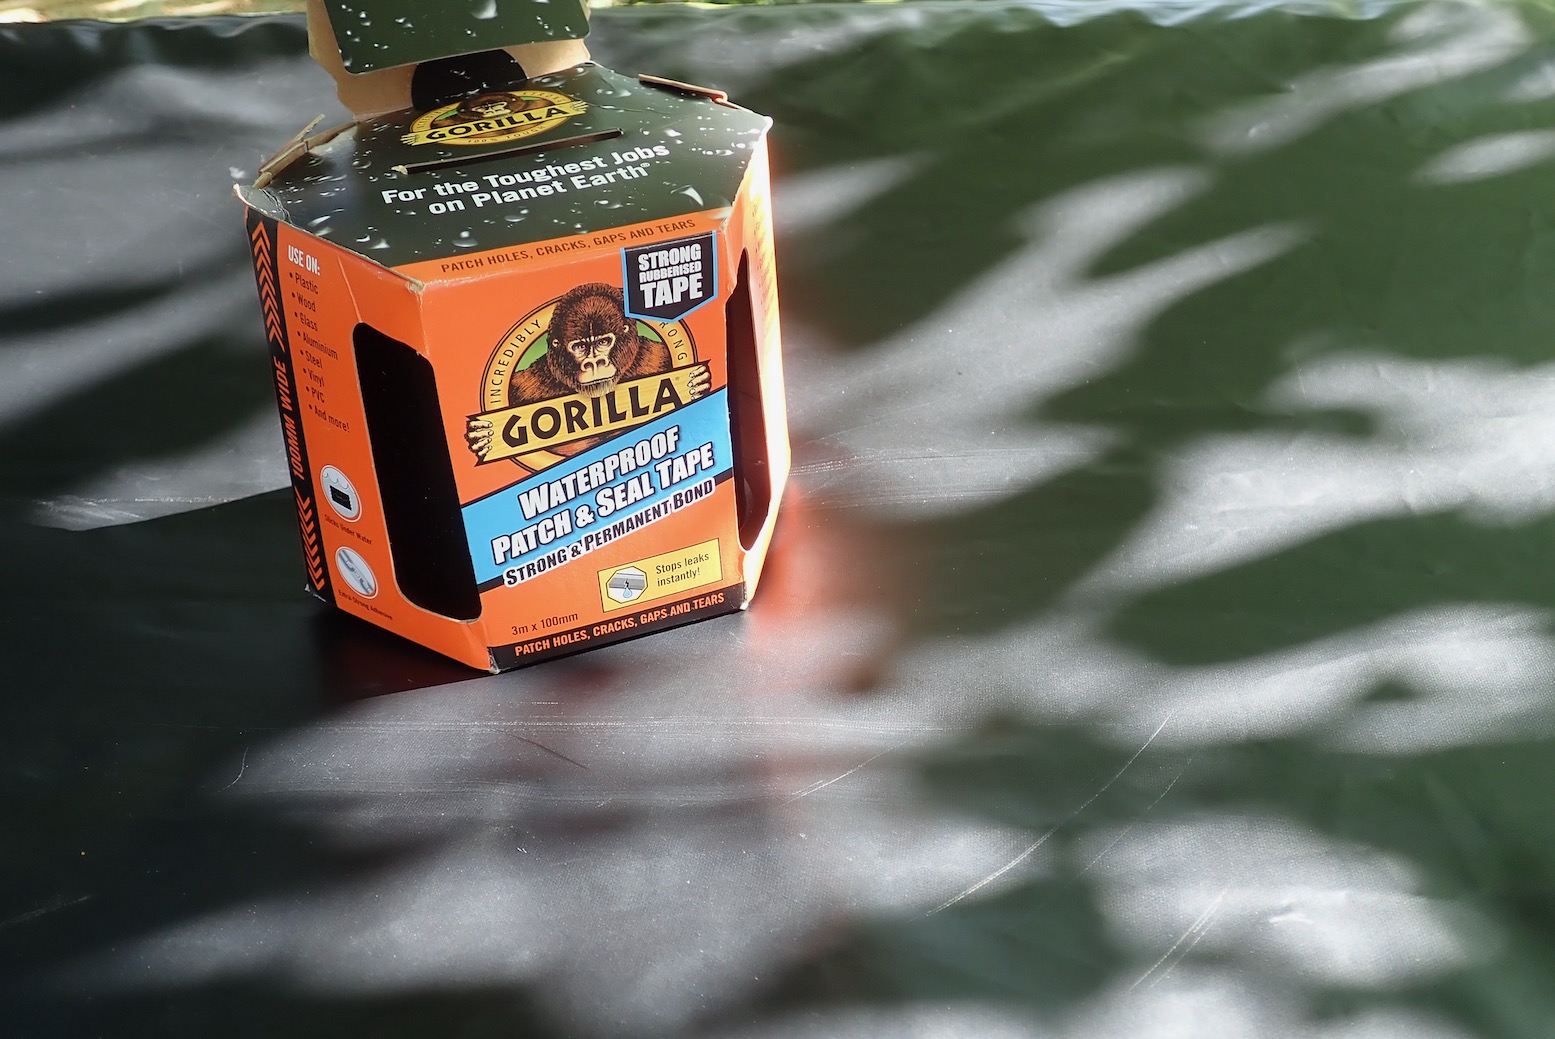
Bladder boat and packraft repairs With smooth-skinned packrafts use two-inch wide Tyvec tape produced by DuPont. Just peel off the back and apply a section to pricks or small tears once the surface has been cleaned and dried. No need for roughing up, but a quick wipe with solvent won’t do any harm. Larger tears can be sewn then taped. Tyvec will work on urethane IK bladders or use ultra tacky Gorilla Patch & Go tape for deep floor scratches and cuts. It will remain impermeable even once immersed.
Helaplast to stick things onGorilla P&G for repairs
Aire-style bladder boat repairs are actually easy. According to Aire’s youtube vid, you unzip the hull shell, slap on a bit of Tyvec on the split, tape up the inner side of the hull shell gash to keep out grit, reflate and off you go. You can glue up in the usual way later, if necessary. I had the feeling that on my Feathercraft Java the urethane-coated sponsons made of thin ripstop nylon fabric (like tent flysheet material) couldn’t have been securely repaired with tape. In fact, it would be difficult to bond anything well to the slippery nylon fabric compared to smooth urethane plastic or hypalon-like surfaces, but perhaps once inflated the seal would have been fine.
On this Sevylor it was the green envelope which ripped a metre long on the second outing! The owned may have over-inflated on a hot day – it only runs 1-1.5psi. The envelope is just a nylon fabric shell so would be an easily sewn repair. Usually it’s the inserted bladders which go. They can be patched.
Once you’ve done your roughing up (sandpaper or a foam abrasive sanding block, left) you need to clean off the residue as well as any oil or grease present. Anything will do in a pinch; alcohol and spirits, after-shave or nail polish remover (acetone), lighter fluid, white gas or petrol of course, but not oilier diesel, aviation fuel or Nivea for Men. Bleaching agents aren’t the same thing. In the end just use water to remove the dusty, post-roughing residue, and on a cold day it can help to warm up the damaged surface to cure the glue more quickly.
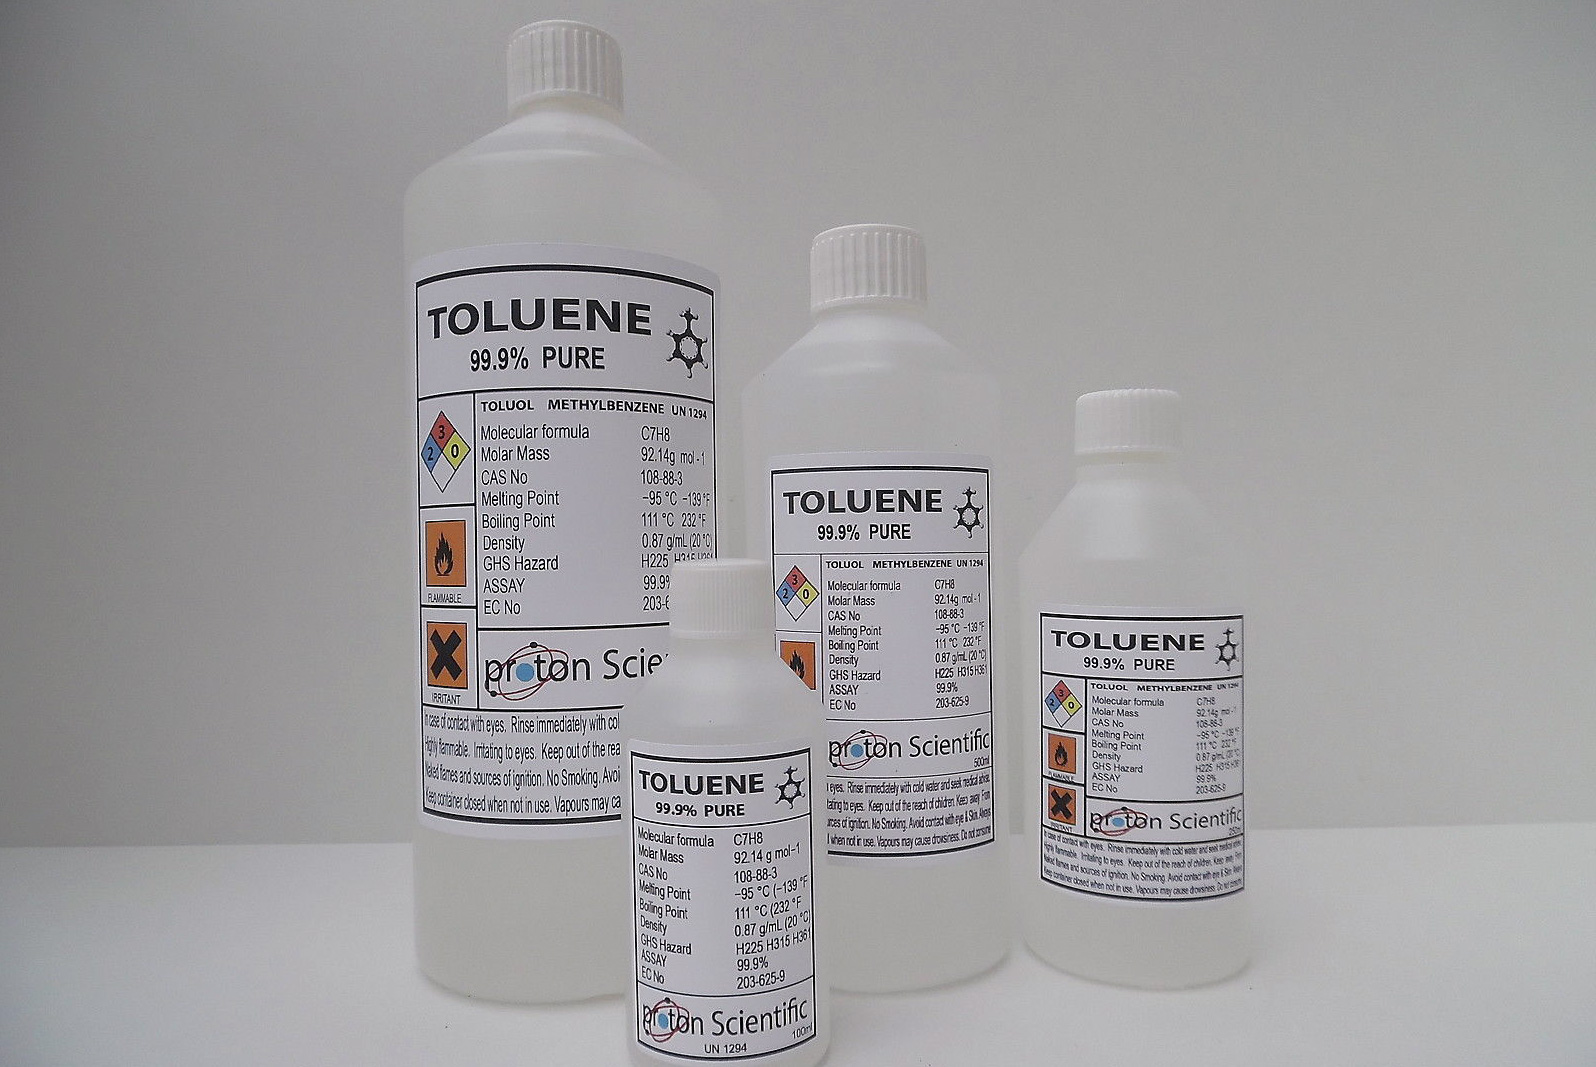
Tri Nitro Toluene (TNT)
For a travel repair kit a tin of lighter fluid (same as white gas) or nail polish remover (acetone) are easy to buy and handy to pack. Back at home I’ve found MEK (Methyl Ethyl Ketone) is inexpensive at £9/ltr and hideously effective. Acetone is even cheaper and perhaps less extreme – all we’re really talking about is cleaning off any grease and the dust after sanding. They say MEK is for PVC boats rather than Hypalon, but on a thin plastic slackraft the PVC will shrivel up before your eyes once MEK’d. Even on rubber-based coatings use MEK or similar toluene sparingly. Expect some colour to come away on the cloth and the coating to soften at bit: good for adhesion. Note the NRS video above specifically recommends toluene (the second ‘T’ in ‘TNT’ explosive, fyi) for hypalon. On ebay uk it’s the same £9/ltr but they won’t post this stuff around the USA.
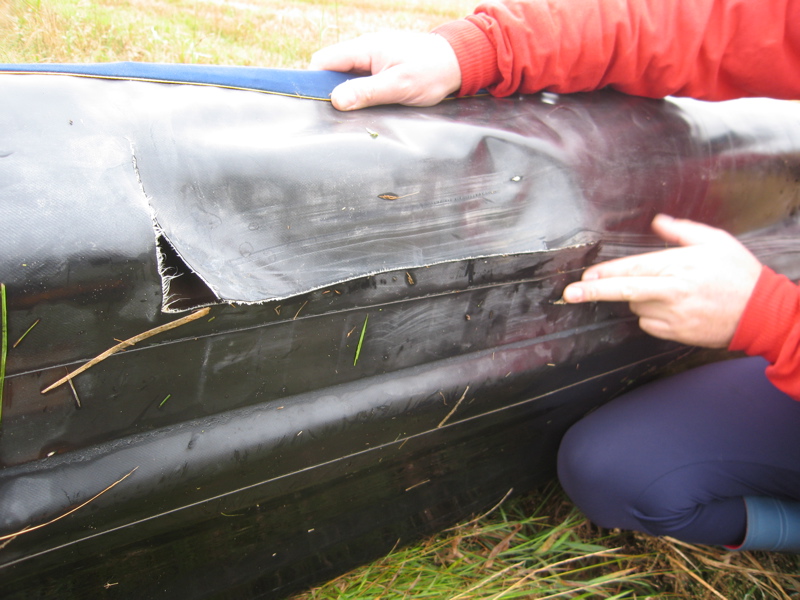
Huge tears and bear bites
If you have a huge gash, as in the folding Klepper’s hull below, sewing is the only way to contain the tear when applied to an IK. Then apply a huge patch with adhesive, as normal. The boat below caught a cut-down metal fence stake buried in a shallow river bed and was actually sent back to Klepper for professional repair. It’s tempting to think an IK’s pressurised hull would have skimmed over the stake rather than snagged it. The smaller 1-inch L-tear on the left was glued with a 5-inch patch but the 30-year-old IK proved to be totalled.
This huge tear…was carefully sewn up..and patched. Good as new.This old Klepper caught a metal stake buried in a riverbed. Rrrrrrrip. Even then, sewing up the tear and a big enough patch, that would be an easy repair
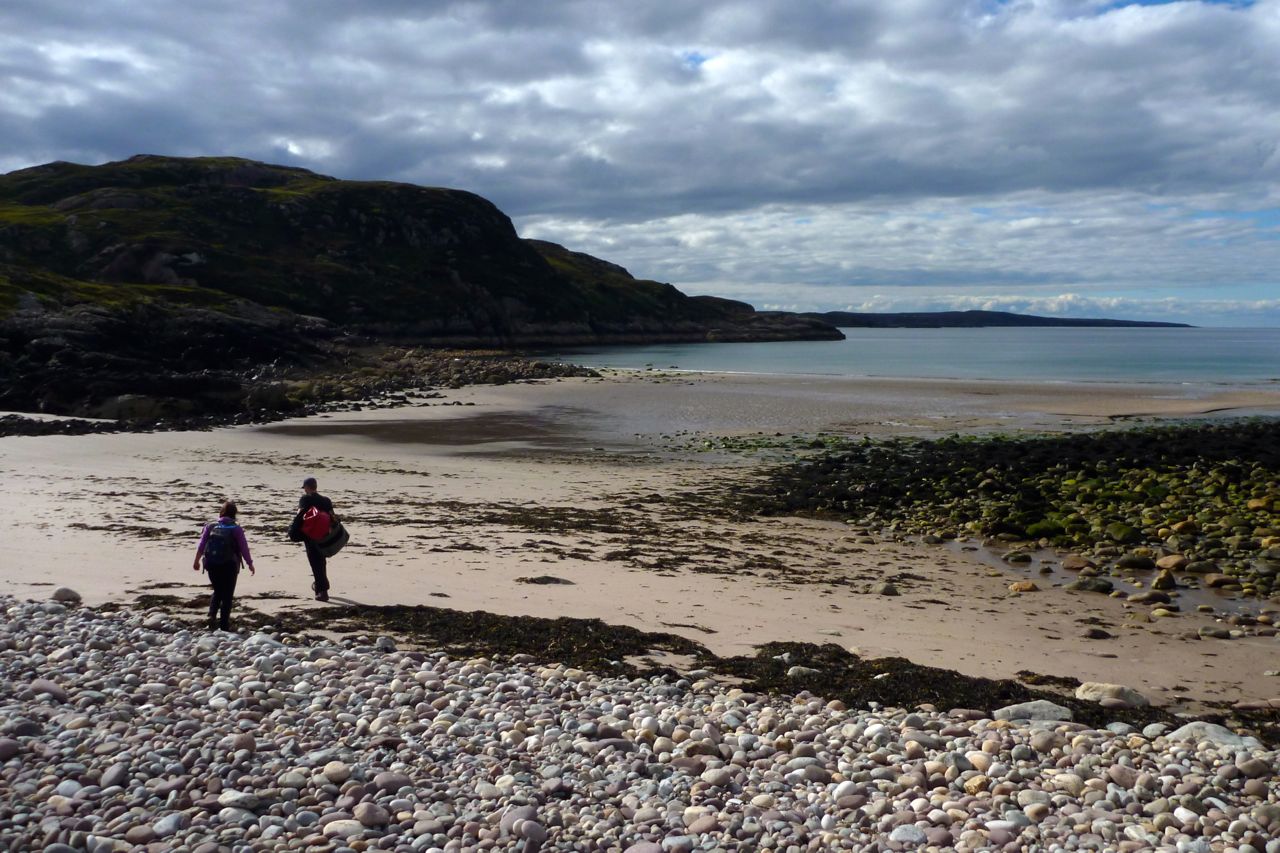
My grand plans to try out my new packframe on a trek from Loch Maree back to the Summers got radically downsized to a day out from Inverpolly. Down at Boat Bay we pumped up the IKs and set off along a route I’d packrafted a couple of years ago.
Surrounded by the singular Assynt peaks, Sionasgaig loch is an amazing place to splash about in a paddle boat, but at kayak speeds that stage was over rather too quickly. Just as well though, as I was trying the Amigo without a skeg, and two-up it wasn’t working. Into the wind was possible with one paddling, but out on Sion with a side wind, even with one in control the lighter back kept swinging off the wind. We put a bag in the back, but at the Sluice Portage (above) we had to commandeer the skeg off Craig in the Solar who up to that point was loving his day out on the lochs. I assured him the Solar was manageable without a skeg as long as he applied appropriate levels of paddling finesse. This low level, almost sub-conscious correction to the tracking is something that’s difficult to achieve when two people are paddling one boat. It’s a shame that a skeg is such a vital accoutrement.
We’d all want them for the Enard Bay sea stage, so at the end of Loch Uidh Tarraigean, g-friend nipped back a couple of miles to the car where the forgotten skeg hopefully lay under a seat. By the time Craig and I had portaged over to little Loch na Dail, crossed it and walked up to the road, the car arrived with the errant skeg.
Past Inverpolly Lodge.
After lunch we rolled the boats up, coasted down to the fish hatchery on the River Polly and set off down the track towards Inverpolly Lodge and Polly Bay beyond. We’d crept up here on our bikes a few months back, to check out ‘Loch Sal’ bay north of the lodge. There’s boat ramp and fish pens there, which was good to know when I passed a while later on my Enard Bay paddle to Lochinver. First time there and Polly Bay glittered invitingly at low water. On with in the skegs, in with the air and out we go into the flat calm. While exploring a bay round the corner, Craig managed to spot an otter gnawing over its lunch at the back of a chasm.
Arriving at Polly Bay
We worked our way around the coastline fringed with kelp exposed by the very low tide. Further along, winkle pickers were at work at Garvie Point, but then cloud rolled in on an annoying north wind; that is why you want skegs at sea. The little Solar bobbed about on the waves, but Craig seemed to be managing fine. We edged round Camas a Bhothain bay – no seals at play today – and slipped through the reef into Achnahaird Bay.
It was now quite chilly and my proposal to form a holding pattern for three hours until the spring tide filled the bay was roundly vetoed. When Achnahaird Bay fills right up on spring tides, you can paddle up the Loch Raa outlet stream almost to the road junction car park, for the short portage to Raa. As it was, there was enough flow to tow the boats all the way up. We’d left a bike here so the Mrs cycled back over the hill to get the car, while Craig and I paddled across Loch Raa and then to the north side of Loch Vatachen. I did this bit without the skeg and was reassured to find that one up the Amigo tracked at least as well as the Sunny did in the same state. Perhaps it’s all down to more centred weight and the aforementioned correcting finesse. I’ll be on the River Spey in a couple of weeks where it’s good to know a skeg won’t be needed (it was).
On the north side of Loch Vatachen we aired down for the short but arduous slog up the hillside to the peat track that leads back to Polbain, a more direct route than following the road. Maybe it’s down to late summer growth, but the grassy tussocks and toe-dragging shrubbery made for an exceedingly tiresome, one-mph haul. Each step required lifting to knee height, and crossing the boggy stream course midway ingested one of Craig’s cherished flip-flops. Struggling a bit with his kayak in a shoulder bag, I was amazed it had managed to stay with him that far. My well-used Teva Omniums clung better to my feet if not the ground, and the heavily loaded packframe sat securely on my back, but I wouldn’t want to spend all day doing this. By the time we reached the peat track where locals periodically excavate their allocations, the sun was setting over the Assynt peaks to the northeast. From here it was a short downhill walk to the village and, after some 12 miles, attending to all the food that was fit to eat.
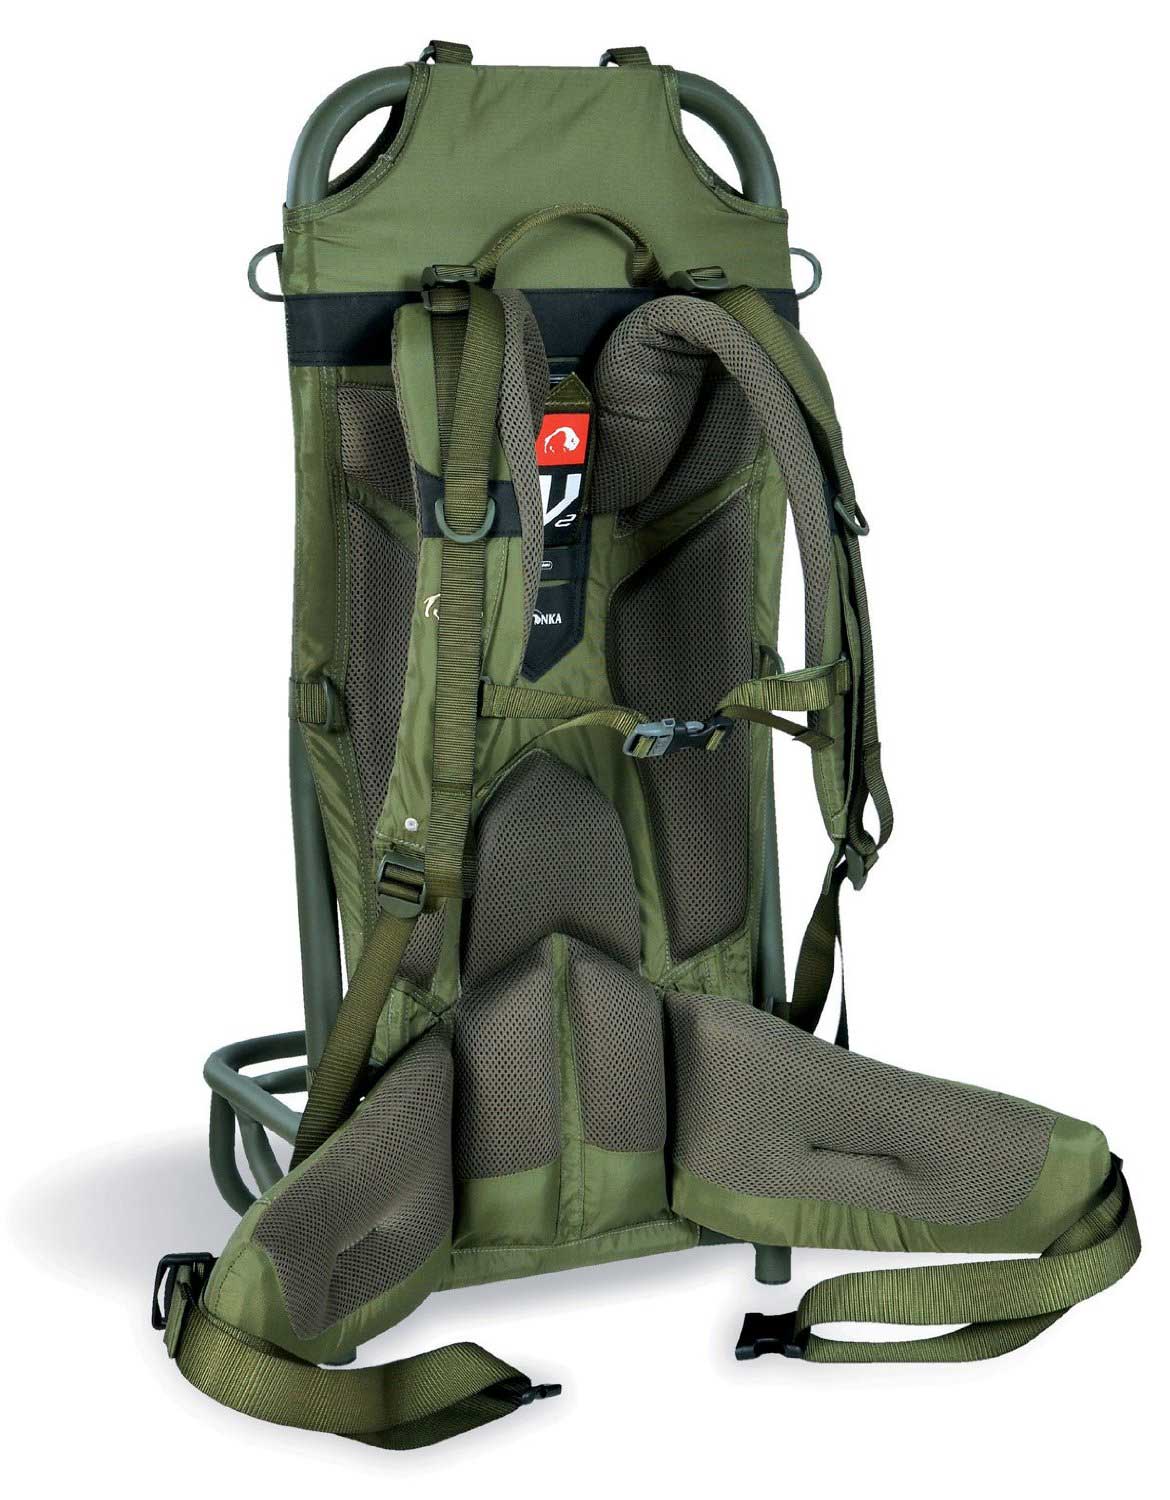
I thought I liked the idea of packframes for pack boating – a rigid rucksack harness and frame without the bag element. The boat, paddles plus dry bags are all lashed to a frame, alongside a drybag.
In the US one time I saw some packframes at a hunting outfitters in Flagstaff (left) that were much better than anything I’ve seen in the UK and going from just $80.They had hinged L-sections to support loads, and looked like an ideal carrier for the UDB and boats. As it stands, my UDB is still my preferred haul bag for overnight pack boating activities. Good analysis, history and list of packframes
Tatonka Lastenkraxe review Lastenkraxe? A Nordic nutcracker? An uncredited evil troll out of Harry Potter? Tatonka is a German company who produce some crafty and functional stuff, such as their pot/cup. A little research reveals that Lasten + kraxeadds up to ‘load bearer’ + ‘rucksack. Vorsprung durch kraknik.
The Lax differs from the hinged hunters’ frames by having a well triangulated, rigid platform. A bit over the top for load bearing perhaps and it certainly won’t slip under the bed so easily. But besides being rated at an eye-watering 50kg, the platform provides the unexpected benefit of standing up straight when placed on flat ground and being a ready-made camp seat.
It weighs 2.7kg but feels lighter for the amount of alloy in there. And like all modern packs, you can adjust the harness to suit your back length, as well as do the usual micro-adjusting to the chunky hip belt and shoulder straps and the all important, non-elasticated, sternum strap. The Lax will obviously work fine for packraft expeditioning, plus kayak day trips where a trolley can’t be used, but I wanted to see if carrying my Amigo IK was a viable option for camping too. The Amigo weighs about 15kg ready to go, and as you can see, takes up much of the packframe when strapped on vertically. Horizontally would make more space above, but having walked about five miles on road, track as well as very rough hillside, treating the Amigo like a packraft will be a tall order.
I recall the Terra backpack on my first packrafting trip in 2010 weighed 18kg with a few days’ food and a drysuit. The Amigo is at least 12kg heavier than a packraft so that’s 30 kilos. I was walking around with about 20kg which felt like plenty. As said, the Lax is rated at up to 50kg which is hard to believe; the stitching alone would be under immense strain.
Realistically, camping with the kayak would work best where there was more water between short and fairly easy walks (few bogs and steep inclines – so not really Scotland then). Of course, having a kayak as opposed to a packraft makes lone coastal paddling and sea loch crossings less intimidating.
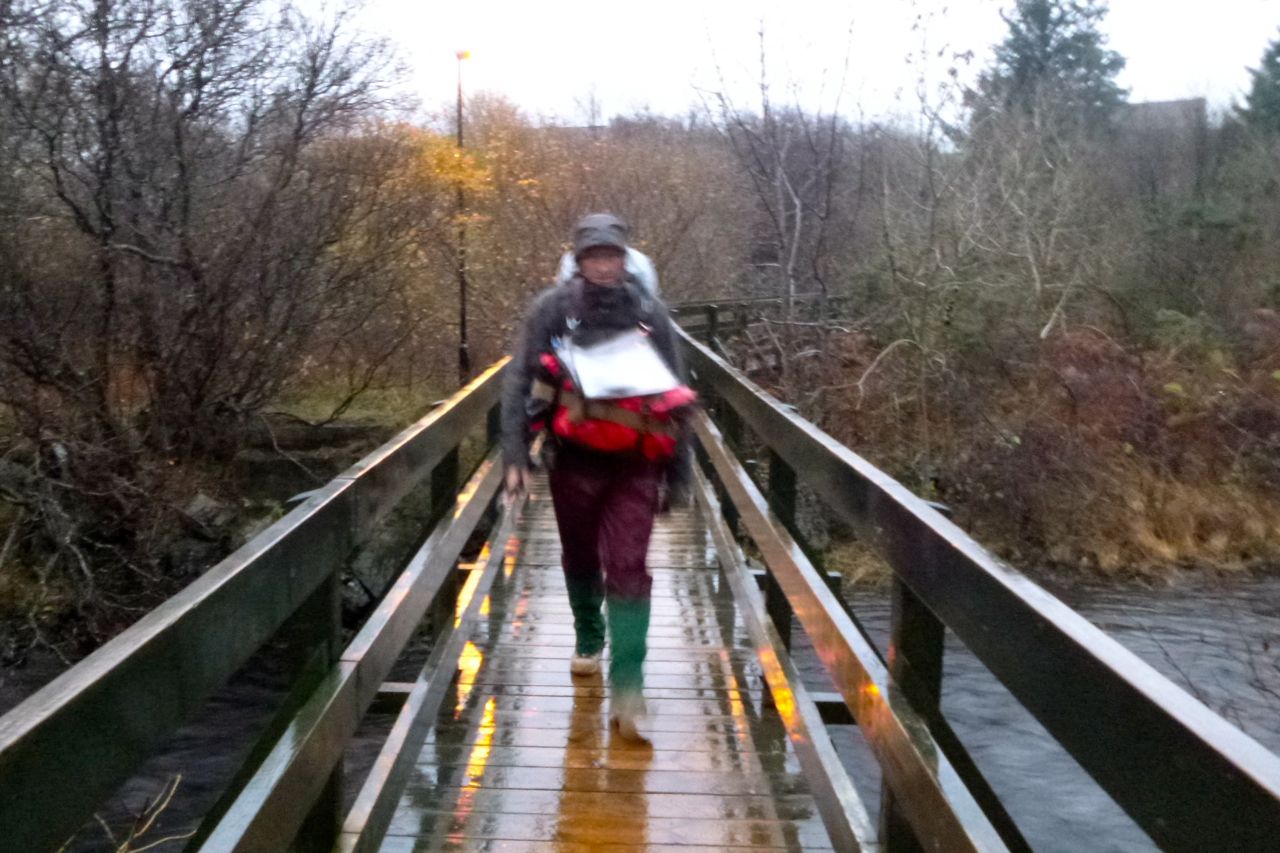
Comfort is as good as can be expected with a 20-kg load, but I think it’s safe to say a rigid frame is less compliant than a modern frameless backpack like my Berghaus C71 (2.6kg). On one stage the lower frame was digging into my hips through the hip belt, although on the next walk I must have adjusted it better and it was fine over terrain that at times was barely walkable. I wasn’t using a packstaff this time, but off-piste that would be a great help.
Early days yet, but quality of construction seems good. I like the lift handle and generous padding. One thing I’d like to see on any harness like this is a pocket or two on the padded hip belt, or even just a bit of tucking mesh. The platform construction looks solid and as well as being a pack stand, with a some cushioning would also make a solid camp seat when unloaded. This is a much discussed and under-rated item, and one on which you could even lean back on, just like you weren’t supposed to do in school. The solidity of this structure also opens up the possibility of adding that nirvana of urban packboat portaging: trolley wheels. More about that if I get round to it. Rrp in Germany for the Tatonka Lastenkraxe is €170. My green one cost £95 off amazon. Black ones were another 20 quid.
In my packframe investigations I discovered that in the Tatra mountains of eastern Europe there’s a local ‘iron man’ sport of ‘Nosicsky’ (‘portaging’): carrying massive loads on wooden L-packframes. Perhaps it was once a way of resupplying mountain refuges when the mules were on strike. As you can see, over 200kg was a record one time, but it proves that L-frames were the original do-it-all packframe, long before modern backpacks found frameless alternatives that kept the weight closer to your back.
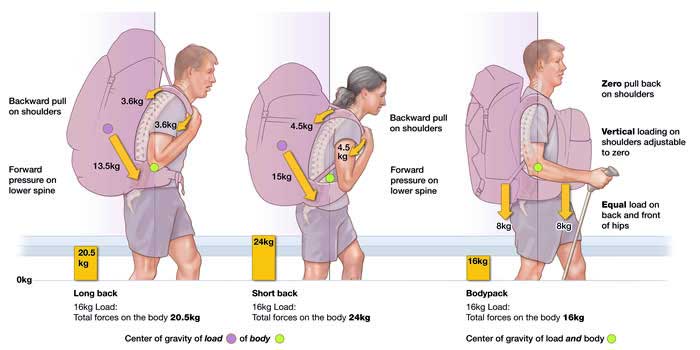
I also came across the Kiwi Aarn website which showcases a frontal load ‘FlowMo Bodypack’ to help improve you posture and balance weight distribution. They’ve designed two pockets for the front straps to carry dense but compact items (like water) while still being able to see where to put your feet. Sounds like a good idea but many of us, like Jeff on the left in the Kimberley (with my old Terra 65), have come up with a similar solution intuitively, when needing to carry a day pack as well as a backpack. Still, it’s an idea worth considering when you have a 15-kilo boat on your back.
Since I wrote this I did try a similar idea on our CWT recce, well at least carrying the packraft on my chest. It did feel good on regular ground: better posture, less stooping – but on gnarly terrain the bulk got in the way of the ground at my feet which got dangerous in the places we were walking. To be fair, Aarn acknowledge this limitation.
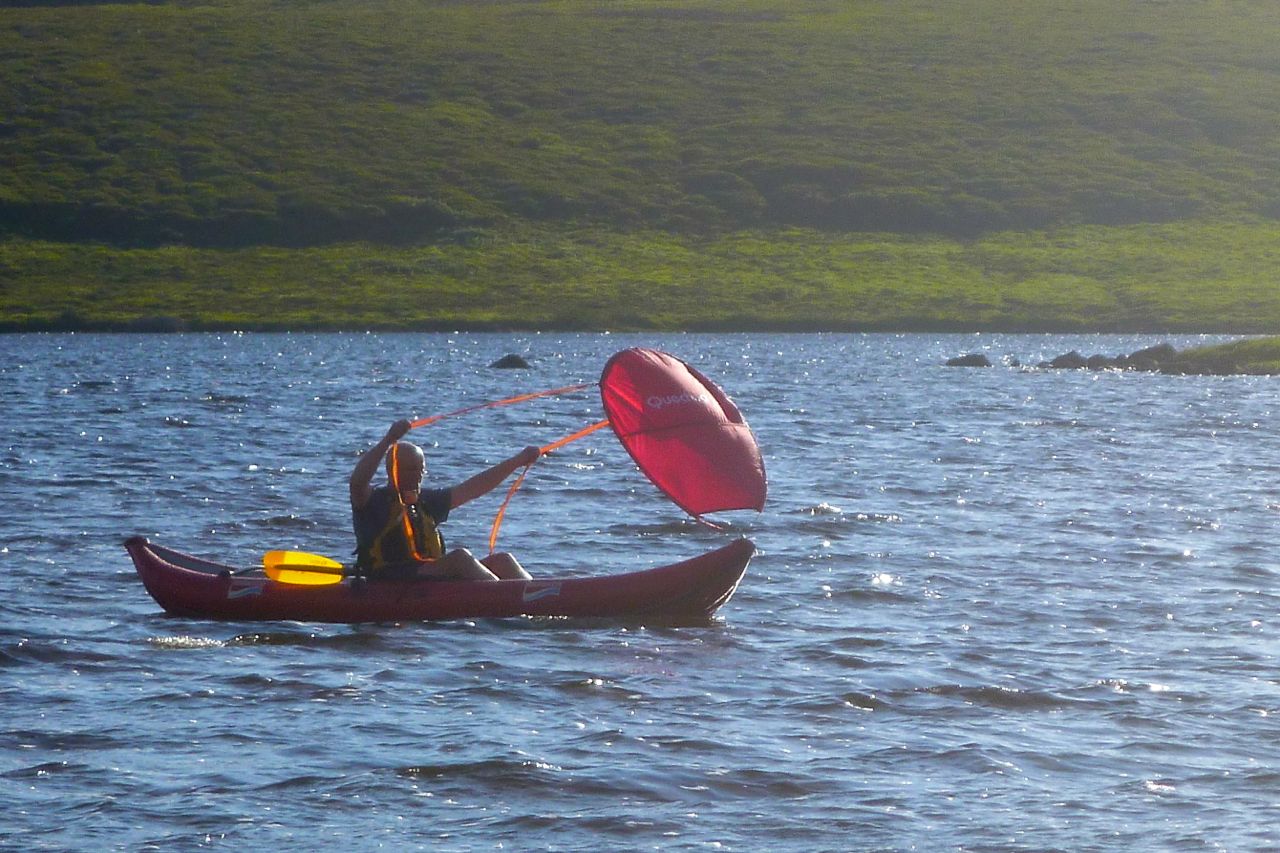
Unbranded windsail update 2016: the 3mm-thick glass fibre rod snapped. I bought another length for a tenner. It felt more flexible but within a couple of days that broke in two places too. If I run 3mm rod doubled up I presume the bending forces will be the same, but if I run thicker rod I presume it won’t fold down three times to thecompact 30cm diametre disc. Looking again at the original WindPaddle, it does seem much of the cost is explained by the ‘proprietary’ composite rod they use, and there seem few easily found online reports of breakages. Prices seem to have dropped quite a lot too (as they have for the ebay knock offs). Could it be you get what you pay for after all? It’s a lesson so often learned here at IK&P!
The other evening I hooked my old home-made disc sail onto the Grabner’s bow (left and above) and took it out on a loch to remind myself that it wasn’t really that good. As before, I found it difficult to get a good run before it flapped out or otherwise lost its drive. My Pacific Action V-sail will work better, but fitting that to the Amigo may require more D-rings. I like the compactness and simplicity of a disc sail, but it was suggested that dishing like a bowl was the key to holding the wind and maintaining steady progress, even if it may be less effective tacking across the wind.
Sounds plausible and WindPaddles are clearly made like that for a reason. Since then it occurred to me that’s why classic ‘descending’ parachutes (‘reverse’ sails) are bowls and not flatter discs which would shoot across the sky. Before I set about recutting my disc into a bowl shape I checked WP prices on ebay and spotted what looked like a knock-off: ‘Canoe sail kayak sail wind sail‘, now just £15 delivered. Cheaper than sewing and at 115cm deployed, it was midway in size between WP’s Adventure which at the time was selling for no less than £155 in the UK (now about half that). Someone assure me that a WindPaddle costs even a fiver to make in China, but see top of the page.
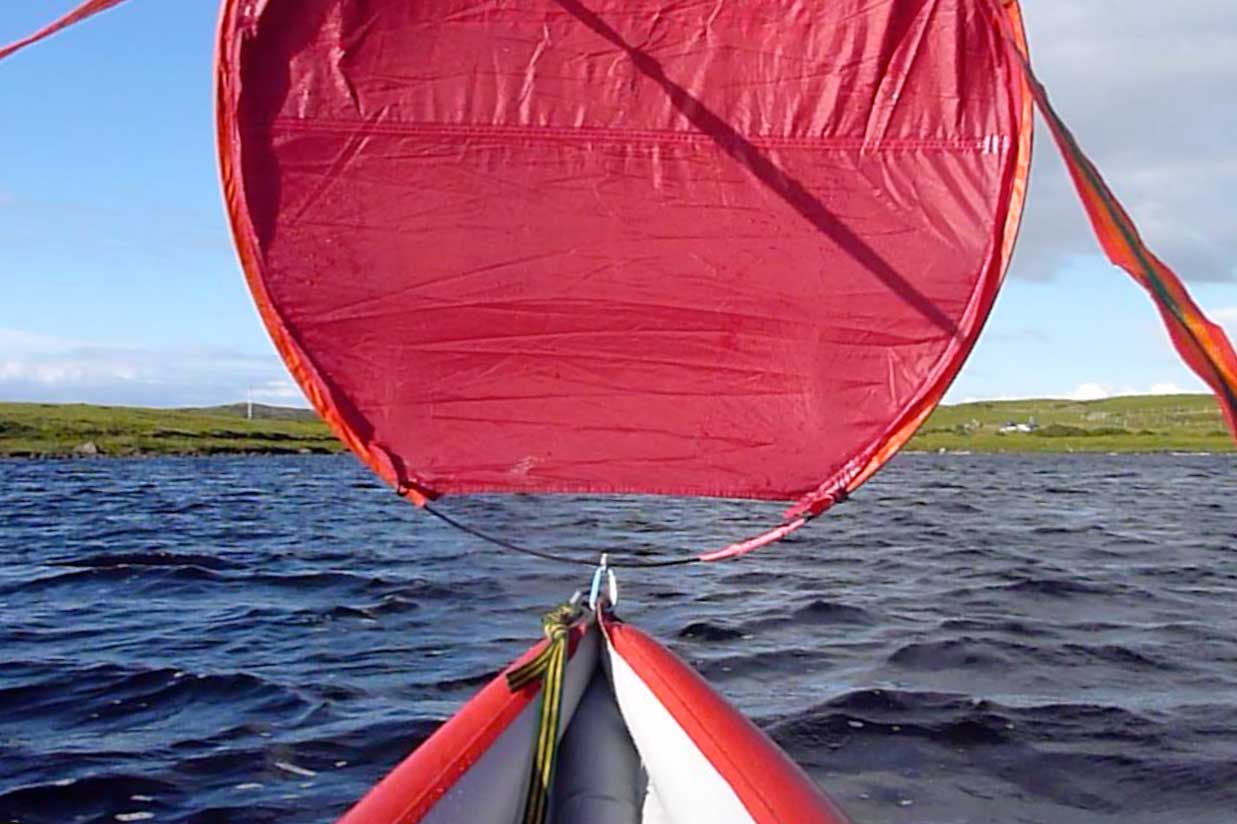
And better still, the no-name windbag folds down into three hoops of just over a foot in diameter (above left). Plus there’s an elastic hoop to keep it like that and a carry bag for the long walk back to the van. Out of that bag, the only changes I made were to replace the too-short control strings with my tape off the red sail which I find easier to handle. I reassigned a sling to hook the sail’s base to a floor D-ring back from the bow (above left). That was already fitted and was the only adaption I needed to mount the sail to the Grabner.
The day before, with the visiting Nimbus family we’d paddled round the Ristol isles. Over lunch on Ristol beach I took my new sail for a burn up. First time out, not bad at all. I got a steady run and up to 3.9 mph on a breeze of no more than 15 mph and with very little faffing. The prospects were good. More wind was needed.
Incidentally, on the beach I noticed how very, very much unlike a sea kayak the Amigo really is. Alongside my old Incept, let alone the lethal Scorchio HV (right), the red boat looked like one of those inflatable kayaks you read about, except it happened to be made from bomb-proof hypalon and pumped up like a basketball.
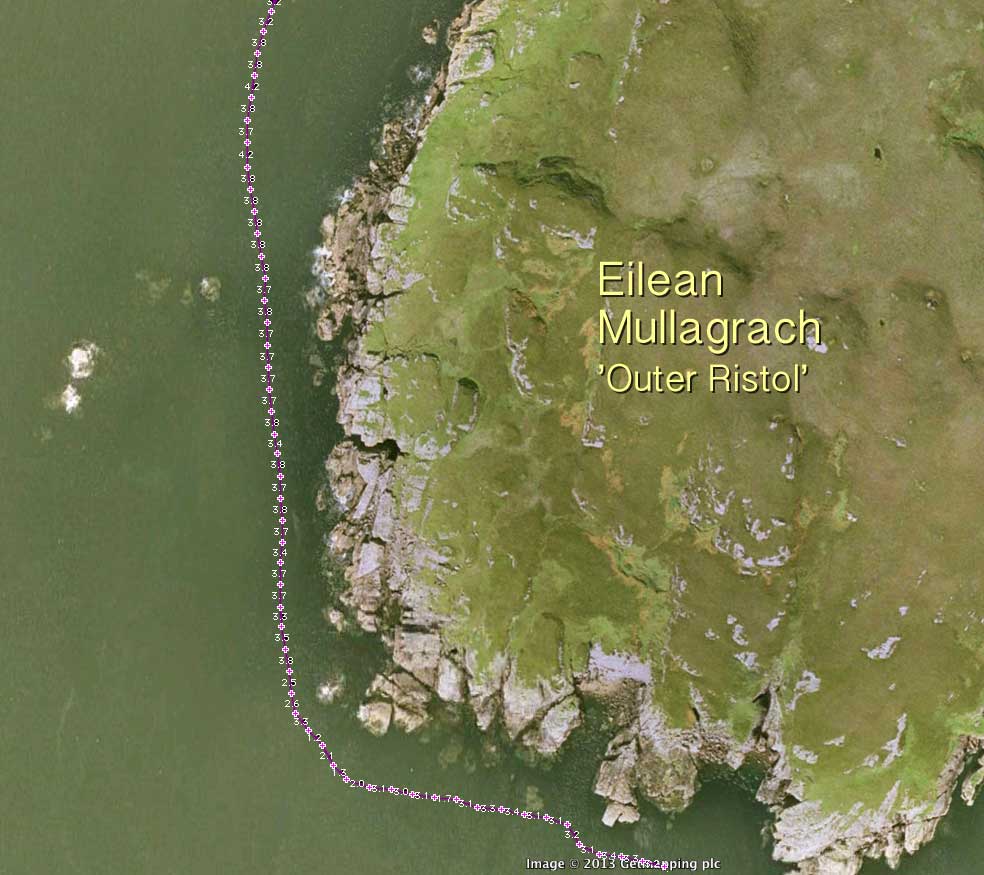
Earlier on, coming round the southwest corner of Eilean Mullagrach, (left), the swell bouncing off the cliffs and crashing over outer reefs looked intimidating. Though we all managed fine, it was everyone for themselves. With heads bent to the task, the comparative speeds of our four boats was clear to see. Way out ahead and longer than your average four-door car: the cheddar-coloured P&H cheese cutter. No far behind, 12-year-old Boy Nimbus darted along in his 12-foot Carolina (later I GPS’d him at 6mph, same as the P&H). Further back Mama Nimbus and little Nima in the K40, all hands on deck. And out back the Grabner hypalon clog – splish-splosh, splish-splosh Slap. Checking the GPS data the speeds weren’t so bad, it’s just that in the rough the hardshells cut through some 30% quicker.
A few days later the Solar was stacked on the Amigo (right) and I realised it was only a foot or so longer than the Gumotex. In that case the Grabner does pretty well for a 12-foot four-, 31-inch kayak that hauls two paddlers. Back to the sailing. Next day winds were forecast at over 25 mph (right) but as it was warm and only a 5-minute drive to a Loch Vatachan, it was worth a crack.
A short pre-paddle suggested my cheapo windsail would probably get ripped off and blown away, or else see me roll off the back of the kayak as it shot away from under me liked a snatched tablecloth. Upwind I couldn’t exceed 2 mph (left), but skimmed downwind at up to 5.5 mph providing I kept the stern right on the wind. And while I was out here, side-on to the one-foot fetch the Amigo felt secure, so not a completely wasted outing. I’d never set out to paddle in such conditions normally (actually I did once), let alone try sailing (actually I had once) so I called it off. Later, Ardmair weather station confirmed the wind had been howling at a steady 35 and gusting to nearly 50 mph.
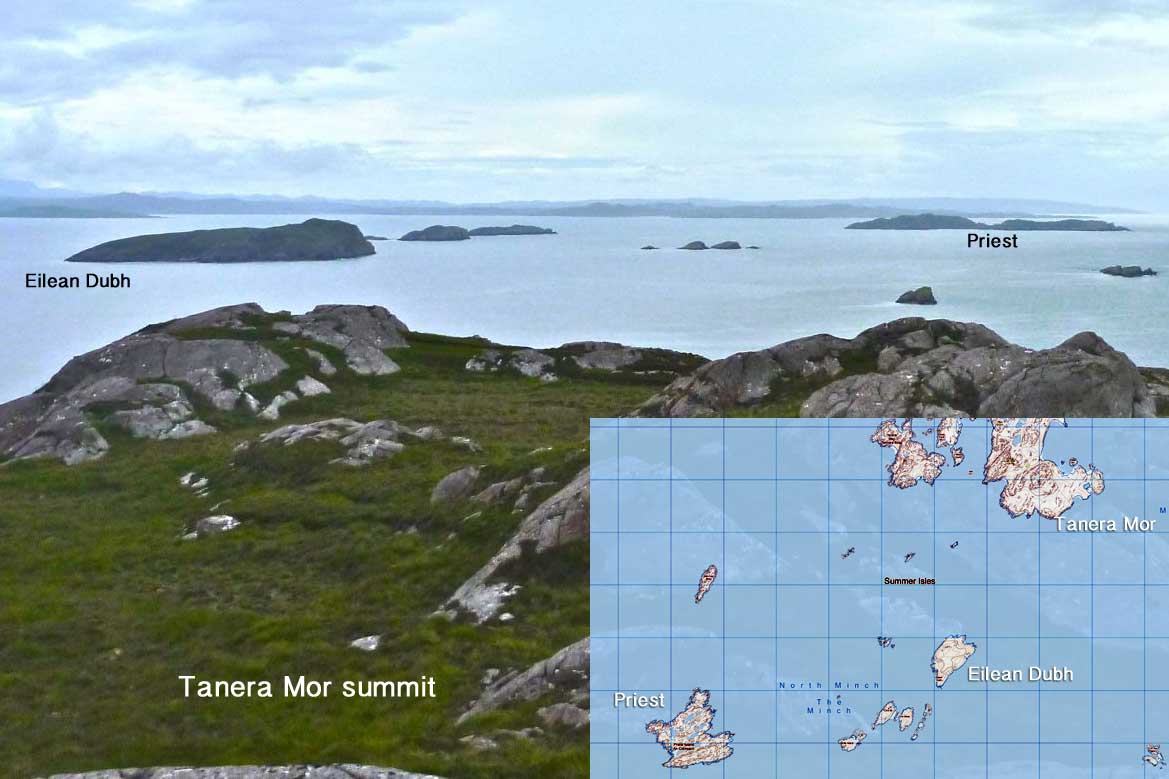
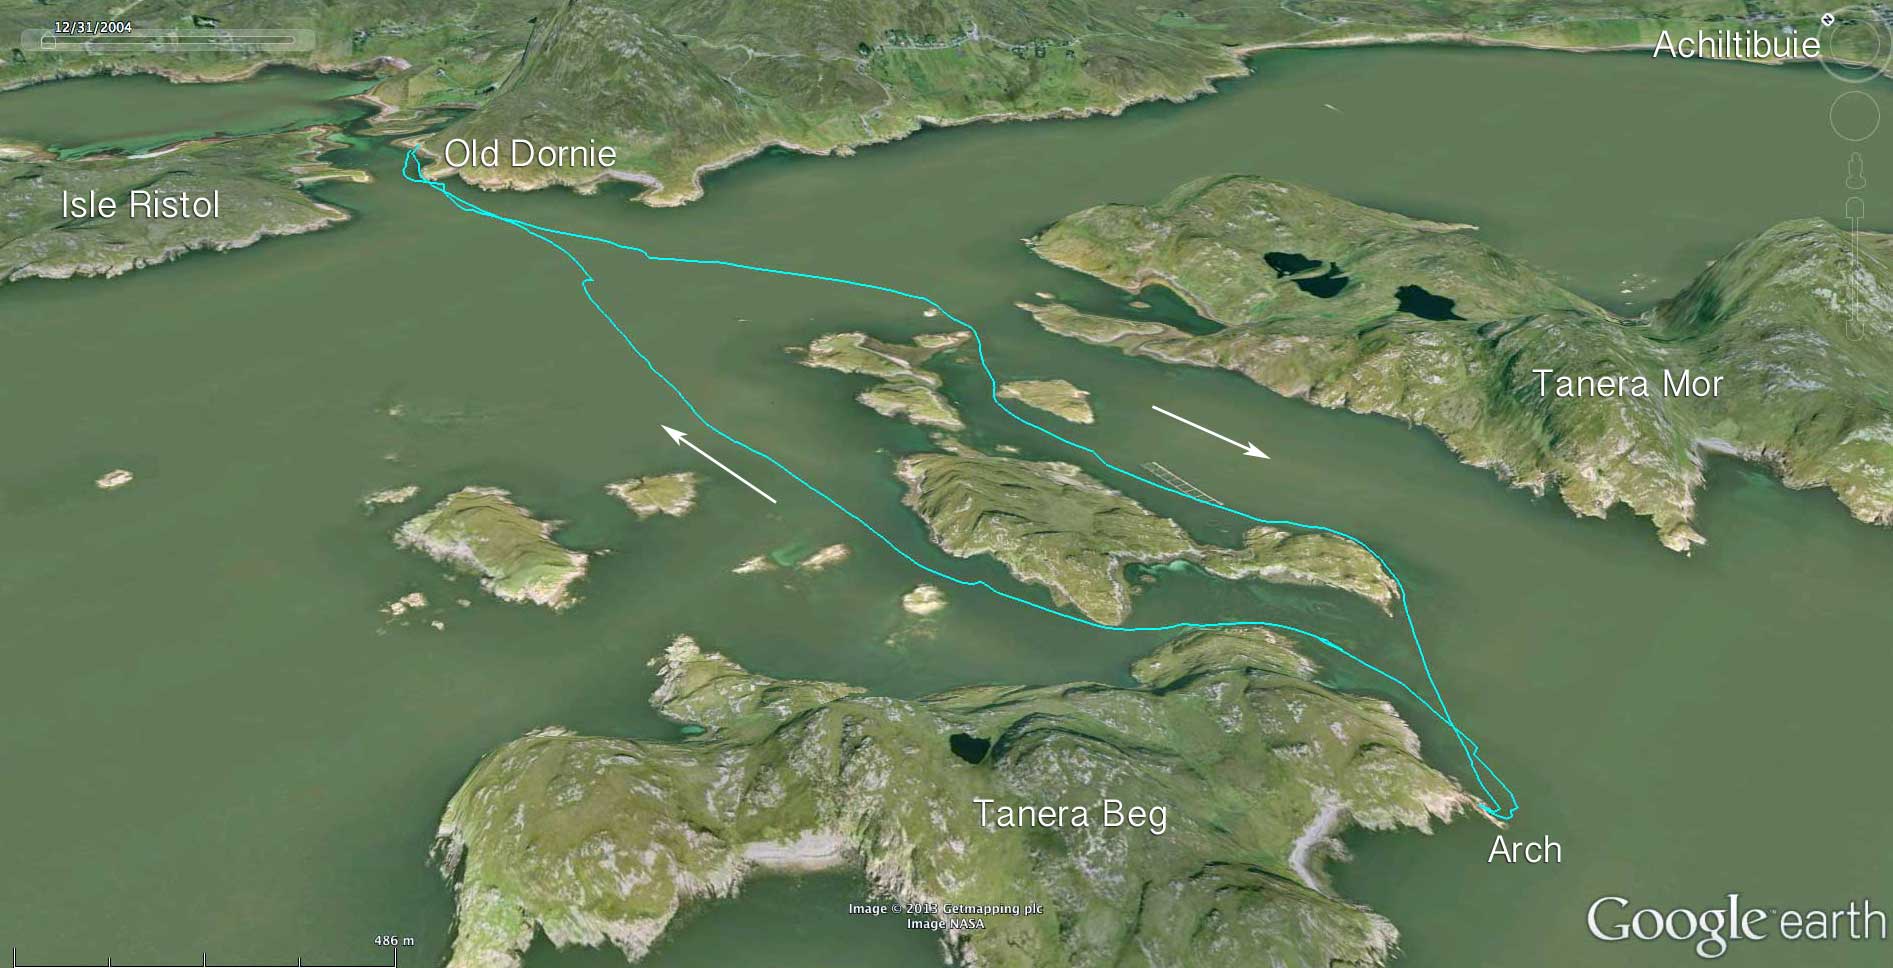
We all ‘yaked over to Tanera Mor one afternoon; three IKs and two SinKs. I realised I’d never actually walked up to the 124-m summit of Tanera Mor for a look around. Up on top a string of islets lead to the twin humps of Priest Island, 4.5 miles in a straight line (right). It was a ten-mile round trip I’ve mentioned earlier but may be beyond reach this time round.
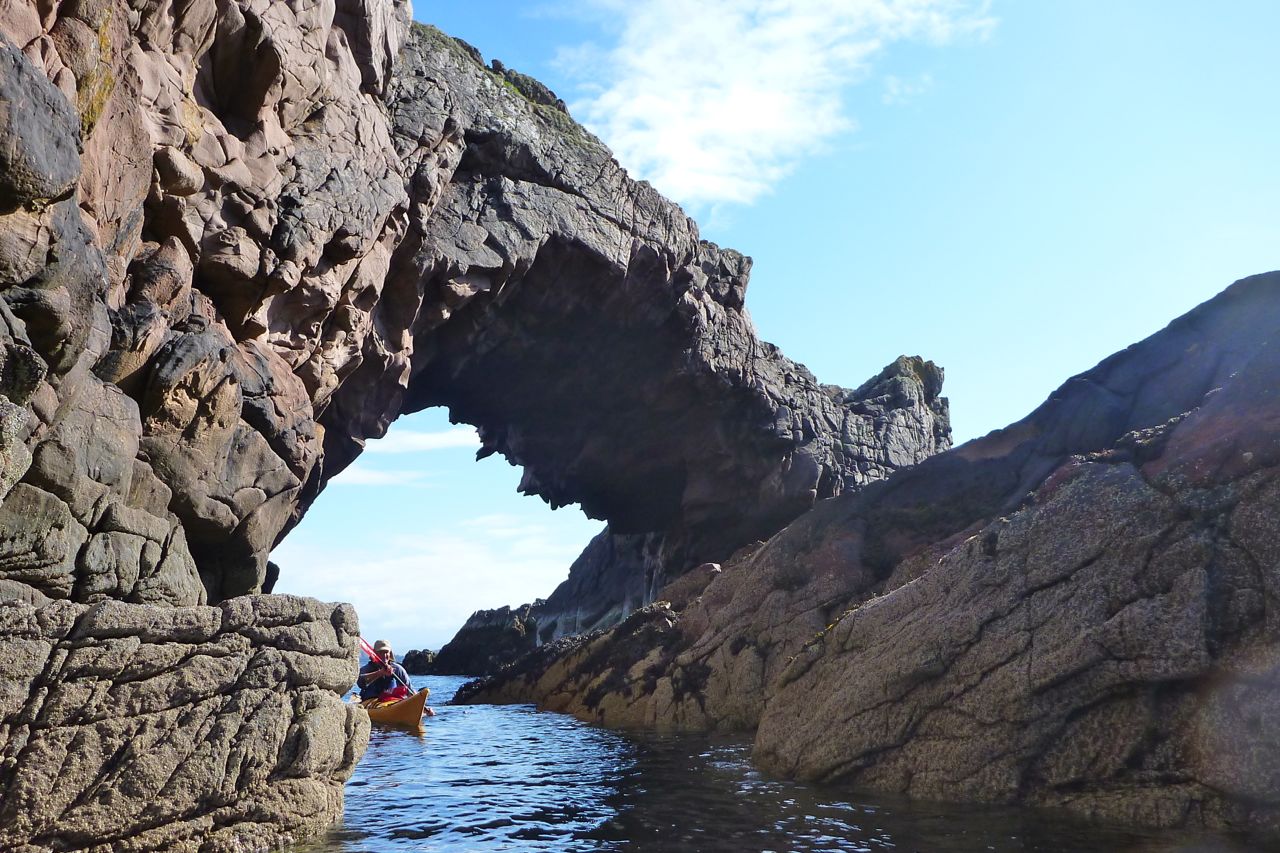
Paddling back from the island, Mama Nim found my old Incept had picked up another pin-prick hole in the side. Wtf is happening to the K40? It’s a lot better than the armchair -wide Sevy they were borrowing before, but three holes in four outings? And it gets worse. On leaving the island the wind dropped to nothing so sailing was off. Instead, we were plagued by sea midges which rise from their lairs as soon as the wind turns its back. Another day and a healthy northerly forecast at 10mph on the BBC which might mean 15 in real terms. I set off with Nimbus in his Scorpio ‘PK’ (plastic coffin) for a look at Tanera Beg’s arch he’d missed on previous visits. It’s a nice arch; we passed it a couple of weeks back, two-up in the Amigo.
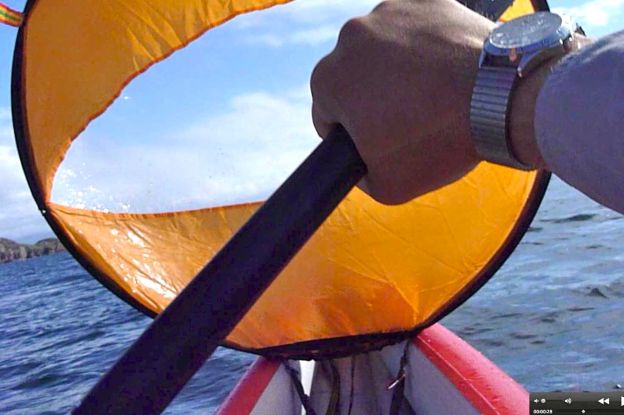
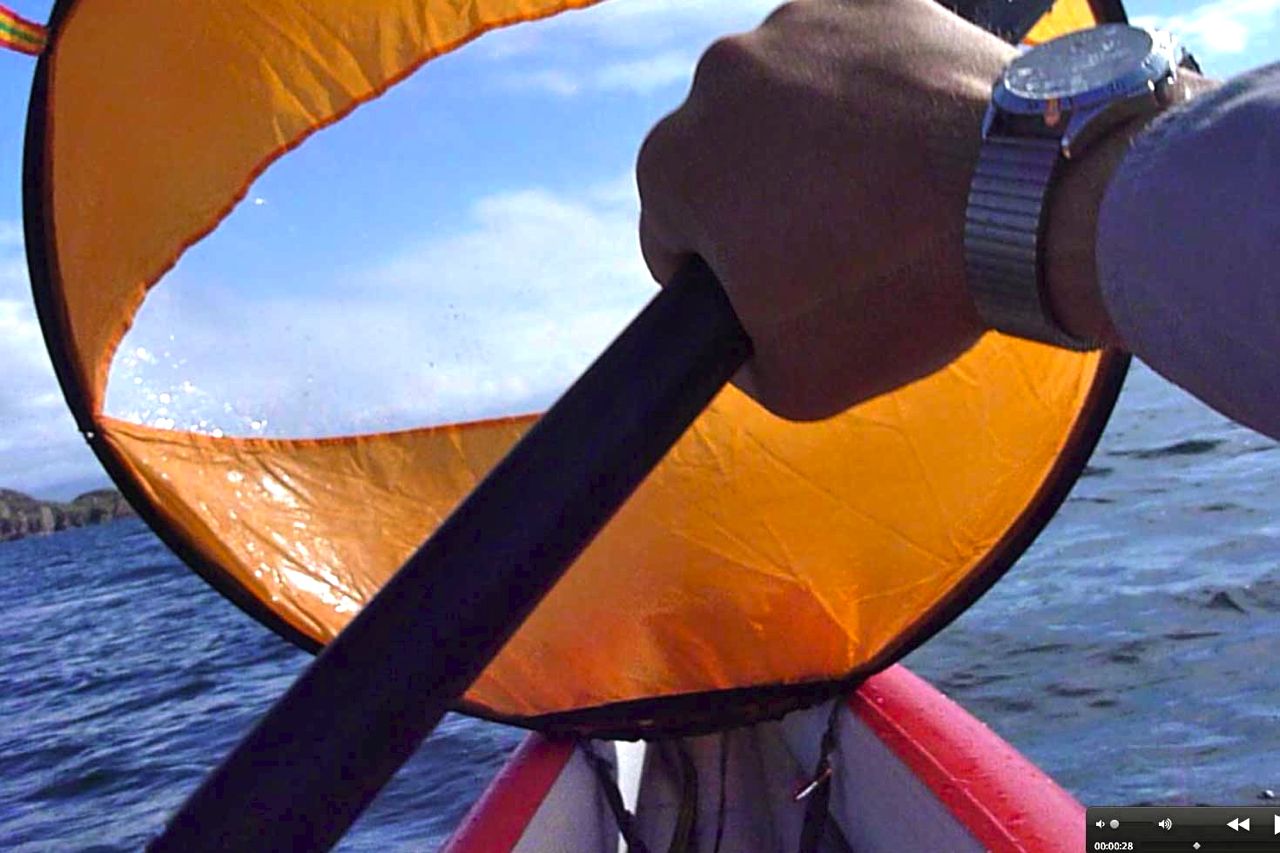
Once clear of Old Dornie I threw the sail out and trotted along at 3.5 mph which won’t be giving me any nosebleeds but I suppose must be classified as progress. At least I found a good way of stashing the sail. Seeing as it’s right out on the bow, refolding it down to three hoops isn’t practical on the water without help or taking risks. But I could just pull it back and tuck the squidged sail under my feet and between my legs (above). Down here there’s little risk of it self-deploying and jumping overboard to become a most unwelcome sea anchor, but it can be thrown up in a jiffy to catch a breeze, just as with the PA.
Once we got to the two Taneras’ In-Between islands the wind remained but the waves were blocked so I threw out the air bag and trickled along again at about 3.5mph again. Then it occurred to me I could hold the sail leash in my teeth and paddle. That worked well too, getting on for 5 mph but without the paddling effort to make that speed unaided. Plus it felt better than having the sail hooked to my pfd and stopped me talking unnecessarily.
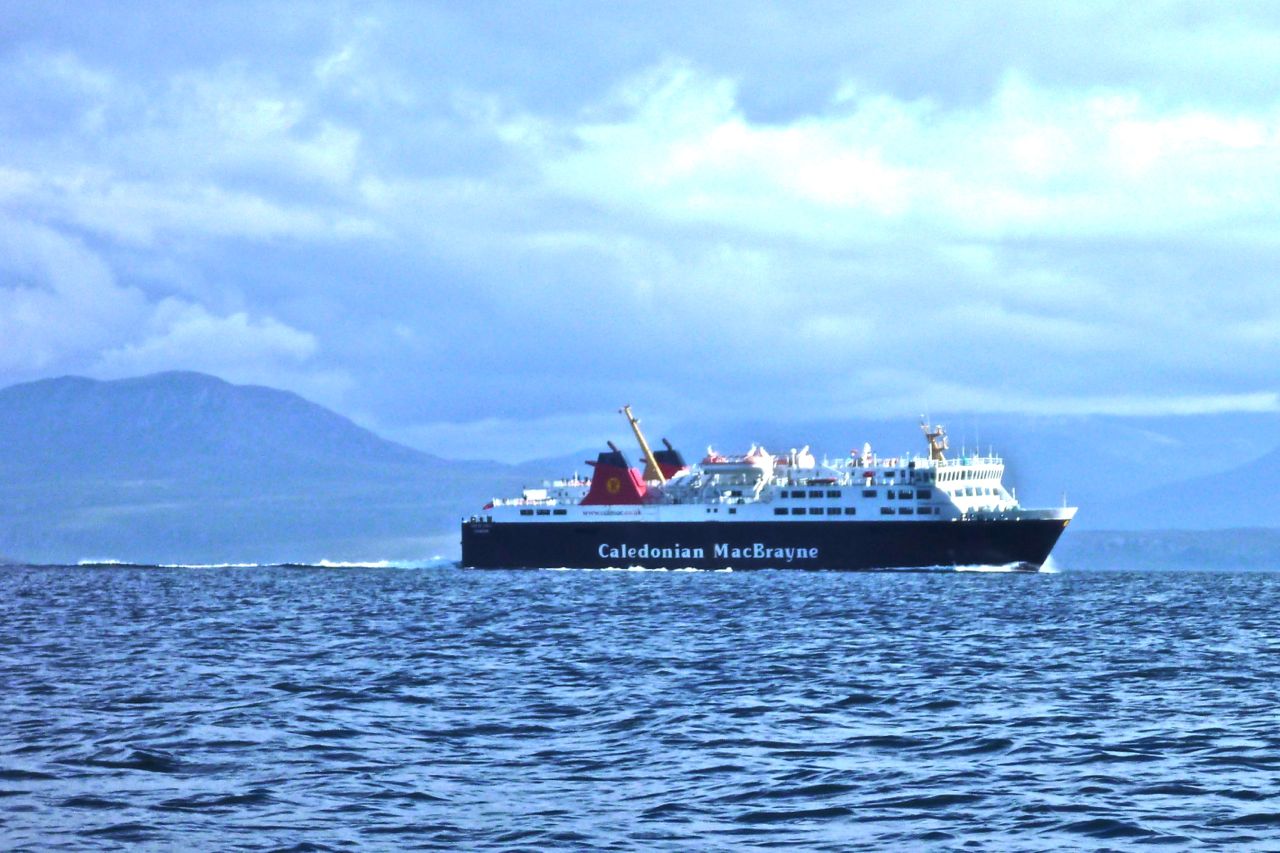
Once past the In Betweens we crossed over to the arch but found we were a metre short of water. Still, high or low water it’s a great mini-destination some three miles out of Old Dornie. The easy part was over; it was going to be a solid old hack back into the wind for Old Dornie. As we turned we were a little perturbed by what looked like the Stornoway ferry heading right at us. I’m sure it never came this far north, was the captain asleep at the wheel or taking a deeper channel on the spring tide?
At the last minute the CalMac turned away and a calamity was averted. A few minutes later its wake rolled in, breaking a couple of feet high just as we passed a reef. It looked like a good picture so I sent Nimbus back for a shot (above) but by then the best of the surf had passed. If that was the swell kicked up by the ferry from a mile away and before it hit full speed in the Minch then I’m glad we keep our distance.
Time to put the camera away and knuckle down for an hour’s bow slapping to Old Dornie. As I’ve observed before in such conditions, Nimbus in his SinK paddled like he was stroking his favourite cat, gliding through the waves in a seemingly relaxed procession. Me? I was loading 16 tons and what did I get? Slipping back further and deeper in bilge. Still, not alone for a change was less unnerving and I quite like a good work-out on familiar terrain. You dial in the effort you know you can sustain for the duration and progress at whatever speed that delivers. From the graph below that added up to about 2.5 with occasional surges to 3 mph when my technique briefly hit form. The P&H PK seemed to hold a steady 3+mph without trying.
The wind had failed to live up to the forecast promise of dropping around 6pm and out in the mid-channel a few white tops developed; for me a warning sign it’s approaching IK limits. I will speculate that I shipped less water than I would have in the Sunny which is a similar type of IK. Partly because of the Amigo’s upsweptbow that front or rear, doesn’t seem to be as much of a wind catcher as it looks. And perhaps too because the boat doesn’t bend with the swell.
In fact it was fun slapping the fat bow against the oncoming waves as I slowly hauled my way closer to Dornie. Old Man Nimbus can read wind speeds like a Tubu hunter reads the sands. He estimated it was blowing at 8m/sec which in English translates to 20mph. I’d have guessed a bit less, as with the spring tide at full flow against it, it didn’t seem too much in an IK (as long as land appeared close by). As we neared the harbour a couple of other SinKs slinked by, tucked right under the shore, out of the wind. Get out here you cowards!
No Name wind sail My conclusion of the no-name wind sail? It’s a WindPaddle at the right price. Easy to fit to my boat and doubtless many others, easy to temporarily stash on the move and probably easy to repair. And easy to steer too; pull left to go left, usually. With the window pane it’s much better than my home-made flat disc, plus it’s less bulky and complex than a V-sail, even if a V will give you nearly 90° reach either side of the wind.
Surprisingly I haven’t found the lack of a rudder an impediment with the Grabner. Though there’s a bit less directional control, at the typical sub-4 mph speeds you can drag a hand or a paddle blade to bring the nose around. And interestingly, providing you’re close to the wind and holding a steady course, the sail worked pretty well when paddling with the leash in my teeth like the 3.30 line up at Cheltenham. I can’t say I ever managed paddling with the Pacific Action on the Incept for long before it flapped out. Plus there’s plenty of scope for hooking up some self-jamming cleats (more here) like I ran on the Incept. Above all, the no-name air scoop is great value for money for the performance it delivers. For thirty quid it wouldn’t be worth making your own. Next job: see how the little Alpacka handles when yanked along by the wind sail.
Inflatable kayaks are a bit like mountain bikes. You can buy a blinged-up piece of overweight junk with ‘full suspension’ from a superstore for under a hundred quid. Or, if you’re serious about your cycling fun you can buy something decent that’ll be a joy to own and ride.