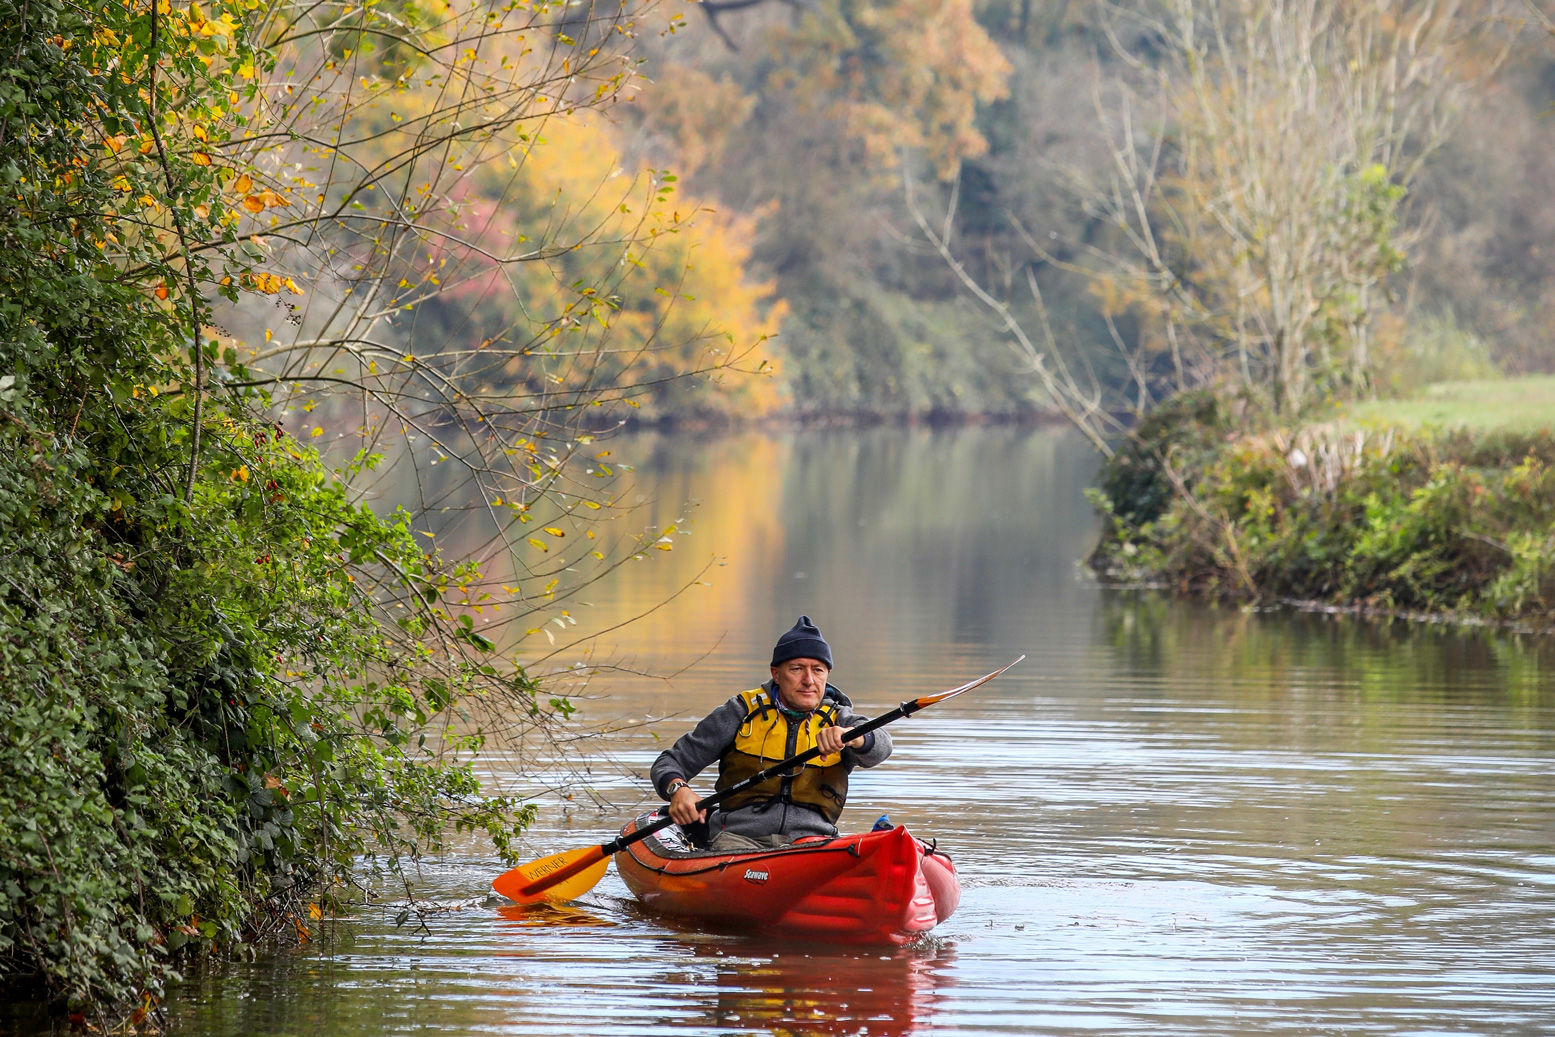
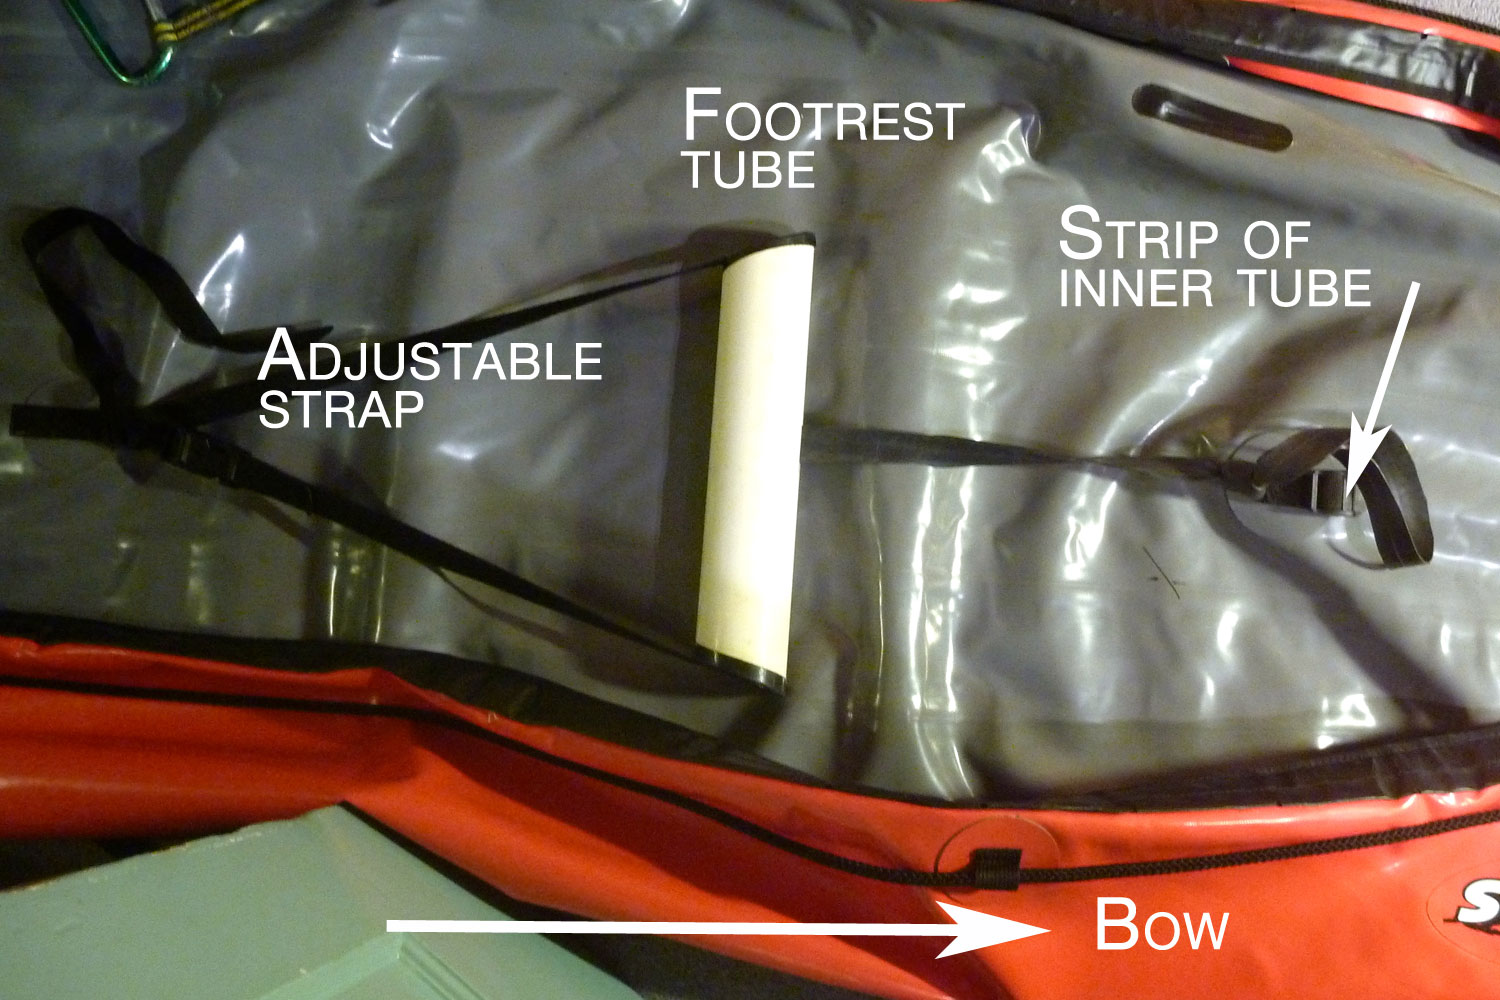
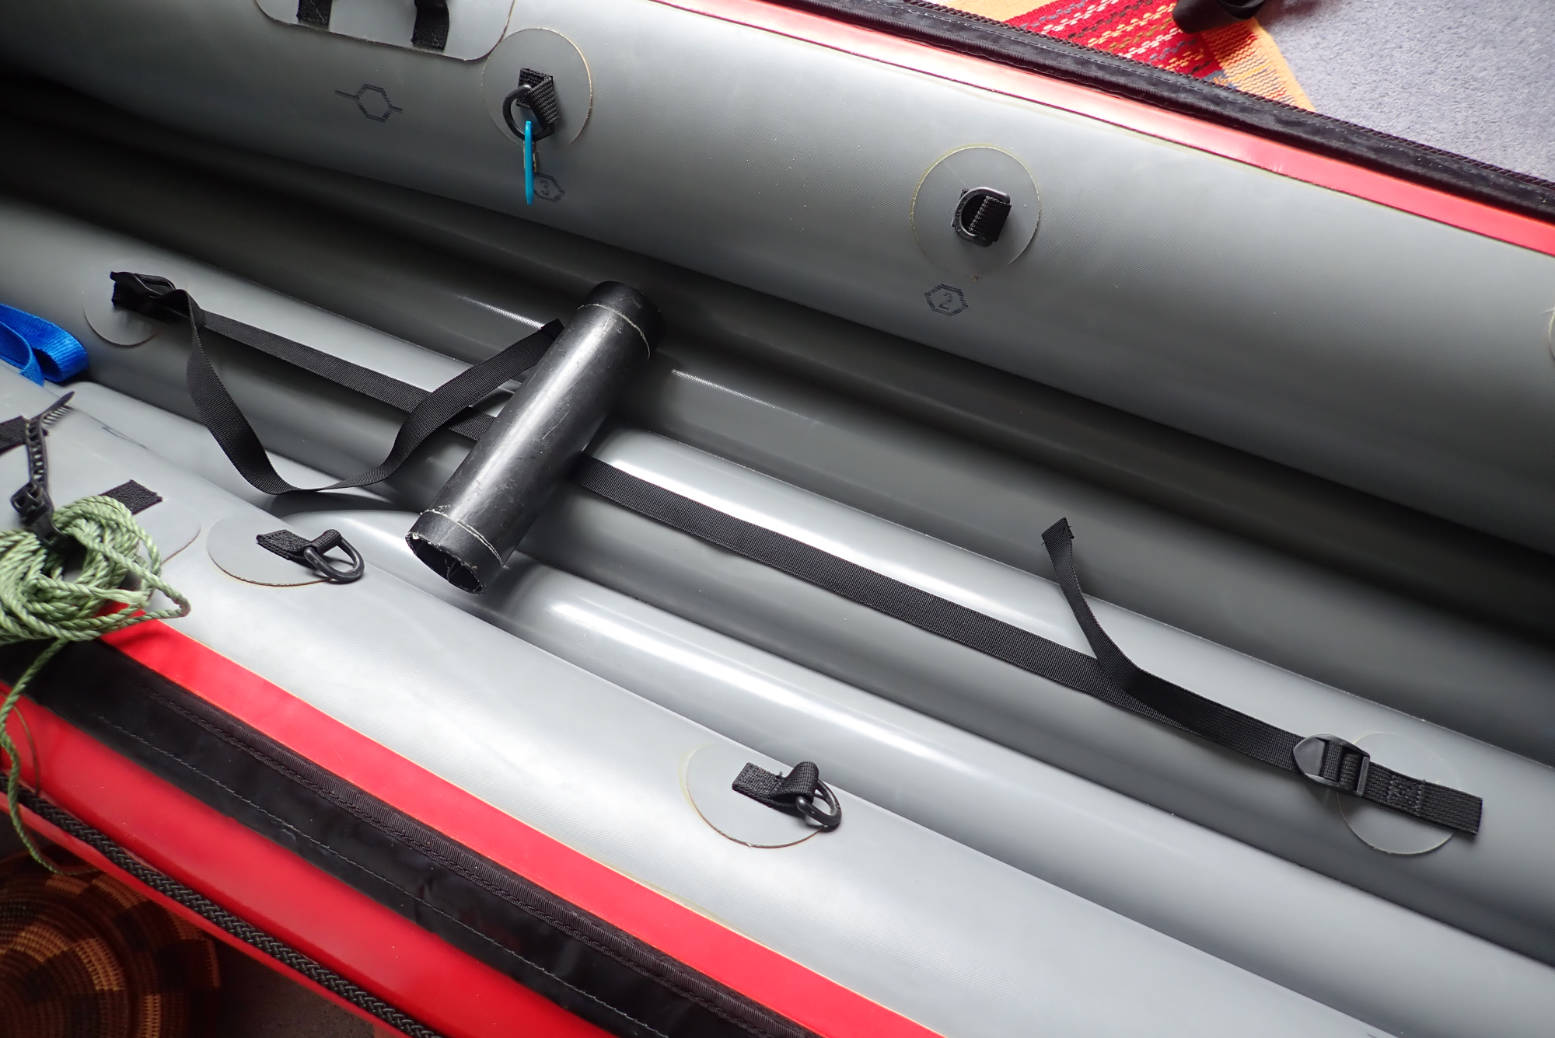
Owning several Gumotex IKs with the rubbish footrest pillow (left), I came up with my footrest tube idea years ago. It’s since been copied (or maybe just implemented) by many manufacturers. In a kayak, a footrest isn’t something you rest your tired feet on while watching Netflix. They’re something you lightly brace against to stop you sliding down in the seat and to improve your connection with the boat. To that end it wants to be solid like a pipe, not mushy like a pillow.
I was never really that happy with my original Seawave’s drainpipe arrangement (below): an adjustable strap running forward from the seat and a counter-tensioning elastic pulling from the bow to keep the tube in position. Too many straps, with entrapment and aesthetic issues.
Original footrest: over complicated
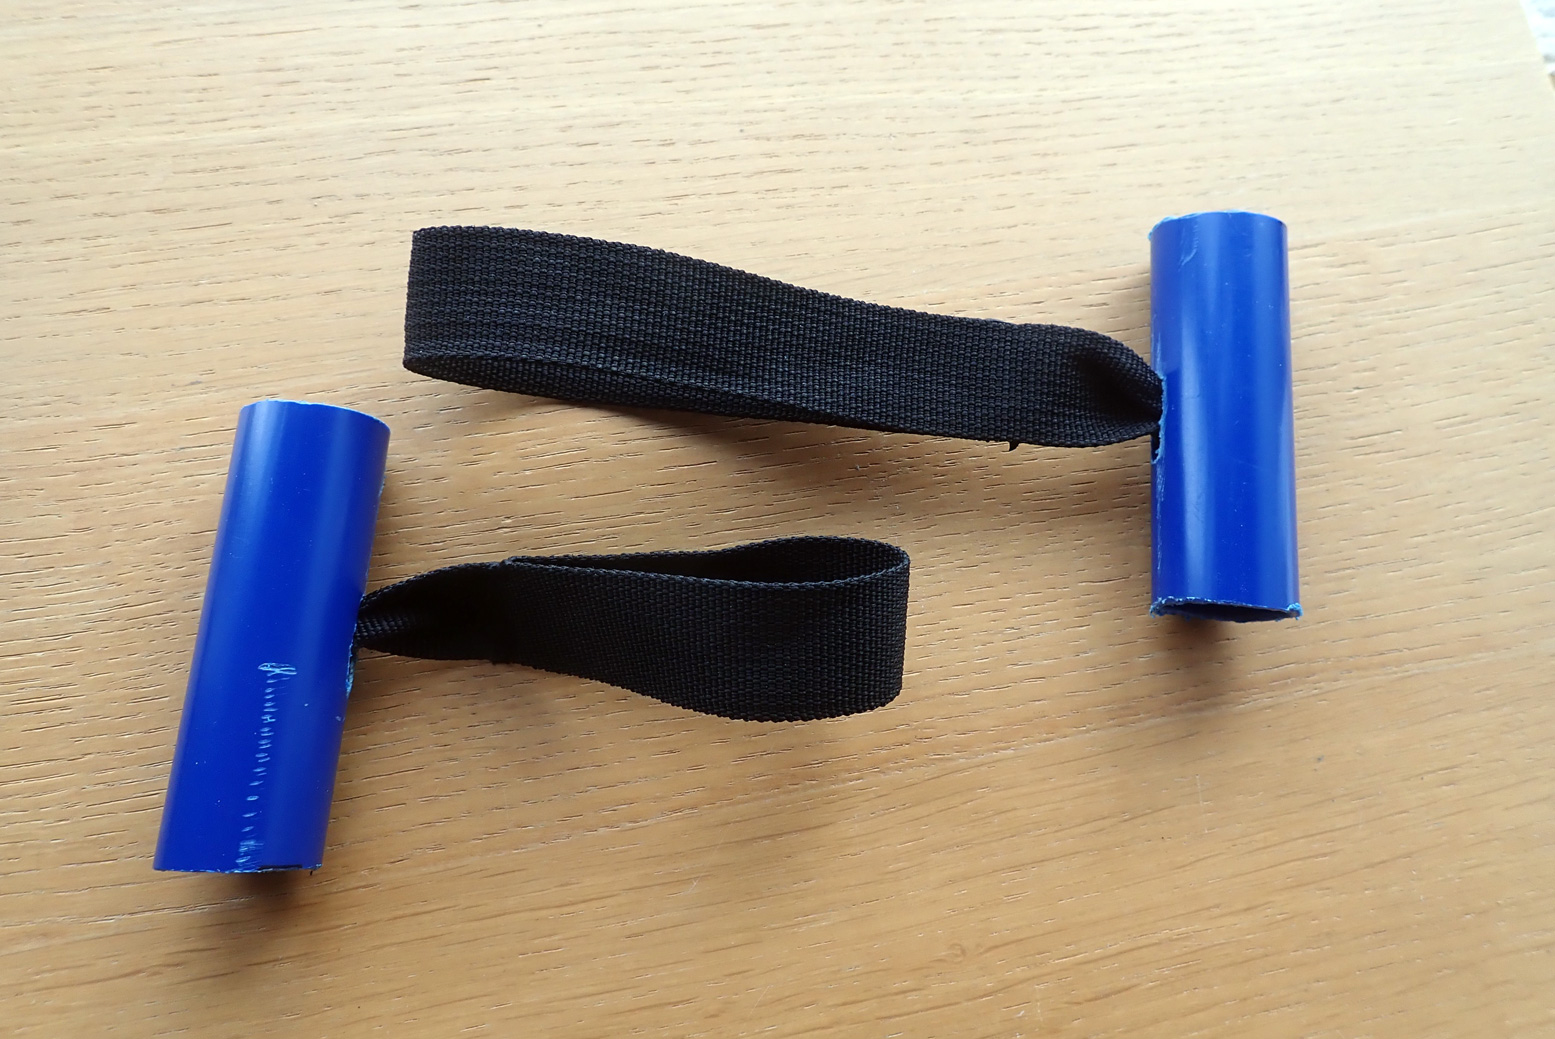
Then I remembered a clever idea someone passed on to me: straps threaded through a small piece of plastic pipe. You can buy them ready-made to jam into car doors to lash stuff down. As was suggested, these anchor straps could also jam into the cavity/channel (left) you find on most tubed and even FD-S IKswith removable floors, where the floor meets the sides to make repositionable/removable lashing points. Also, they are dead easy to make.
As footrest tube strap anchor points they work especially well because the tension on the strap is sideways (towards the bow) for better jamming, and they can be slid forward along the channel when paddling two-up and beyond the adjustability of the strap. And best of all, no tedious 2-part D-ring gluing required.
Or just straight to the sides; even simpler
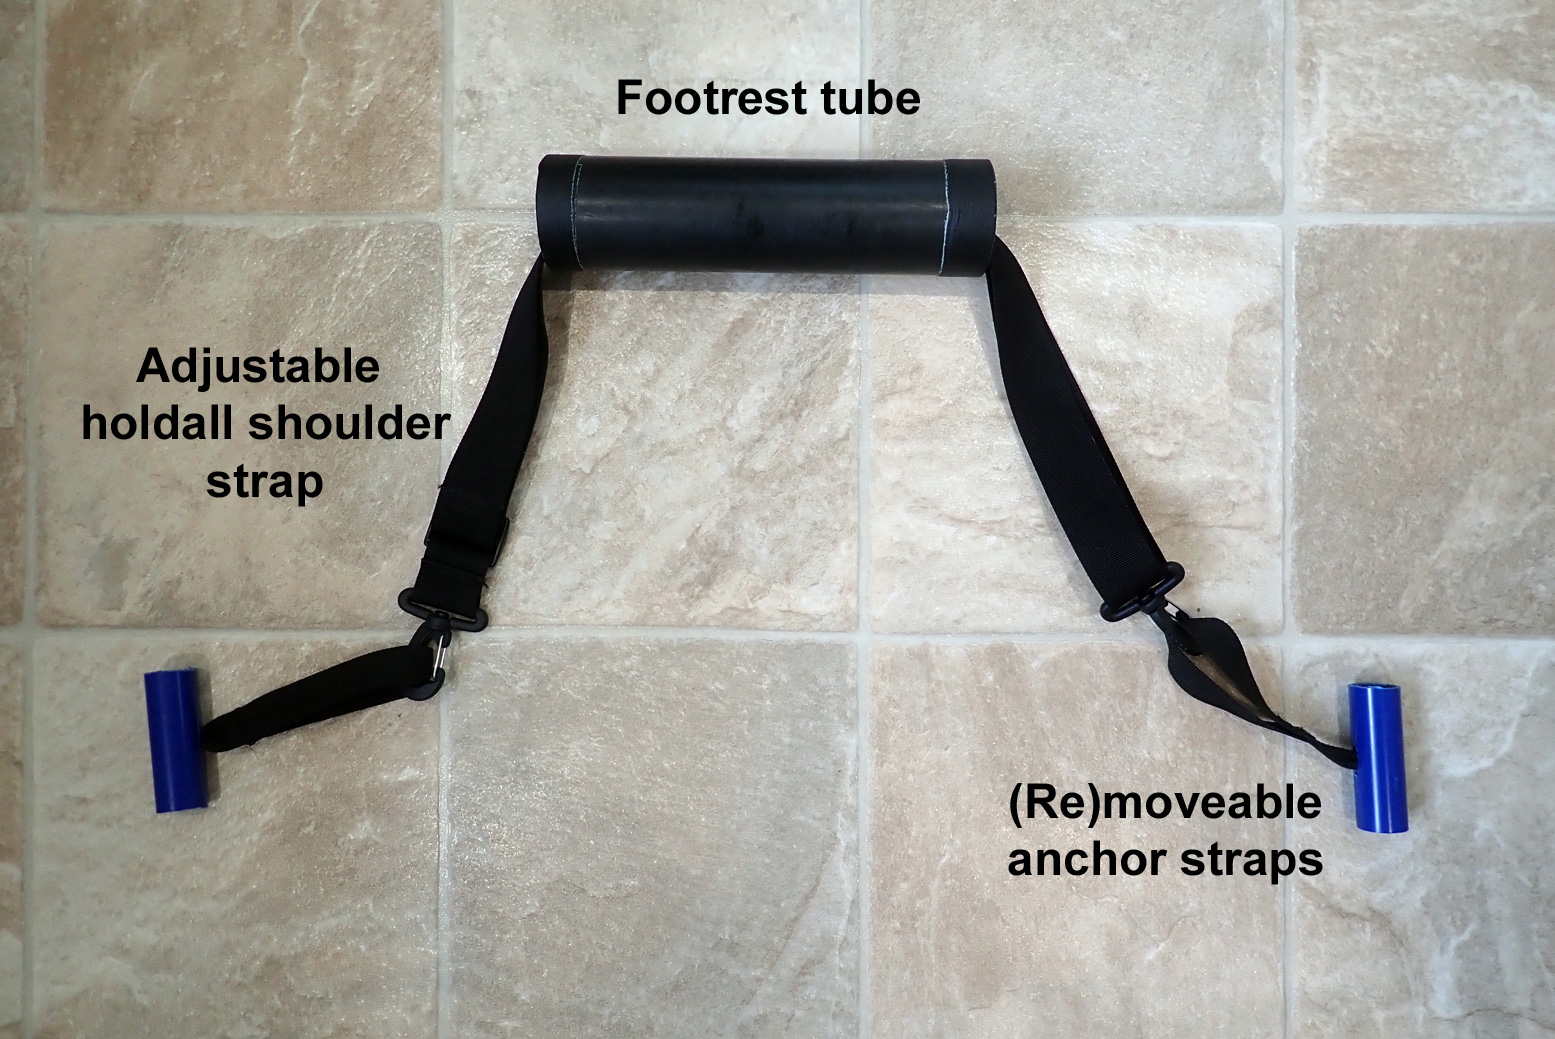
I got to try out the new system on the Wey and it worked great. The location is solid, so much so that one lazily heat-welded strap broke and I learned fast how essential a footrest is. In bodging something up to get me home, I noticed in fact that the D-rings you can see on the right, below, are more or less in the right position (for me) as long as the footrest tube strap is nearly taught. All the better: it’s one less thing to do on set up.
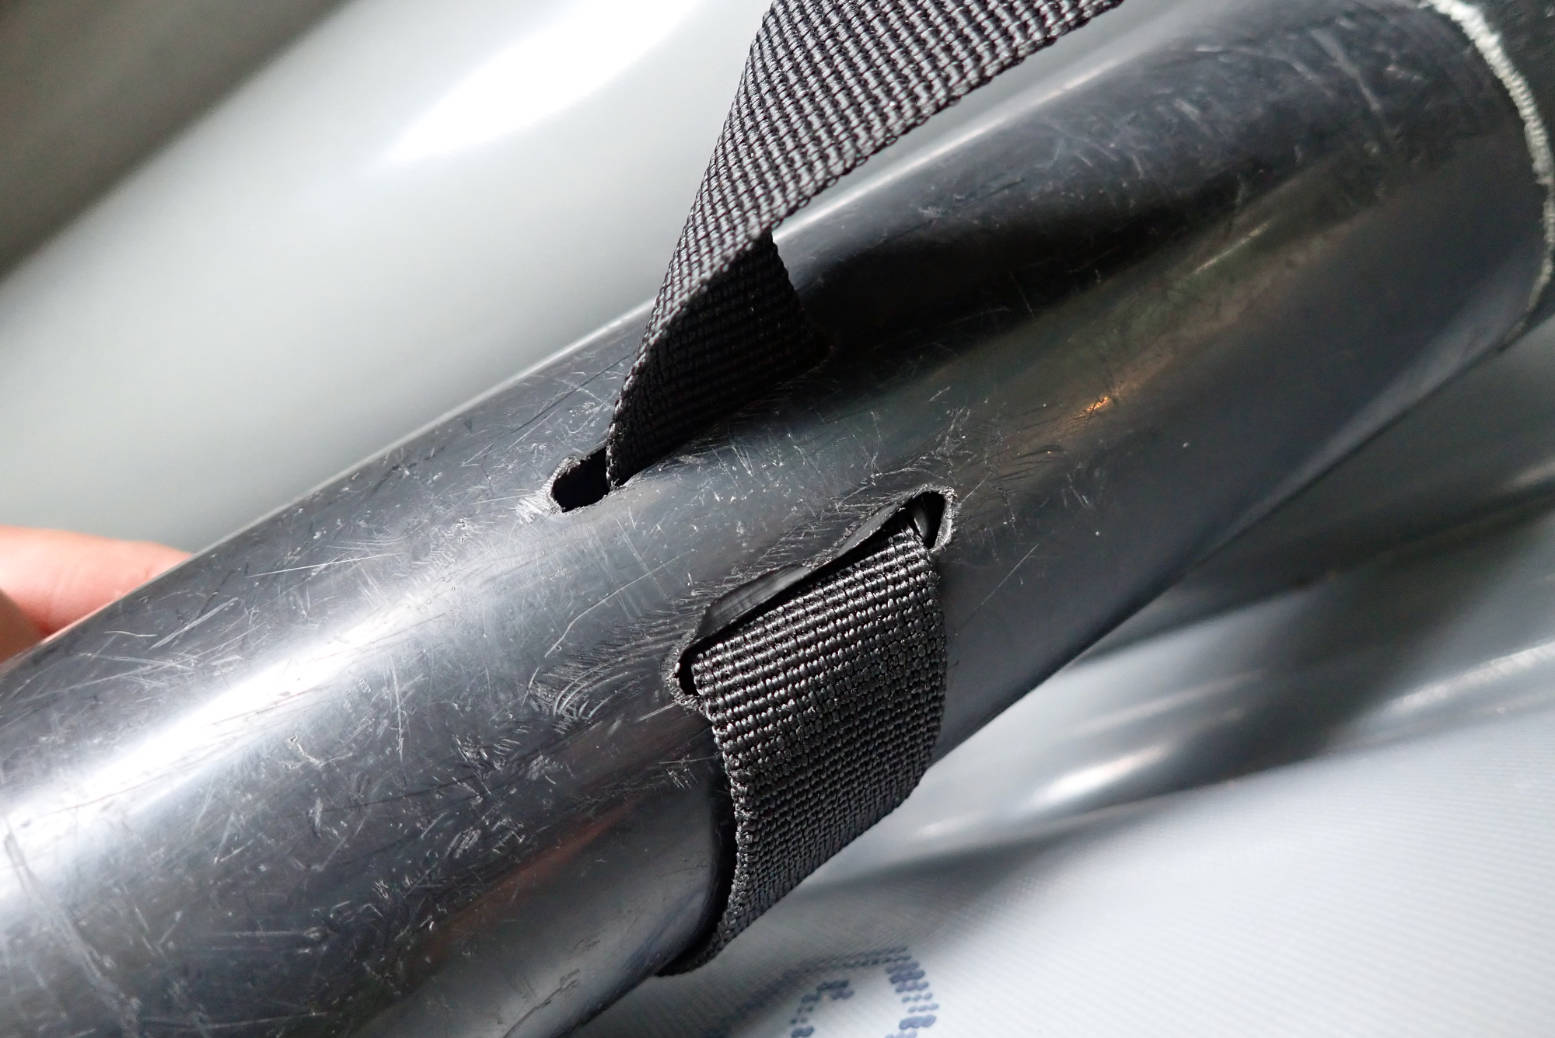
Then, while rigging up a rudder which worked off a pivoting footrest, a bit like bicycle handlebars work for steering, I realised the two existing tensioning or ‘ladder’ buckles fixed on the boat’s floor can be used to thread a strap, with the footrest locked off midway. The footrest needs to be fixed in position along the strap in, most simply by knotting the tape inside the tube, behind the slots. This makes a very quick and neat way to swivel the tube front or back them paddling double or switching paddlers. It’s possible the need to balance the tension on the centrally pivoting foot tube with your feet may not work so well when not steering a rudder.
I actually used two straps joined inside the tube.
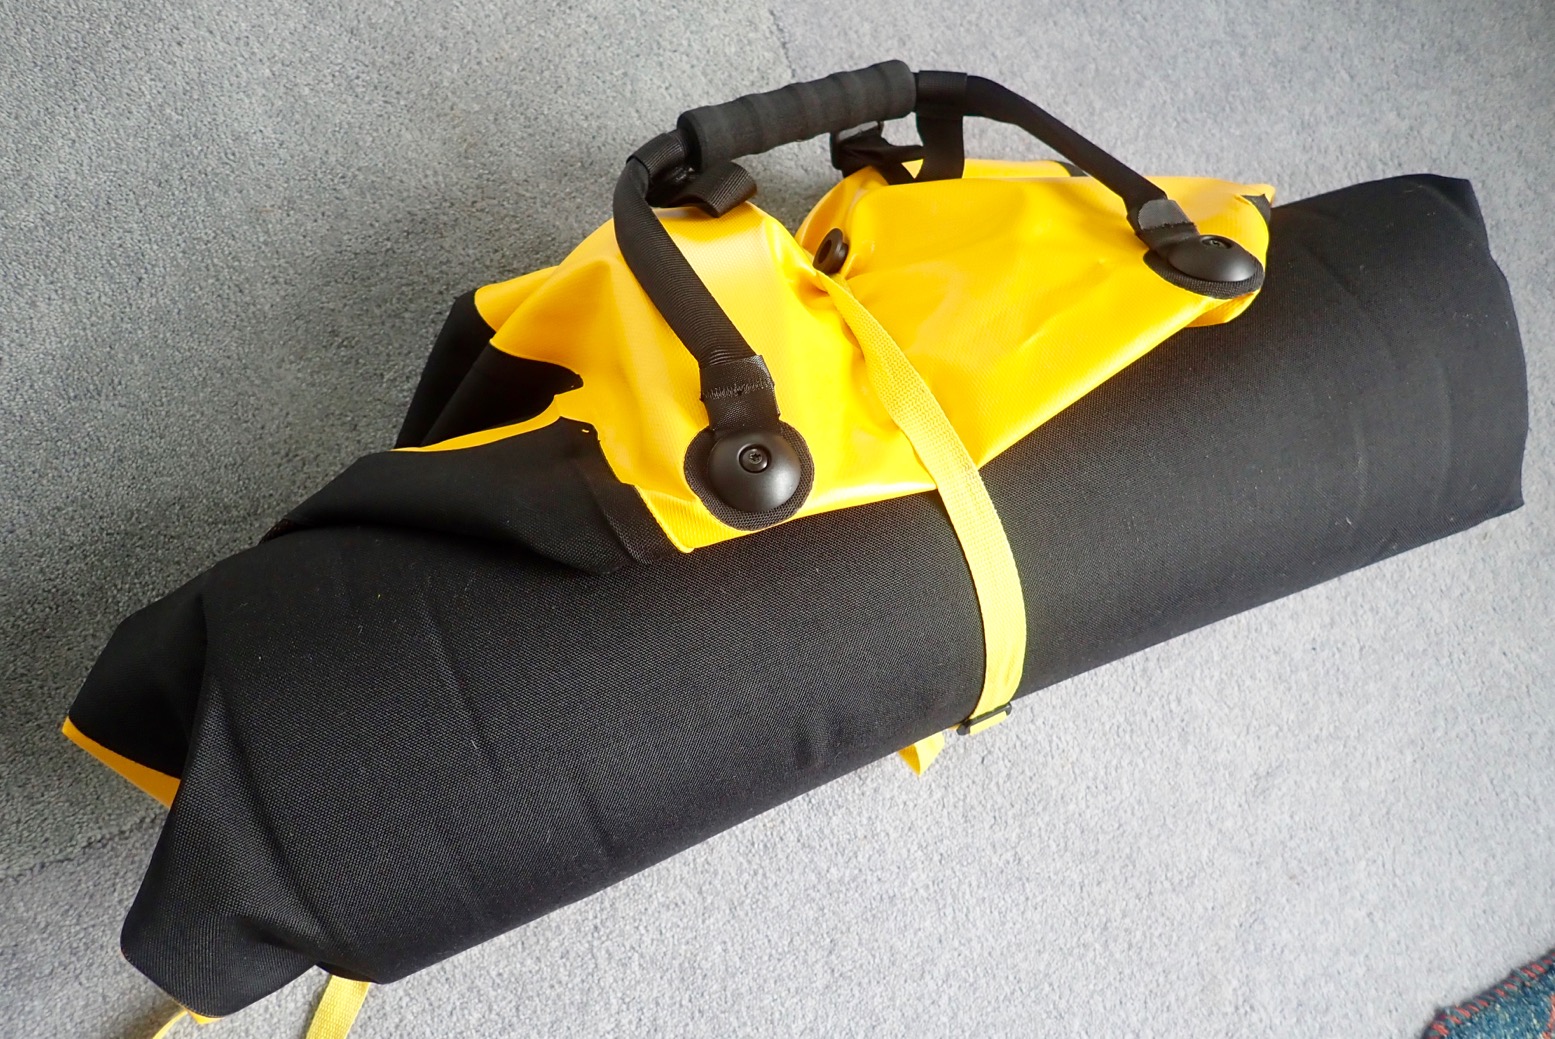
In a line: Huge IP67 submersible roll duffle/backpack with integrated ‘trolley’.
Cost: £180 (shops seen from £185, typically £230).
Weight: 3170g (verified).
Where tested: A mile’s walk to a river on road, track and path.
• Durable wheel design • Rolls up • Waterproof TiZip • Non-rigid design less prone to damage • Lockable main zip • Exterior mesh pocket • Detachable backpack harness • Rigid handle eliminates bobbing • Easy to remove wheels
• Costs a lot, but so do they all in this size • PVC feels a bit thin • Little mud clearance for wheels
What they say … the Duffle RS is made to withstand the rigours of the most adventurous of expeditions while at the same time offering a high degree of travel comfort. The bag’s heavy-duty wheel system is connected to the body of the bag in a waterproof manner. The 100 mm wheels and the rigid floor plate made of contoured aluminium offer increased floor clearance – ideal for both airport terminals and rugged outdoor terrain. And given the importance of lightweight luggage, especially when travelling by plane, the bag’s designers opted for an adjustable grip that guarantees plenty of leg clearance and comfortable towing instead of a heavy telescopic towing frame. The foam padding at the base of the bag offers enhanced stability when the bag is fully loaded and the watertight zipper that runs across the whole length of the bag gives you quick access to your gear. The zipper can also be locked using the integrated wire loop and a small cable lock (not included).
Review
In need of a replacement for NZ, I chopped down a cheap folding trolley and lashed it to my trusty 96-litre UDB sausage bag (left). It was unstable but worked pretty well and all weighed in at just 2.7kg. With airline baggage limits at 22kg or so, luggage weight becomes important, but luggage must also be robust enough to withstand rough treatment, not least by baggage-weary baggage handlers. This bodge was a valiant attempt at not splashing out on Ortlieb’s RS140 Duffle which I’s been eyeing up for months and fitted my needs: a stable and submersible roll bag with good clearance and integrated wheels. A few months later an unused, RS popped up on eBay about 20% cheaper than the shops and, like the feeble consumer I am, I fell for it. More gear, sigh…
Orlieb does two types of wheeled duffles: the RG (‘riGid’) series in 34-, 60 and 85 litres with a rigid floorplate or frame supporting an extendable aluminium handle (right), like regular wheeled luggage. And the more unusual frame-free ‘roll-able’ RS (‘Saggy’) series in 85, 100 and 140 litres.
Wheeled duffles are nothing new: all the major outdoor outfitters do models up to 140 litres. But like the Ortleib RGs, they all use rigid frames for the telescoping handles which sees weights exceed 5 kilos. None claim any level of IP-rated submergibility and few have a backpack harness which, at huge capacities, is more realistic than a shoulder or holdall straps.
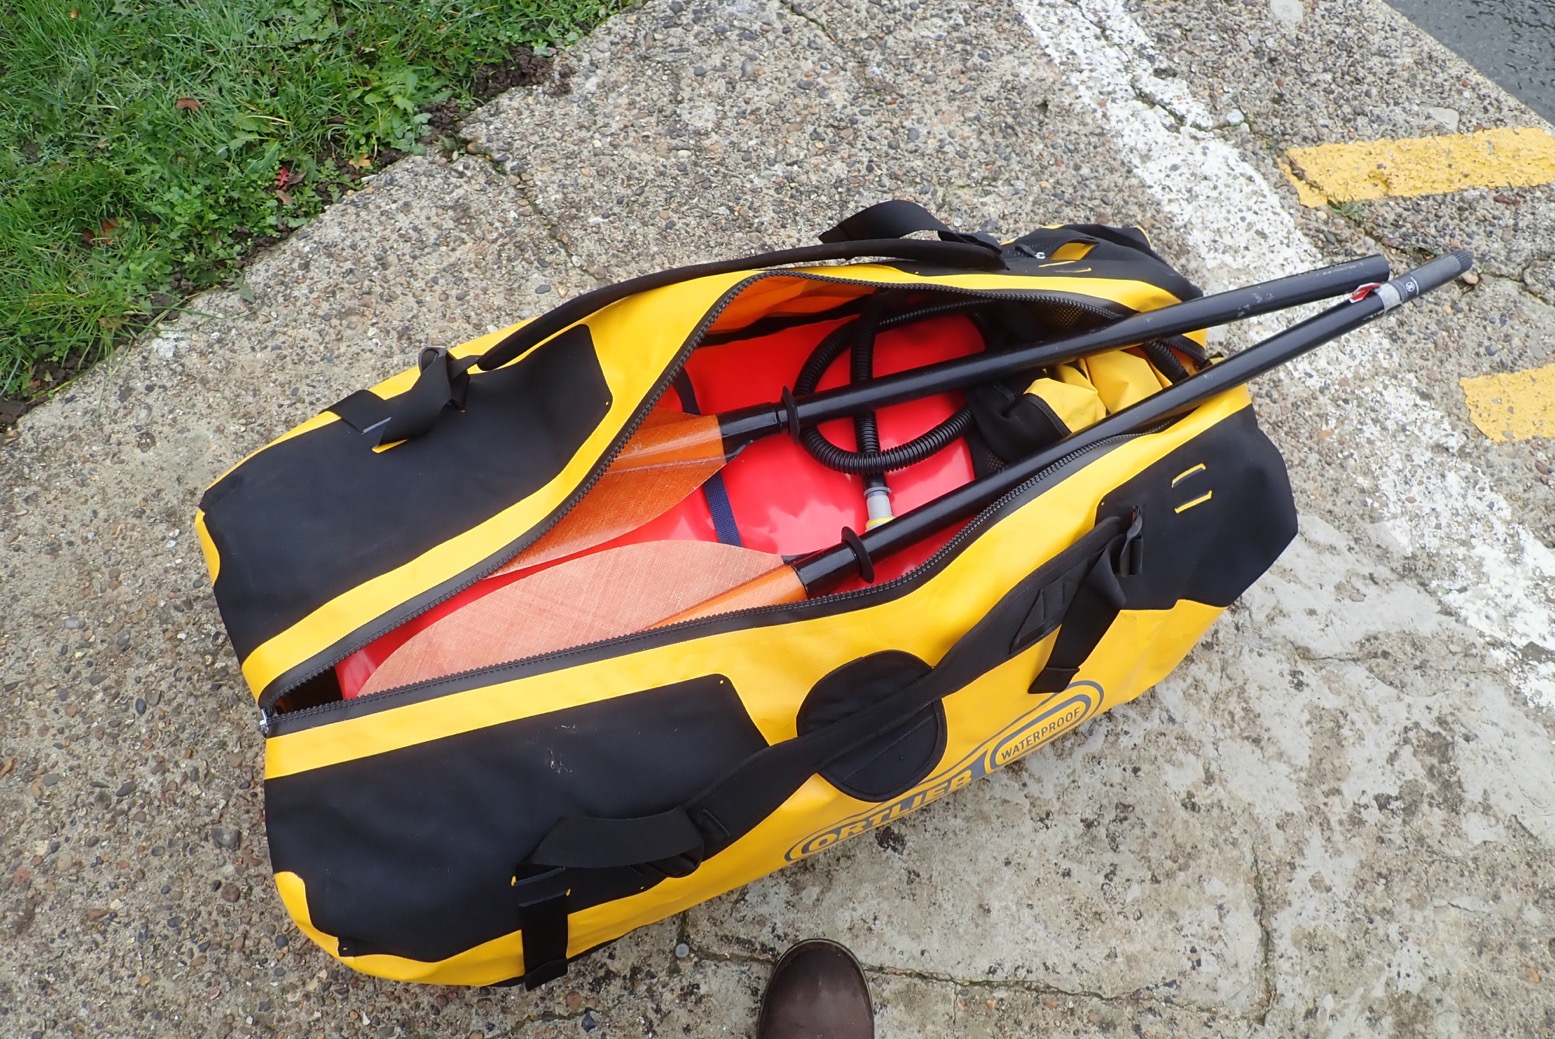
In a kayak and especially a packraft, a rigid bag is a nuisance. Only the Ortlieb RS can be rolled up (below left) and only the 140 is big enough to easily swallow a big IK and gear (below right).
rolls up…… fills up
With wheeled bags intended for rugged terrain, large 100mm ø wheels roll over irregularities better and can give better clearance. What’s important is a solid mounting as the bearings or axles get a hammering when loaded up on rough ground. The RS’s wheels have a smooth solid feel and have replaceable bearings and the solid alloy plate – effectively part of the axle – also takes the knocks from stones. The wheels are also easily removable with a 3mm hex key. Handy if a stone gets jammed in there or mud clogs then up
It’s the full-length TiZip which makes this bag special; IP67 rated which will do me. Because it’s long, getting my Seawave in there was easy and left 30 litres for camping and paddling clobber. If you just want a day transporter for a solo IK, the RS 100 may do you. When closed, the zip end hooks on to a stud and you can slip a padlock under an embedded cable to lock it in place (above right). On the water, the idea is that, once you’ve deployed the boat, the bag carries the rest of your camping stuff in a more compressed form, plus with a guarantee that it won’t get wet inside. This makes the RS a truly do-it-all big-hauler on land and sea.
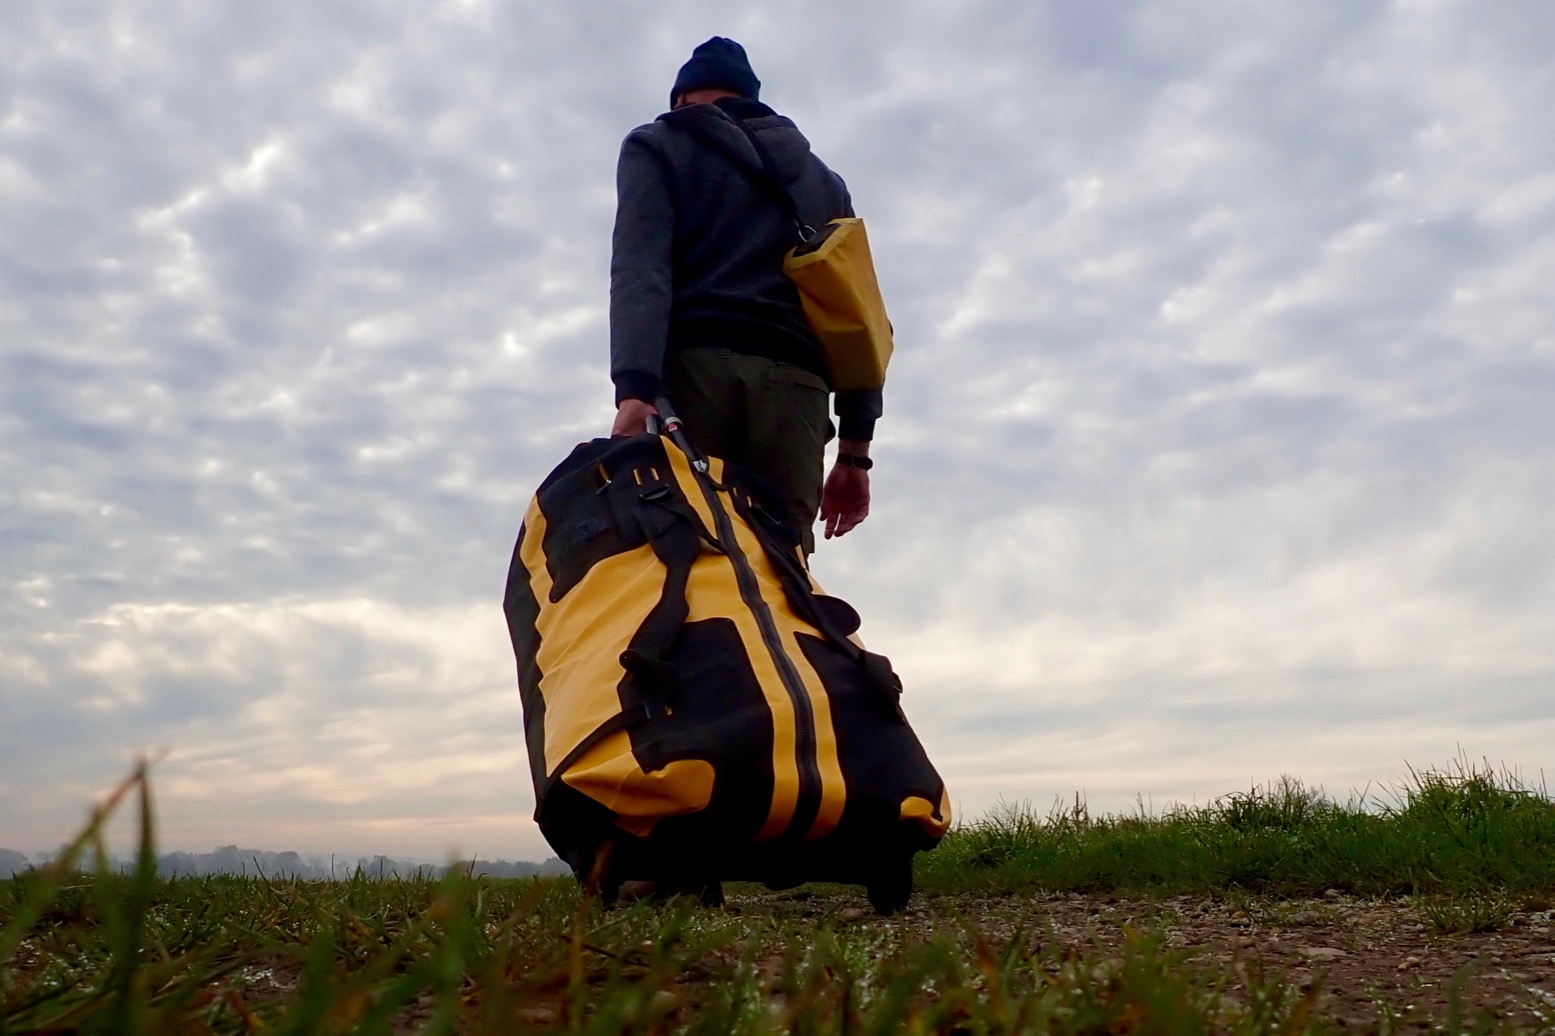
At the other end the two-part handle has a rigid bar and an adjustable strap for length and I found the bag rolled along better than my UDB lash-up. It didn’t bob because of the rigid handle, and it didn’t catch my walking legs either. Finally, a comfy roll bag.
Inside, a 20mm-thick foam base is glued in to protect the floor from sharp impacts; the floor gets an additional layer of Cordura on the outside too. And the compression straps incorporate a zipped document pocket. The backpack straps are thin and basic – good for stairs but not really fit for the north face of the Matterhorn. But the whole frameless soft bag sags nicely across the back and is surprisingly comfortable at 20kg all up. You’ll want to carry it on paths as below as the mud soon clogs up the narrow gap around the wheels.
The backpack straps join up with velcro to make a carry handle and there’s another handy grab handle at the wheeled end. The backpack straps are removable so could easily be replaced with something cushier, but it’s a big load to carry on the shoulders for long. Four bag-top tabs (not really ‘daisy chains‘) allow you to lash on yet more gear, like paddles. There’s also a small zipped mesh pocket (left). The PVC is the same thickness as regular Ortlieb roll bags. For something able to carry such heavy loads and getting knocked about in and out of airports, I’d have preferred something more durable. That would of course add weight, and one good thing with this stuff is that it’s dead easy to repair, either with tape or a dab of Aquasure.
My 100-L Gumotex Seawave backpack has been rolled up from new and is stashed for when the boat gets sold. The RS is now the Seawave’s spacious travel bag. It rolls along just as well as you’d expect: nice and stable (unlike my UDB trolley set up), has good clearance and protection, (although the Cordura picks up the dirt and mud) and sits surprisingly well on the back for a frameless backpack. My 4-part Manta Ray paddle fits right in, along with a foam PFD, barrel pump and all the other day-out knick-knacks. Full camping gear with Seawave may require an extra bag.
Adding an oral inflation/suction valve
Some reviewers say the RS is saggy to roll when not packed full. I suppose that may be true. But because the RS should be airtight, fully inflated or vacuum sealed, it ought to hold that form and be less of a wheeled sack. Yes you can squish it down and do up the zip, quick. Or you can fit an oral inflation valve protected inside the exterior mesh pocket (left). They’re hard to find online; try here or here. Now I can suck the bag down, much like I would a boat using the pump in reverse to get it compact. Do it to RS and the bag becomes ‘vacuum sealed’ and much stiffer. There’s less chance of the belly dragging on rough ground and you’d like to think less chance of snags from loose folds. Fully inflating would not be quite as effective as I find the bag cab be into an annoying bob as you walk because the air can compress. Sucked down it’s as stiff as a board. Another good reason for a valve on a bag like this that you can blow it right up as a buoyancy aid to cross a narrow but deep river, or to get ashore after a razorbill puffin bites your boat. Either way, for wheeling rigidity or emergency buoyancy, an oral inflation valve is handy when using such a bag for paddling.
Sealed bags on planes Whenever I checked in my UDB for a flight I always opened the zip a bit so it wouldn’t burst or strain the seams in the decompressed hold. Turns out I was over-thinking it. Cargo holds are pressurised at the same level as the rest of the craft; a tubular fuselage shape (right) requires it to spread stresses evenly. Yes, it is reduced to 20% less than sea level pressure. That’s why some containers occasionally leak a little,
Though not totally convinced by the boat just because it was new, I planned to buy a Gumotex Rush 2 in the early summer of 2020. I sold my old Seawave easily, but by the time I dithered over coughing up a grand, UK lockdown discounts had ended. Soon availability of Rushs dried right up, along with so many other IKs in 2020, which also saw prices shoot up.
Eventually it transpired the Rush wouldn’t be back before 2021 (was there some flaw with the new design?). Needing a boat for the book cover, with help from a Czech chum, I bought a second-grade Seawave direct from Gumotex, saving 15% on the CZ price (Gumo won’t sell these specials outside CZ). This was just before the price went up to nearly €1300. As predicted, Gumotex prices have risen across the board; the Rush 2 is now nearly €2000 and demand has not surprisingly collapsed.
It’ll never ever be this flat and compact again…
“Defects … are only of a visual nature (abrasions, patches, larger amounts of glue, stamp imprint, etc.) and do not affect the driving characteristics and life of the boat.“
Rather unnervingly, the exact nature of each boat’s damage is not specified or identified by Gumotex. It’s the luck of the draw. On unpacking the new boat it took me a while to locate a barely visible patch on the side (left). It may not even be a hole (hard to believe how that could happen in the factory), more likely a scratch or a nick down to the scrim.
Anyway, I’m happy with my Seawave, one boat I don’t mind owning again until something better comes along. The only difference I can see between my old one are grommet/ports for the rudder kit on the stern deck. The factory fresh fabric also feels oddly tacky, like TPU, something I’m sure will go away.
The seats and footrests are the same old over-weight rubbish. Gumotex aren’t making any innovations here. Just as with my first Seawave, before the boat got wet the seats went onto eBay for fifty quid, bringing the price down a bit. I refitted my proven packraft seatbase/SoT backrest idea. More on seats here.
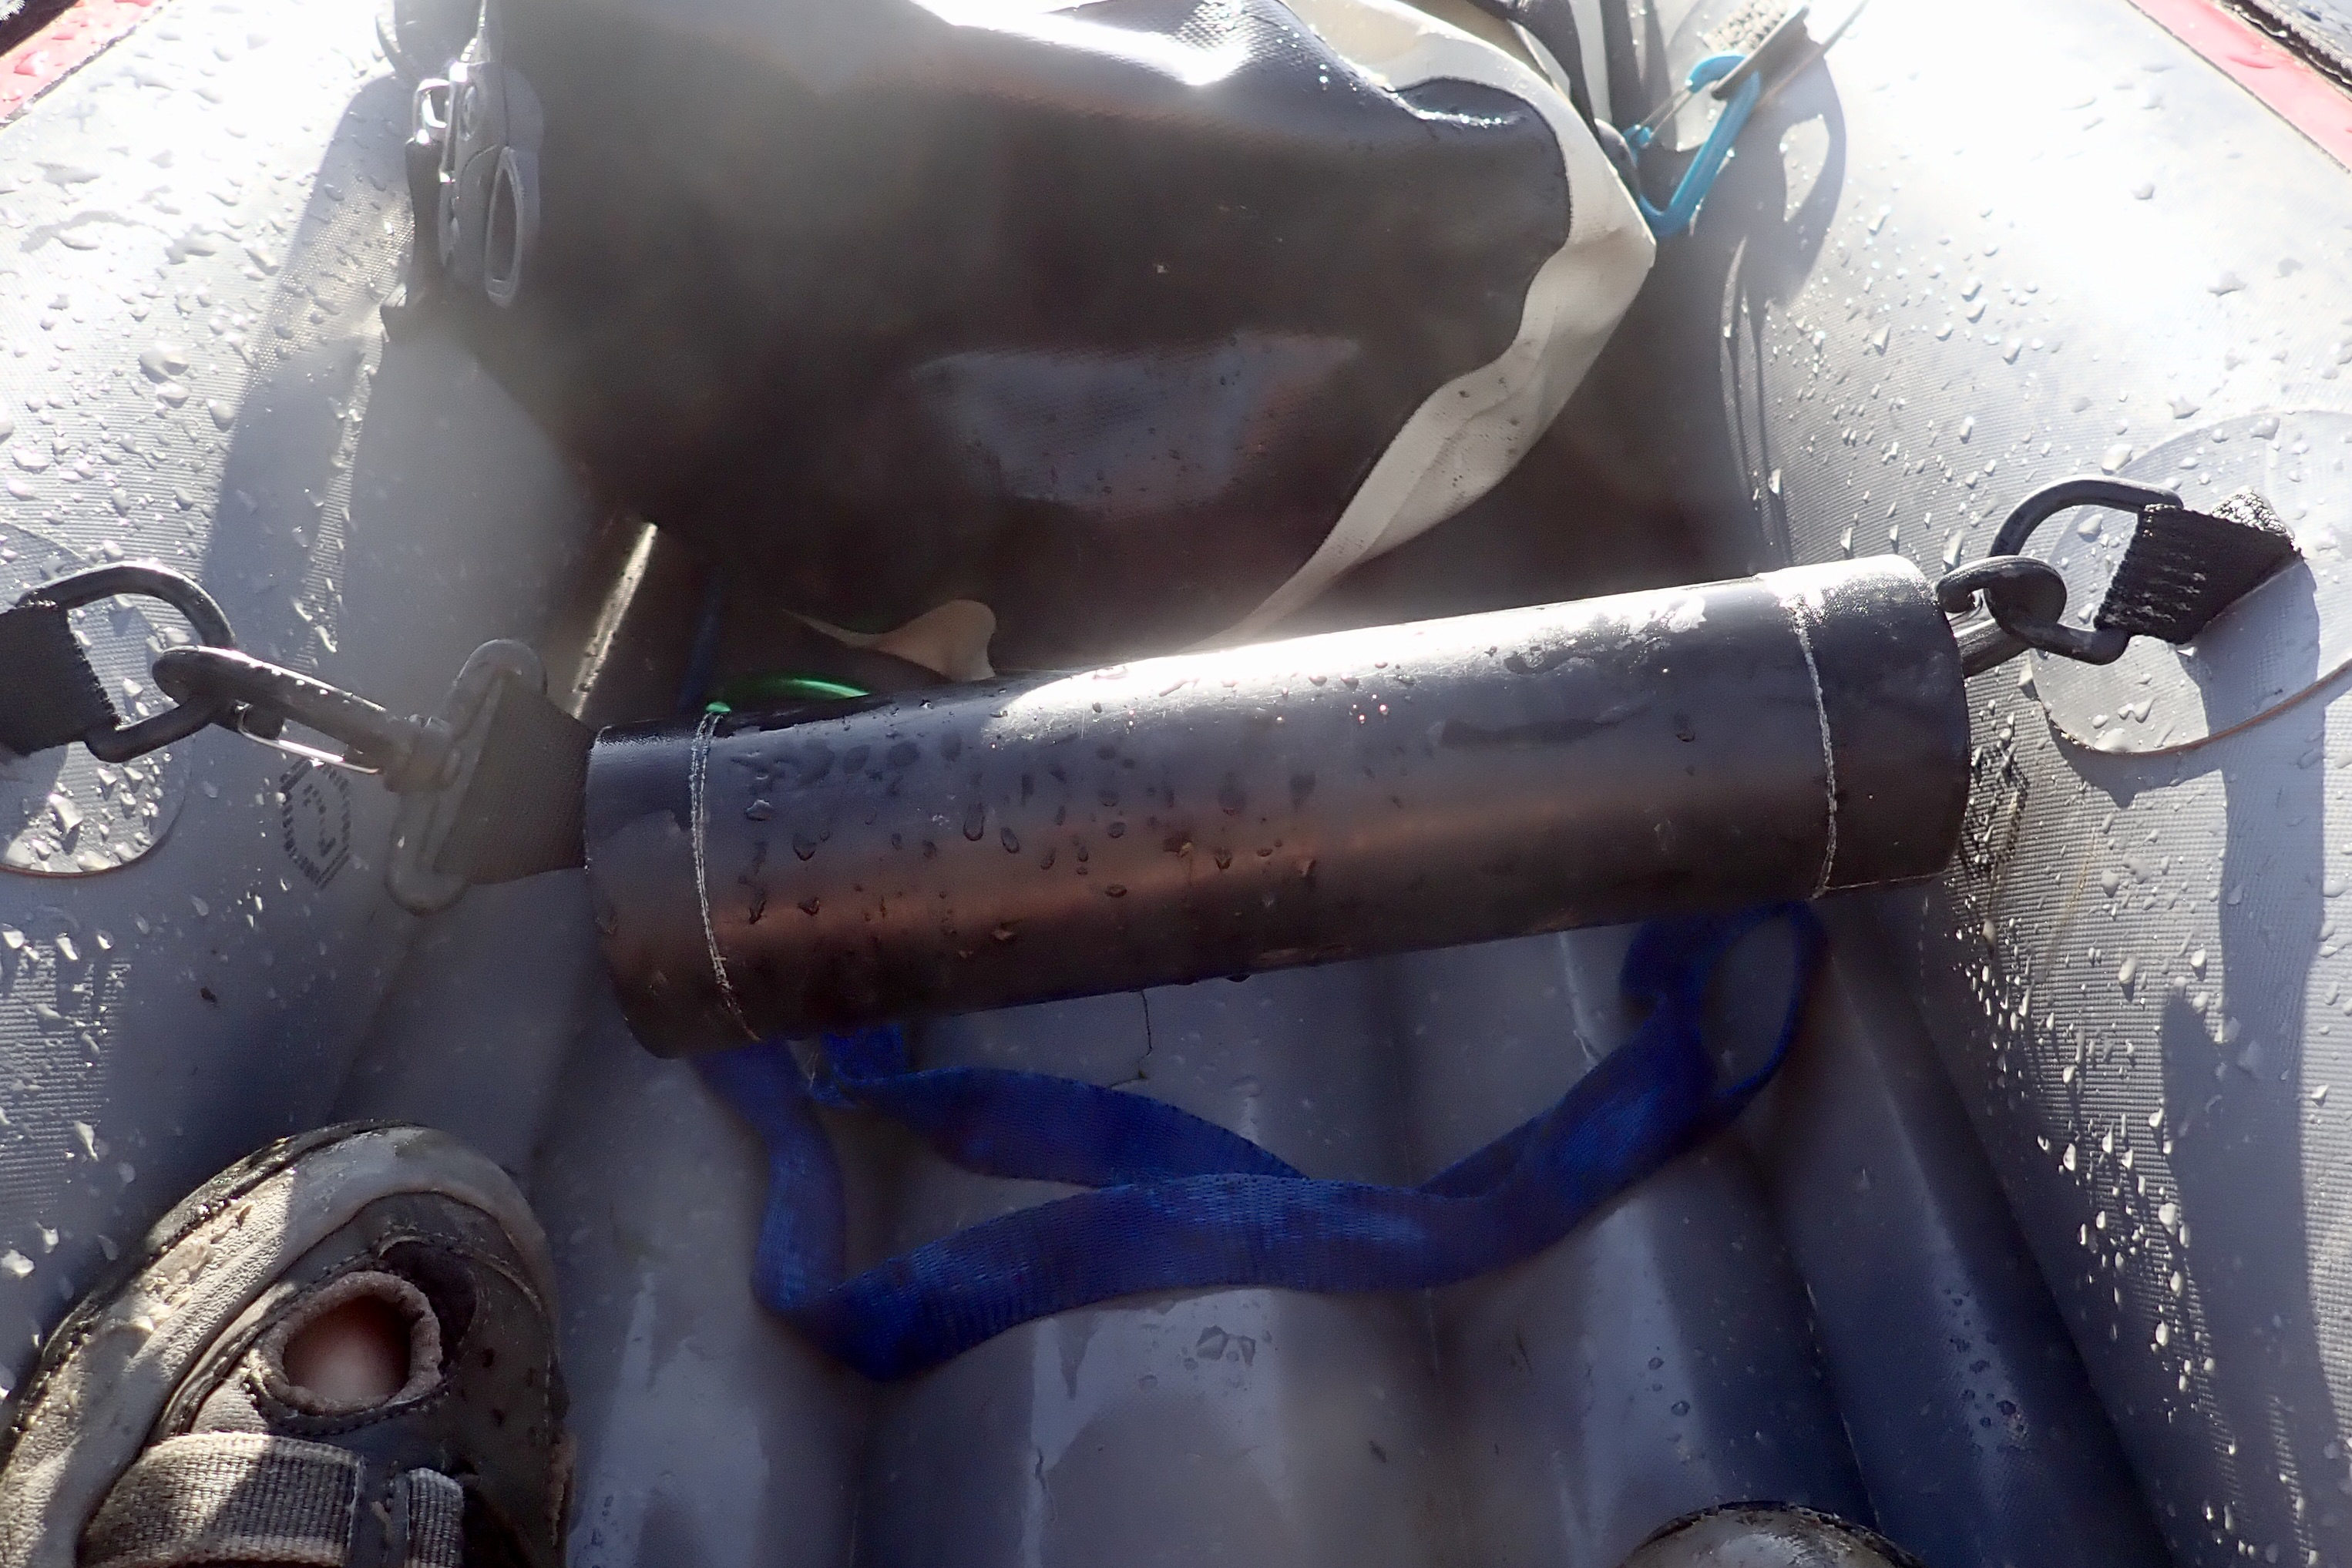
One useless footrest cushion got chopped down into spare Nitrilon patches and oral valves. For a non-critical low-psi item, inside it looks amazingly well made. I plan to re-fit my footrest drainpipe system, and have a great new idea about how to fit and adjust it. More about that soon.
Shrunk down in my Ortlieb RS140
I took the chance to re-measure the Seawave. Yes, it really is just 30” / 76cmwide and yet looks huge in the corridor – the only place in our flat it can be inflated. And it weighs 19kg with everything in the supplied bag, Ditch the seats (965g x 2) and footrests (411g for both), add a single SoT/packraft seat and a mooring line, and the 4.5m Seawave is a genuine 16kg on the water. Pretty darn good for a 4.5-m boat. And it’s compact too. Now I’ve learned how to vacuum-shrink a boat (you need a bayonet nozzle with valve-opening pin) and have added an oral valve to shrink down my Ortleib RS140 roller bag too (above right), the boat takes up less room than ever.
An interesting thing was pointed out to me about the Seawave and other tubed Gumboats: they are effectively made from just two big sheets of Nitrilon (plus deck pieces): the red outer/lower and the grey inner/upper (above). They touch at the edges of the floor and join in a flat seam on top of the sidetubes. Simplicity, I like that.
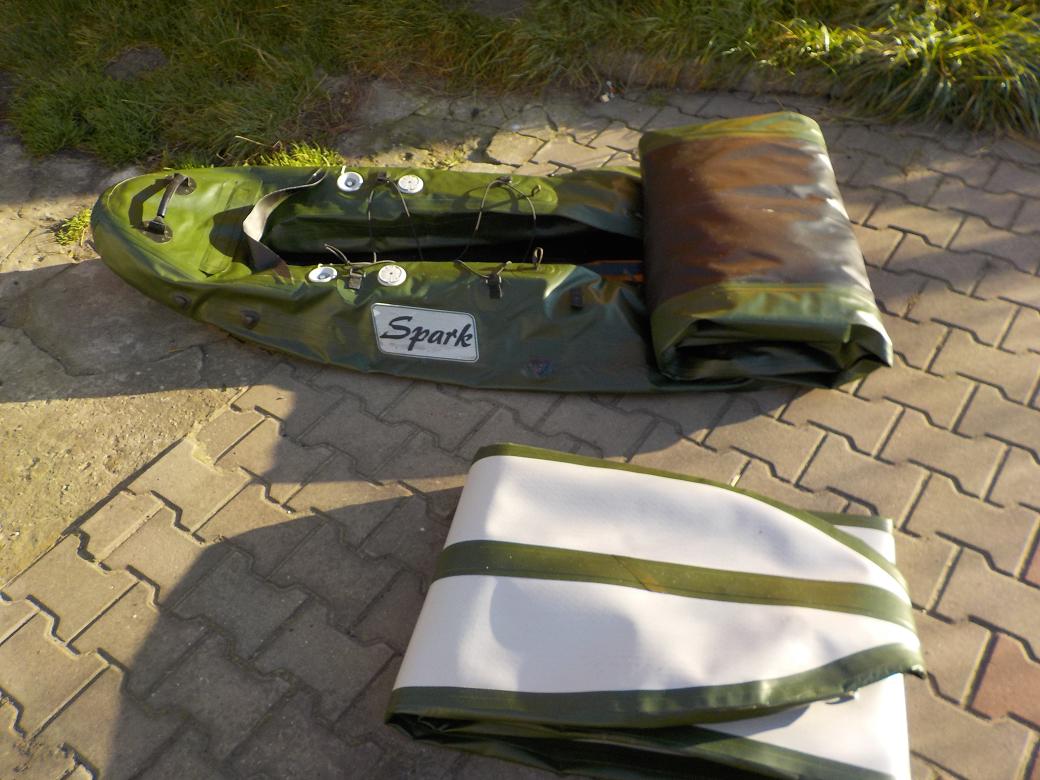
Zelgear is a Ukrainian outfit producing PVC rafts and packrafts, folding kayaks (under the Neris brand) and other outdoor gear since 1999, as well as some innovative IKs. Their current tubeless PVC IK line up includes the drop-stitch floor (D-SF) Alpha-Z II and Spark in three sizes: 370, 450 and 520cm. Zelgear are sold in Russia, Poland, Germany, the US and maybe elsewhere. As with some other importers, the ZelgearUK website currently only features the discontinued Alpha and Needle (‘Igla’) models. Gumotex Solar owner Marcin S from Poland pointed me to his detailed review of his Spark 450 IK which has led to a closer look at this brand.
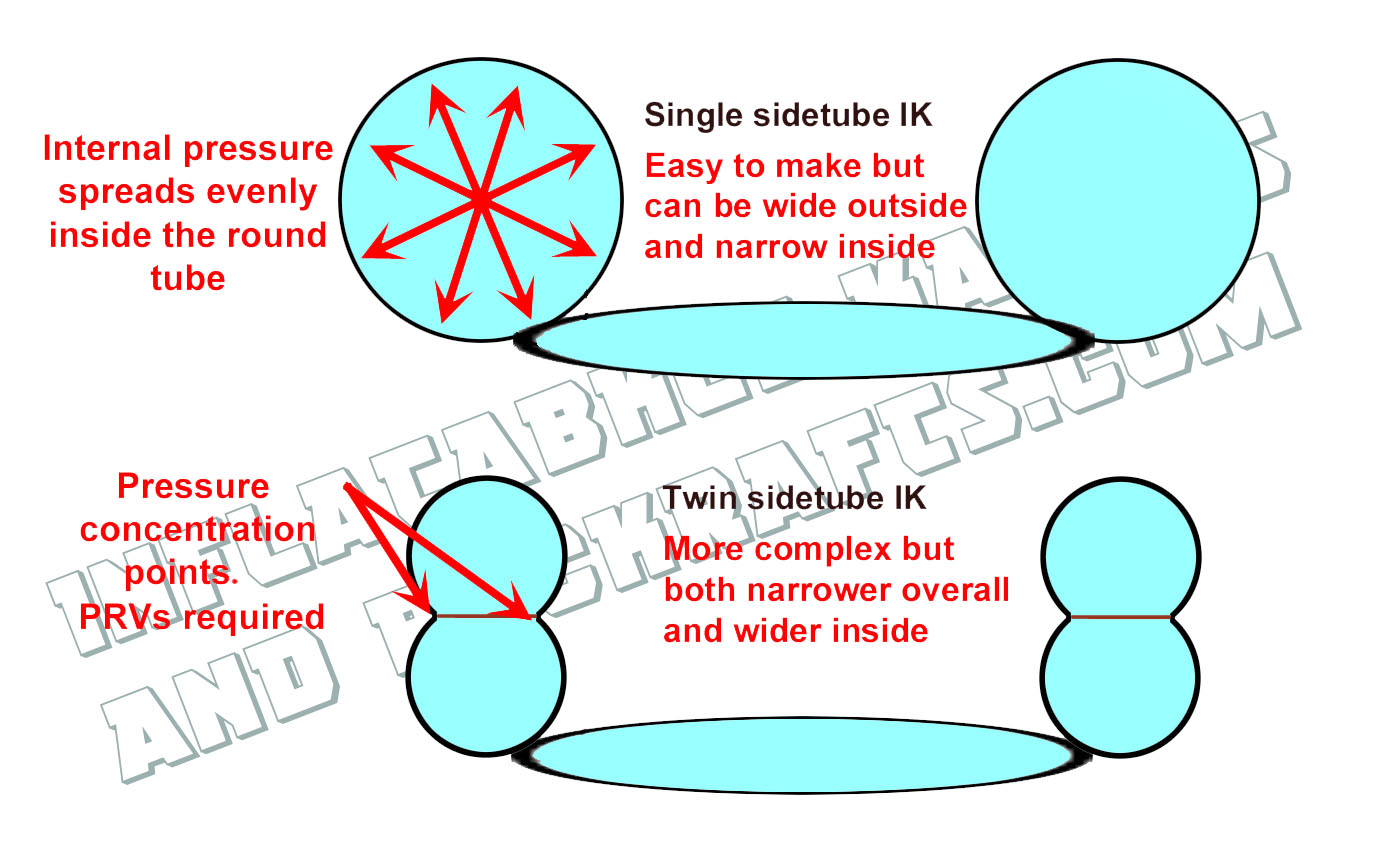
The Alpha-Z and Spark look similar but the Alpha-Z II has round sidetubes; the pricier and heavier Spark has twin sidetubes, like my old Incept, the discontinued Gumotex Seaker or of course the Grabner Holidays based on the old Semperit. Stacked sidetubes provide more space inside – always useful with tubed IKs – as well as less overall width, good for speed at a slight cost to stability. In 450 and 370 sizes, the Spark is just 83cm wide vs 87 in the Alpha-Z II (according to online specs). That’s still 7cm more than my single-sidetube Seawave so there sure is lots of room in there: 43cm width inside – same as a Holiday 2 and 10cm more than a Seawave. That’s a length-width ratio of 5.42. See the full comparison table here.
Twin sidetubes are more complicated to make as they need an internal I-beam to form the tall but narrow ‘8’ profile. Although Grabner manage without, I-beams (used in non drop-stitch IK floors) benefit from a pressure release valves to protect the I-beams from rupturing if the tubes get too hot and pressures climb. Round tubes spread pressure loads evenly so can withstand over-pressure. That’s why pressurised gas cylinders are cigar-shape. But in fact the Alpha gets side PRVs too. PRVs make over-pressure worries a thing of the past, whatever your sidetubes.
It’s also possible that at the same pressure, stacked sidetubes flex less longitudinally than a round tube, but I doubt there’s much in it. Stiffness is primarily down to psi, although PVC fabric is innately more stiff than synthetic rubbers. Good on the water; less good for folding up when cold. PVC is Heytex or Valmex from Germany (or German branded, at least). PVC is said to be less durable and UV resistant than rubber in the very long term. The plasticisers evaporate (that distinctive PVC smell) and the fabric hardens. As Marcin observes at the end of his post: Spark in Nitrilon would be less bulky but costlier.
The unusual DS AirBoard floor
You’ll see from the video still and above that Zelgear uses an unusual and removable DS floor. AirBoard or AirDeck, they call it, with the unusual ‘horns’ or spars poking out to make sharply formed prows to the stern and bow – another failing with tubed IKs. It looks like the floor’s flat and wide section is DS, the neck may be just an empty round tube and the end pieces have a couple of I-beams in them.
This is a much more complex assembly than a regular iSUP-like DS floor panel, but the benefits are clear: a hardshell like prow without resorting to plastic mouldings or worse still, alloy ‘backbones’. Clever. The sidetubes run a very firm 0.3bar (4.3psi) and the floor is rated up to 0.6 bar (8.7psi) making a very stiff boat. (Other sources say 0.25 and 0.5).
In the video the chappy mentions opening the PRVs on inflation, and the online specs also say leave them open during use. Why would you want to close PRVs? Or does the cap push open once pressure climbs? Who knows.
Marcin mentions his Spark is a lot quicker than his old Solar. Not hard to believe when you consider the Solar is just a long Sunny, still running just 2.9psi. But the difference is quite dramatic, and so is the effect of using thigh straps on a firm D-S floor: all the energy gets transferred to better propulsion or less effort.
The Spark floor has tabs for mounting a footrest, but only when sat in the rear. As Marcin observes, another set is needed for solo paddling when sat in the middle. But that would be quite easy to make and glue on. Talking of which, I came across this interesting footrest idea (left), possibly from a discontinued Igla. Similar to the Gumotex skeg mount, that could also be dead easy to make for any IK, and you wouldn’t have to use shin-gashing bent and riveted alloy either.
Other features with the Spark include loads of D-rings, a velcro paddle holder; seats with an inflatable base and foam backrest; thigh straps!; a generic rudder mount and fittings plus Seawave-like velcro to fit an optional deck (left). There’s no skeg (an optional order or easy glue-on) but Marcin says the boat tracks very well thanks to the prow forms.
A fly in the ointment is the boat’s weight at 23kg in the bag where my similarly long and wide Nitrilon Seawave is 19kg. That’s PVC for you, but see this. And the PVC becomes hugely bulky once rolled up. Look at this picture of Marcin’s massive bagged-up Spark alongside his old Solar.
A Spark 450 is listed at 24,000 grn from Kiev, which is under £700. It’s hard to find Spark prices elsewhere, everyone’s still trying to clear out the old models.
I must say I’m quite impressed with the Zelgear D-SF IKs: stiff hulls, thigh straps included and tubeless, too. In a vast sea of Asian-made Shell & Bladder bloats, only Sea Eagle and the Intex K2 Excursion Proare tubeless PVC. I still think I’d rather run a D-SF IK than a full drop-stitch floating box. But I’ve yet to try either. For more on the Spark, including pictures,, read Marcin’s kayaking blog.
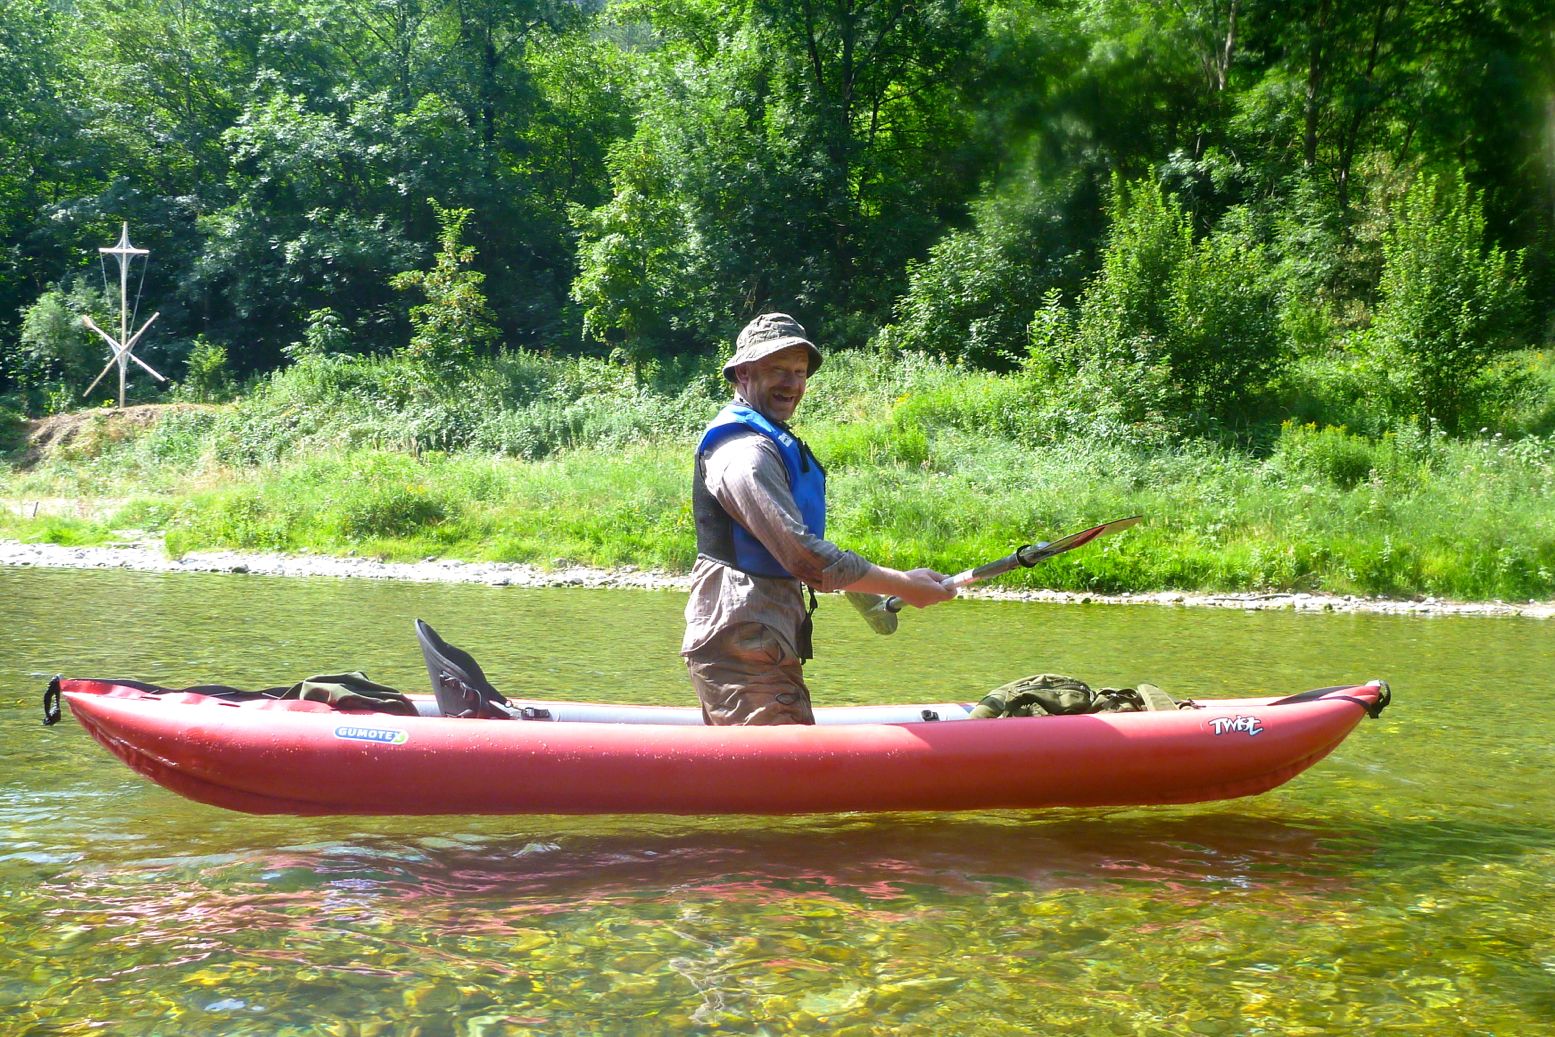
As mate was getting out of a current-model full-NitrilonTwist 2 the part of the boat under a jetty rose up into the sharp end of a bolt securing a mooring ring.
KABOOM!!
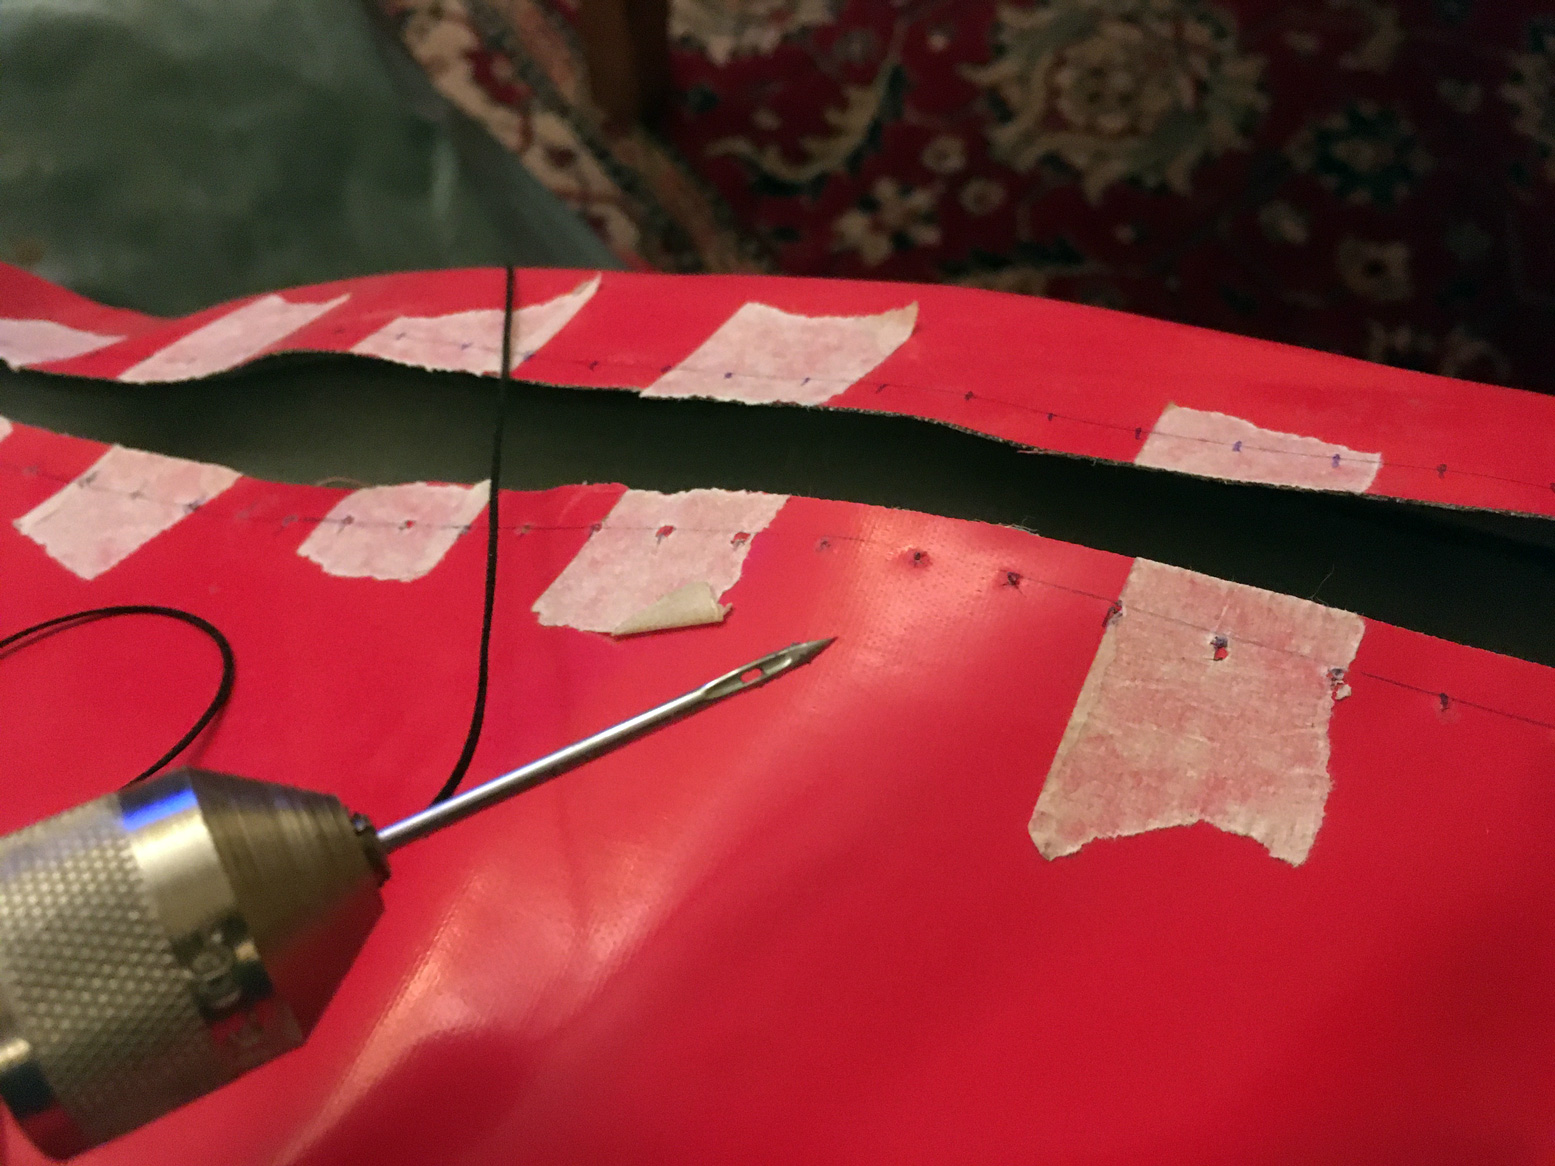
.. a two-and-a-half foot rip tore across the top of the hull in both directions with a puff of South Moravian talc. As it’s a largely linear rip in an accessible location, making the repair was fairly straightforward: sew, then patch.
[FYI: I know of two other Twists which have suffered similar long rips: here and here. But not any other Gumotex model].
Because the coated core of the red Nitrilon fabric is a woven mat, sewing is an effective way of holding the two sides of the rip together to reduce the tension on the eventual glued-on patch once the boat is inflated. You need an awl spike to pre-poke each hole for the thick polyester thread. This fabric is hard to cut with sharp scissors, let alone thread with a needle.
Rip neatly sewed up with a special cobbler’s reverse herring backflip cross-stitch. One thing that got forgotten was sanding then cleaning the surfaces alongside the rift before sewing began.
Completed repair. This would work on a PVC IK too, but most of them are shell and bladder or drop-stitch. PVC is a bit harder to glue well.
I’ve often thought of doing a really long river in France, but once you get out of the hills I get the feeling they can drag on a bit, even if it is France. It didn’t stop these two guys; 5 weeks from Goudet near Le Puy (near the Allier) to St Nazaire bridge just under Brittany. First couple of days they had to wrestle some pretty gnarly rapids in their 4.1-metre IKs. Never mind ‘dress for the swim’ – ‘pack for the capsize’ too! Interestingly, one suffered a flat on the Framura’s relatively pointed back corner, presumably from all that rock scraping. I’m amazed those rudders survived, too. Even with its fixed deck, sometimes I fancy a Framura. At just 75cm wide, it was the new Seaker but half the weight. But then I see how they flex, being long but only regular 2.9psi Gumboats, not 3.6psi like the Seawave. It’s quite a difference. And those are twin-tube sides, so jacking up the psi there, then fitting PRVs, as I did to my Seawave, would not be such a good idea (the I-beam in the side tube could rupture).
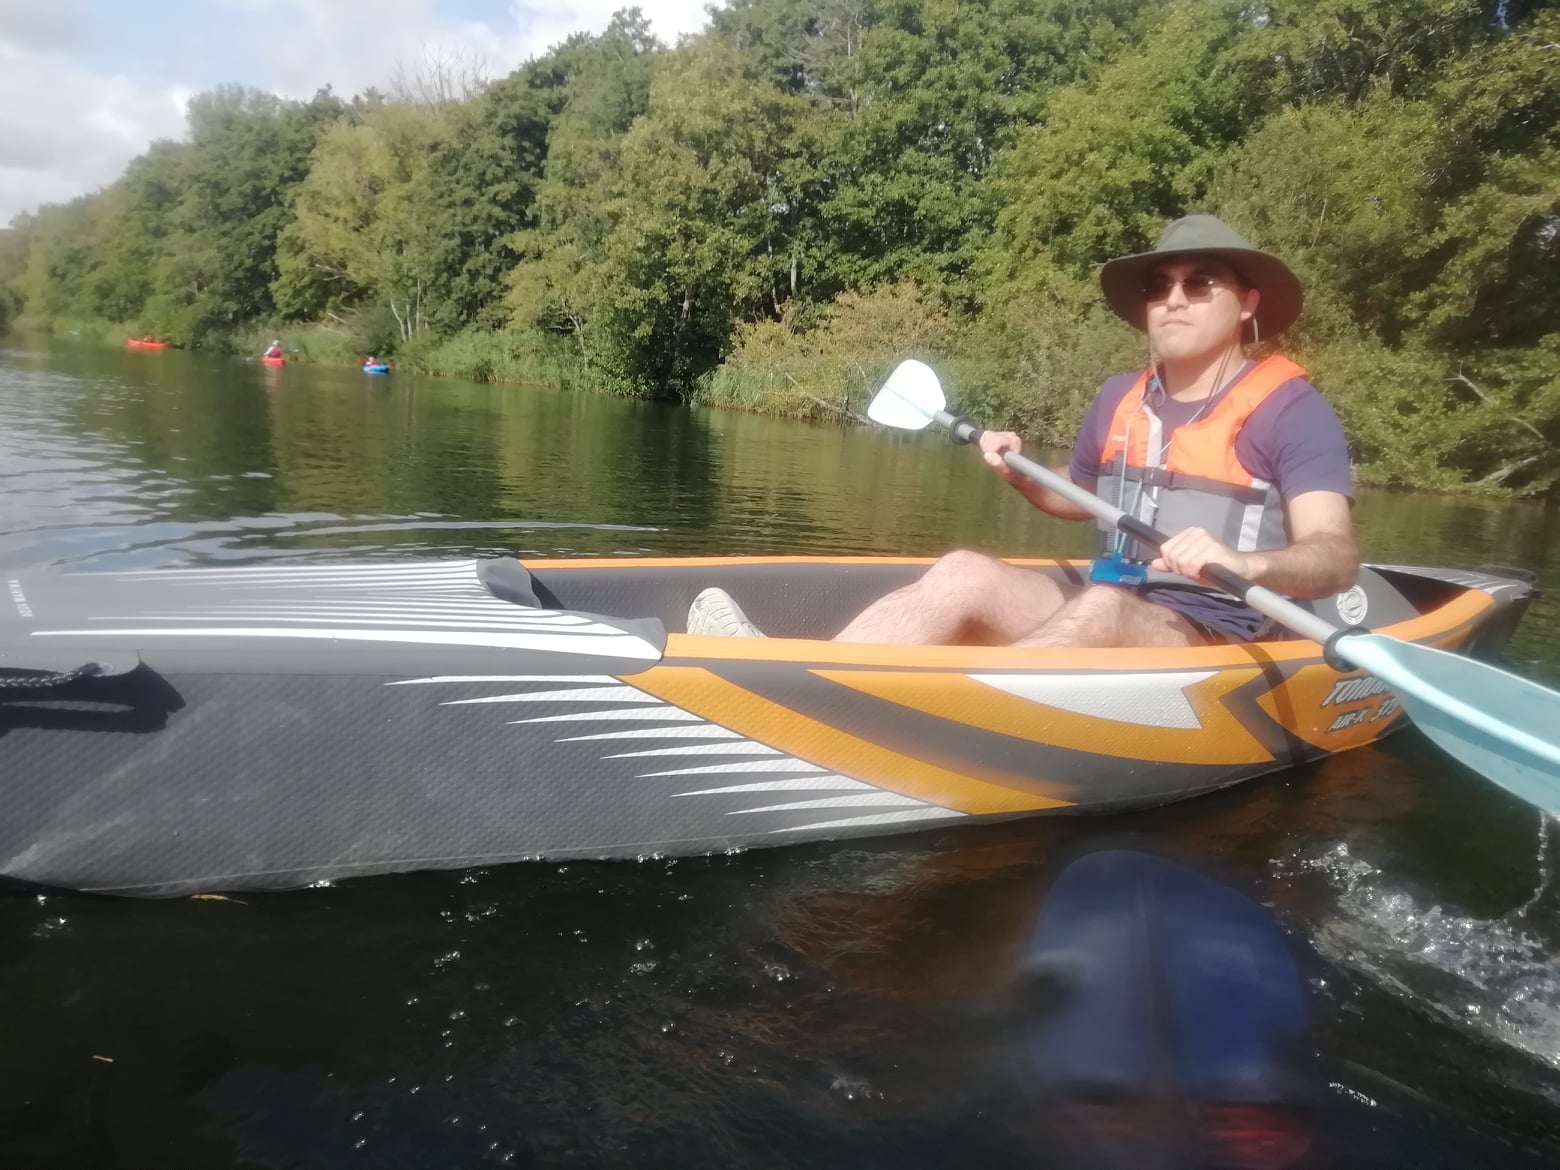
I recently bought myself an Aqua Marina Tomahawk Air-K 375, after floating around on a cheap Bestway Hydro Force (right) over the summer. The choice was partly driven by availability – the Tomahawk was still on sale where others had sold out, perhaps because it was specifically listed as an intermediate to advanced kayak, while beginners are driving the shortage.
Overall I am pretty satisfied with the boat, though it’s not perfect. It comes in a fairly hefty package, but it is manageable for myself, an average fitness male. Smaller people and/or those with less strength may struggle a bit. The bag fits well and it technically a backpack. I wouldn’t want to go far with it but it works sufficiently well to get it out of the flat, down the stairs, and into the car.
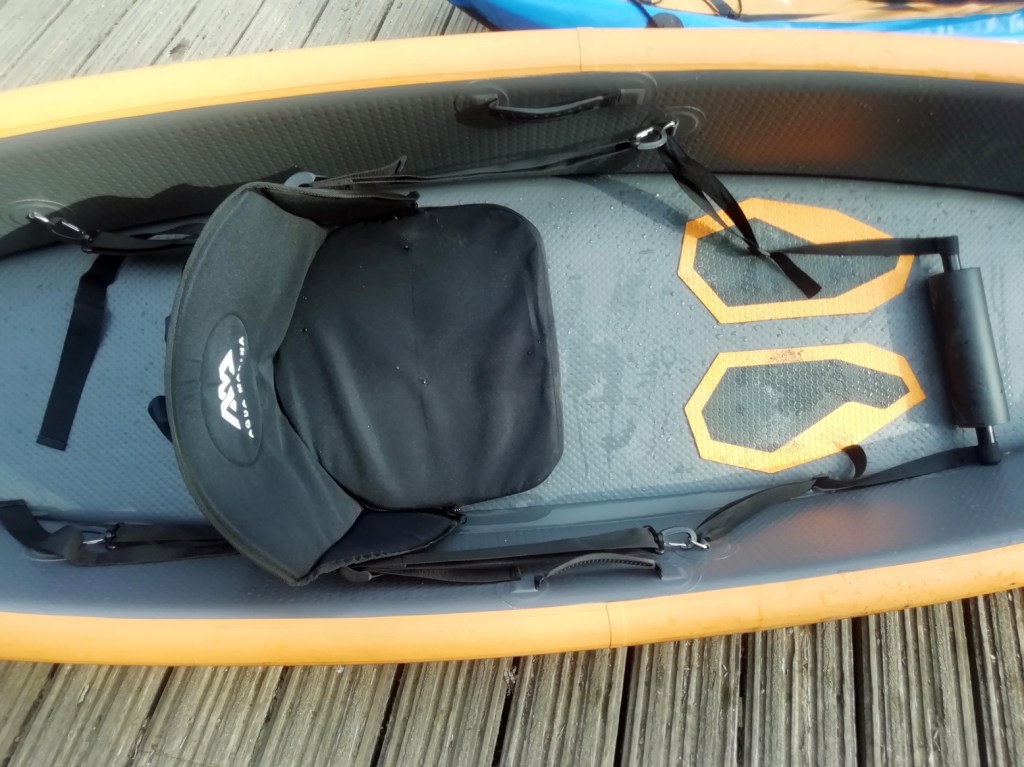
Some work is required for set-up – the included pump is effective but needs some effort towards the end when approaching 10PSI. I may invest in an electric at some point. In fact the hardest bit is fitting the twin skegs: these are very stiff, and it’s difficult to apply pressure to the thin edge. I may need to take some sandpaper to get these to fit better, though I’ll try some silicone grease first. The seat and footrest are effective, a little strap threading is needed for the latter, nothing terrible. The seat straps keep their tension once set up, but the footrest doesn’t. Total setup time is about 20 mins, though that may reduce as I get more familiar with the kayak.
On the water it is a step change from the basic inflatable, though you’d expect that based on the price! It’s much faster, tracks amazingly well, and is a lot less tiring to paddle. The addition of an entry-level carbon fibre paddle provides a lot more range before fatigue sets in (though I still need to improve my stamina!). It turns relatively slowly to compensate, but I’ll take the better tracking any day.
I removed the front skeg to see if it would make it turn better. Turning was indeed a little easier, but the tracking was noticeably less effective (though still far better than the budget IK). In the end I decided I preferred both skegs, plus it’s reasonably heavy and right at the bottom of the boat and so provides a bit more stability. It would work fine without through so it’s more a case of personal preference. It is noticeably tricky in the wind – because it’s relatively light, I’m slower in a headwind than a friend with a Point 65 sit-on-top. In crosswinds the high sides catch the air which makes stability less good in a gust.
It feels a lot less stable than the Bestway (I’m 77kg). I’m constantly working to balance it though I think more use will see that become less of a worry. Once or twice I’ve had a wobble and almost felt like I’ve gone over. However I think it’s actually a little better than it seemed. I deliberately flipped it to ensure I could re-enter and it took a lot more leaning over than I thought to capsize. It is probably not suitable for beginners whose balance is questionable, though. Re-entry was a little tricky put perfectly doable.
Packing up is reasonably quick – note that I do it with minimal drying on site, then re-inflate it fully once home to give it a proper wipe-down and time to dry. The drainage issue mentioned in the article is definitely evident: it’s basically impossible to get every last drop of water out, though I’d say no more than a tablespoonful was left which is not terrible. The joins between the floor and the sides also tend to attract sand and grit – the wipe-down gets rid of most, but I suspect at least a little is starting to build up there, though I don’t know how much of an issue this is in the long run as they shouldn’t rub against each other.
Despite the ‘Intermediate to advanced’ labelling, I think a beginner wanting to move on from an Intex or similar could do worse as long as they have at least a modicum of balance and confidence. I don’t think it would be for everyone though, as there are definitely more stable FDS kayaks out there. Overall I’m pretty pleased with with the Tomahawk, and hope the construction is good enough to provide many years of kayaking to come!
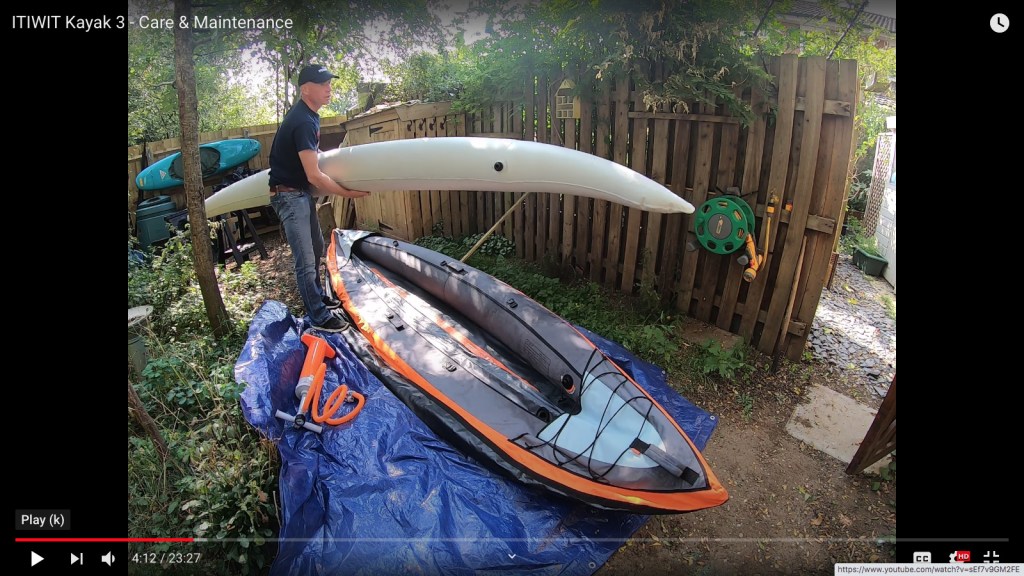
This video shows how to properly clean and dry a 3.8-metre Itiwit 2-3 seater, one of the most popular IKs of Covid 2020 – or at least one which remained available when stock of so many others ran out. It also shows the inner bladders and how they fit: something that’s rarely described on vendors’ websites.
Like so much Decathlon gear, their shell & bladder (S&B) IKs are a bargain. This orange Itiwit cost just £300, but the cleaning and drying process takes a while and realistically, is something best done over a couple of hours back home, if you have the space. Quite rightly, after a sea paddle the owner was concerned about sand and other grit getting into the nooks and crannies around the floor, and even inside the sleeves which house the relatively fragile bladder ‘inner tubes’.
Banana-like side bladderI-beam floor bladder out of its removable sleeve
As it happens, the sidetube and removable floor sleeves plus their respective bladders (above) were merely wet inside. As on all IKs, the grit mostly settled down in the gutters inside where the floor joins the sides. This is why, with full drop-stitch (FDS), drop-stitch floor (DSF), or sink and bladder (S&B) IKs like this Itiwit, a removable floor makes proper rinsing, cleaning and drying so much easier.
Tubeless IKs like vinyl ultra-cheapies, most PVC Sea Eagles and IKs made from synthetic rubber, like the old Gumotex Sunny (below; and packrafts, come to that), merely need seats unclipped before a freshwater hosing and wipe down. A river paddle on a warm day won’t even require a rinse: just wipe the boat dry and roll up till next time.


 • Durable wheel design
 • Costs a lot, but so do they all in this size