What air pressure does a typical packraft run? 1 psi, 1.5, 2.5? Answer at the bottom of the page.
Air bagging. Air bagging. Oh isn’t it wild?
Most inflatable devices come with an air pressure rating at which they perform best, including inflatable kayaks which run from 2psi/0.14bar up to 10psi/0.7bar in drop stitch. On the cheapest vinyl Intex or Sevylor dinghies, as well as slackrafts there won’t be a number, instead you get a ‘stretch gauge‘ (left). With a Sevy you keep pumping until a sliding black tab settles between A and B; your squishy slackraft is probably now at less than 1psi but is good to go. Add a bit more air to try and make it feel less of a water sofa and the thing will burst a seam. It may do that anyway if you give it a week or two or look at it too long.
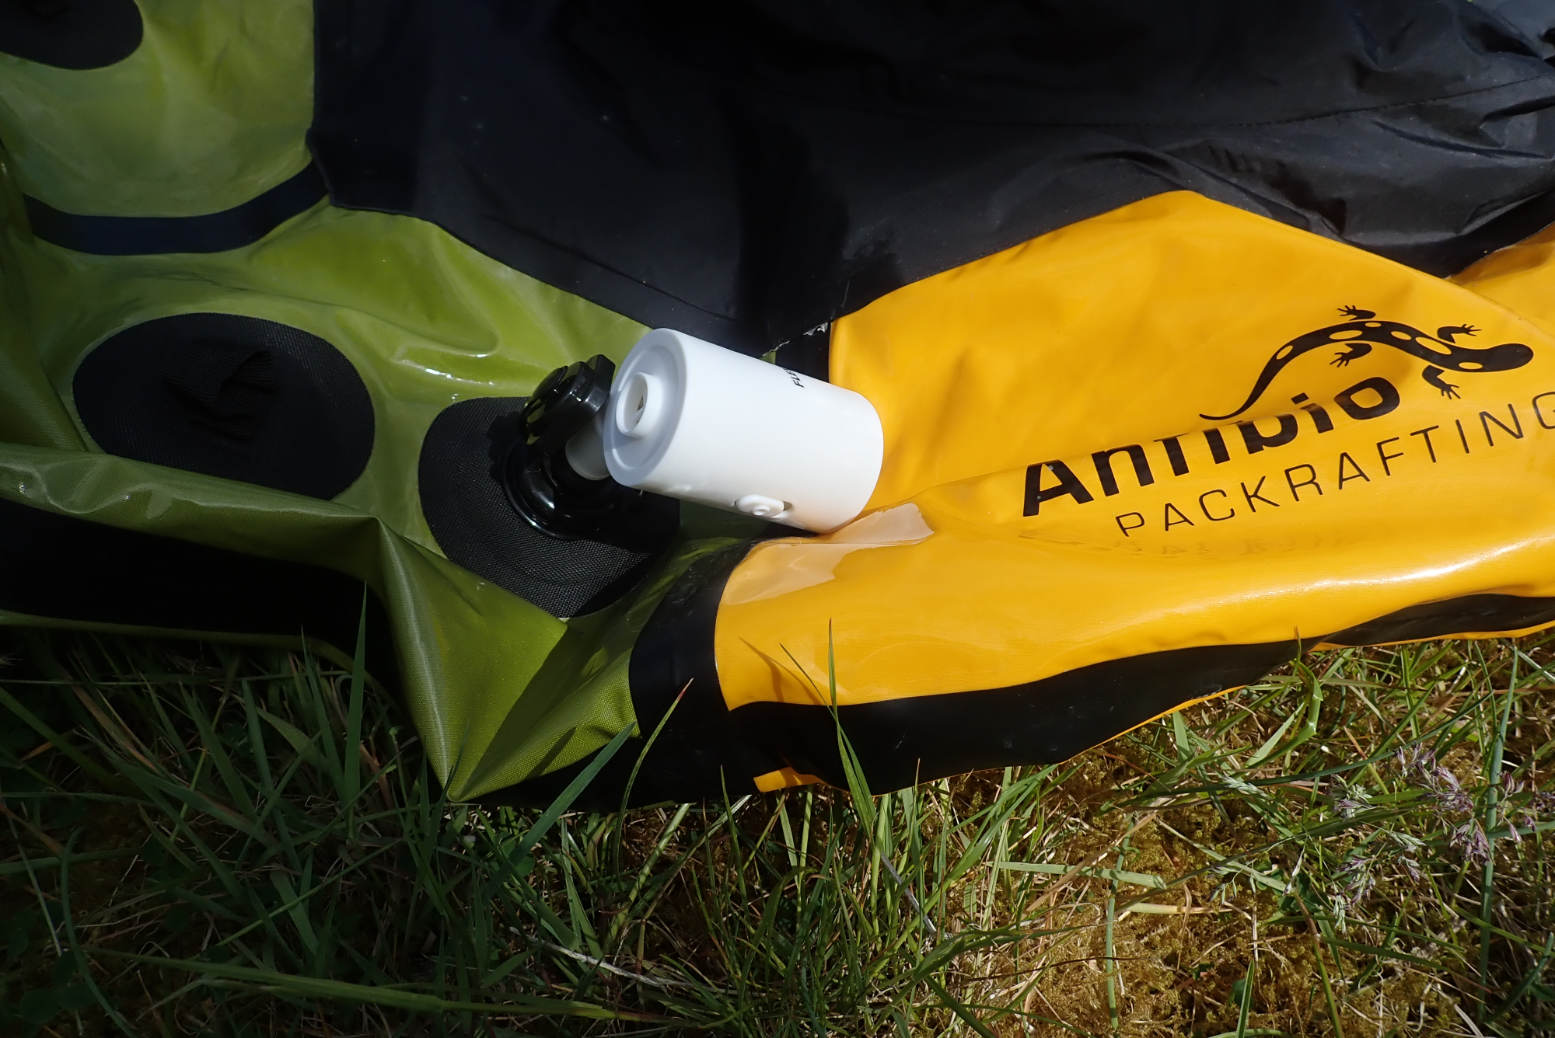
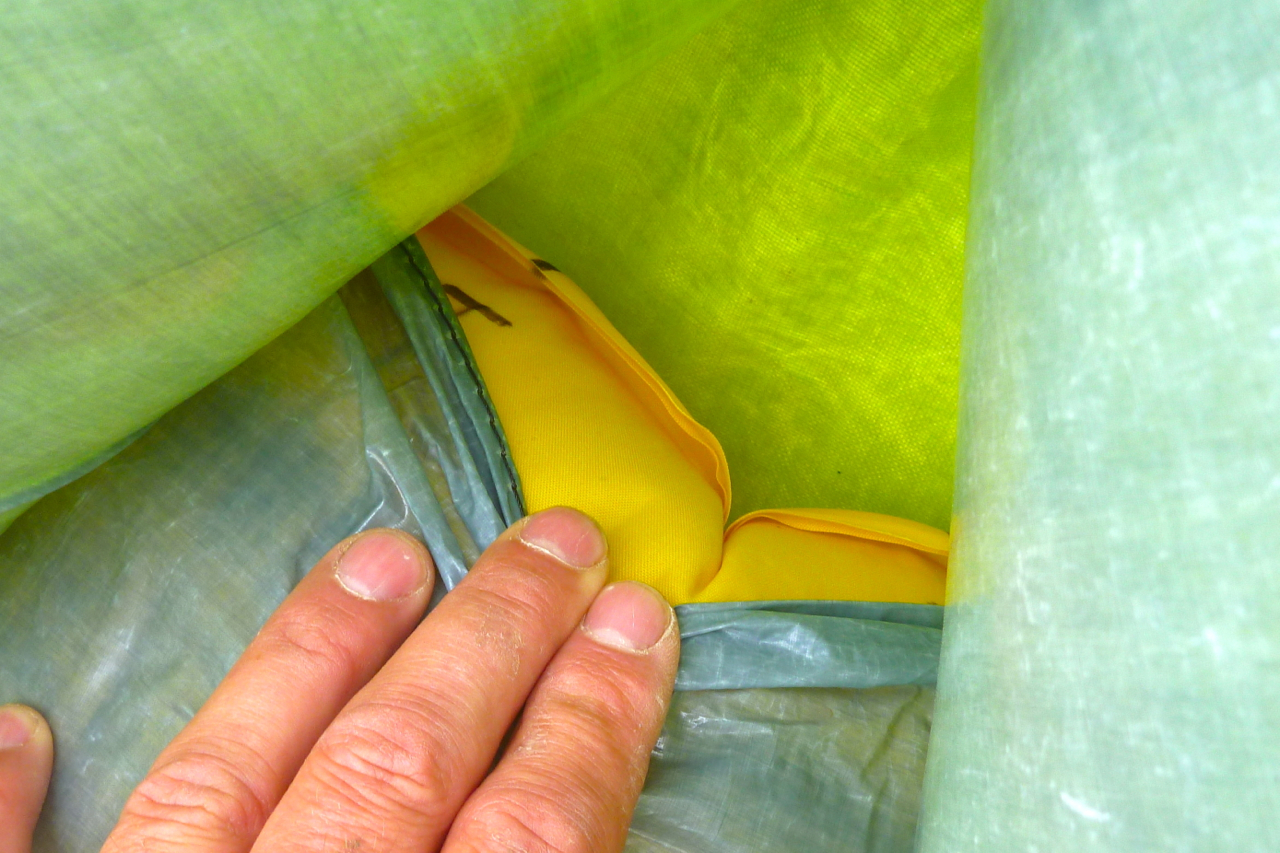
Right from the start packrafts never had air pressure ratings. You just aired it up with a flimsy nylon airbag (above) until you couldn’t get any more in. The airbag idea was surprisingly effective once you got the knack, and the bag weighed next to nothing. You then unscrewed it without trying to lose any air, quickly screwed on the cap, then topped off by mouth via the separate twist lock elbow valve (left) with all you had in your lungs. The more you blew the firmer you boat became – and that definitely made a difference to response on the water. It helped if you didn’t smoke and played lead trumpet in the local jazz band.
Once on the water all inflatable boats cool down and the hard-won air pressure inside drops a bit so you have to top it up again to get the boat firm. What was the air pressure? As much as possible but what did it matter as you couldn’t overdo it with your lungs. Stronger lunged paddlers and opera singers paddled firmer boats. And anyway, such very low pressure would be difficult to measure with a normal handheld manometer.
These days most packrafts use simple and effective one-way Boston-type valves (left) which screw off for a wide open ‘fast inflation’ port for airbagging, but have a one-way valve built into the cap for topping up, just like a car tyre. What goes in, stays in so you can build up pressure and get the boat good and firm. No more crumby twist-locks and undignified topping up by mouth.
Mini electric pump; ditch the airbagMini handpump to top up
Better still, inexpensive pocket electric inflators like Flextail (above left) do the job of airbagging while mini handpumps (above right; adapted from party balloon inflators) can do the important topping up without giving yourself a lung hernia. But what’s the air pressure!? Who cares, it’s better than it used to be provided you could pump the handpump with all you had – I find it takes 100 jabs. A Flextail or similar will burn out long before it can get close to a handpump’s final pressure.
Tip: all these pumps are handy but I always leave an airbag in my packraft’s storage pockets in case the Flextail packs up or I forget it. Otherwise it will be a lot of blowing or handpumping to air a boat up. And with a Boston-type valve as above, a short section of half inch garden hose makes inflating by mouth much easier should you’re topping-up handpump pack up too.
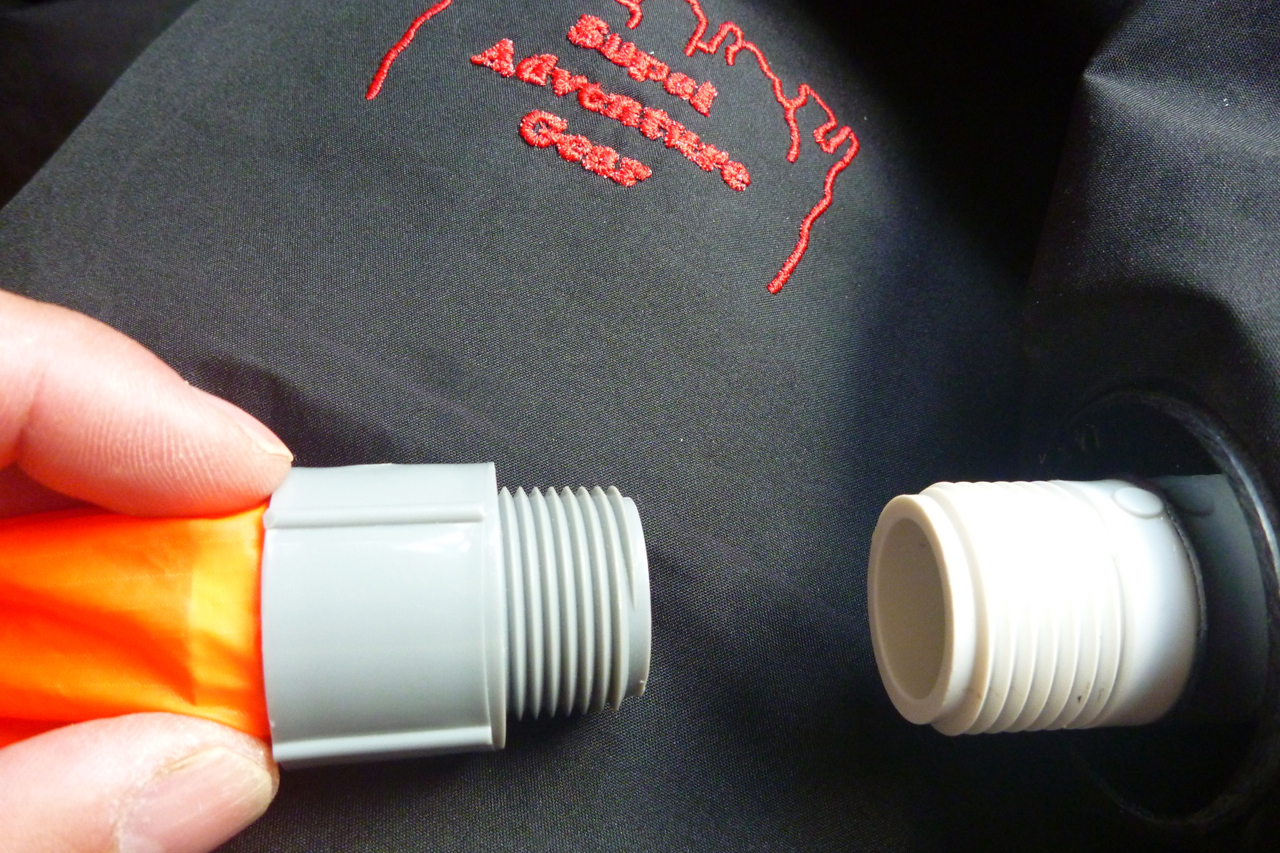
Kokopelli and French-made Mekong packrafts (and maybe others) feature a RIB-style Leafield D7 push-fit inflation valve. That’s push-fit as opposed to more secure bayonet fitting as on proper IKs and iSUP boards. It’s what Gumotex IKs used years ago and is actually not a bad idea on a packraft as the pump nozzle on the end of a hose will blow off the valve as pressure climbs, meaning you have to try hard to over-inflate the boat.
Black boat and Englishman
But these one-way valves have now made over-inflation a possibility, and we know how that can end. However, one thing we’ve learned with TPU packrafts over the last decade or two is that it’s virtually impossible to burst a well-made packraft using a human-powered pump, even a high-pressure iSUP barrel pump. You would really have to go at it or leave a fully inflated black boat out in the midday sun. The fabric and simple but strong sewn and heat-welded assembly spreads forces equally across the single chamber hull ring. So much so that MYO packrafts have become a thing for individuals with a big table and a sharp pair of scissors.
With a D7 valved packraft you could use a handheld manometer (left) with a push-fit adapter to read the boat’s pressure. Such manometers have a pin in their throat which pushes open the D7’s sprung valve stem just as the gauge body seals around the valve housing, so getting get a live pressure reading.
I don’t have a D7-equipped packraft at hand, but I do have a Bravo Alu 4 R.E.D barrel pump fitted with a 14.5psi/1 bar inline manometer (left). With an adapter jammed in the Boston’s threaded port I ought to be able to get a full-pressure reading off my Anfibio TXL.
I’m guessing about 2psi / 0.14bar to get a pinging firm TXL. It’s what my early Gumotex IKs used to run, using the now obsolete footpump. When the Seawave came out, rated at 3.6psi/ 0.25 bar, that was quite a revelation, though before that I ran a 4.3psi/ 0.3bar Grabner Amigo and you could have battered down a wall with that boat, proving that rigidity didn’t require drop stitch panels as long as the boat was solidly assembled. At Grabner prices, you’d expect that to be the case.
Back to the test. And the answer is…. just 0.1 bar or 1.4 psi. And this was with the TXL as tight as a drum such as I could never manage with the balloon handpump but might have with a K-Pump Mini. Now we know.
Two good-value, four-part paddles from Anfibio ideal for packraft or IK travels. The yellow VertexTour is a newer redesign and a lot lighter, even with a longer range of length adjustments and has a better clamp. But the black Wave (left) has the classic dihedral (two-faced) blade. What is the difference and does it matter?
What they say
Anfibio Vertex Tour Our new, redesigned Vertex Tour paddle comes with a classic double blade, fine shaft and sub one-kilo weight. Equally suitable for lakes, calm rivers and moderate whitewater. The position length is adjustable from 210cm to 225cm at free angle.
Anfibio Wave High-quality, lightweight carbon paddle for long tours on calm waters. Freely adjustable in length and angle.
I’ve done several hours with both paddles and for this comparison we took both on a 15-mile paddle down the Wey in Surrey in the TXL. It was a hot day but water doesn’t get any flatter unless it’s an ice rink. Below some weights and measures to mull over.
Weight g
Length cm
Shaft cm
Shaft g
Shaft ø
Blade gm
Longest piece cm
Blade cm
Price
Anfibio Vertex
851g
210-225
118cm
303g fibreglass
29mm
274g
63cm (blade)
44 x 19.5cm
€125
Anfibio Wave
1011g
210-220
108cm
283g carbon
29mm
365g
65cm (blade)
44 x 16cm
€125
I didn’t notice until I weighed the blades, but the two are made quite differently. The larger Vertex blade – about 650cm2 – has a molded central ‘corrugation’ to stiffen the blade. The Wave has a classic dihedral (two-faced) power face which is said to power smoothly through the water better than a plain flat blade. The Wave blade is also smaller – 600cm2 at a guess.
Black Wave dihedralYellow vertex more flat faced
People ask: what is the the weight of a large banana?
So the main differences are weight, blade size and blade face, and I suppose adjustable length and the texture of the shafts. Will you notice the difference in a packraft? I very much doubt it but I think I’d prefer to paddle all day with the smaller bladed and dihedral Wave, even if it’s 160g heavier: the weight of a large banana.
I have a theory with length-adjustable paddles that into the wind or upstream (ie; max effort) you can ‘lower the gearing’ by shortening the paddle and leverage. Meanwhile downwind you can get the most of your paddle by setting it at full length overdrive. It’s good to have the option and one day I will test this theory but really, we paddle as hard as the situation demands. Sometimes easy, sometimes more efortful.
Wave shows the carbon weave; both are 29mm ø, good for smaller hands
Feather angle alignment My Vertex came with no alignment line on the lever clamp to set the angle against a grid. It took me a while to work this out until I couldn’t and a couple of yellow tape arrows set at my preferred 45°R. Anfibio have since told me this was a production flaw and current Vertex have an alignment marker on the clamp. A permanent alternative to my stick-on arrows would be melting a slot into the clamp with a hot knife. It would be easiest to do this with the paddle feathered at zero (no offset) which is easy to estimate. Think before you melt or use tape!
No index line on the clamp. Tape arrows addedTwo ways of setting alignment on the Wave
The Wave’s alignment system is as you’d expect. In fact there are two ways: a slot on the clamp to align with the grid; and pre-set angles molded into the clamp to align with the zero line on the grid. As it is, on both paddles the white alignment grid gets slid over at each assembly and will probably wear away over the years so you’ll end up with a tape marker anyway. That’s what I’ve done on my old Werners which had a grid sticker on the outside which eventually peeled off.
The blades on both paddles felt a little loose once mounted on the shafts. Maybe they’re made that way as the shaft may swell over the years as it did on my carbon AquaBound. It’s unlikely you’d notice on the move but no movement is best. A small bit of thin tape (left; not a full wrap) was enough to remove any play and if the tape wears or pulls off it’s easy to apply some more. Once clamped down there was no play at the shaft join.
On the Wey you might notice the weight swapping from one to the other, but after a while you’re just paddling. In a way the ideal combo would be fitting the smaller Wave blades on the longer, better clamped Vertex shaft, but oddly they’re not interchangeable.
In the end, for €125 you will not be disappointed because either paddle will proper your boat forward, adjust readily and fit easily in your pack.
Incidentally, I did an IK&P survey when I paddled the Wey in 2021. 2022 numbers in red. In over a decade I saw my first every packraft actually being used on the water! An underinflated MRS. I got the feeling the owner didn’t know that airbagging was not enough; you have to top up too. Has he not read my book?!
Hardshell canoes: 1 1
Hardshell kayaks: 1 8 (group)
Hardshell SoT: 1 0
Vinyl IKs (rock-bottom cheapies): 5 1
PVC (bladder) IKs 3 0
Packrafts 0 1!
iSUPs: 10+ (mostly women or mixed groups goofing off) 10
I just dug out this story I wrote a few years ago about our packrafting adventure in northwest Australia. There’s more here, including vids. Originally published in Terra magazine2011.
In the far northwest of Australia is a barely tamed region of spinifex-clad tablelands, big seasonal rivers and the world’s largest expanse of tropical savannah woodland. About the size of California but with a population of just 40,000, the Kimberley hosts marginal, million-acre cattle stations, tracts of land returned to local Aboriginal people, remote wildlife conservation ventures and undeveloped national parks.
But the Kimberley might be better compared with Alaska, a wilderness that is under threat. Inaccessible by road for the rainy half a year, the Kimberley is such a relentlessly tough environment that unlike in the rest of Western Australia (WA), exploiting the valuable mineral resources known to be here only now become viable. WA itself is a state the size of India but with 3% of its population, and continues to thrive on a century-old mineral boom. The Kimberley is under pressure to join the party, but as a parallel environmental awareness to conserve Australia’s last tropical wilderness has grown, industrial development of the region has become controversial, not least with the current plans to turn the ochre cliffs of James Price Point 20 miles north of Broome into a vast LNG plant. No one wants to see the Kimberley end up like the Pilbara highlands, 600 miles to the southwest, criss-crossed with private railroads and pitted with huge iron ore excavations as hills are turned into holes to ship the ferrous rubble to resource-staved Far East. But the Kimberley one other abundant resource which the populated southern rim of Australia is crying out for: water.
Most visitors experience the same Kimberley; they transit the 450-mile Gibb River Road, a dirt track which bisects the region between the former cattle ports of Wyndham and Derby in the west. With a branch track leading north to Kalumburu on the coast, it’s the Kimberley’s only track, dotted with fern-clad gorges, waterfalls and swimming holes. It was an area I’d visit eagerly when updating an Australia travel guide, often spending too much time and fuel money researching out of the way spots that ended up as just a few lines in the finished book. But even then I knew I’d barely got beneath the Kimberley’s skin and my work there left me wanting to see more. Specialized trekking outfits used local contacts, helicopters and seaplanes to access outback areas, but charged several thousand dollars.
Follow a river – that was the way to do it. With high humidity and average daytime temperatures over 90°F, the constant need for water was solved, while the boat took the weight off feet and shoulders. I’d researched short trips with inner tubes or float bags, but they weren’t really sustainable. Then in 2010 I discovered Alpacka packrafts and knew I had a tough, lightweight craft with which to explore a Kimberley river.
All that remained was to choose a river. Most of the big Kimberley rivers, the Durack, Drysdale and King Edward drained into the Timor Sea lapping an uninhabited and fjord-riddled coastline of 1500-miles on which the small Aboriginal outpost of Kalumburu was the only settlement. But up here the presence of estuarine or saltwater crocodiles as well as 35-foot tides heaving through rocky gaps to form ‘horizontal waterfalls’ made bobbing around in a tiny raft a risky idea.
Horizontal Falls, where the falling spring tide rushes back out of the lagoons through narrow gaps
The key for this visit was to pin down an amenable stretch of water with easy access and exit points and without the menace of saltwater crocodiles. I knew well that no matter how easy you made it – the coolest period, the flattest river – the harsh conditions in the Kimberley would take its toll. My mate Jeff and I didn’t want to be abseiling down ravines, hacking through snake-infested rainforest or looking twice at every passing bit of driftwood in case it slowly started swinging its tail from side to side.
The most likely candidate was the Fitzroy, at 500 miles the Kimberley’s biggest river and in peak flood, the highest volume river in Australia, flowing at up to 30,000 cfs under the Highway 1 bridge at the town of Fitzroy Crossing. Running the churning Fitzroy in the unpredictable Wet sounded a little extreme for me. The good thing with packrafts is that extended portages are relatively effortless; the excess payload adds up to a 5lb raft and a 4-piece paddle. So Jeff and I decided September, the end of the dry season, would make an easier introduction; cooler and less humid just as long as we were prepared to walk between the pools.
Mornington
The take out was obvious: the bridge at Fitzroy Crossing, the only town for a couple of hundred miles along Australia’s peripheral Highway 1. And some eighty miles upriver, Mornington Wilderness Camp seemed like the best place to start. A former cattle station spread across the King Leopold Ranges. I’d visited the Camp a decade or so earlier, soon after the Australia Wildlife Conservancy had taken it over and de-stocked it. It’s one of nearly two-dozen sanctuaries the AWC manages on the continent and at nearly 800,000 acres, one of the largest, with a range of unique ecosystems as well as high levels of biodiversity which included several rare and threatened species.
When we arrived at the Camp, following a 30-minute flight from Fitzroy Crossing, the Camp’s manager Diane was midway through a pre-dawn finch census lasting several days and assisted by volunteers from all over Australia. The ranges around Mornington are one of the preferred habitats of the stunningly colourful Gouldian Finch, an endangered passerine or ‘songbird’ whose breeding patterns and habitats have been disturbed by changes in the bushfire regime as well as introduced predators, topped by the feral cat – the scourge of indigenous birds right across Australia.
When I think of the Kimberley, it is above all the chorus of the largely unseen birds which evokes the spirit of northern Australia’s wild and remote corners. From just before dawn until sunset the bush resonates with avian chattering, from the strident squawks of the corellas, cockatoos and kookaburras, to the milder coo-ing of the crested pigeons. This would be the daily soundtrack for our five-day descent from the Mornington to the highway bridge.
Dimond
On the water soon after dawn, by the mid-morning of the second day we arrived at Dimond Gorge on the southern edge of the Ranges. Here the Fitzroy cuts back on itself as it pushes past the gorge walls, scoured smooth by the monsoonal torrent. At the southern exit where the gorge walls are just a few hundred feet apart, a dam had been proposed to match those on the Ord river in the eastern Kimberley. In 1960 the original dam enabled the development of the Ord River Irrigation Scheme (ORIS), the new town of Kununurra and with the much bigger Ord River dam completed in 1972, the 400-square-mile expanse of Lake Argyle was formed. But the ORIS has been slow to reach any potential. Thousands of kilometres from its domestic market, the produce, mostly sugar cane and high-value sandalwood, gets shipped to Asia and the power generated from the huge dam only supplies Kununurra and a nearby diamond mine.
Water has become an acute problem in the populated southeast of Australia where the steady depletion and raising salinity of the Murray-Darling basin which fills most of New South Wales and Victoria has led to water restrictions. Meanwhile, on the opposite side of the country, the Fitzroy’s wet season run-off spills into the Timor Sea at a rate of a ‘Sydney Harbour’ every nine minutes, or evaporates from the vast 1000 km² surface of Lake Argyle. This potential was anticipated in the 1980s ago when a 1200-mile pipeline to already drought-stricken Perth was proposed, until it transpired that the cost of securing and delivering water to be six times that of local desalination. And so by 2006 the world’s first desalination plant to powered by a nearby wind farm was opened just south of the city Perth, supplying nearly a fifth of the city’s needs.
Emerging from the uplifted sandstone escarpments of the King Leopolds at lunchtime on the second day, we were having no such shortages. The preceding Wet had ended five months ago breaking all Kimberley records, and as we’d flown into Mornington a couple of days ago it was clear that, against our expectations, below us the Fitzroy was still flowing and four-fifths was open, paddleable water. There’d be a lot less walking than we’d anticipated.
Now, ahead of us lay the cattle country where we expected the river to lose its depth and definition as it meandered southwest among granite outcrops towards the highway. Sure enough, after lunch the flow soon dissipated into a jumbled rock bar with one particularly tough portage over huge boulders which left me croaking with thirst. Walking consumed so much more energy than paddling and we fully expected the stage across the cattle plains of Fossil Downs station to be tough, fly-ridden and with the menace of semi-feral stock.
Although we’d end most days exhausted, it in fact turned out to be the highlight of our traverse. There were no more rock bars but periodically the river’s main channel became choked with flood-borne sand which diverted the remaining flow into the trees along the banks. Here, under a cool canopy of river gums replete with twittering of birds, we’d wade the sandy shallows for hours, towing our rafts like sleds. Occasionally we squeezed under- or climbed over a log jam, or sank to our hips in quicksands.
Jeff was using a $30 PVC pool toy rather than a fancy, $1000 Alpacka, so had to nurse the limp raft and repair punctures almost daily. The cattle and harmless freshwater crocs (a species unique to northern Australia) usually scuttled away or stared indifferently as we sploshed by. At one point the acrid reek of urea announced a huge colony of riverside bats which once agitated, took to the wing in their hundreds with a high-pitched screech. Come the evening, we’d spread out on a sandbank with plentiful firewood within arm’s reach, and set about steadily rehydrating ourselves from the day’s efforts.
By the fifth day we sighted the Geikie Ranges, the northern gateway to an unbroken, deep channel which flowed past the distinctive ramparts of Geikie Gorge National Park. Here, eons of flooding had eroded the former limestone reef into bizarre, scalloped forms. Freshwater crocs laid their eggs on the adjacent sun-baked sandbanks while out in the 100° heat, we paddled into the twilight to complete a marathon 12-hour, 20-mile day on the river. By the following lunchtime we crawled up the steep bank below the highway bridge at Fitzroy Crossing. Jeff could barely face another moment in his excrable pool toy, but like me, he’d followed the river.
After a decade or so are packrafts finally becoming a thing? Better known for their Slackrafts, especially Downunder (where Jeff dragged his Bestway Outdoorsman down the Fitzroy one time) check out the new for ’22 Bestway Hydro-Force Wayfarer packraft. You can mute the jaunty music as there’s not much you can tell from the short vid. A glancing close-up shows ‘fabric’ with distinctive embossed vinyl dimples – so not a fabric as such, just thick Inflatashield™ plastic? But do I see proper raft valves not just Bostons, as well as twin hull chambers (like a ROBfin) and an inflatable floor – possibly a separate mat? You’d surely need PVC fabric for those sorts of potential pressures. It certainly looks like it skims and yaws across the water more than a 1-psi-slackraft blob. It might even be a self-bailer. Bestway moving into PVC packrafts? It happened with Decathlon so why not. Expect Intex to follow soon and before you know it the mystique of exotic packrafts will be just a dream.
Twin-chamberVinyl or PVC?Cool low shotHappy chappy with his BestyRaft valve? CuriousYes, Bestway make PVC too
Update May 2022. Charged Max Pump packed up after a year/20 uses. Slide switch was off so not accidentally discharged. Plugged into computer; no charge light. Plugged into USB wall socket (as have done before): very bright light followed by smoke… Replaced with the boxy, orange, heavier, notionally waterproof Max Pump Plus for £23.
In a line Cheap, light, compact, USB rechargeable and fast, for when air-bagging is a faff or awkward.
Light, compact Faster than clumsy air-bagging – handy on a narrow bank/shore Can suck (vacuum) as well as inflate Ought to do > 15 fills Max Pump as a conventional stiff slide switch, not ‘touchy’ inductive switch on the newer Max 2 version. Max Pump Plus has a silicon covered press switch. Will do other stuff, like airbed mats and fire embers Newer models can be used as a power pack, have LED lights, are IPX7 rated and can be programmed to sing Waltzing Matilda.
None of the supplied nozzles with Max Pump jammed nicely into a Boston valve My Max Pump packed after less than a year and about 20 uses. Replaced with bulkier Max Pump Plus Only replaces air-bagging; still need to top up by mouth and/or hand pump Will discharge eventually, unlike manual methods, and will eventually die for good
What they say My name is Max Pump 2020. I can quickly inflate and deflate your swimming tube. air mattress. and other inflatables. With vacuum bags .I can create more capacity for your suitcase and wardrobe at home. When in outdoor.I can provide oxygen for your burning ovens. enabling you to enjoy your food more easily.
Apple, pump with nozzle and my Boston adapte
rMax PumpMax Pump Plus
Review An electric pump to save a couple of minutes’ packraft air-bagging? Do me a favour! That’s what I think when applied to bulkier IKs where a two-way barrel pump is fast and easy. But factor in cost, weight, size, USB rechargeability plus supplementary uses and, for a packraft, FlextailGear’s range of pumps (above) is worth a punt. Air-bagging is a clever idea to inflate a typical packraft, but on some days it’s not the most intuitive of actions, perched on seaweed covered boulders. Once a day is fine, but on a trip where you’re airing up and down a few times a day, the effortlessness of the Max Pump is welcome. A good case to point was my paddle on the Wye where accessing my Rebel 2K’s internal storage pockets to get to the camping gear each night meant re-inflating the boat every morning. The Flex pump would have made this less tiresome. Another example is getting back from a tiring sea paddle and wanting to reinflate the boat to rinse and dry properly. Plug in the Flexy and get on with other after-paddle chores.
Max Pump adapters but none fitted a Boston valve’s two ports just right
Actually the grey rubber nozzle (right) will push and seal into the main threaded port, and with my second Max Pump Plus, there was a hard plastic nozzle to fit a Boston’s mushroom valve (middle) too. But to reduce loose bits, I made a 2:1 adapter (left) to fit both ports, using tape to make a good seal.
Out of the box With Max Pump I got the pump, four nozzles, a short USB-A lead and a small bag. While one nozzle loosely fitted a Boston valve’s threaded airbag port / dump valve, nothing fitted the one-way valve body. You’d think with Boston valves so common on Chinese-made slackrafts, packrafts and cheaper IKs, this Chinese brand would include a Boston valve nozzle. Luckily, I’ve amassed loads of adaptors and nozzles, and one 16mm (5/8″) adaptor fitted the pump’s main nozzle and jammed into the Boston port. [The orange Max Pump Plus included a nozzle for the valved port].
The rubber bung adapter fitsWith added tape my combo fits both ports
Off a laptop allow two hours to fully charge the pump out of the box. After just three fills (12 mins?), it took just hour or less to get the green light. Off the mains is faster.
Two-and-a-half minutes
I estimate the volume of my Rebel 2K was 240 litres, (12 jerricans) so at the claimed flow rate of 300 L/min (currently the highest in Flextailgear’s range of mini pumps), that ought to take less than a minute. In fact it took 2:30s to reach the equivalent of airbag pressure (full volume; above). But this was pushing through the one-way valve, (like a car tyre) not direct into the hull via the airbag port / dump valve which has no resistance. Now with a bigger TXL with a volume of around 350 litres, I inflate directly through the screw port into the hull: 2:20s and if you’re quick you don’t lose much air screwing the cap on. Then I Flex for another 30s via the valve (or do 20 breaths to save the battery) and finish off with the handpump. According to the Flextailgear table above, my heavier orange Max Pump Plus has 10% less power and max pressure than the Max Pump, but it’s hard to verify any of this data other than weight. The fact is, either pump does a packraft in a couple of minutes. Max Pump Plus: 170g + nozzles.
My comfy full-length Exped Synmat XP 9LW – which also needs air-bagging to avoid humid breath – inflates in just 25s. And as many will know, air-bagging a sleeping mat in a cramped tent when you’re worn out is not one of the joys of camping. The Max 2020’s 3600mAH lithium battery is claimed to run for 40 minutes, so that ought to do at least 10-15 raft fills plus a few mats, when camping. I imagine the Max Plus will be the same.
Deflating either of these items is of course as easy as rolling them up, but getting the last bit of air out can be tricky, even though it can save a lot of packed volume. Pump suction definitely works on my Seawave IK because the one-way valve can be pulled open with the bayonet nozzle. On the packraft and mat, you have to suck from the unvalved airbag port, and by the time you’ve plugged that, some air gets drawn back in. I find just rolling up, squeezing, then sucking the last of the air by mouth works best, as your hands are free to get to the valve cap fast.
Max Pump Plus will do my Anfibio TXL in under 3 mins
Last word to Sven from Anfibio: “Can’t live without one anymore. Cannot remember when I last used an inflation bag.” These young people, honestly.
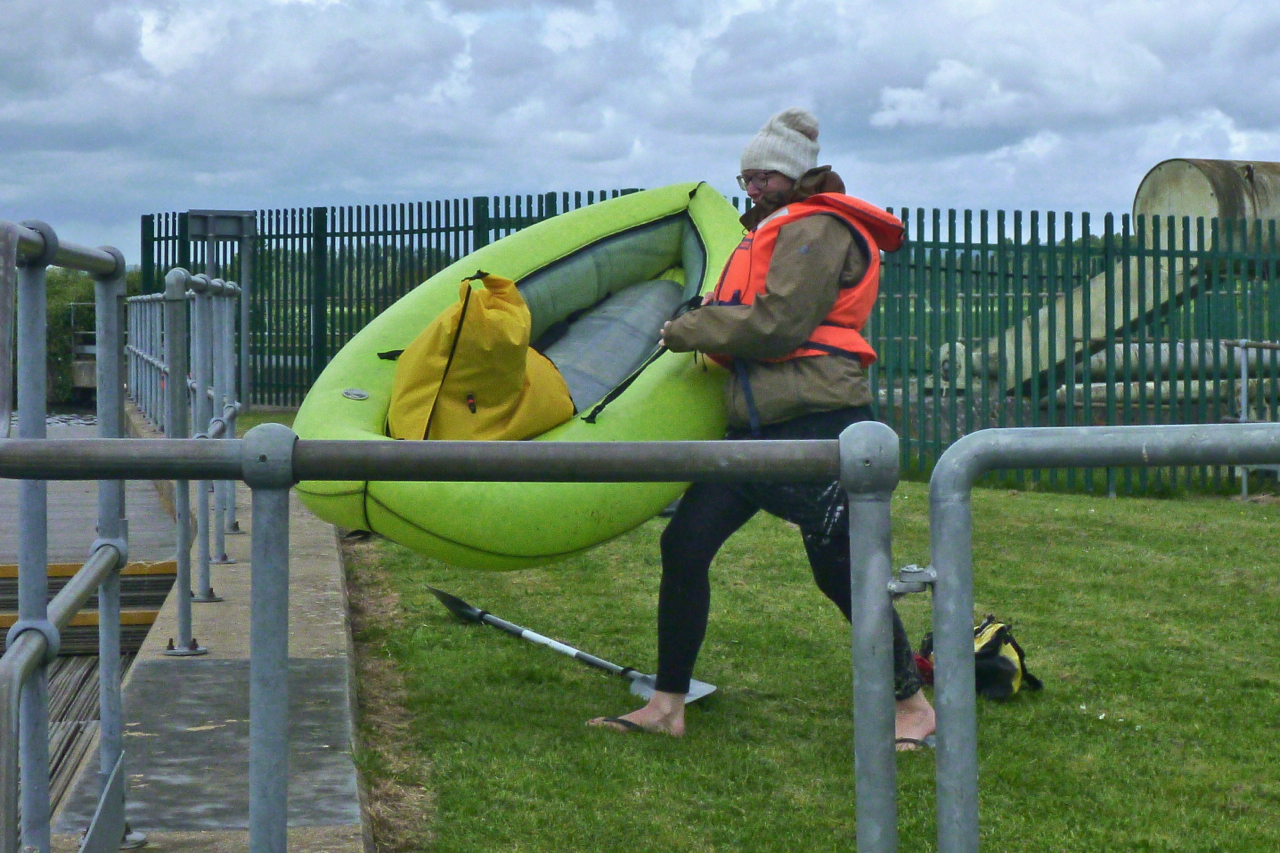
The basic gear you need for packrafting adventures so you don’t end up as above, or simply just inconvenienced and wet. For general camping kit (sleeping, eating, washing) you’ll find lists all over the internet and beyond. Mixing paddling with walking, I prefer a 1-kilo down bag, a compact tent, a thick, full-length air mat and a Pocket Rocket-like burner with a big Tatonka or MSR 500ml+ pot/cup and a Gimp stove for back-up Below, I suggest cheap alternatives in green. A cheap alternative to a proper packraft is of course… a Slackraft but you’ll only every buy one once.
1. A pack for your raft
Do you use a regular hiking backpack packed with your boat in or outside, or a purpose-made drybag pack with usually a rudimentary integrated harness, or use a separate packframe harness as pictured?
If you’re a first timer and own a regular hiking backpack, make do with that, but having tried both I prefer a harness. You’re on the water so (unless you can store in the hull, waterproofness trounces all-day carrying comfort. A submersible UDB duffle is tougher, as airtight as a packraft and provides high-volume back-up flotation should you get a flat on open water; exceedingly unlikely but important and reassuring.
For short approach walks like on the Tarn, or the Kimberley, I used my UDB’s basic integrated harness: just sewn-on straps. For Turkey which was mostly walking, I fitted it into NRS pack harness (above left; no longer made) whose load capacity easily exceeds its straps and your back. In Germany Anfibio Packrafting now sell the more sophisticated US-branded Six Moon Flex Pack (left; new 2021 design), a ‘drybag hauling system’. You can lash anything that fits within the straps, including your rolled-up boat. ULA Epic is another one. In Europe such harnesses seems unknown. Remember: with any big backpack the key to support and comfort is a stiff board or frame connecting the hip belt and shoulder strap mounts so the weight can be carried low on your hips, not hanging from your burning shoulders.
Cheap alternative: any old rucksack and a tough bin bag.
2. Four-piece paddle
Get a paddle that breaks down into four pieces for easy transportation. A paddle like this may not be as stiff as a good two-piece, but the Aqua Bound Manta Ray left or the Anfibio Wave (right) will still be under a kilo and anyway, you’re in a slow packraft not a razor-thin surf ski. Some four-parters don’t like being left assembled when wet; don’t leave it out of the water more than a day or it may be very hard to separate.
Even cheap alloy-and-plastic ‘shovels’ come with adjustable feathering; an ability to offset the blades. Flat (zero offset) works OK, but most find a bit of offset makes paddling more efficient. I’ve got used to 45° Right (ledt blade rotated 45° forward) over the years. Whitewaterists prefer 30°. Left handers will go the other way. The Anfibio Wave had infinite feathering and 10cm length adjustment.
Cheap alternative: A TPC 2-piece or similar.
3. PFD (‘personal flotation device’)
A proper foam pfd is bulky in transit but is essential for remote solo paddles or whitewater (as is a helmet and a whole lot more if you’re really going for it). For flatwater paddles and calm, warm conditions Anfibio’s lightweight inflatable Buoy Boy (left) has twin inflation chambers, rolls down to less than a litre in volume and comes with handy net pockets and a useful crotch strap to stop it riding up when you’re flailing around in the water. Aat any other time, you’ll barely know you’re wearing it. Note It does not claim to be a CE-rated buoyancy aid.
Cheap alternative: A used foam PFD.
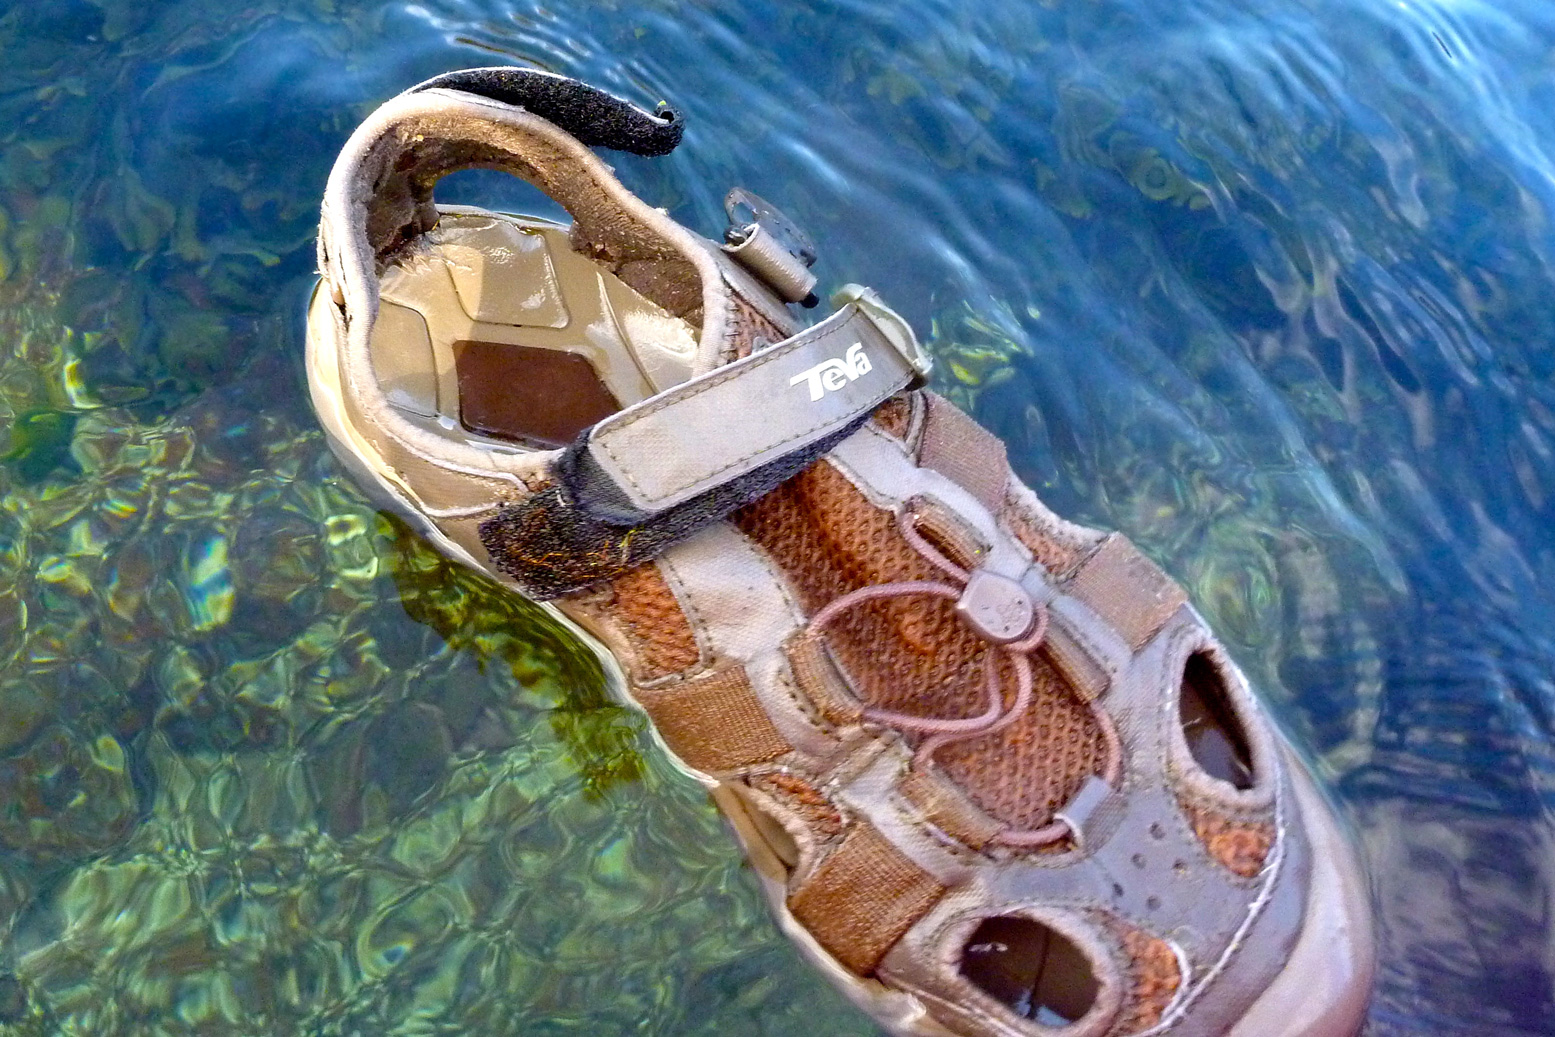
4. Wet shoes I’m on my second pair of Teva Omniums (left) which are do-it-all wet shoes that are OK for unloaded walking. If trekking the wilderness for days with a full pack over rough terrain, you’re better off with proper lace up trail shoes or boots, but bear in mind that anything with a breathable membrane takes ages to dry once soaked inside out. I use membrane-free desert boots. SealSkin socks are another solution, while they last. More here.
Cheap alternative: Old trainers or Crocs.
5. Day bag or case
You want something light to carry your valuables when away from the boat in populated areas. Choose a bag or case which fits under your knees without getting in the way. Whatever it is, it will sit in water, get splashed or even submerged, so it needs an airtight seal. If it has handy external storage pouches or pockets, so much the better.
Recently in France I tried an Underwater Kinetics box (22cm x 16 x 8; 540g, above left) used on ebay for under a tenner. It’s about the size of a Peli 1150 but a bit less deep and took my Kindle Fire, camera, wallet and bits. It’s light enough to carry away from the boat and also happens to make a handy camera stand. But most of the time I use a 20-L Ortlieb Travel Zip (left) which zips open easily and stores loads. As for a camera? This is what you want.
Cheap alternative: large, clip-seal lunchbox and a plastic bag.
6. Repair kit
A couple of feet of Tyvec or similar tape and a small tube of Aquaseal is probably all you need for quick repairs. Something I’ve never had to do in all my years of packrafting.
Cheap alternative: Pieces of vinyl tape stuck to you spare repair patches.
The other year while leaning over on a salmon pen platform, my cherished six-year-old Benchmade Griptilian slipped out of the pfd and down into the briny depths. We ummed and ahhed about diving down to retrieve it, but I’m told these pens are 20-metres deep and can hold no less than 80,000 fish.
It was a bitter loss, all the worse when I saw what a replacement cost new. Long story short, I replaced it with a similarly anti-stealth orange PBK EMT Rescue Knife for a few quid (left). Like they said “you won’t worry too much if you drop it off your lifeboat and [it] sinks into the depths.” No I won’t.
At 150g it’s heavy but locks out with one of those cheap ‘liner’ locks and has a window-smashing stud, should I ever find myself in the nightmarish scenario of being trapped in a sealed aquarium. You also get a pocket clip, plus a handy line cutter – a good idea when your packboat begins to acquire too many lines and straps all adding up to an entrapment risk when expelled from the boat in lively water.
As it is, I’ve long had a quick-grab Benchmade #8 Rescue Hook permanently attached to my main pfd (below). With no sharp point, it’s a good thing on an inflatable and rusts quietly away.
NRS Pilot knife
Then the other day I decided I could streamline things by ditching the somewhat illegal PBK EMT with a proper, quick-grab kayaking rescue knife. NRS’s blunt-tipped Pilot Knife seems the main one available in the UK at around £44. The RRK is another with a hooked tip. The NRS’ locking mechanism wasn’t the smoothest from new, especially when reattaching. I gave it some WD40, but as it is the blade exposed in the shealth looks too ‘knifey’ when strolling into Greggs wearing the PFD after a peckish paddle. So I managed to elongate the Benchmark’s fabric sheath and the NRS slips in there unseen, while still being quickly grabable.
Once you’ve cut yourself free from your boat, the next thing is to alert others of your distress. Some sort of pea in a whistle body gives it a more punchy warble. Look up referee whistles on ebay from Fox or Acme. The piecing blast it puts out will be hard to ignore.
Phone, knife, whistle
Practice self-recovery before you need to. With IKs, getting back in alone from deep water is easy compared to a hardshell. Same with a packraft. That’s part of the appeal.
Seriously: the best way to dodge dangerous situations is to avoid them in the first place. That’s not as glib as it sounds. For me, who’s written and talked (and even won awards) about adventure travel for over four decades, paddling is one of the more potentially risky things I do these days. Or at least one where I’m aware of my limitations paddling mostly alone. I got the whitewater thing out of my system some time ago and have settled on Grade 2 or portaging. At sea, I mostly do day trips in fine weather, which in the UK can mean days or weeks staring out the window. But I’ve yet to have a ‘moment’ nor come close to falling out of my sea kayak. On rivers, I’ve not been tipped out of an IK since my Sunny days and never in a packraft. That’s how boring my boating is! I’ve managed that by avoiding the high-adrenaline side of things: technical whitewater, pounding surf, gale-force winds, as well as being ready to portage or change plans mid-trip. I’ve had my fair share of dramas doing other stuff. For me the adventure with paddling is quietly exploring wild places with packboats. I leave the appalling fascination of this sort of thing to others ;-)
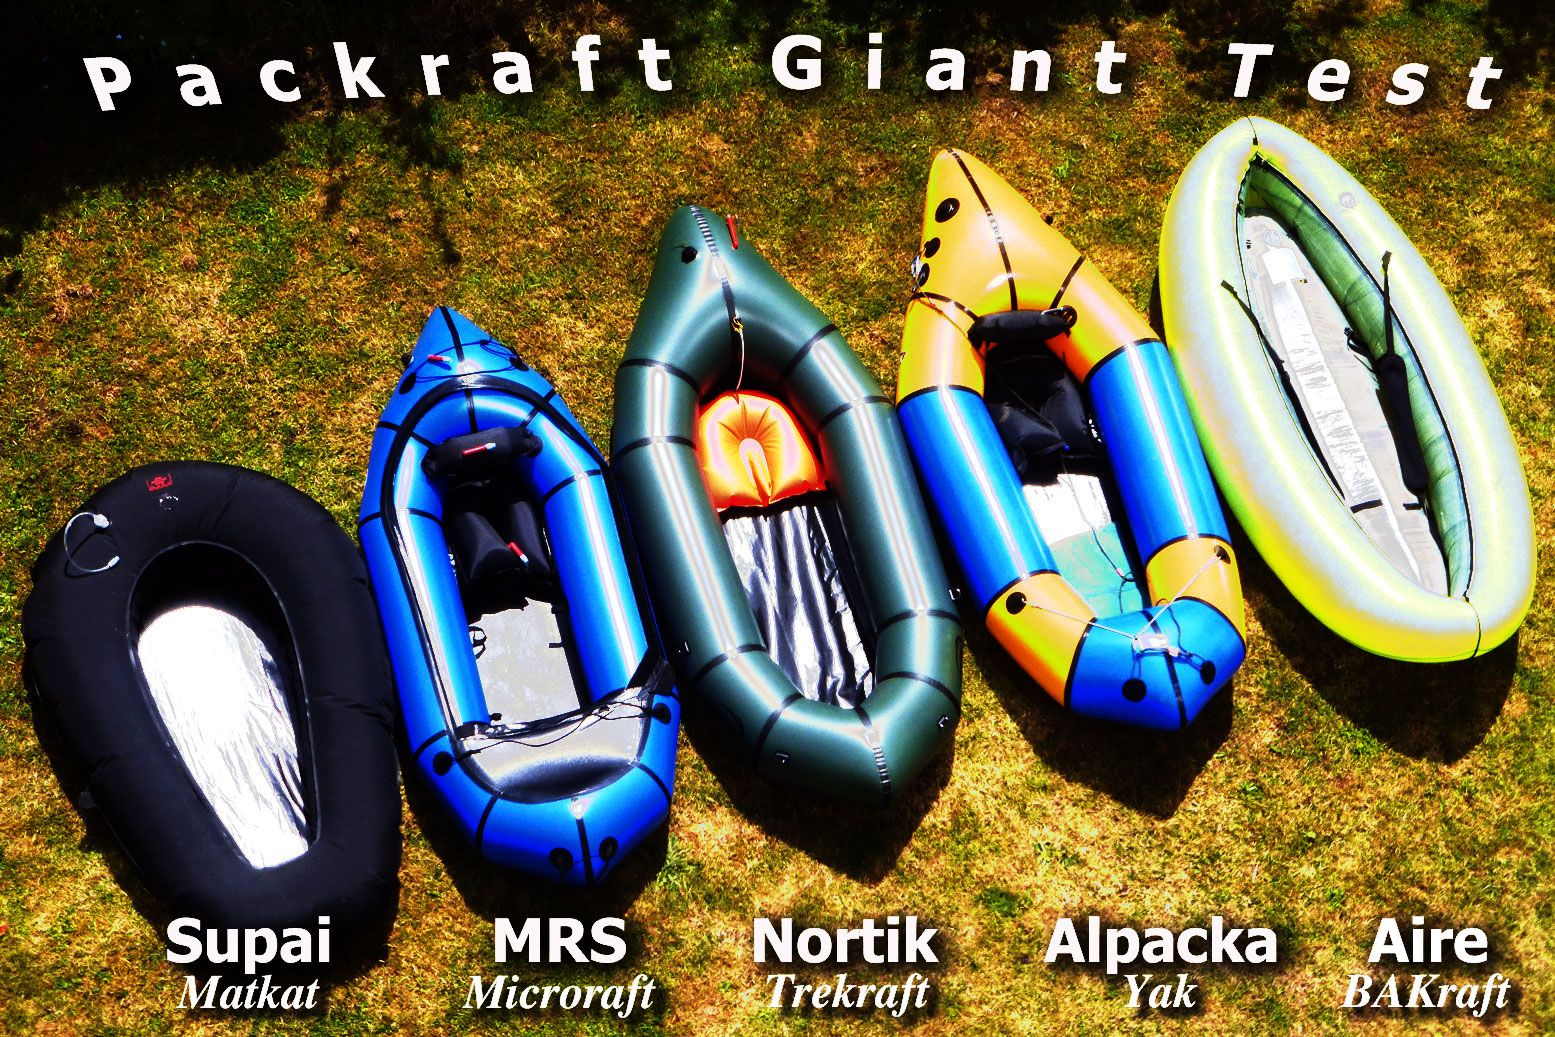
The range of packrafts has slowly expanded since I bought my first Alpacka Llama in 2010 and Alpacka rafts themselves have changed a lot in that time. But here in the UK people are still slow to see the benefits of these lightweight portable boats. Much of this reticence must be due to the price of these niche-interest boats which, at a glance look not much different from what I call Slackrafts: disposably cheap vinyl beach toys. Another reason might be that packrafts appeal more to outdoorsy types looking for a new way to enjoy the wilderness or countryside, but with no interest in acquiring the technical skills far less the storage and transport issues of hardshells. They won’t come across these boats very often but as this test clearly proved, anyone can hop into a packraft, set off down river in a straight line and tackle an Environmental Agency Grade III canoe chute. The testers all ‘got it’ and by the end some were already cooking up packrafting adventures.
We’re comparing a prototype Aire BAKraft as well as the new Supai Matkat, bothfrom the US; the Russian-made, German-branded Nortik Trekraft, and the Micro Rafting System (MRS) Microraft from China. The unusual Aire calls itself a hybrid IK-packraft, the Supai is an ultralight ‘crossraft’ intended for flatwater use. The other two more closely resemble Alpackas in current or former iterations. My current 2014 Yak made a fifth boat on our test, one which I at least could compare against the others.
These four boats were lent to us by what is now called the Anfibio Packrafting Store in Germany which sells, rents and now makes under its own Anfibio brand, the biggest range of packrafts and packrafting gear in Europe. Sven at the Packrafting Store helped clarify or correct technical aspects in this review but the opinions, observations and most measurements are our own. Some of the more exciting photos are also from the Packrafting Store. We asked NRS to participate: they didn’t answer. At the time Feathercraft’s packrafts were another option but Feathercraft is no more.
For this group test it would have been great to set off across the hills of Wales or Scotland, deploy the boats and then follow a river, hop out, walk some more, set up camp and swap notes. The reality of combining good weather and four other people with the free time to help do all this was slim. So we settled on an eight-mile day trip down the Medway River in Kent (above): me and four testers who’d all paddled (some with trousers rolled up) but had never packrafted. At each lock and chute we swapped boats, so everyone tried each raft at least once.
Me – Height 1.83m; weight 93kg Experience: Into IKs and packrafts for day trips and touring. On my third Alpacka.
Bob – 1.78m; 85kg Lilo incident, Margate 1965. Lea River canoe lessons, Harlow 1980.
Hannah – 1.75m; 75kg Much canoeing, some kayaking, love touring. Don’t understand eddies, yet.
Lois – 1.62; 63kg Dicking about on the Thames in Gumotex IKs and a Dagger. Rely on enthusiasm rather than skill.
Robin – 1.78m; 85kg Scouts canoeing, NZ white water, Colorado kayaking, various inflatable trips, usually with tides.
How the packrafts were weighed and measured Weighing was done using the classic Salter 1004 SSDR digital kitchen scales. They come with a classy brushed steel finish and still rate at 4 stars on amazon. They were checked and registered 500ml of water as weighing 500g.
Each boat was weighed exactly as it came out of the box, and then weighed again as it was actually paddled, without air bags, repair kits or straps (where included). It was then weighed again before going back in the box. All dimensions were also taken twice, the second time using stakes to get the external measurements at the widest points (above). Internal dimensions were taken at the shortest point, usually halfway up the curved tube side. Measurements from other sources may vary; there’s a table at the bottom of each review’s page and the summary for quick comparison. * Our exterior measurements for the Matkat were 3- to 5cm less than the Store, but 4cm longer and 1.6cm slimmer than Supai states. Unnoticed leaks during the measuring stage may have stopped us pumping the boat up to actual size.
Construction All these packrafts are made from pliable fabrics which form airtight vessels when inflated by human power alone. That’s about 0.03 bar or 0.4psi according to the Packrafting Store’s tests and probably too low for a regular manometer to measure accurately. The BAKraft uses an in-line ‘squeeze pump’ to potentially attain 0.17bar or 2.5psi – firmer than most vinyl IKs. All the models used here except the Supai were pressure tested to an impressive 0.5 bar (7.25psi) by the Store without exploding into a blaze of TPU. As a comparison, my old Grabner ran 0.3.bar as was as stiff as a gangplank. Hardshell-like rigidity is an inflatable boat’s goal, and while design and shape might come into it, some rafts become more rigid than others and so perform better. The best rafts use a fabric (or construction design) which becomes stiff when inflated but is pliable when folded (especially at low temperatures) as well as being durable against sharp impacts and abrasion. Among other things you could add resistance to UV rays, ready supply and ease of assembly in the factory, repairability on the trail, and a range of fabulous customer-friendly colours.
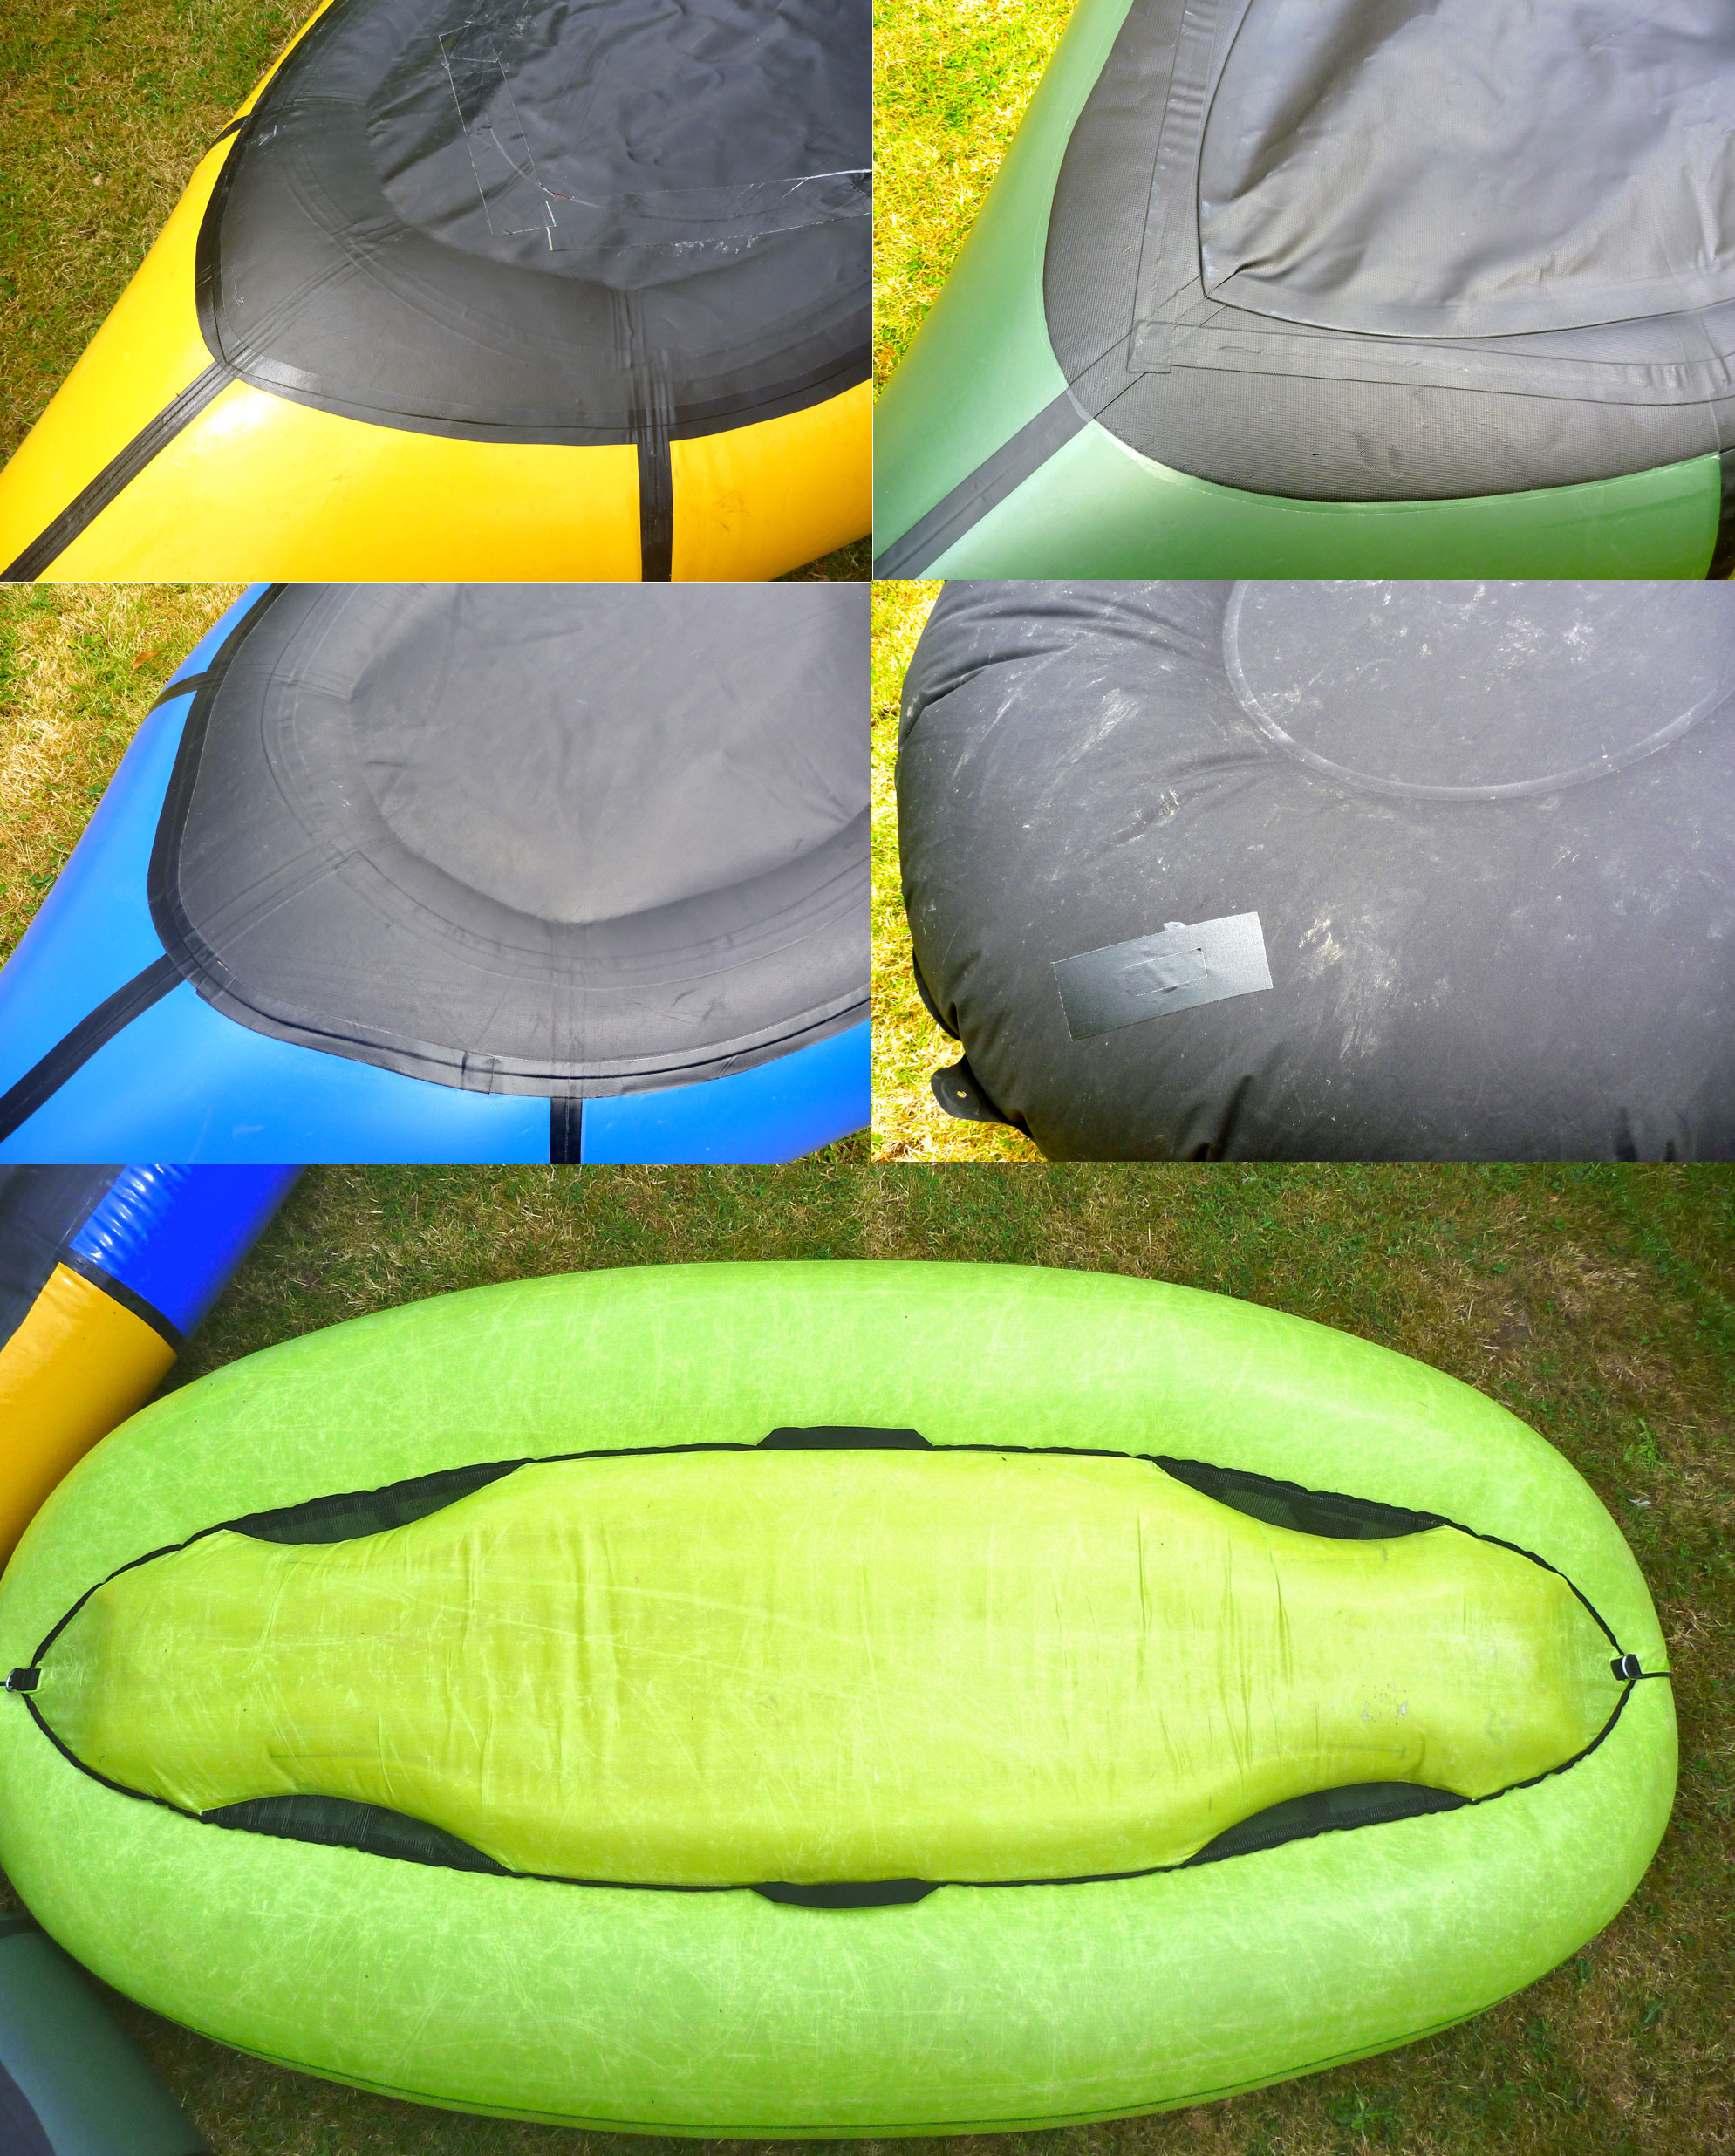
Broadly speaking the hulls of the Alpacka and MRS use ten panels of urethane (TPU) coated nylon fabric which are sewn together. Tape is then heat welded over the seams. The Alpacka fabric is only coated on the outside; the Nortik uses a similar double-coated fabric to the MRS (above; green, but not our Trekraft), but the Nortik’s seams are heat-welded with thicker tape (no sewing).
Double-coating adds weight and other technical aspects of proprietary coated fabrics vary greatly; they’re often specifically formulated for a raft manufacturer. The benefits of an inside coating are a second barrier to punctures when a light scratch to the exterior reaches down to the fabric core but doesn’t actually cut through it.
The floors on the Yak, Nortik and MRS are glued on then taped over (Nortik on the inside, the other two outside). They’re typically two or three times the denier rating (thread weight) of the hull fabric. The Alpacka uses something called ballistic nylon which sounds cool but I’ve found is far from bulletproof. No part of an inflatable raft weighing just three kilos can be expected to be. Occasional repairs are all part of ownership, like a bicycle’s tyres. So is rinsing any grit out the boat before it works its way into the nooks and crannies. On the right click the extra large picture to have a close look under the boats and compare workmanship.
The superlight Matkat is in a class all of its own, entirely made from 75-denier ripstop polyester with a single urethane coating on the inside, the same weight (and sealing method) as an MSR water bag. The red picture below right is of another Supai we tried which you’ll see had a diamond pattern on the surface. The black Matkat we used here had a plain surface like an MSR bag. On both boats the four panels (floor, inside, top and bottom hull) are heat-welded together. It’s possible to repair these seams with a hot iron (or glue).
The AireBAKraftprototype we tested used a thin and slightly stretchy urethane film ‘inner tube’ or collar supporting the hull, and a much thicker and stretch-free urethane-coated yellow nylon fabric for the I-beam floor (left). These bladders or ‘AIREcells’ as Aire calls them, are contained inside a sewn-up shell of fabric which need not be air- or watertight. If I interpreted the owner’s manual correctly then the BAKraft’s green exterior shell is made of Spectra and the grey interior of lighter-weight Dyneema fabric. You may know stretch-free Dyneema guy lines found on better tents.
The urethane bladder can be accessed for repair via long zips (left); the nylon floor can be pulled out for repair from each end. On packing or refitting care must be taken not to twist the bladders. I’ve never been a fan of it (for reasons explained later) but this AIRECell system has been used by Aire on their PVC whitewater rafts and IKs for many, many years. With minimal seams compared to a traditional packraft hull, air retention is excellent. On all the boats seats, backrests and decks (where present) are typically made from urethane-coated nylon with seams or joins heat-welded and maybe taped.
Inflation/deflation If you’re combining walking with navigating bodies of water – packing + rafting – you want a boat which inflates and deploys without any faffing about. In this respect the Microraft was the best of the bunch. It used the proven screw-in inflation bag (see video below) and, being a small volume boat, took about ten ‘scoops’ to fill up. The main valve cap is attached with a short plastic ring tab – no fiddly bits of string. Top off the air pressure by blowing all you got into the twist-lock valve and with practice you’re good to go in three minutes.
In the video below, from arriving at the beach to paddling away takes about 8 minutes. Speeded up 15x. A jet passes overhead.
My Yak followed exactly the same inflation procedure, but being a higher volume boat (a little bigger than the one in the video above) took twice as many ‘air-grabs’ to fill up before topping off with lung power. Every time I do this I wonder whether my super-thin airbag will split or unravel at the seams if I scrunch too hard. I can feel the air leaking through the sides.
One-way spring valve
Like the MRS, the Trekraft’s airbag is also made from a reassuringly thick fabric, but is spoiled by a push-in plug, even though there’s obviously a thread in the boat’s port. Compress too hard or if it’s wet and the bag plug might pop out, so inflate gently. Instead of using the old twist-lock to top-off, the Trekraft has a one-way spring valve stem with a cap (which came adrift and eventually got lost). This valve (above left) is dead easy to use and avoids the risk of over-tightening a cheap plastic twist-lock valve (as on older Alpackas). But when airing down, with the spring valve you can’t suck and seal the remaining air out unless you jam something in the valve as you suck. Packraft or IK, this ability to suck your boat down is handy for compact packing.
Next comes the Matkat. No airbag supplied even though the Supai website states: ‘We are working on developing an inflation sack to work with our valves hopefully we will have it released in mid-2014.’ When we tried the smaller red Supai Canyon Flatwater II in late 2013 we found it took about fifty breaths to fill, plus topping off. The higher volume Matkat takes about eighty breaths. I like breathing but that’s not something I’d want to do more than a couple of times day to save the 100 grams of an airbag.
Oh…
Unlike the Alpacka, Nortik or MRS, the Supais use a male threaded dump valve which protrudes from the boat and onto which screws a cap with a thin tube and the twist lock valve on the end (right, red boat) – a neat and simple system that’s just about accessible for on-board top-ups. Alpacka use an identical threaded valve port but on their air bags; it’s a regular American plumbing ¾-inch size. If I had a Supai packraft I’d get an Alpacka airbag for $20 and then either find a female-to-female plastic connection, or jam on a short section of clear plastic tube to join them together. That way I can save the hyperventilating for Glastonbury.
That leaves the BAKraft. Even before I received the boat I had my doubts after seeing pictures of the convoluted inflation system which Aire suggest.
The BAKraft uses Halkey Roberts (or very similar) valves, as found on proper IKs and whitewater rafts: one in the floor and one for the urethane bladder that fills both sides of the hull, or what what they call the ‘collar’. These valves work like car tyre valves (or the Nortik top-up) – a spurt of high pressure opens the seal and a spring seals it shut – except that you can lock them open by pushing and twisting the valve stem. This is necessary to deflate a boat easily, or to loosely pre-inflate it without having to push against the valve spring. These valves are really designed to be used with pumps not flimsy air-catching inflation bags, far less lung power. A simple and compact push-fit pump like a K-Pump will work. A high-pressure stirrup pump with a ‘Summit’ bayonet connector on the end will be even quicker, but is way too bulky to travel with.
With the BAKraft you’re supposed to use the backrest/cargo bag as an inflation bag and scrunch air into the boat via a tube fitted with a bayonet connector (left). But the backrest bag’s weight, odd shape and relatively small volume makes this task awkward, even past an opened intake valve which is still a restricted airway. I gave it a go but soon saw that, while I’d get there in the end, it was going to take ages.
Once the boat has ‘shape’ you’re then supposed to quickly close the boat valve then splice in a low-volume/high-pressure hand-squeeze pump into the ISC bag. The squeeze pump has another one-way spring valve in it: charge it with air from the backrest then squirt air by hand past the closed valve until the boat is firm. This squeeze pump is quite a clever idea but at about 150cc a go will take a while to do the job. Sorry to say I wasn’t even curious to find out how long – I’d guess at least 15-minutes for the whole inflation, same as it took to pump up my 4.5-metre kayak the other day with the one-litre K-Pump Mini. So instead I reached for my Bravo stirrup pump – it took two minutes – and on test day I brought my compact K-Pump which took about twice as long.
I see now that I’ve actually RTFM I used an alternative method. The image above right suggests you don’t use the backrest bag to charge the squeeze pump, but just blow then squeeze the hand pump directly using an oral tube, like a silent bag pipe. If I’d thought of that I might have tried it as it’s a much less clumsy way of topping off the BAKraft.
All the other packrafts here run at an air pressure that’s governed by the lung power you can exert through the top-off twist valve (left). But with a one-way valve you can pump more air into a raft (that goes for the Trekraft’s top-off valve too, now I think of it). The BAKraft is made to run an IK-like 2.5psi although you’re warned not to over-pressurise or allow it to happen. That can be easily done of you get carried away with a stirrup pump or leave the raft out in the hot sun. It may have seemed clever to give the necessary backrest multiple uses, but it works only a little better for filling the boat with air than it does as a backrest (see review). I’d recommend getting a $20 Feathercraft inflation bag which comes with the ‘Summit’ bayonet fitting from their BayLee packrafts (they also use Halkey-like valves). And if you don’t get on with the oral/hand pump system, then get a 600-g K-Pump Mini too. I’d guess using both these devices will more than halve the inflation time.
From the four corners of southern England the throng gathered at Tonbridge Town Lock, the boats got pumped up, cooled off in the water then topped up some more. Then, after a quick groupie, we set off down the easy first chute. I took it upon myself to get in the Matkat while I was still feeling fresh.
Some people place a rubber cap on the paddle shaft and use it as a walking stick. This application makes me nervous about damaging the paddle shaft.
Luc Mehl, The Packraft Handbook
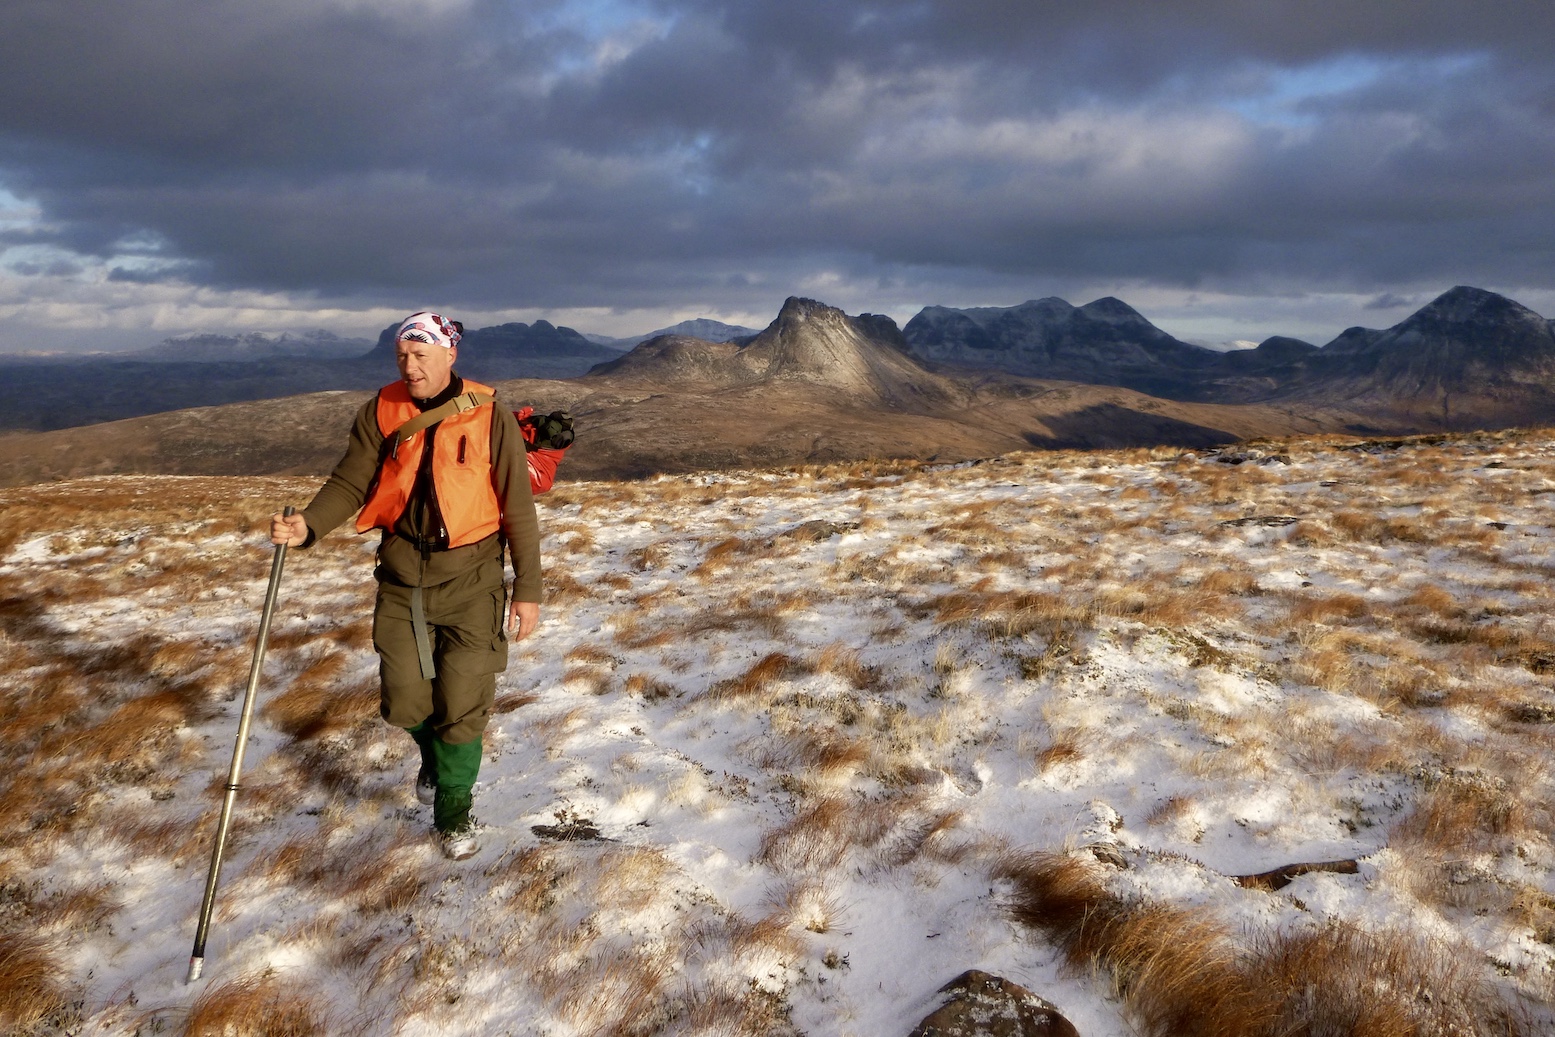
Packstaff in Scotland
No one’s ever asked me how to make a packstaff attachment for their four-part paddle, but I’m going to tell you anyway. After over a decade, I’m still a big fan of my idea.
What’s so good about packstaffs? Well, they’re a great way of converting your light but strong paddle shaft into a light but strong walking staff that’s stronger and longer than trekking poles which are useful on the trail, but redundant on the water. Not needed on flat ground, staffs help you trek uphill and down dale with the same benefits as trekking poles, spreading the load off your ageing kneesto your arms and chest. And when hauling a full load, they help with balance, reducing the effort need in your core for self-correction. I am sure my legs have felt less tired after a full day of loaded packstaffing in the hills.
Packstaff in Turkey
Plus a longer packstaff can easily take your weight as you inch downhill with a heavy backpack pushing you forward. A cheap telescopic trekking pole would collapse, or sure feels like it might. Like any long staff, they’re also handy for prodding bogs, fighting off Turkish mastiffs plus help with vaulting narrow streams and ditches or fording stepping stones in a bid to keep the feet dry. Again, a lightweight walking pole may not be stiff enough to do this. An MYO packstaff nib weighs 200g, costs next to nothing, and works with any four-part paddle, like my old Aqua Bound Manta Ray. There’s even a bloke on ebay who’s partly copied my concept. See bottom of the page on how to simply converting an Anfibio Vertex Tour by sawing off the end of a canoe paddle handle of one section and using the other canoe paddle handle section.
Packstaff in Mauritania
Find a bit of tube that’s close to the right diametre to slip into your paddle where the blade goes. My blue tube was from some cheap paddle that came with a long-gone slackraft. Add tape to make a snug fit, if necessary. But not so tight that you risk jamming when wet. Drill a hole at a point where there’s enough overlap to make the assembly strong, and then fit a spring clip. I bought a pair on eBay for a fiver, though you can buy cheaper pressed out ones for less. As it happens it turns out my Aqua Bound uses cheap pressed clips. You may not be able to find the typical 7-8mm buttons to fit the AB files. I settled with 6mm. This spring clip is easy to fit and a big improvement over my previous ‘slip-on’ nib which got sucked off in bogs.
Match up the overlapFit spring clip into blue nib6mm button in 8mm hole
Collar is important to take loads off the button
Next, line up the two holes or fit the spring clip and add a collar. You don’t want the nib’s striking force impacting on the clip’s button alone. I sawed a bit of old fibreglass kayak shaft which was a tight fit on the blue tube, so split it then glued it on. That glue didn’t work so well so I added a couple of rivets. The collar also protects the end of your paddle shaft. The actual end ‘nib’ is currently a black plastic screw section. Stuff and glue in a bit of cork or other blockage in your nib end (right) to stop the tube slowly filling with mud or stones. The nib weighs 137g.
All up my packstaff weighs 213g. The AB paddle is 890g
Using the packstaff with an open shaft at the top, I sometimes worry that stumbling onto that shaft at face height could take an eye out. With a canoe T-grip (below left; fiver on ebay) you can press comfortably on the staff coming down a hill, and it also acts as a handy hook. Mine had to be ground down to fit. It weighs 78g with a 6mm SoftTie to attach it to the nib during transit.
When you don’t need to carry the packstaff you can stick it under a shoulder strap, but I find it slips out. So better to break it down to two parts and slip it under a belt or similar loop. Again, I find the double-loopable SoftTies handy for this, and the loop stays on this paddle to make a handy paddle leash attachment using the mooring line when sailing or in rough open water.
Packstaff 2
In 2022 I got an Anfibio Vertex Multi Tour 4-parter so sold my old Aqua Bound Manta Ray 4P which weighed about the same. The Multi Tour comes with two canoe handle sections to make a pair of canoe paddles. I can’t see myself canoe paddling but figured there must be a way to convert these pieces into a Vertex packstaff. Sure enough there is. Take the canoe paddle add-on with the clamp on the end, the section of shaft also with the clamp, then saw the handle off the plain canoe handle section. You now have a three-part, length adjustable packstaff. Jam whatever nib you think is needed onto the thick carbon-plastic end of the sawn-off handle. The whole thing weighs 400g, and the advantage of length adjustment between 100cm and 133cm, which may have its uses.