The best inflationvalves for an inflatable packboat aren’t the bungs you find on an airbed or an old Semperit. Nor the thin, twist cap stems off a Feathercraft Java or an old Alpacka. What you want are one-way valves. Like a car-tyre valve, one-way operation as well as a secureseal are the key, so what pumps in doesn’t push back or escape when you remove the inflation hose. Found on cheaper IKs and packrafts Boston valves are simple and effective for lower pressures. More below.
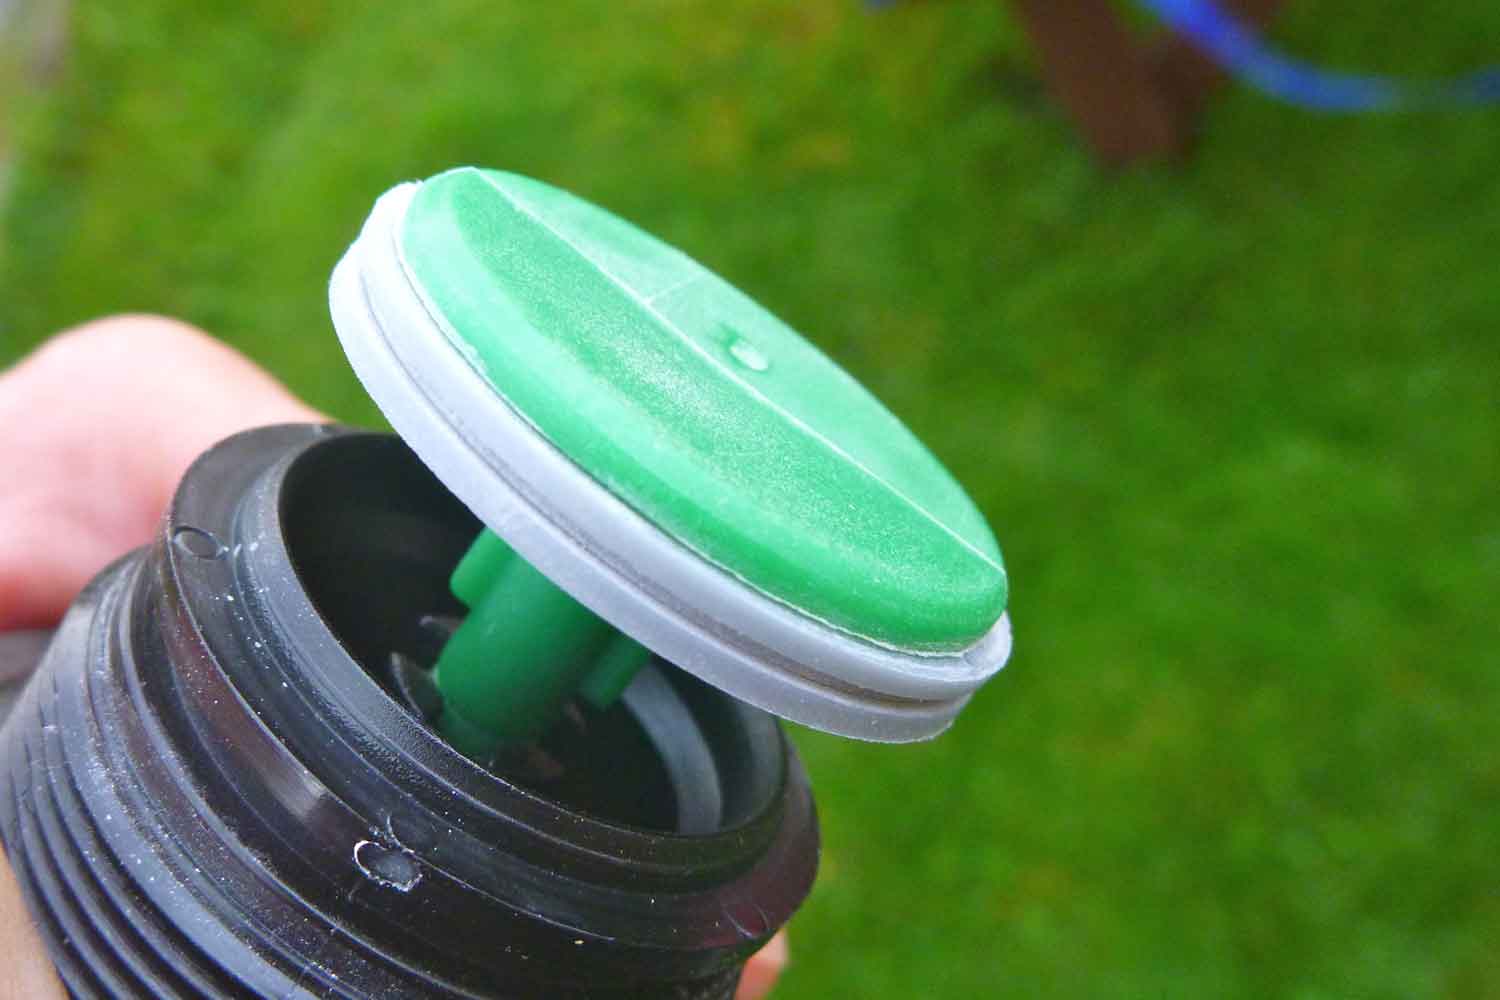
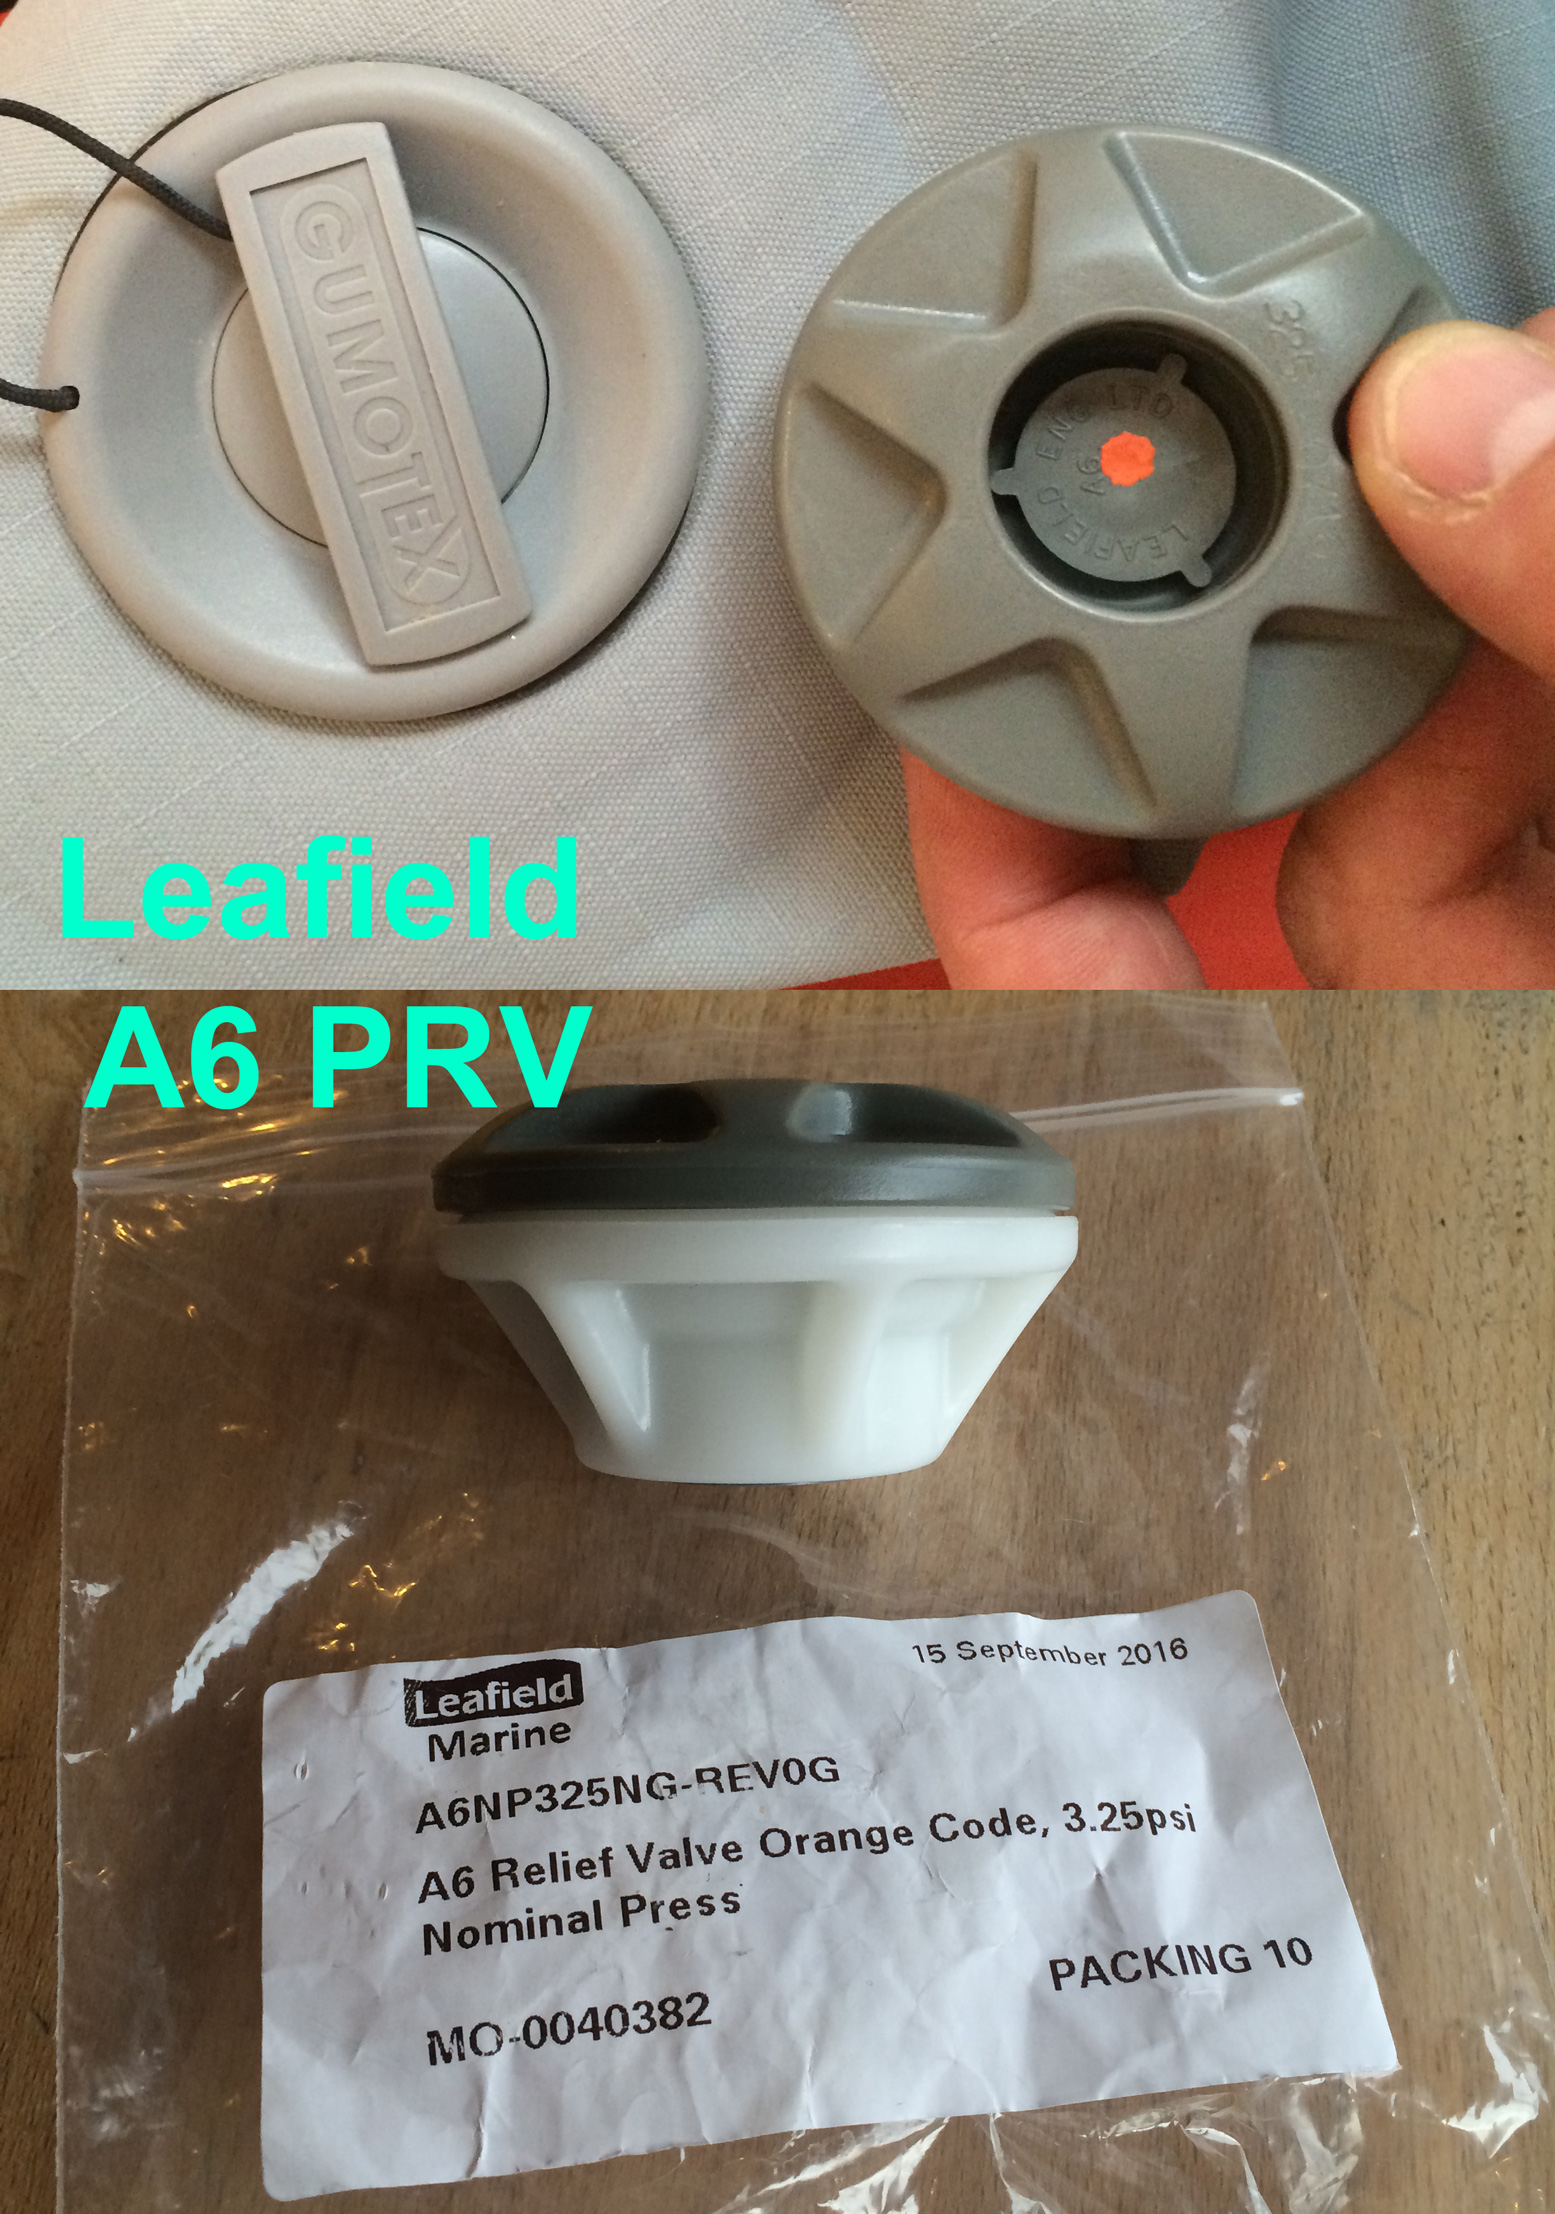
What I call raft valves (left) like Halkey Roberts, Leafield suit higher pressures and are needed for dropstitch panels. In America they’re called ‘military’ valves. With raft valves you either push and twist the button clockwise to lock open (deflating). For pumping up, push lightly and turn anticlockwise so the button springs back up to seal. This closed ‘button up’ position is the best way to transport an IK too. To lose a little pressure (say, the boat is getting hot in the sun) just jab the valve core button, same as on a car tyre.
Many raft valves are now ‘push-push’ (graphic left) which work like a clicking biro so are even easier to use. I always refit the cap seal straight away to keep water and grit out of the mechanism.
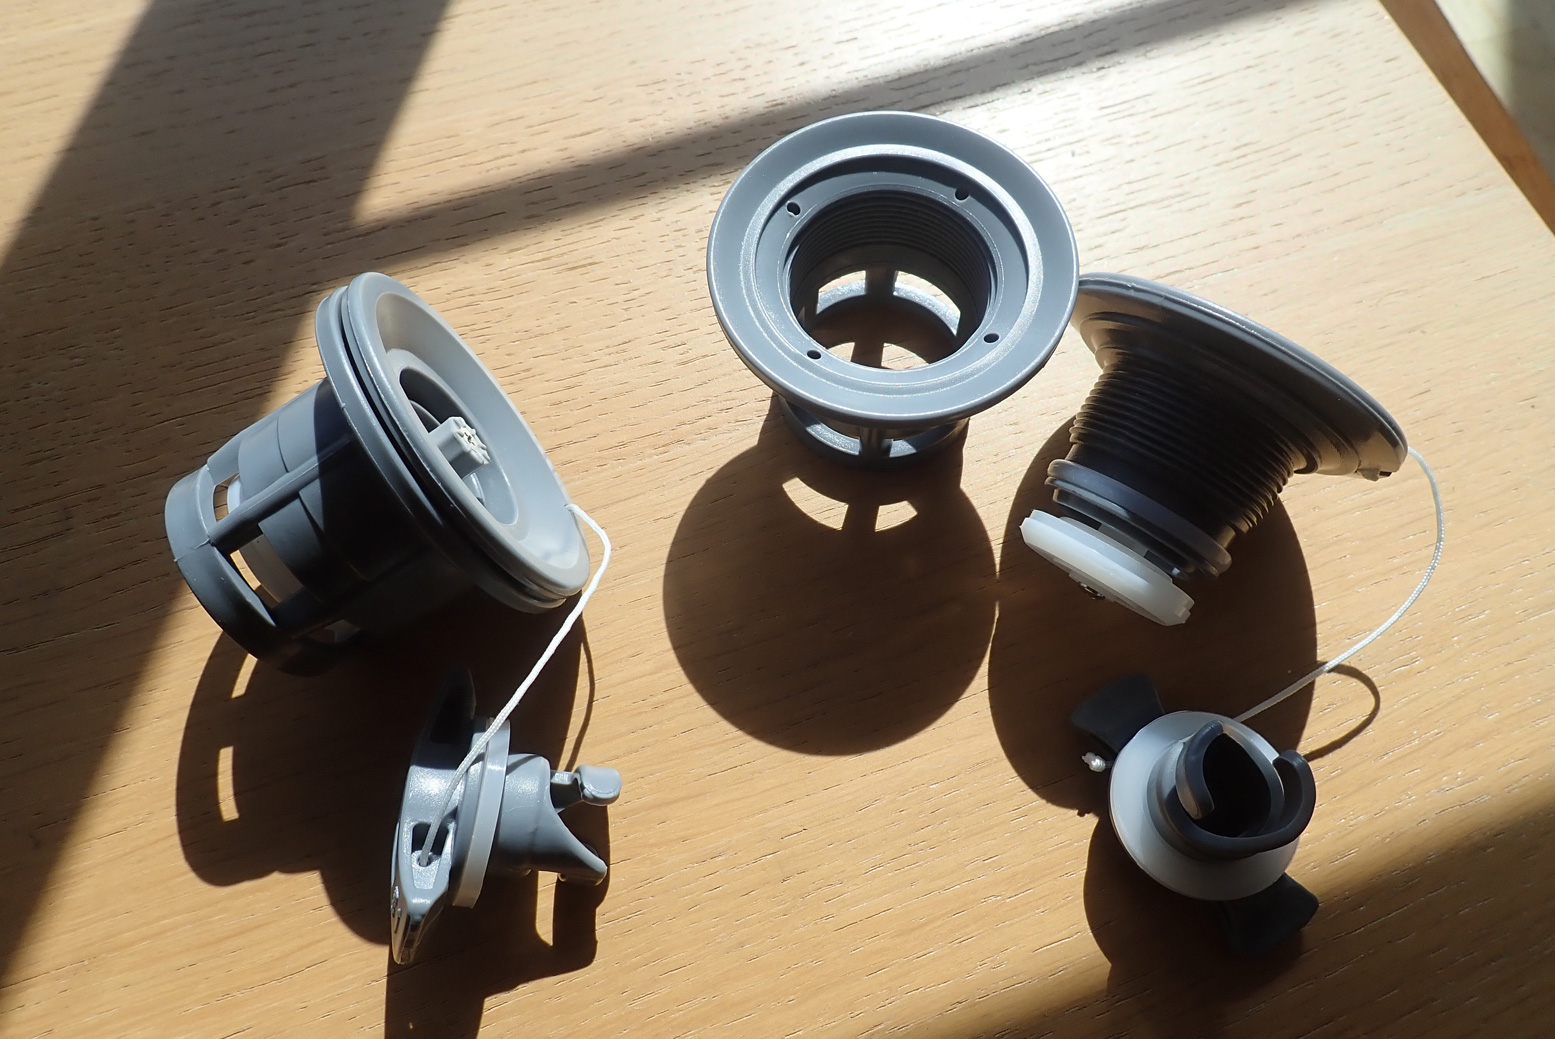
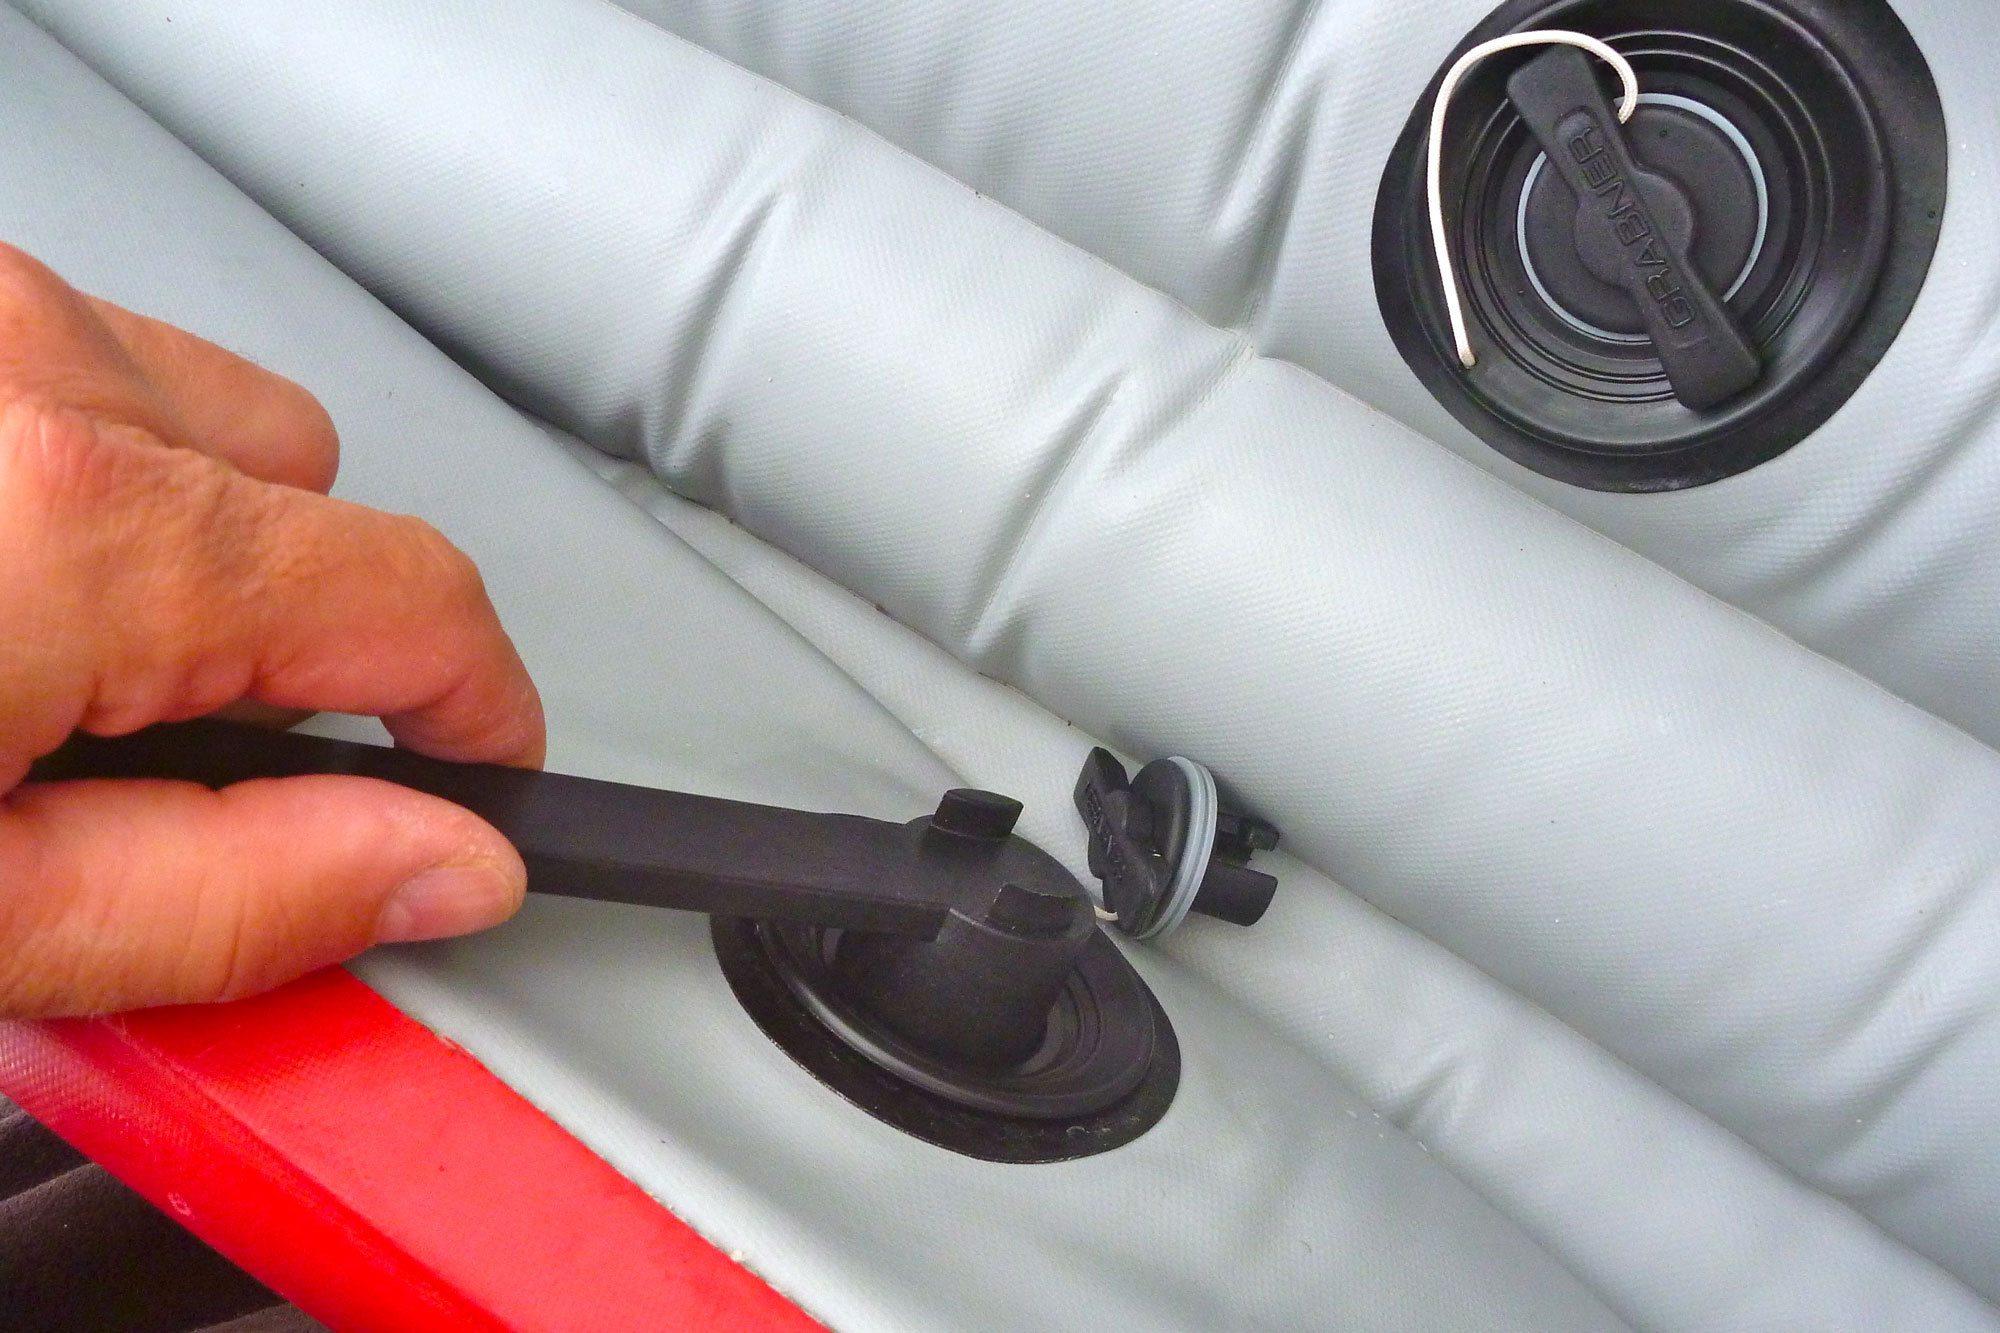
Two raft valves. On the left the collar goes inside the hull, the valve body screws into it tightly and the dust cap goes on top.
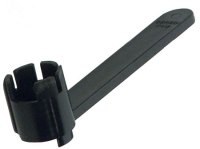
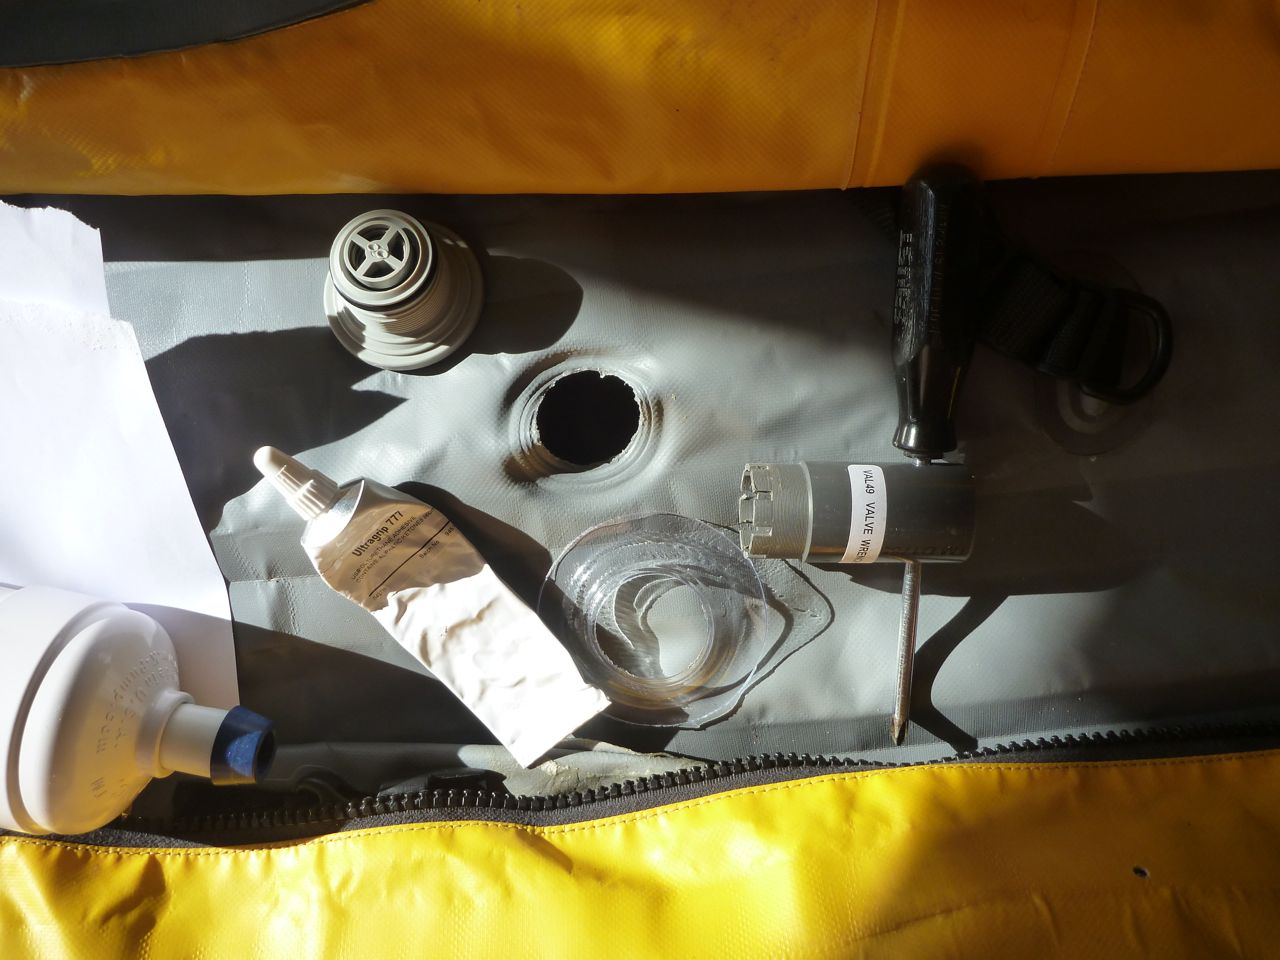
I’ve found these valves reliable on all my IKs, although this Gumotex 410C owner didn’t. Once in a while – or after the boat is new – you may want to check the valve is screwed tight against the fabric with the valve spanner, right. They’re also useful for removing the valve (or a PRV; see below) should it play up.
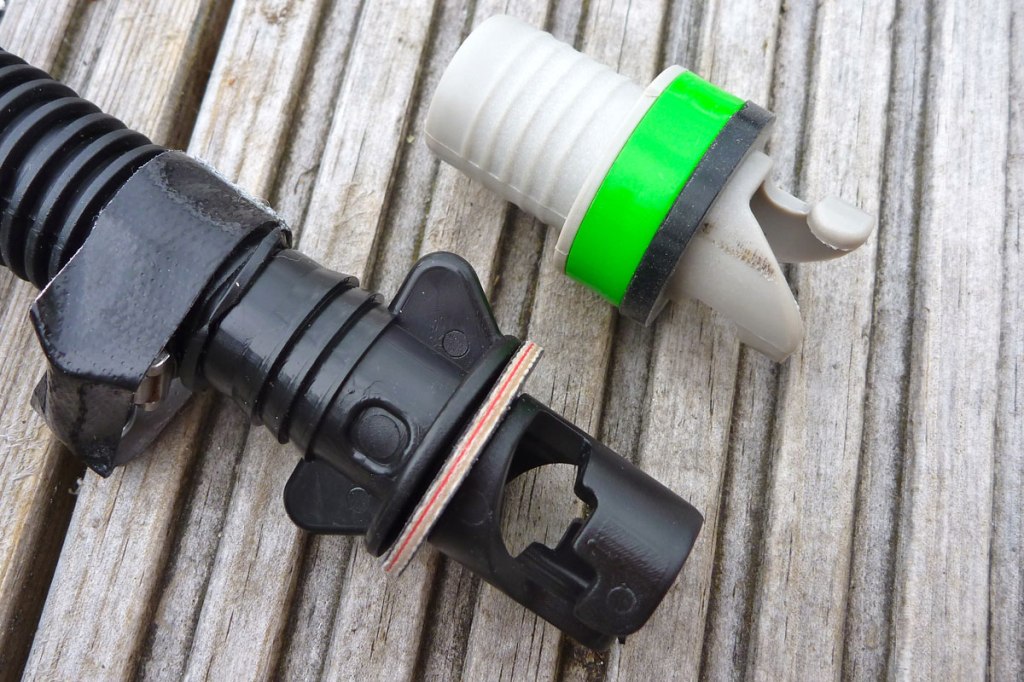
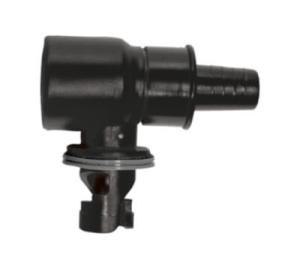
When it comes to inserting the inflation hose, a simple push-fit plug as shown below left can work; just jam the adaptor into the valve body and it usually stays in place while pumping. It looks cheap but on a Gumotex at least, works fine. With higher-pressure boats like Grabners and Incepts and some Gumotex (as well as dropstitch boats), the jam-fit can blow off so you’re better off using a bayonet fitting (below right) which won’t pop off as pressure builds.
Low-pressure valves for packrafts
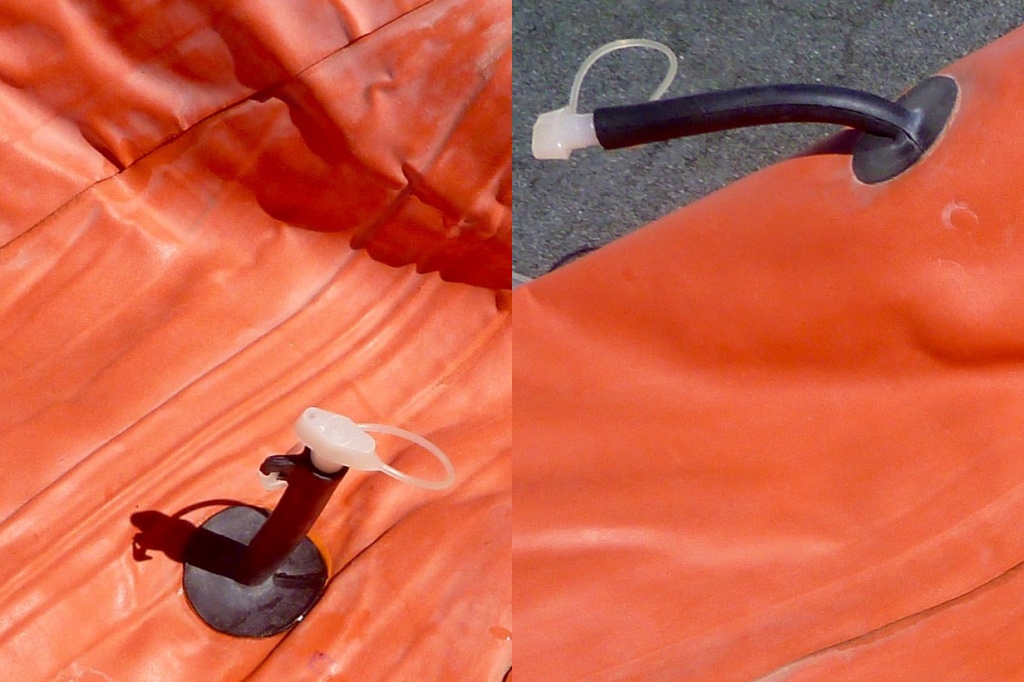
Alpackas and even Feathercraft used to use crappy, soft plastic twist-lock oral stem valves (below left) which you could never be sure were done up just right and which didn’t take well to pump nozzles.I suppose they were a step up from blow-up airbed plugs (below) which are still found on cheap IKs.
Retractable one-way flap valve. Annoying to delateLilo plugs: Ok for seats, crap on a hull
Now best used on inflatable seats and the like, they’ve been superseded by similar one-way stem valves (below right) with a light spring closure easily openable by lung pressure. They’re a bit trickier to deflate: you have to depress the ‘X’ with a finger while squeezing out the air. The one below right is actually on a buoyancy vest.
Twist-Lok: OK for seats and old packraftsSpring valve one-way for higher pressure
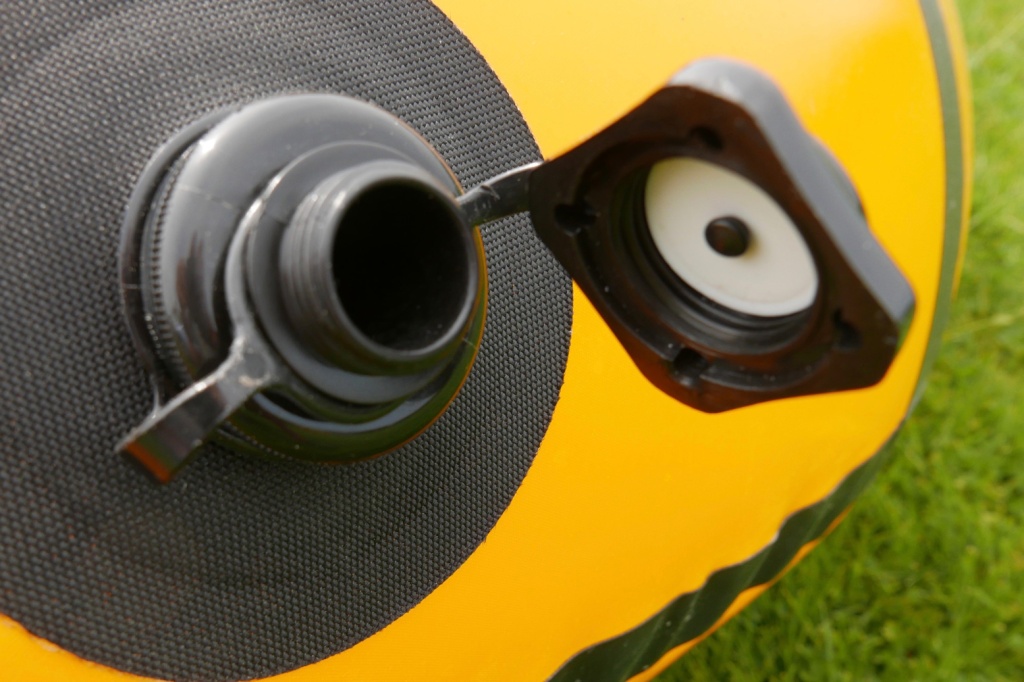
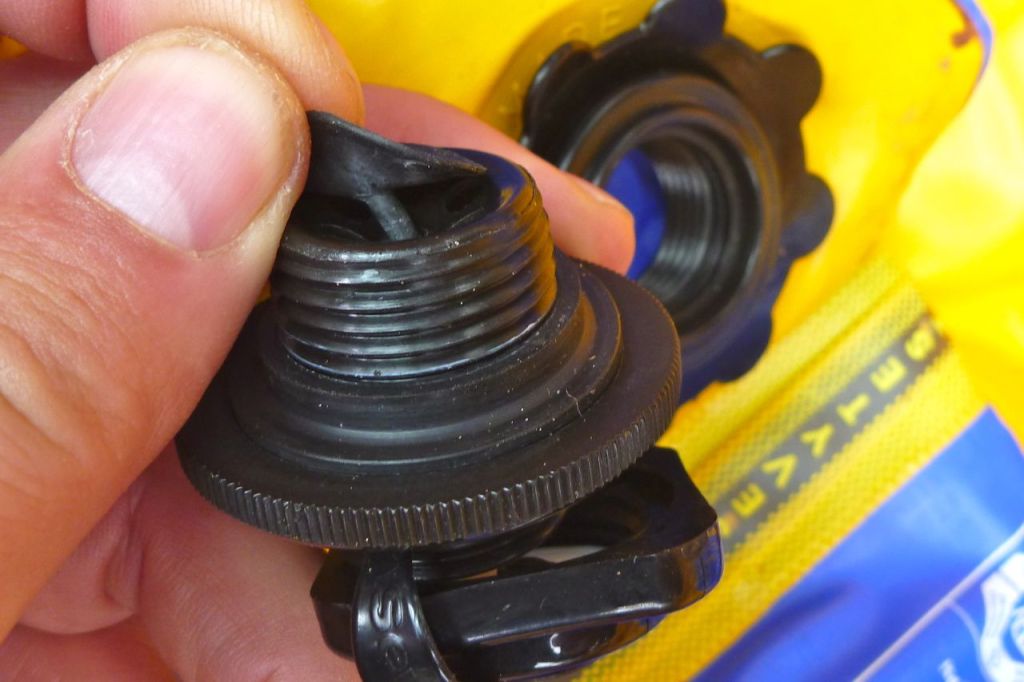
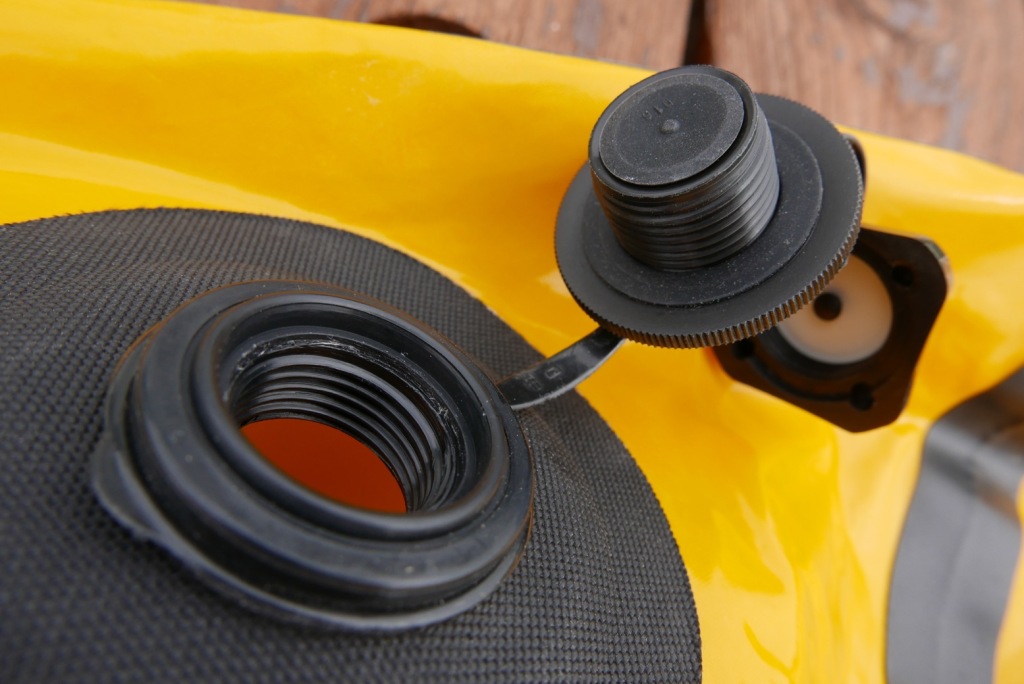
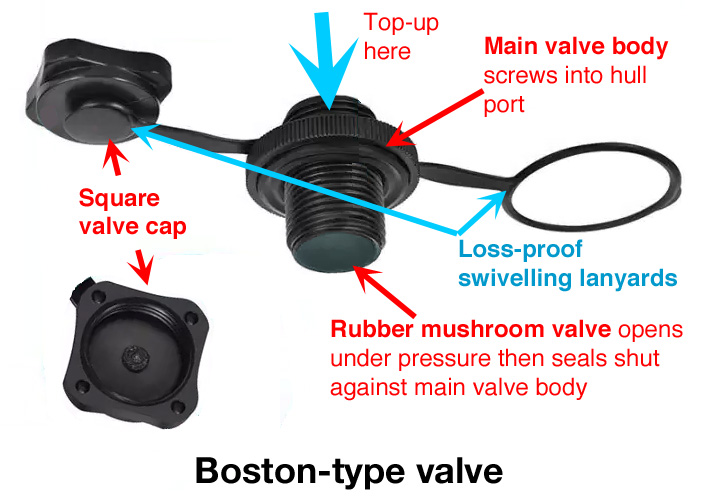
Boston valves is a generic name for a one-way valve long used on cheap IKs as well as slackrafts and have now become common on packraft hulls. Note they’re widely copied and not all may be identical, like well-known branded IK valves. The square top cap screws onto the round valve body which itself has a knurled edge to easily unscrew from the hull port (below right). Here you attach your air inflation bag or open to quickly dump the air when rolling up.
Inflation: top cap removedRubber ‘mushroom’ valveDeflation: unscrew valve body
Ideally suited to low-pressure boats like packrafts, they use a simple rubber ‘mushroom’ valve on a stem (above middle). Once the main valve body has been screwed back into the hull, unscrew the square cap to finish the inflation process by either topping off by mouth or with a hand pump.
A one-way Boston-type valve eliminates the need for the old separate stem valve and the whole assembly has swivelling plastic lanyards so nothing drops away when unscrewed.
Pressure release valves (PRV) for some IKs
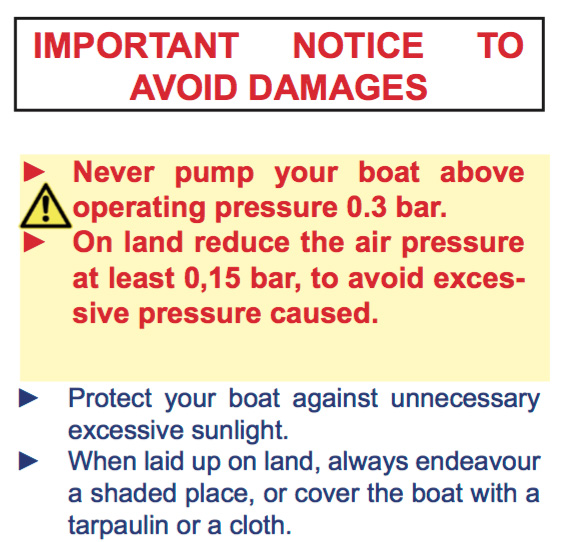
I’ve learned the hard way to be careful and not let an IK get too hot when out of the water. On a hot day you can feel the more exposed sidetubes tighten like a drum. This of course happens to be good for rigidity and paddling efficiency but isn’t good for the seams or an I-beam floor or the sewn seams of a cheap shell&bladder IK.
Oddly, not all Grabner IKs have PRVs which means…… faffing about with pressures on hot days.
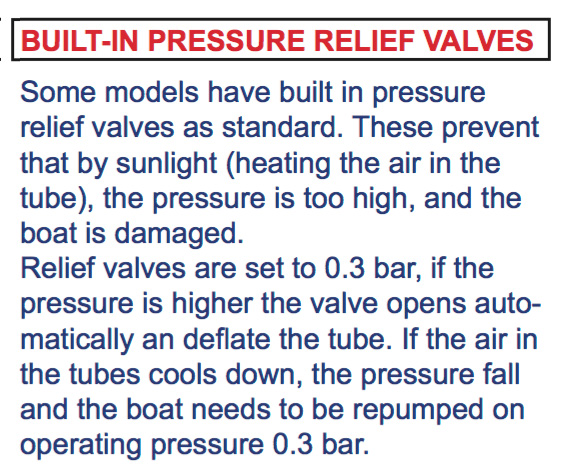
The floor tube on my old Sunny had a pressure release valve – oddly it’s something rarely mentioned in the specs, even on current Gumboats. It’s there to protect the I-beam floor which could rupture inside under pressure (I-beam floors explained here). The valve is set to purge (open) at a certain pressure when the air inside heats up, expands and pressures rise. With Gumotex it is 3psi or 0.21 bar. It means an IK can feel a bit soft on a cool morning following a hot day; don’t worry, you don’t have a leak, it just purged some air when hot yesterday and in the cool air make sit a bit soggy. A quick top up is all you need to do. The handy thing with a PRV is that it makes a good guide to how hard you ought to pump up the other chambers of the boat without PRVs when you don’t have a pressure gauge. At whatever pump effort the floor PRV starts hissing, that’s the same or a bit more pressure to put in the side tubes which usually don’t have PRVs.
As mentioned, the air in an IK can also get cooled, for example when pumping up on a hot day and then putting the boat in a cool river: a normal scenario. Cold air contracts (loses volume/pressure). Because you want the boat to be as rigid as possible, after initial inflation it’s worth topping up again once the boat is in the water; splashing helps cool the sides. Topping up, or tempering as it’s called, optimises rigidity and with long, 2psi boats you need all the rigidity you can get. Conversely, pumping up your boat in sub-freezing temperatures then putting it on water which actually ‘heat’ it up, though this is a much less likely scenario.
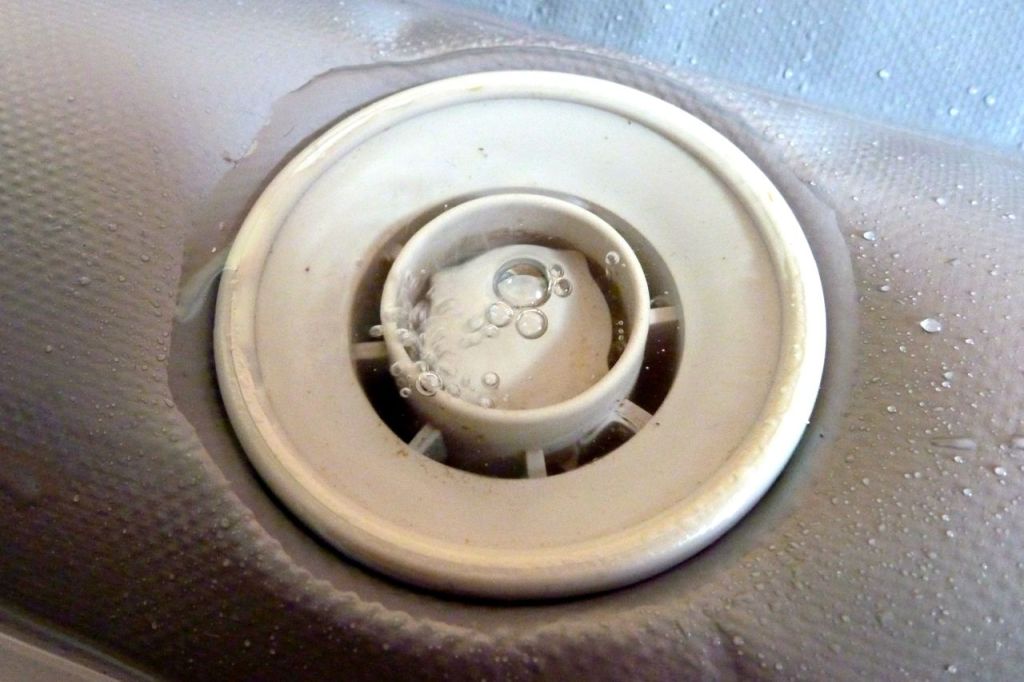
A PRV purging correctly
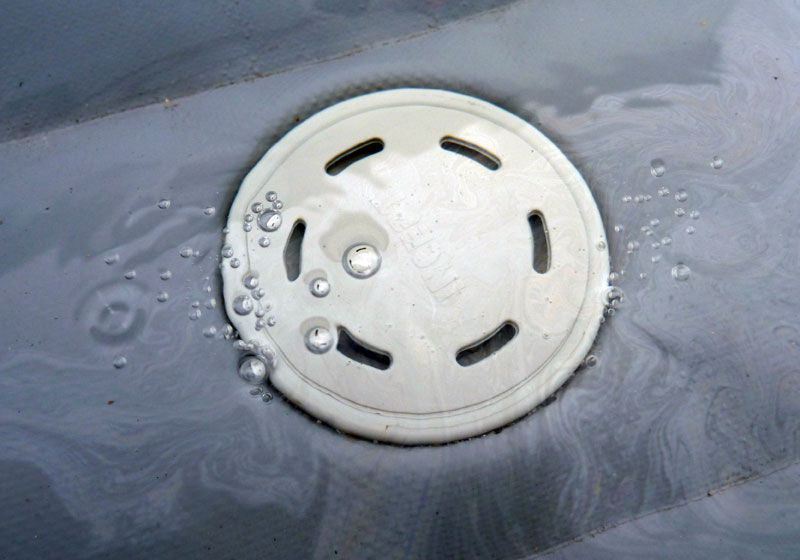
PRV leaking from the sides not through the valve. Needs tightening with a special tool; a common necessity with hastily assembled new IKs.
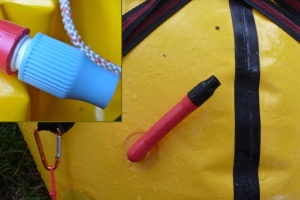
My higher pressure Incept K40 had PRVs on all chambers which meant you could confidently leave it in the Sahara and it would safely purge then feel a bit soft once cooled down back in the water. Picture above: Incept PRV test with the protective cap removed and purging correctly through the centre. Below: a PRV being resealed after leaking from the edges (left). This was because I failed to check tightness after buying the new boat, as recommended by the manufacturer. (My Gumotex IKs never needed such tightening or checking in years ownership.) I ended up also fitting sidetube PRVs to my Gumotex Seawave to run higher pressures and the be able to leave it pumped up and out of the water for months at a time. Like any valve, PRVs can leak due to grit on the seal or a weak or sticking spring. Grit is not so unlikely when you think they can’t have a cap and have to sit on the floor of an IK, with water and sand occasionally swilling in and down into the body. Try removing the cap and blasting it out with air and maybe give the spring a squirt with 303 (UV protectorant). The best thing is to remove the PRV with the same valve tool, inspect and clean the sealing surfaces and reinstall.
Oddly, my old Grabner Amigohad no PRVs at all and neither do the latest Holiday models and a few other Grabners, even though all run higher than normal 0.3-bar pressures. One presumes Grabner are so confident in their construction they’re not needed, despite the warnings above. It should be included with the boats, but if your pump has no gauge, Grabner do pressure relief adaptors to fit on the hose (left) which purge at 0.3 bar, so dispensing with faffing about with a handheld pressure gauge. It’s a good idea.
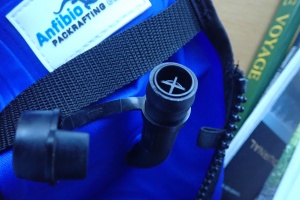
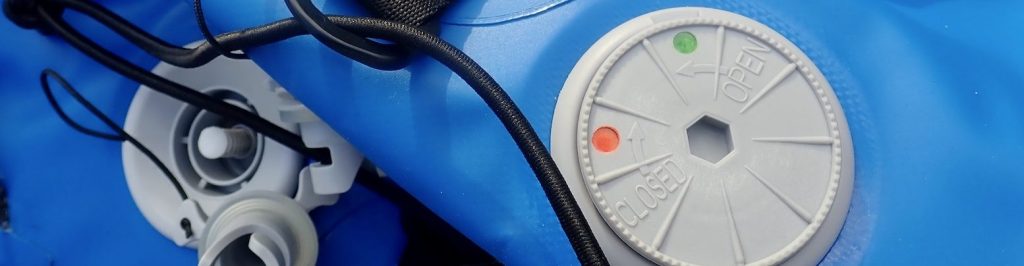
My current Zelgear Igla 410 has closeable 0.25 bar PRVs on the twin I-beam sidetubes (below). The separate DS floor runs twice that pressure but has no PRVs. I find it’s actually quite handy to ‘lock in’ the air during cool transits or when getting into the water. When the paddle is over I open the PRVs which hiss a bit back down to 0.25 bar. I leave it like that until the next paddle when I top everything back up.
Lockable PRVs; quite handy actually
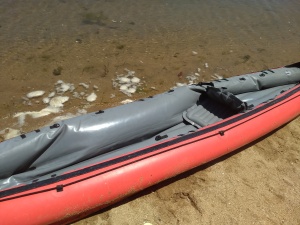
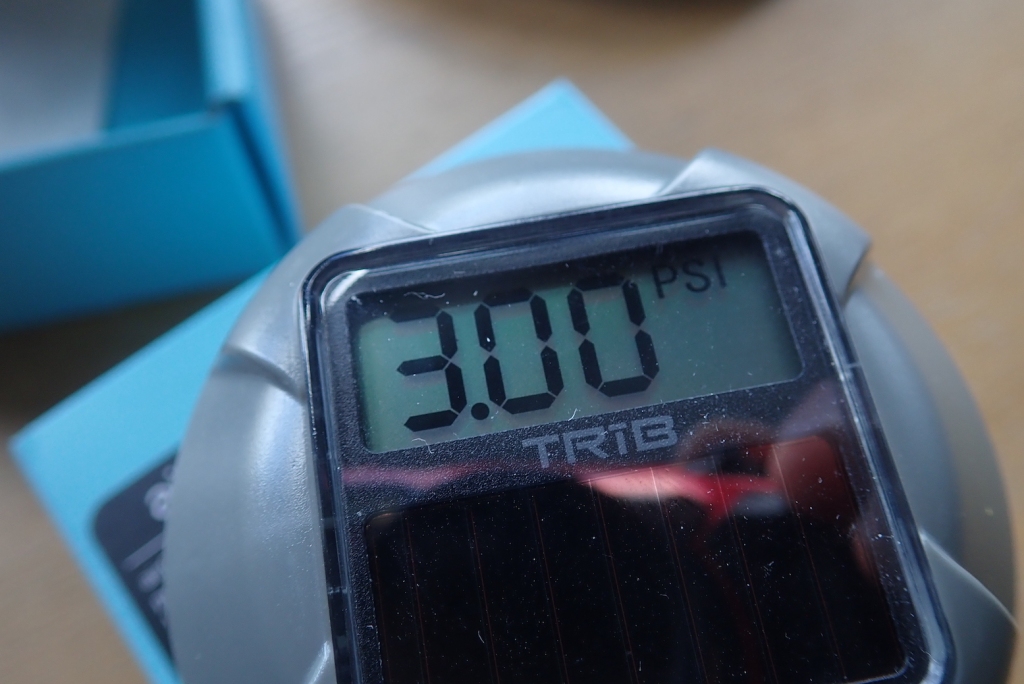
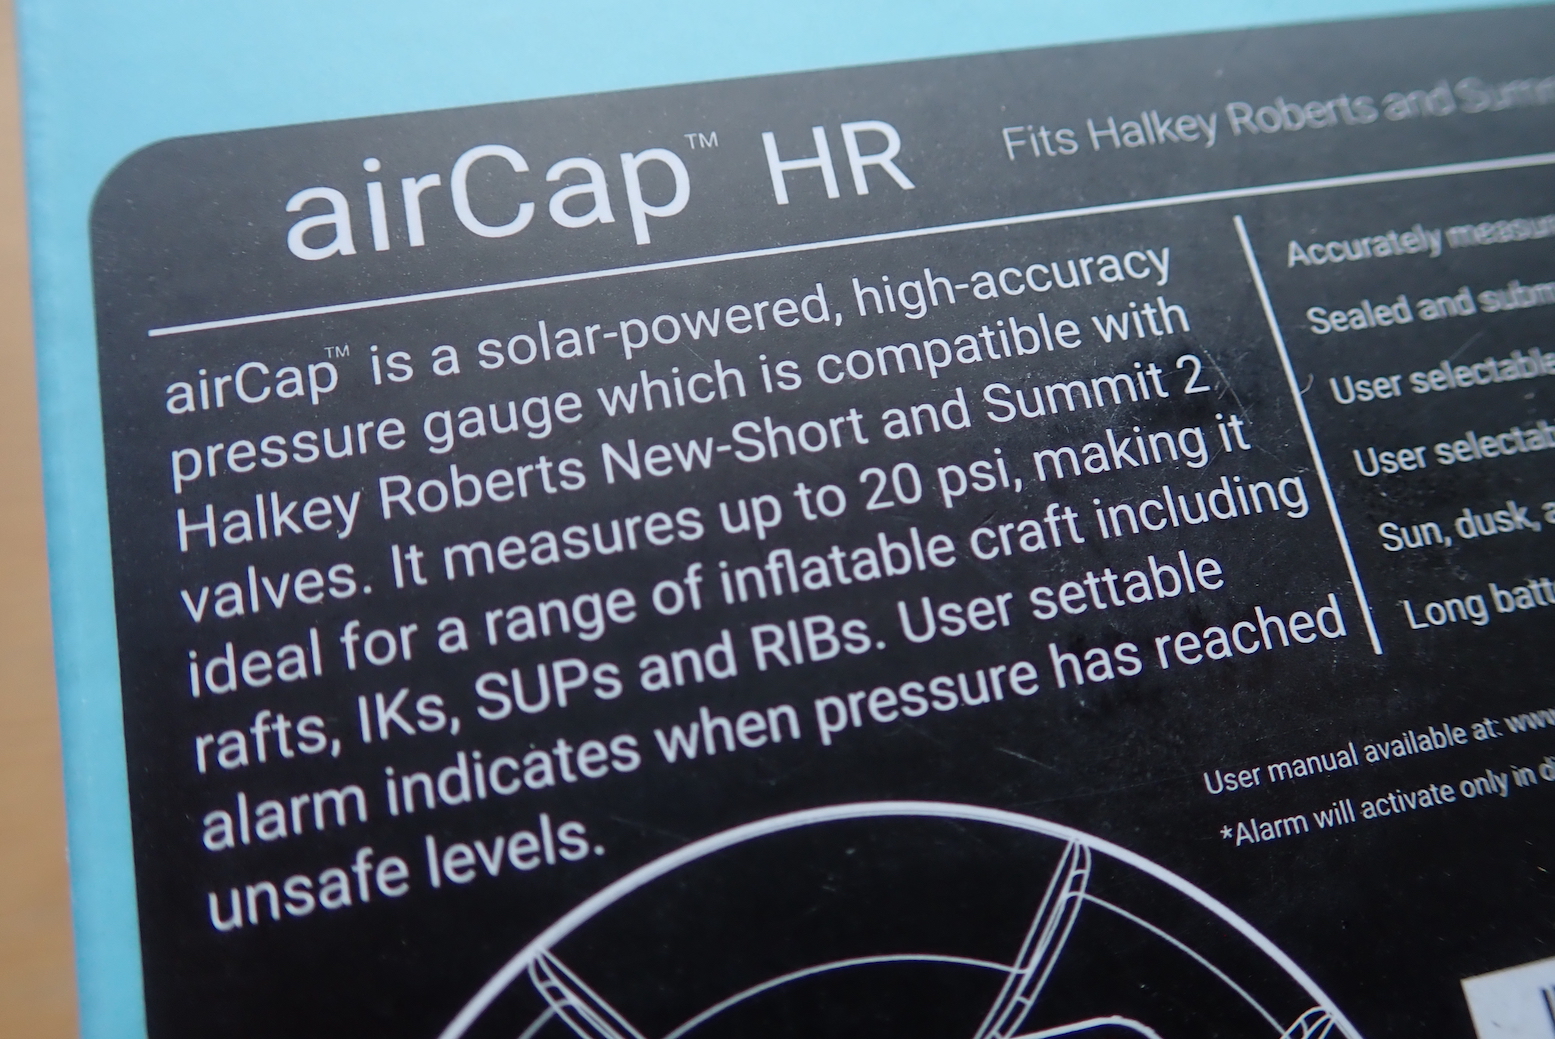
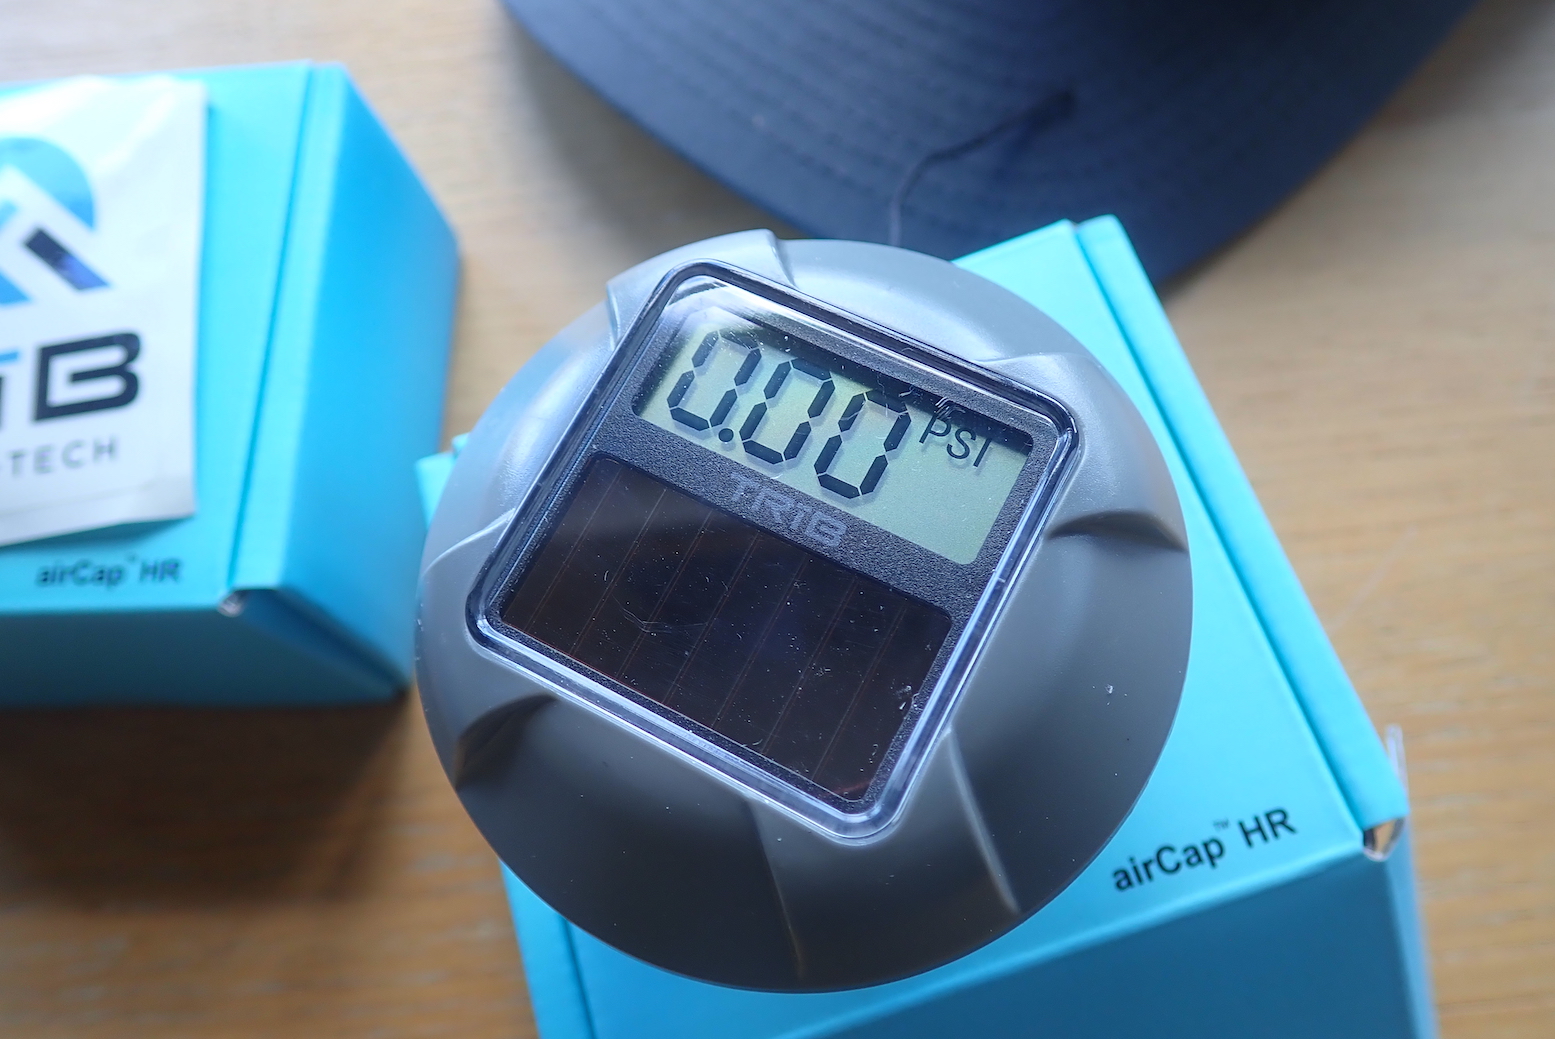
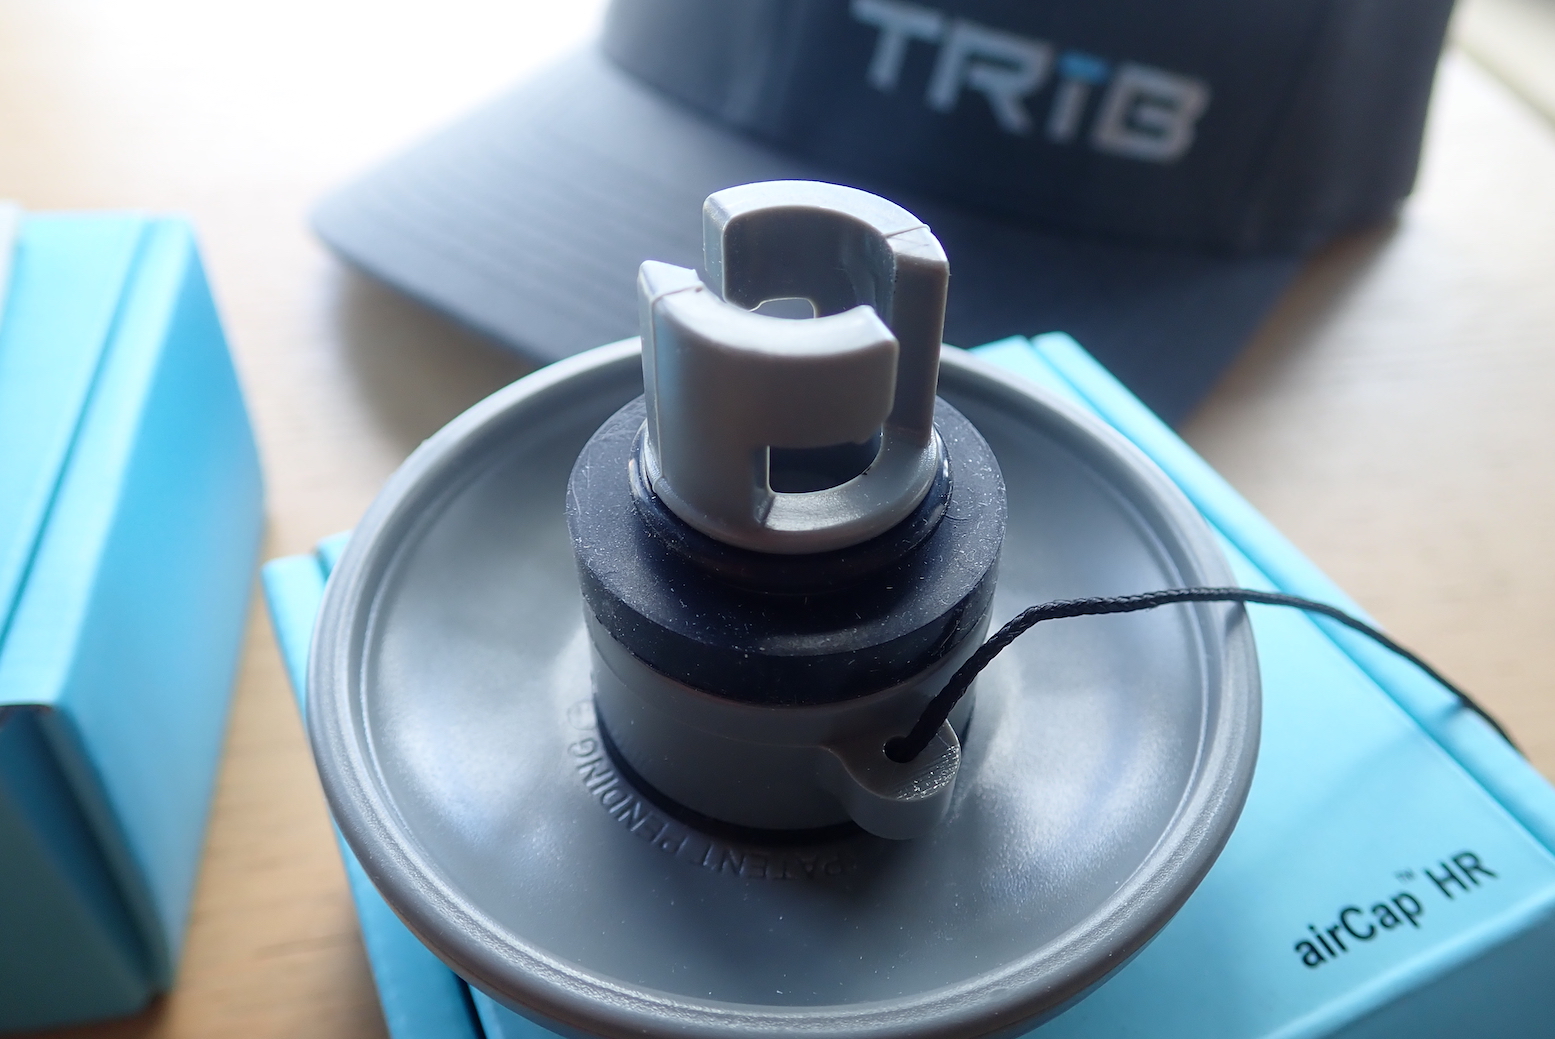
Another good idea are TRIB airCap live pressure monitors so your boat doesn’t end up like the Seawave left (actually an unexplained internal rupture while in the water). These TRIB solar-powered gadgets replace the valve cap on bayonet-type inflation valves like Halkey Roberts or Gumotex. One fitted securely an LCD display displays your pressures in psi, kPa or bar, a bit like TPMS for cars and motos. And like TPMS, you can even set a bleeping alarm at anything up to 20psi / 1.37bar. You need to make sure the seal is good and air is not slowly leaking out, but you can also use them as simple digital pressure gauges: twist on, measure and remove. Once fitted, you can watch as pressure drops after you put the boat in the water, and then seeing it rise out on a hot river bank. If I kayaked in a hot country (ie: not the UK) they’d be a simple alternative to the faff of installing PRVs. TRIB airCaps cost $40 in the US and the same in £s in the UK. The ribstore sells them.
The Aire Cheetah seat (left) turned out to be no worse than the inflatable original, but was a bit lighter – even though it weighs just over 2kg. I’ve also set it up so I clip the seat to the boat’s seat mounts (which originally used a knotted bit of rope) so I can take it out at camps or to dry/clean the boat. Plus, along with the box for a footrest (below), it’s one less thing to pump up.
Firm backresting was a problem with the OE seat; or to be precise, fitting points to hold the back of the seat upright as you push back with your feet. Because the support strap is attached from the seat top to the front seat base, as you lean bank it just pivots rather than supports. The 410C is much better in this respect. To cut a long story short, I imitated them by gluing mounts to the hull’s side tubes to attach to the seat top. This way the pulling force is in a better line and the seat doesn’t pull down. Some say though that the old-style seat have better back support than the plain Mk2/3 style Sunny seats. Since fitting on the side tube mounts (the real answer to this problem) I don’t think about the seat now which must mean it works. The Aire seat is still a bit heavy though.
Footrest The OE inflatable footrest pillow was non-adjustable (on the 410C it is) and always too far away to be effective, even for me at 6′ 1″, so I replaced it with a 5010 Otter box (left), which of course has uses to store stuff on the water.
However I then noticed the strain of me pushing back off the box was tearing the lower seat mount tabs glued to the hull (where the rope used to be). The box is now attached directly to the seat with adjustable slings. This way I now push inside a ‘closed loop’ made up of the seat and box, so only straining the sling and clip joins which make up the loop – and not the boat mounts. Of course this does mean there’s some energy-absorbing slack between me and the boat, but it’s a gumboat not a K1 racer alas, so will have to do.
Although I find I’m happy to paddle with my legs lying flat, when you want to go for it a firm foot brace and a bent knee are much better, but require a fairly solid seat to push against. The long box-to-seat strap loop seems to work OK and I discovered a side benefit; the straps can be pulled over my knees to make thigh braces (right); another possibly handy feature when the going gets rough. It’s not like bracing directly off the hull or anywhere near as good as with a SinK’s ‘underdeck’; it’s more to achieve good paddle thrust using the core not the arms which they keep telling you to do. And anyway, even in the roughest rapids I’ve done, the Sunny feels stable enough without thigh braces and if anything I prefer having my legs free to stick out to steady myself (or fall out neatly). The Sunny usually swamps long before things get hairy enough to tip it over.
As mentioned above, sometimes I feel with the Cheetah seat that my butt ought to be a bit higher. It’s also pretty heavy at 2 kilos (4.5 lbs). Now I’ve inherited a spare new-style Alpacka packraft seat (left), I may try and adapt it to fit the Sunny. The Alpacka seat is not half as robust as the OE Gumo Nitrilon seat so it needs to be supported in a way that won’t wreck it. I haven’t worked out how to do that is yet; maybe a stick across the hull like a Grabner, but that requires gluing. This seat will be higher than the Aire which is an important feature with kayaks: butt higher than heels is much more sustainable, comfortable and efficient for paddling, so you want to set a seat as high as you feel safe, bearing in mind CoG and stability as discussed here. The Alpacka seat also weighs just 220 grams (half a pound), saving nearly 1.5 kilos, or nearly 10% of a Sunny, and a bit of bulk… (but I got rid of the Sunny before I had a chance to work this one out).
My OE seat burst at the heat-welded seam inside the ‘U’ while bumping through the shallows in France. I re-heat-sealed it to the full seam width with an iron and it’s lasted since then, though Alpacka say it will fail eventually. There was a rash of failing seats and they sent me a replacement a few weeks later. On the original there was only a 5-8mm heat-welded band; the new seat base is yellow (less prone to sun-heat expansion-bursting) and has an even 8-10mm wide heat-welded seam all around.
One annoyance is that the seat backrest always flops down just as you’re staggering about on the rocks trying to re-enter and get set up before the next rapid. It needs holding back somehow; easily done with an elastic to one of the back lashing points, though I’ve since realised this won’t work with the skirt zipped up, so maybe a velcro patch then, inside at the back below the skirt zip. In a bid to make the seat easily removable for drying and camp use, I removed the seat holding laces, tried some electrical wire instead for a while (as left), was going to velcro it in and finally decided just to attach it to the tabs in the hull with another couple of mini-krabs.
They say using an air mat is better for the floor, reducing high points of impact and also keeping your legs warm in cold water. I have a Thermarest (left, on right) which fits pretty well and is light, or an Exped (orange, left) which is much better to sleep on and fills out the back of the seat too. More weight forward is better, especially unloaded in white water with a strong headwind! Again, you wonder if inside the boat, gritty boot soles may cause excess abrasion when jammed in around the front end, so mats are best.
An Alpacka comes in a pretty basic form which allows you to customise it to your needs. Some mods I’ve made include attaching a clip and some bright tape to the main inflation cap – don’t want to lose that. I’ve also added a bit of garden hose to the spray skirt release tab to make it easier to find and grab in a panic. I still have a phobia about skirts, but am already learning to appreciate it in rapids. A 12-kg load sits very securely across the four bow lashing points using Alpacka’s Packtach quick release system. They say if you flip over with a pack on board you want to release it fast to make it easier to flip and drain the boat, if necessary. I’ve yet to try this but I’d imagine it would be quite easy to flip stern over bow, pivoting on the load. The load would also make getting pack in easier (though I have not tried that, either). I’ve improvised a toggle (inset left, pink) onto the Q/R buckle to make it easier to find and grab to release a bag, if needed.
I’ve also added mini carabiners – a blue one at the bottom below) to clip the thin Packtach chords to the 4 mounting points on the hull; it’s bad form having chord rubbing on nylon web under tension, plus it makes the whole Packtach system easy to remove without undoing fiddly knots. As you can see I’ve also added a 3-metre lead (yellow/green tape) for towing and tying off. I’ve since changed that to a piece of paracord. ‘Painter’ I believe is the correct boating term, but I’ve become aware that whatever you call it, needs to be hooked carefully out of the way for faster rivers. I find threaded across the two mounting tabs can be done and undone fairly quickly. I’ve glued another tab mount to the middle of the floor inside with Aquaseal and clipped a krab in to hold a day bag. These mini-krabs are my new thing and I’m using them for all sorts of things on the boat, the pfd and elsewhere.
Short answer: IKs: yes. Packrafts: helps away from white water
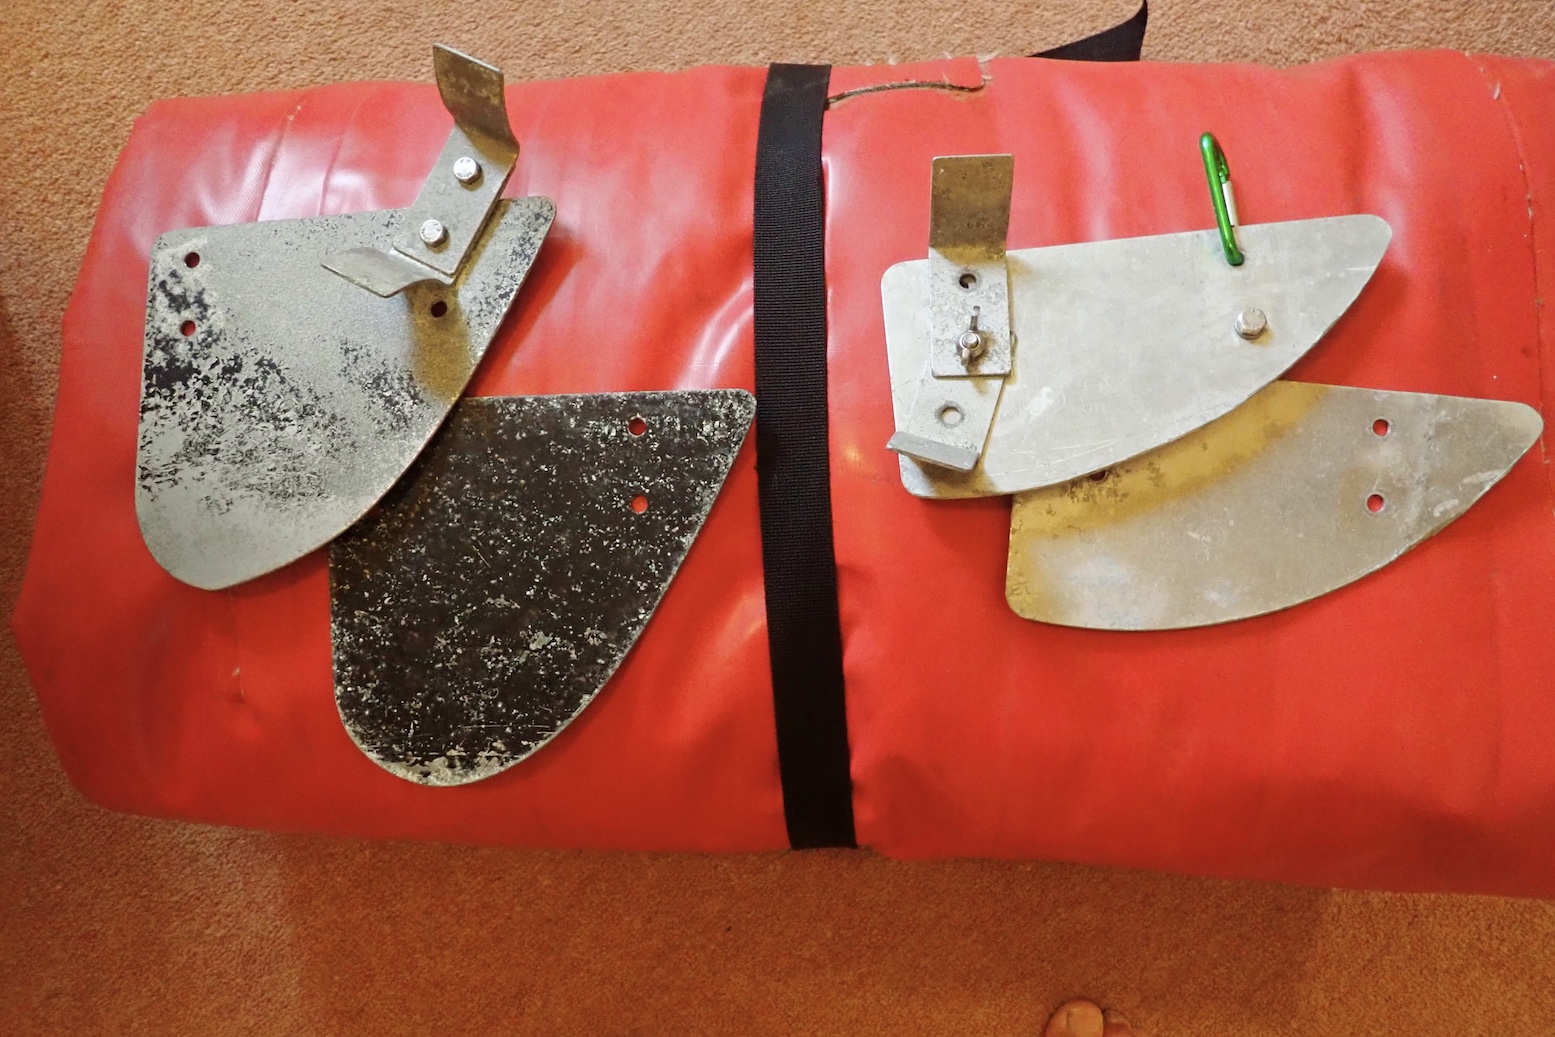
Generic, over-tall skeg. Snap-prone but trimable.
A skeg is like a fixed ‘rudder’ under the back of the boat which makes it easier to go straight (track). Only the very cheapest single-skin vinyl IKs don’t have skegs (Grabner, one of the most expensive IKs, is an exception; though it’s an optional add on). If you’re IK doesn’t come with one, it’s easy to glue one on (see below).
Some flat-floored IKS have up to three (imo, a gimmick), and many skegs on Chinese-made IKs are unnecessarily tall (too deep) which makes them snap-prone. Just about all skegs can be easily removed by hand, because in shallow rivers you might want to do so to avoid grounding. You can as easily buy a spare and trim it with a hacksaw.
Gumotex skeg glued to a Grabner Amigo
Original over-sized Gumotex alloy skeg on the left. Later smaller; now tough plastic.
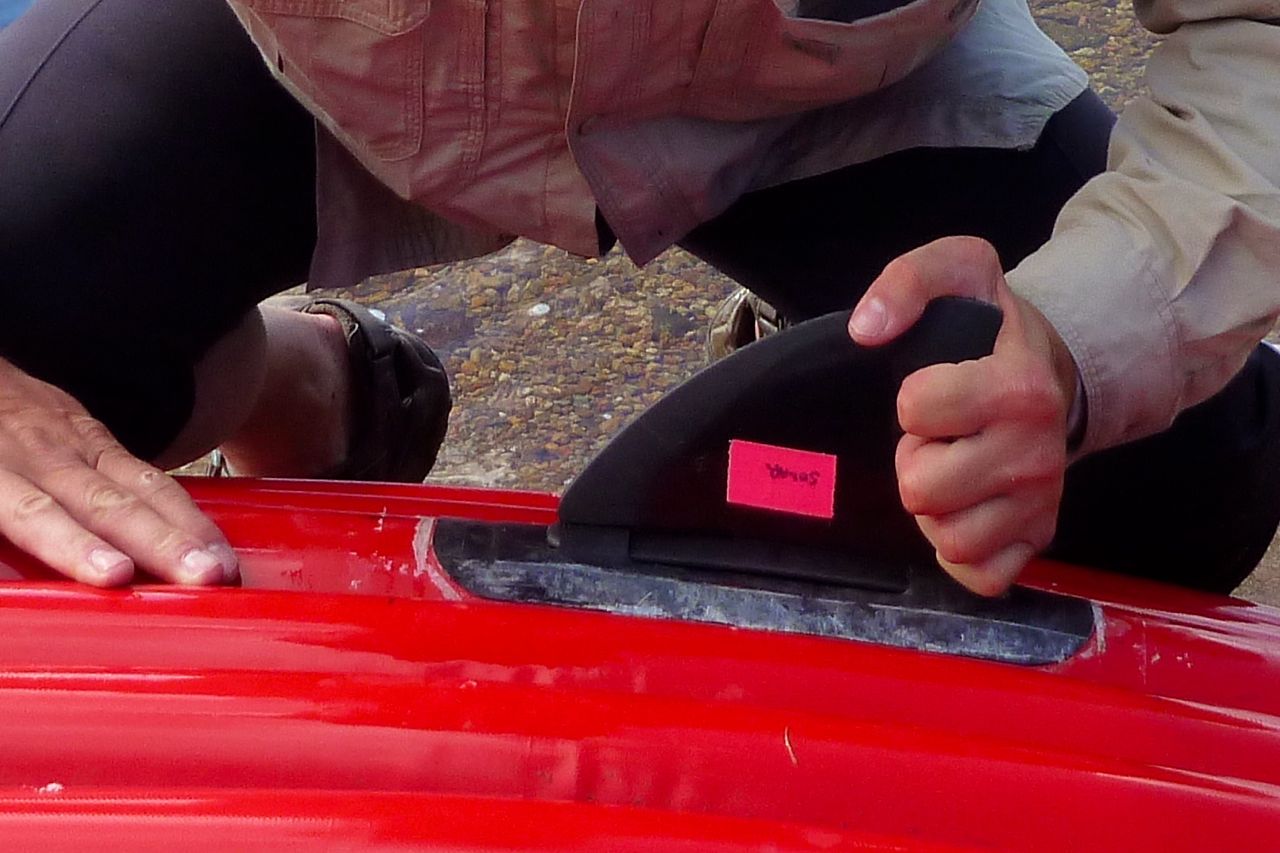
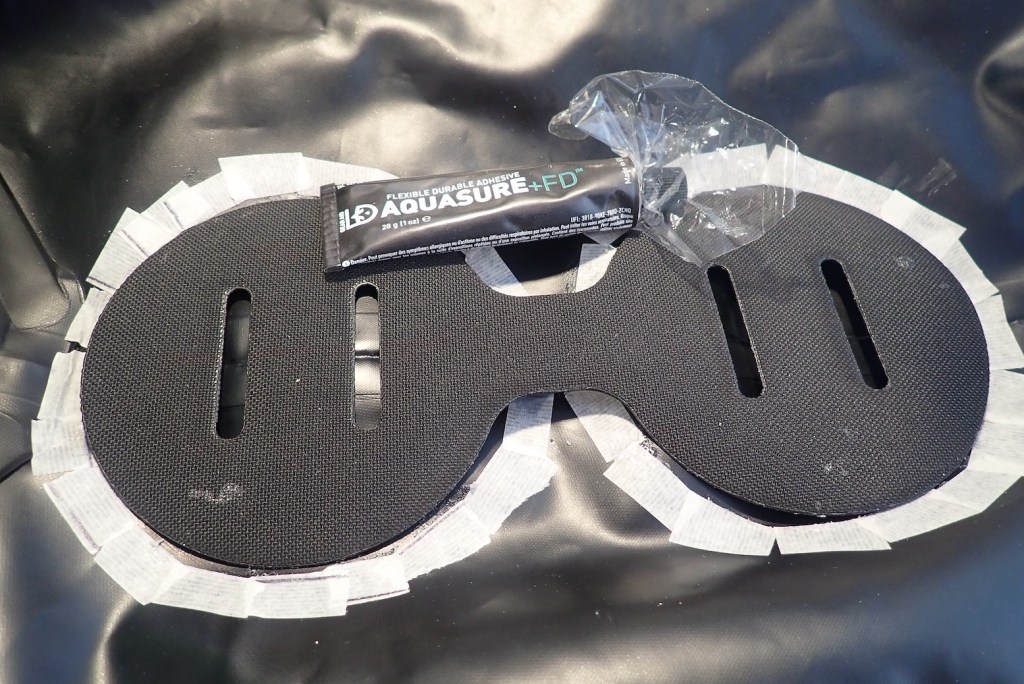
Years ago Gumotex introduced a slip-on, black plastic tracking fin (skeg, above) which was near identical in shape to one I’d had made to replace the old-style oversized alloy skeg (left). A smaller skeg made better clearance and still tracked fine. But metal bends; tough plastic is much better and that’s what all their boats come with now. I’ve fitted these plastic skegs to older Gumotex IKs and other IKs. The kit is about £25 + glue, and the plastic skeg is pretty much unbreakable. Just make sure you glue the mounting patch on really well; it helps if your boat is made from a matching rubber fabric as the supplied Nitrilon patch or make your own patch from same fabric. But I have glued PVC to rubber successfully – use good two-part glue. The pictures below help you see where to position a skeg.
On shore a skeg is a pain with a loaded boatSkeg: underneath and at the backGluing a Gumotex fin to a Grabner (which come with no skegs)
I fitted the Gumotex plastic skeg to my Grabner Amigo IK (above) and at sea used it all the time. But on the shallow River Spey (below) this boat didn’t handle at all well without a skeg, possibly because the tailwind pushed the kicked-up stern around. It was really quite annoying because a few years earlier my broadly similar Sunny managed the Spey just fine without a skeg, so skeg-free tracking clearly varies from boat to boat.
Paddling without a skeg If you’re an experienced paddler you’ll have acquired the knack of going straight without a skeg – handy for paddling shallow rivers where the skeg would ground. A little more paddling finesse and constant smallcorrections are required, especially if powering on. It’s good to learn this technique before you need to: fix your eyes on a tree or marker on a distant bank and paddle as gently as you like towards it, not looking away and keeping the nose of the boat in line with the marker. By using very light strokes you’ll see it can be done if it’s not too windy when again, a skeg helps with tracking (going straight).
Gumo Solar with no skeg
I even found I could paddle a ten-foot Solar 300 (above) without a skeg. Once you know you can go straight without a skeg, it’s just a matter of adopting the same finesse but with a bit more power. Only when you attempt the speeds of a Viking longship will bow deflection or yawing get too much because to paddle faster and still go straight you need a skeg. Out at sea or on busier rivers, I always use a skeg.
IK&P Tip: drill a small hole in your plastic skeg and attach a ring or zip tie directly to you boat. It’s annoying to turn up and find you misplaced your skeg.
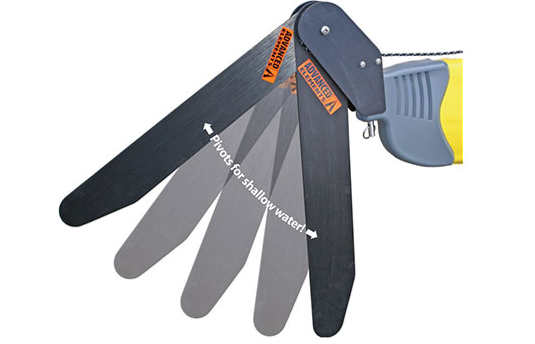
I’ve often thought a hinged retractable skeg would be a good idea: it would pivot backwards when dragging in shallows, then drop back down when there’s enough depth. It seems SUPs need skegs and in the US, FrogFish have made such a thing for boards, but you hear the spring can be a weak point. If your kayak has a rudder mount (or you can make one), another way of doing it is fitting a swing-down skeg similar to kayak rudders. It works the same way as a rudder with a looped cord swinging the skeg up over the stern, or down into the water. The pivot skeg shown top right is made by Advanced Elements for their AirFusion IK and costs about $/£80. Or have a look here.
Packrafts
On shorter, wider, slower solo packrafts the consensus used to be that skegs made little difference. Especially when unloaded and with a full-weight paddler, the bow yaws merrily left to right as your paddling pivots the boat from the back. Or so I used to think until I tried the skeg on my Rebel 2K. Up to then I’d been ambivalent about them – using the same boat fully loaded a few weeks earlier on a fast flowing river, yawing had not been an issue. But unloaded (and with my generous 95kg of ballast) yawing was notably reduced with a skeg. Speed however, was the same or was too small to measure.
If you think about it, a packraft actually pivots from a point around the middle of your swinging paddle, not from the stern, as it feels from the seat. The centre of mass behind the pivot point does make an unladen bow yaw more, but the stern will yaw too; just less and unnoticed.
Longer stern puts you more in the middle of the boat, like a kayak
One reason some packrafts may manage without a skeg is that way back in 2011 Alpacka invented the ingenious extended stern (right). It helped limit yawing much like a skeg, and effectively positioned the paddler more centrally, like a kayak, while also adding trim. This idea has been widely copied by just about everyone since and it definitely works, compared to the original dumpy Alpackas. But as mentioned, once there’s a good load over the bow, yawing is reduced in any packraft. Anfibio sell a detachable shallow skeg and glue-on patch for €21. My Rebel 2K came with a skeg and I must admit I use it most of the time now. But it does not have a fully extended stern like the Alpacka above right. Then again, my longer Nomad tracked great without the skeg.
Skeg on an MRS Nomad. Tbh, tracks great without itSkeg on an Anfibio 2K. Reduces yawing
Frontal skeg? Now I have a longer 2.8-m Anfibio Sigma TXL and I was curious to see if adding a frontal skeg would make a difference. Seated centrally or two-up, this boat does not yaw from the boat like an unloaded solo packraft, but it does wander a bit (track poorly), especially with the inflated floor pad). I decided a front skeg did not help much, though it might improve sailing.
I hopped on the Go-Pro bandwagon way back in 2010 but was shocked by the crumby, underexposed results above. They’ve clearly got a lot better since, but I just film with my P&S camera now.
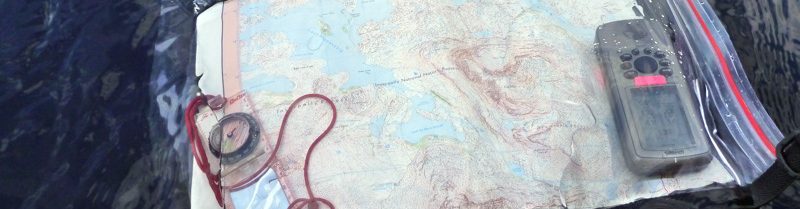
It was a bank holiday weekend in Scotland and the West Highland Line from Glasgow to Mallaig was packed out, but only one person got off the train at Morar station. Me. There was nothing here other than a few houses, a B&B and a lovely sandy beach facing the isles of Rhum and Eigg. The waters of Loch Morar spill out onto those sands and meander down to the sea. I was heading the other way, inland alongside the loch’s 20-km long north shore on a back road that turned into a track and finally a narrow path rising above the waters.
I was of course taking a very keen interest in the state of those waters. As must be normal around here, the wind off the North Atlantic was blowing up the loch with me, but not enough to make hauling the 20-kilo backpack on soft rafting shoes any easier. It looked like a downpour had recently smothered the area; transient waterfalls were running down the valley sides and occasional squalls rushed up the glen. By the time I got past Swordlands Lodge – a WWII-era spy training base for the predecessors of MI5 – all I wanted was a flat patch of dry land to pitch. I’d got further than I thought, covering about 14kms in 4 hours and was now just 7kms direct from the bothy (refuge) at the far end of the loch. The wind had calmed, but the bothy could wait till the morning. I spread out on a narrow jetty, inflated the boat and went for a walk north over to Tarbert Bay, a few houses on the tidal Loch Nevis where a ferry drops in from Mallaig every other day on a circuit serving the otherwise inaccessible community on the Knoydart peninsula. The paddle up Loch Morar and short portage over to Loch Nevis to follow the coast back to Mallaig was a popular day trip for sea kayakers.
Never mind about that. The thought of my first real, fully loaded packrafting paddle alone on the 1000-foot deep Loch Morar was a little unnerving. Even fresh water inland lochs like this are prone to sudden storms that have drowned ill-prepared canoeists. How would my boat handle in a swell with a 12-kilo pack strapped to its bow? When the time came next morning I found I just went through the motions, knowing that I’d done my best to get it right. Sealed inside a heavy dry suit, I pushed off and tried to keep a respectful distance from the steep shore, as the bay I’d sheltered in overnight opened out into the winds. Out there, funnelled in by the 1000-foot ridges, whitecaps furled the foot-high swell, but despite my dry mouth and hyperactive paddling, there was really nothing much to worry about other than worrying too much. With an open deck and the wind to my back, the loaded raft sat on the water as reassuringly as a wet mattress.
At one point the sun came out and soon after the white speck of Oban bothy came into view at the base of the narrow, cloud-filled valley which would lead me over to the next loch. Coming back to shore I felt a small sense of achievement; I’d managed seven whole kilometres across a windy loch carrying all my needs. With the wind and hard paddling, it had taken only one and a half hours, much faster than following the shore on foot, but that was enough adventure for one day. Though it would put me behind schedule, I decided to spend the rest of the day in the bothy, drying out the tent soaked by overnight rain and my dry suit soaked by over-anxious paddling.
On the map only intermittent paths lead to Oban bothy which seems rarely visited and as you can see from the video, is pretty basic but a very welcome shelter set in a brilliant location. Across the loch abandoned crofts reminded me that that this part of Scotland was not always the wilderness we like to think, but a land abandoned two centuries ago when poverty and inland expulsions to enable sheep rearing forced the inhabitants to the coasts, cities or overseas. Amazingly, in the next bothy the logbook showed a recent visit by some Canadians whose forbears had abandoned Glen Pean in 1793. With the gear drying on the line I went for a walk up the valley to confirm just how mushy the track would be. Later that evening I scooted off in the empty raft across the loch just because I could.
Over the pass Next day was going to be a short-haul, just 8km by GPS up the valley and down the other side to another bothy in Glen Pean. I’d rather taken to bothy life. Though these places are basic and grubby, with no facilities other than a fireplace, some bed bases, left-over food and rubbish, the simple presence of space, shelter and mouse-eaten furniture is so much better than sodden tent camping.
While a packraft does open out your mobility options, especially in the Scottish Highlands, it does increase a typical 12kg camping payload by 50% once you add in a dry suit. Carrying that sort of load over the boggy, hummock-ridden terrain, where the high summer grass and reeds obscure knee-deep ditches and peat channels is probably more dangerous than bobbing around in the middle of a windy loch. To this end I’d adapted a sawn-off piece of paddle shaft to slot on the end on my AquaBound paddle to make a packstaff – something I’m still using over a decade later. It proved to be one of my best ideas on this trip, useful as a probe boggy-looking ground that was often actually firm (and vice versa) and a balancing- or weight-bearing aid. Climbing or descending, it helps take the load off the kknees and saved a lot of the energy expended in avoiding or trying to hop over peaty trenches which could suck you in down to your knees. I’ve been using the pack staff for packrafting and Scottish hill walks ever since. This attempt at dancing around the mire while hauling 25% of my body weight was partly what had worn me out on the walk in from Morar station, not helped by trying to keep my feet dry in my quick-draining ‘canyoneering’ Keen water shoes. Today I decided to try out my Seal Skinz socks which had ssat in a drawer for years. Even though once wet, wool socks keep warm, the waterproof but bbreathable Skinz were as good and should mean less chance of trench foot. All I need for next time is a wade-proof, knee-high pair, though I soon learned the waterproofing or membrane in the Seal Skinz doesn’t last. With an improved packing set up, I set off for the pass, no longer skirting the puddles and putting my weight onto the packstaff when needed. Taking it slow, I felt much safer with the staff as I plodded steadily up to the watershed. Here, still surrounded by boggy the steep valley sides, a faint sheep trail descended steeply to a water-logged valley where it disappeared altogether. Even with a staff and wet-proof feet, the valley still took some negotiating, inching around outcrops while leaning on the firmly planted staff which would have pretzeled a Leki walking pole. In the end, it was simpler to follow the stony river bed. Presently I came upon Lochan Sagairt as marked on the map, unreached by paths from either side and jammed in among dense contours in a gorge. Either side would be a tiring climb with the load I carried and so here was a perfect evocation of the Packrafter’s Choice: to expend effort but possibly save time by keeping on land – or to deploy the raft and scoot across the lochan effortlessly and maybe even catch a bit of a ride off the stream on the far side. (If you’ve watched the vid, it’s here that the film and my photos end – my 8-gig SD card filled up). It took just 12 minutes from stopping to paddling out through the reeds onto the lochan. (Here’s another version.) Following the stream gave me up to a kilometre of paddling distance, but soon that became too shallow and worse still, up ahead seemed to drop through a small gorge. Very keen to play it safe, I rolled up the boat and took to what was now a quad bike track which brought me through a jungle of ferns to the deserted bothy in Glen Pean, nine kilometres walk and four hours from Oban.
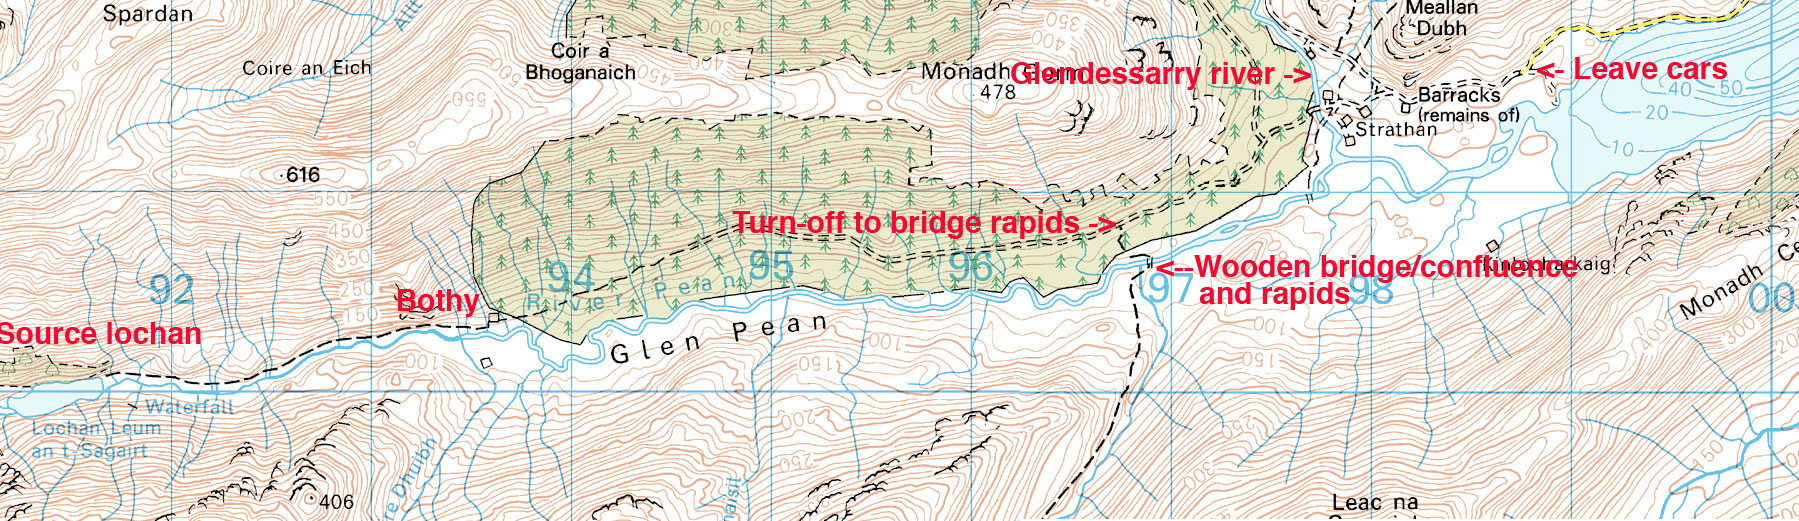
Glen Pean The plan here had been to track the Pean river on foot and put-in as soon as it became paddleable, hoping that that would lead smoothly into Loch Arkaig, the next big body of water. I had my doubts it would be as simple as that, and after lunch set off, first up to an interesting-looking waterfall on the far side of the valley, and then back down into the valley to recce the river downstream. This exposed one of the flaws of packrafting in this sort of wild terrain. Walking the water courses in the valley bottoms, you’re in the worst, waterlogged terrain, fit only for birds and slugs trapped in a squelching morass of saturated peat and spongy moss. Up here the meandering Pean river flipped between deep, Guinness-coloured pools and clear, shingly shallows. No big problem in an unloaded raft as I’d found in France where we’d spent the last few months, but with a load you ground out sooner, meaning getting out and pulling or even unpacking and carrying; not an efficient use of energy. I tramped downstream around the deepest mire where the forest plantation met the river, and up ahead noticed an ominous dip in the tree line between two knolls. Deadly, Alpacka-shredding rapids!
A perfectly walkable track led through the forest to the head of Loch Arklaig and a group of houses known as Stathan. I looked closely at the 1:50k map and sure enough, where a path came down the valley to bridge the river and join the forest track to Strathan, two 25-metre contours crossed the river within a quarter kilometre. To confirm that paddling the Pean may be more effort than it was worth, at 6pm I set off along the forest track to that bridge and suss out the river. An hour later I looked down on a two-metre drop before it led into a boulder-chocked funnel. My hunch had been right, though of course, terrified as I am of being swept unwittingly into a mini Niagara, I’d have surely heard the waterfall and done something about it.
Back at the bothy, I was satisfied with my recce. The upper Pean was navigable with a little effort for about 4kms from the bothy to the bridge, but at the bridge you’d need to pack up and haul up a messy track into the forest and walk on down to Strathan, or stagger along the banks until the river cleared up. (I’ve since returned and paddled the Pean from that bridge down to Loch Arkaig).
Loch Arkaig to Gairlochy Next morning I stood on a bridge in Strathan, a few buildings of the Glendessary estate at the west end of Loch Arkaig. Below me the Glendessary river rushed towards the Pean in a tumble of white water, while the Pean river itself wound placidly into Loch Arkaig. Like Morar, Loch Arkaig ran for 19kms end to end, a long paddle that might take most of the day and certainly most of the day’s energy. A back wind was rushing along, maybe only a little worse than on Morar; here would be a good place to experiment using an umbrella as a sail. A narrow road also trailed the loch’s north bank and having lost a bit of time hanging out in the bothies, I thought I’d try and hitch a lift towards the Great Glen and Loch Lochy where the Lochy River lead south to Fort William. If I could get there tonight I’d have caught up with a chance to carry on to Rannoch as planned. Plodding along the road eyeing up the loch, I passed a bunch of young canoeists on a course and figured if I couldn’t get a ride I’d be better off getting on the water and riding the swell down to the east end. Before that decision became necessary, a car squeezing past saw my thumb his mirror and half an hour later dropped me at the loch’s east end. Rich worked for the local Outward Bounds kids camps and spent his spare time adventuring himself on the islands and highlands. He told of some canoeists last winter who’d portaged the way I’d come yesterday. One ended up breaking her leg somewhere near Lochan Sagairt and getting helicoptered out (in fact I found the thread on that event here and there’s a video here). Portaging a canoe from Loch Morar? Have these people not heard of packrafts?! Either way, I was sure glad I didn’t have to trudge down that long, lochside road; I’m sure whitecaps or not, eventually I’d have taken to the water. It brought up another flaw in my gear: I was wearing Keen Arroyos which gave little more support. Luffing a 20-kilo load over rough ground, I should be wearing boots for hiking. They did the job but the insides of my Arroyos were being ground to a pulp and my feet were beginning to suffer. Rich dropped me off somewhere near Clunes, a shopless wooded hamlet surrounded by retirement homes. I was back in tourist lands on the Great Glen Way footpath. Possibly as a result of yesterday’s efforts, I suddenly became ravenous and tore into my food bag to boil up a mug of soup and some stew-in-a-bag paste while the wind howled through the trees. The freeze-dried food I’d been eating was pretty tasty and very easy to prepare, but for once, I wasn’t eating enough. Twenty kilometres away, Fort William would see to that.
All that remained to see was whether Lochy loch was paddleable in all this wind. Sure enough, the west bank was sat in a wind shadow. With a swell running at a couple of inches, this was a loch I could do business with. No need for the drysuit, just zip on the skirt to keep the insides try. How nice it was to paddle on a calm loch. Back in phone range, I called the g-friend to fill her in on my triumphant achievement. A lighthouse marked the top lock on the canal: right for the canal and Gairlochy, left for a weir which led down to the river. Camping by the lock on trimmed grass was free, and many recreational boaters were berthing for the night. Fort William and a seafood basket with salad, chips and a cappuccino would have to wait. I pitched the tent, de-aired the raft, and went to suss out the state of the Lochy River from the towpath. Between the trees and the wild raspberry bushes I spotted some fly fishermen by a couple of sporty rapids and found a good place to put-in tomorrow just past the lock. I was getting a bit desperate for proper food, but Gairlochy had nothing except all-you-can-eat wild raspberries. The nearest resto was up towards Spean Bridge, more than my blistering feet could manage.
River Lochy to Fort William: Riding the Wavy Trains I was fairly sure I had the measure of the River Lochy, a canoeable river that led down to Fort William and tidal waters, interrupted only by one Grade 3 rapid which the Scottish canoe guide warned of but didn’t locate. A look on Google Earth had pinned down the probable location where the river took a hard left with a telltale smudge of white. I put it in my GPS. I set off down the Lochy, knowing I’d be having a lunch of real food off a plate, not out of a bag. It was great to be riding the wavy trains again, with nothing above WW1 as long as you chose the right chute. At one point I hit 14.5kph (9mph) according to the Garmin and safe in my drysuit, what control I had steered me from tedious shallows or boat-flipping boulders. The grade-three waypoint was right on the money, where some young boys where being tutored in the art of fly fishing by a ghillie (river gamekeeper) dressed in full regalia, including a deer-stalker hat and a crimson face. Inspecting the rapid, I’d have been curious to see how even a proper kayaker could manage to fly down the chute and stay upright where it ramped up to the left to flip you right, straight onto the rock. UK Rivers rates the Lochy quite lowly and barely mentions this rapid, but then goes on to add that a poacher and no less than a dozen commandos have drowned here over the years. The mossy, muddy portage was another job for the packstaff, and now a little braver, I took the hardest lines through the remains of the rapids and presently rocked up at the rail bridge at Inverlochy, a suburb of Fort William.
Loch Ossian It was Wednesday lunchtime and my train out of Rannoch was due in 48 hours. If I was to make it I’d have to move on that afternoon, but after checking into a hostel I was dizzy with hunger. The afternoon would have to be spent answering the call of the stomach. In between I paid my respects to the outdoor gear shops in search of bargains, but merely confirmed the daunting truth: other than a couple more dried meals and some 2-for-1 mini karabiners, there was nothing I needed. The next day the train dropped me off at lonely Corrour station, a mile away from the lovely wind-powered SYHA hostel alongside Loch Ossian. All that remained was to spend the afternoon paddling down with the wind to the Corrour estate lodge at the far end of the loch and walking back along the shore to satiate another ravenous appetite.
I now have an idea about packrafting in Scotland: what sort of routes are optimal and what gear works best. The recce around Glen Pean made me realise that no matter how up for it you might be, hiking cross-country across bogs and tussocks as I’d planned to do from Glen Nevis over to Blackwater and from there to Loch Laidon, would have been a hiding to nowhere while hauling a heavy pack. If I’d had the time I’d have followed the West Highland Way out of Fort William to Kinlochleven and on to the Kings House hotel in Glencoe (40kms – two days). From there an eastbound moor path passes close to Loch Laidon (we did it years later, below); either can be taken to reach Rannoch station.
Speeds The raft can be pretty quick on a loch, paddling hard with a backwind, even with a load, and so some sort of sail would reduce the effort and so give more range. I never expected to try and paddle the full length of Morar or Arkaig (19+ kms). Loch Ossian (6kms long) was surprisingly slow as at one point I headed across the width of the loch with a stiff sidewind to see how the unloaded boat handled (pretty flappy but probably more secure than an IK).
When I decided to buy an IK back in 1998 there were not as many models available as today. And information about inflatables was very scarce. I intended to make multi-day trips with this boat, but the only paddler I had heard of doing so was the late Audrey Sutherland. In a Sea Kayaker magazine article she mentioned she paddled a 13-foot Semperit Forelle III for extended trips in Alaska. I wanted the same boat because it was obviously proven as a durable expedition craft by her many summer trips done there.
Doing some research on the Internet I also found a very convincing article by Marge Nichols. We got in touch by e-mail and she gave me valuable information about her Grabner Holiday, almost identical to the Forelle, but now manufactured by Grabner. The good news was that Grabner was a European company and they had a reseller in Paris so I could have a look at the boat before ordering one.
I wanted a boat that I could use for multi-day solo trips, and day trips in tandem with my wife, or for taking the kids around. The boat would be paddled mostly on the sea, wherever we would take it during our vacations. It would be transported by car, bus, train or plane. As we are living in an apartment in Paris, it would be stored in our small basement unit.
The boat itself is very well made and the material is very sturdy. It doesn’t take long to inflate up to 0.3 bars (4.5 psi); less time than installing the rudder. The aluminum tubes used for backrests look like crap compared to the hull, the rudder pedals or the rudder head. The plastic part of the backrest is attached with tiny screws that did not last long and I soon replaced them with bigger screws. The wooden rudder blade is tough but not very hydrodynamically profiled. I use the rudder in a following sea (backwind) to go straight, or in beam [side] winds as the rudder helps control drifting leeward.
Compared to my rigid sea kayak the H2 is a good 30% slower. But the main performance difference is that the H2 cannot be accelerated beyond 3 knots (3.4mph), while I can boost my rigid kayak beyond 5 knots (5.7mph) for a while if need be. In a following sea the H2 doesn’t surf without a steep wave. Paddling against a short wind-induced chop is a trudge as you can’t control it with hips and knees as in a SinK, it bobs like a cork on the waves, which is annoying if it lasts a few hours.
The 3.95 metre H2 floats high on the water. Even though this means more windage, it also means less water splashing in. It does take water so I always sit in a pond, but not to the point I need to bail, except after some hours being beaten by a rough chop. I was sometimes swamped by some dumping waves when paddling inside the impact zone along exposed shores but the boat didn’t sink and was still manoeuvrable. I just had to escape the impact zone then bail the cockpit.
Being 75 cm (29.5″) wide the H2 is very stable, even more when loaded down with gear, and I never felt I was on the verge of capsizing. Just in case I did some capsizing/re-entry exercises in deep water. It’s easier to get back on board using a looped rope hanging from the boat. The H2 is short and highly manoeuvrable. It turns on itself with a few paddle strokes. Draw strokes work very well and there is no need to edge it on its chine to make a sharp turn as with a hard shell sea kayak. This makes exploring caves and rock gardens easy. There are plenty of useless footrest adjustment fittings in the cockpit (left) and none for attaching gear. I bought some D-ring fittings from Grabner and glued them in the front on each inside of the bottom tubes. Drybags are maintained by shock cord and secured by a leash. In order to push the cylindrical bag further in the front, I deflate the deck. The dry bags buoyancy is enough to compensate for the loss of the front deck buoyancy. When I stop on the shore while the tide is ebbing, if I don’t want the boat to be grounded by the receding water, I install a mooring fore and aft. For achieving this I use two painters and a netbag (made of a piece of fishing net found while beachcombing). I fill the netbag with pebbles and secure it to the aft painter. I put the bag on the rear deck so that it falls in the water if I shake the boat. The fore painter is attached to a rock or a tree on the shore. I push the boat off. When the front painter pulls the boat back, the bag falls in the water and anchors the boat. When I want to get the boat back, I just pull on the front painter and the boat comes dragging the pebble bag. Then I haul in the bag with the aft painter, remove the pebbles, tidy the painters and we’re done. When the wind is offshore I just need the fore painter. Paddles I carry two identical two-piece paddles (one spare), 230cm long with narrow grp blades, Lendal GRP shaft made by Plasmor, #1 sea kayak manufacturer in France. When traveling by plane, I carry a Lendal Kinetic 4-piece split paddle. I use shorter paddles, 218cm, with my regular rigid sea kayaks. But the width and height of the sides of the H2 require longer paddles for reaching water.


