The other year while leaning over on a salmon pen platform, my cherished six-year-old Benchmade Griptilian slipped out of the pfd and down into the briny depths. We ummed and ahhed about diving down to retrieve it, but I’m told these pens are 20-metres deep and can hold no less than 80,000 fish.
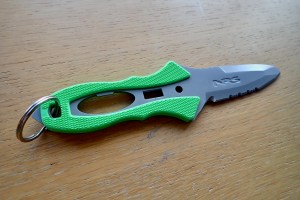
It was a bitter loss, all the worse when I saw what a replacement cost new. Long story short, I replaced it with a similarly anti-stealth orange PBK EMT Rescue Knife for a few quid (left). Like they said “you won’t worry too much if you drop it off your lifeboat and [it] sinks into the depths.” No I won’t.
At 150g it’s heavy but locks out with one of those cheap ‘liner’ locks and has a window-smashing stud, should I ever find myself in the nightmarish scenario of being trapped in a sealed aquarium. You also get a pocket clip, plus a handy line cutter – a good idea when your packboat begins to acquire too many lines and straps all adding up to an entrapment risk when expelled from the boat in lively water.
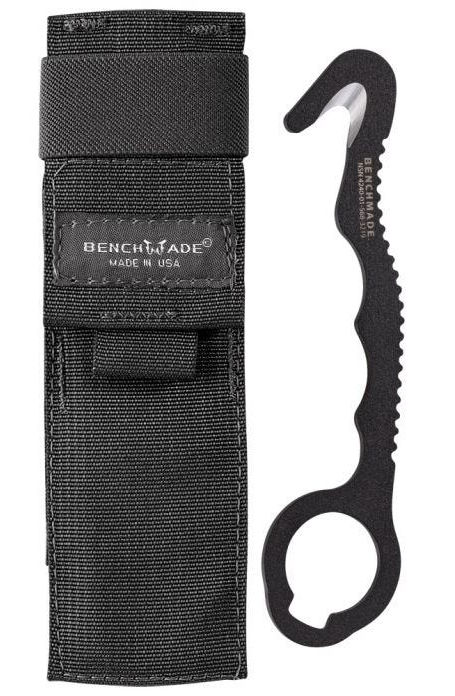
As it is, I’ve long had a quick-grab Benchmade #8 Rescue Hook permanently attached to my main pfd (below). With no sharp point, it’s a good thing on an inflatable and rusts quietly away.
NRS Pilot knife
Then the other day I decided I could streamline things by ditching the somewhat illegal PBK EMT with a proper, quick-grab kayaking rescue knife. NRS’s blunt-tipped Pilot Knife seems the main one available in the UK at around £44. The RRK is another with a hooked tip. The NRS’ locking mechanism wasn’t the smoothest from new, especially when reattaching. I gave it some WD40, but as it is the blade exposed in the shealth looks too ‘knifey’ when strolling into Greggs wearing the PFD after a peckish paddle. So I managed to elongate the Benchmark’s fabric sheath and the NRS slips in there unseen, while still being quickly grabable.
Once you’ve cut yourself free from your boat, the next thing is to alert others of your distress. Some sort of pea in a whistle body gives it a more punchy warble. Look up referee whistles on ebay from Fox or Acme. The piecing blast it puts out will be hard to ignore.
Phone, knife, whistle
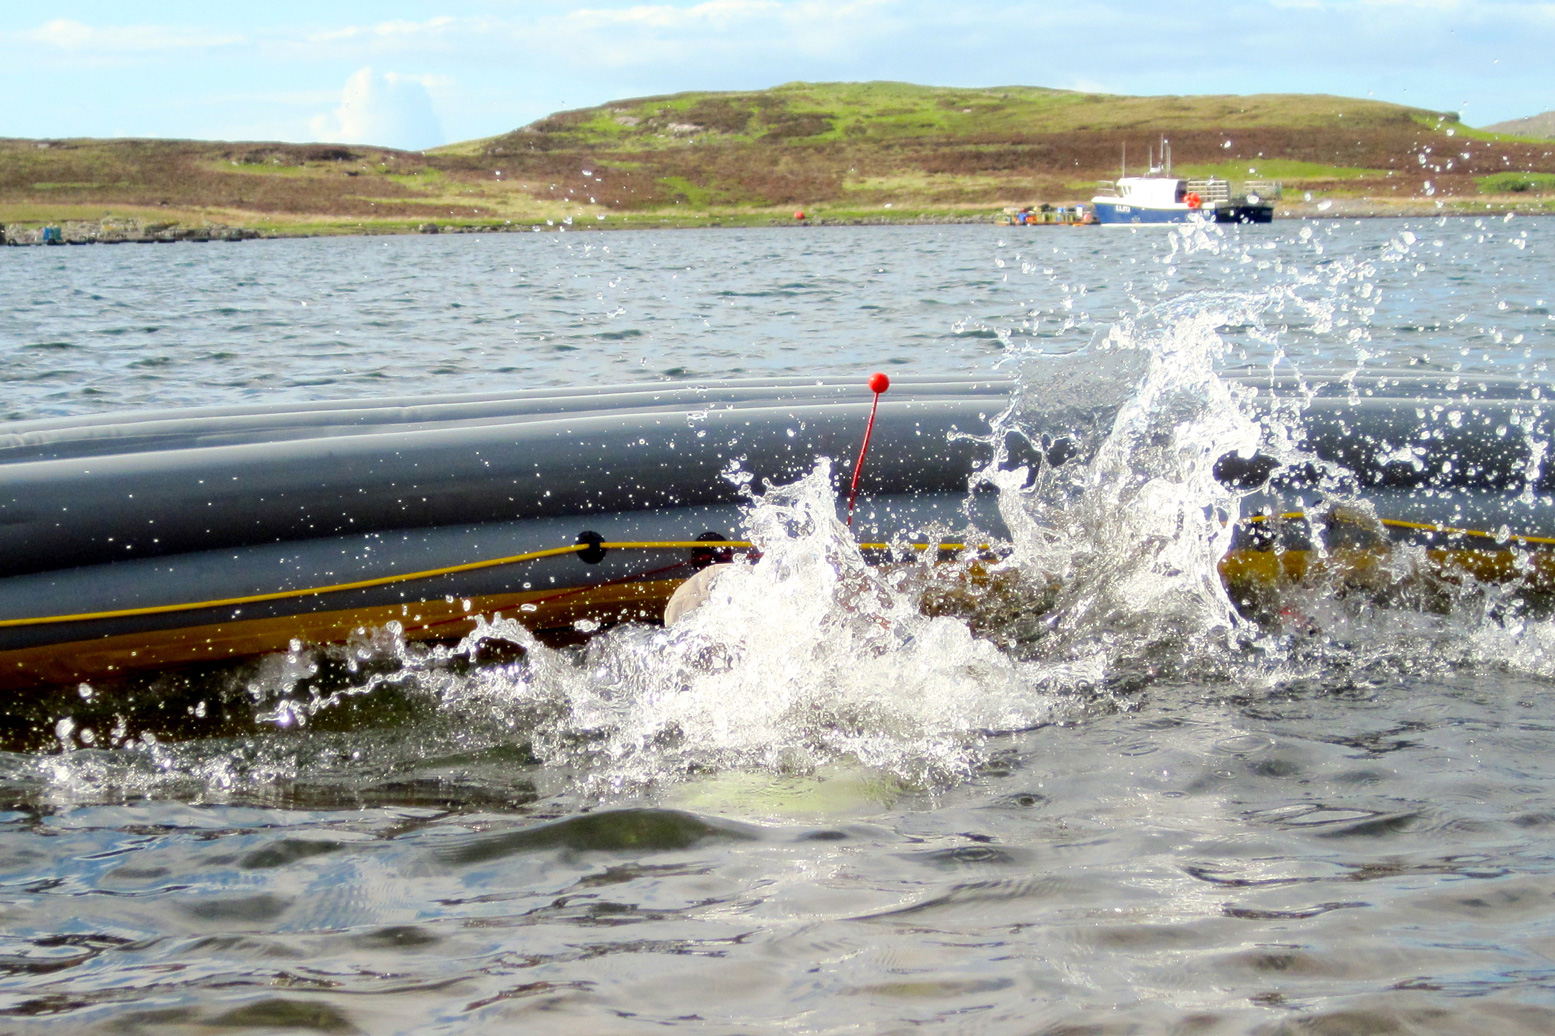
Practice self-recovery before you need to. With IKs, getting back in alone from deep water is easy compared to a hardshell. Same with a packraft. That’s part of the appeal.
Seriously: the best way to dodge dangerous situations is to avoid them in the first place. That’s not as glib as it sounds. For me, who’s written and talked (and even won awards) about adventure travel for over four decades, paddling is one of the more potentially risky things I do these days. Or at least one where I’m aware of my limitations paddling mostly alone. I got the whitewater thing out of my system some time ago and have settled on Grade 2 or portaging. At sea, I mostly do day trips in fine weather, which in the UK can mean days or weeks staring out the window. But I’ve yet to have a ‘moment’ nor come close to falling out of my sea kayak. On rivers, I’ve not been tipped out of an IK since my Sunny days and never in a packraft. That’s how boring my boating is! I’ve managed that by avoiding the high-adrenaline side of things: technical whitewater, pounding surf, gale-force winds, as well as being ready to portage or change plans mid-trip. I’ve had my fair share of dramas doing other stuff. For me the adventure with paddling is quietly exploring wild places with packboats. I leave the appalling fascination of this sort of thing to others ;-)
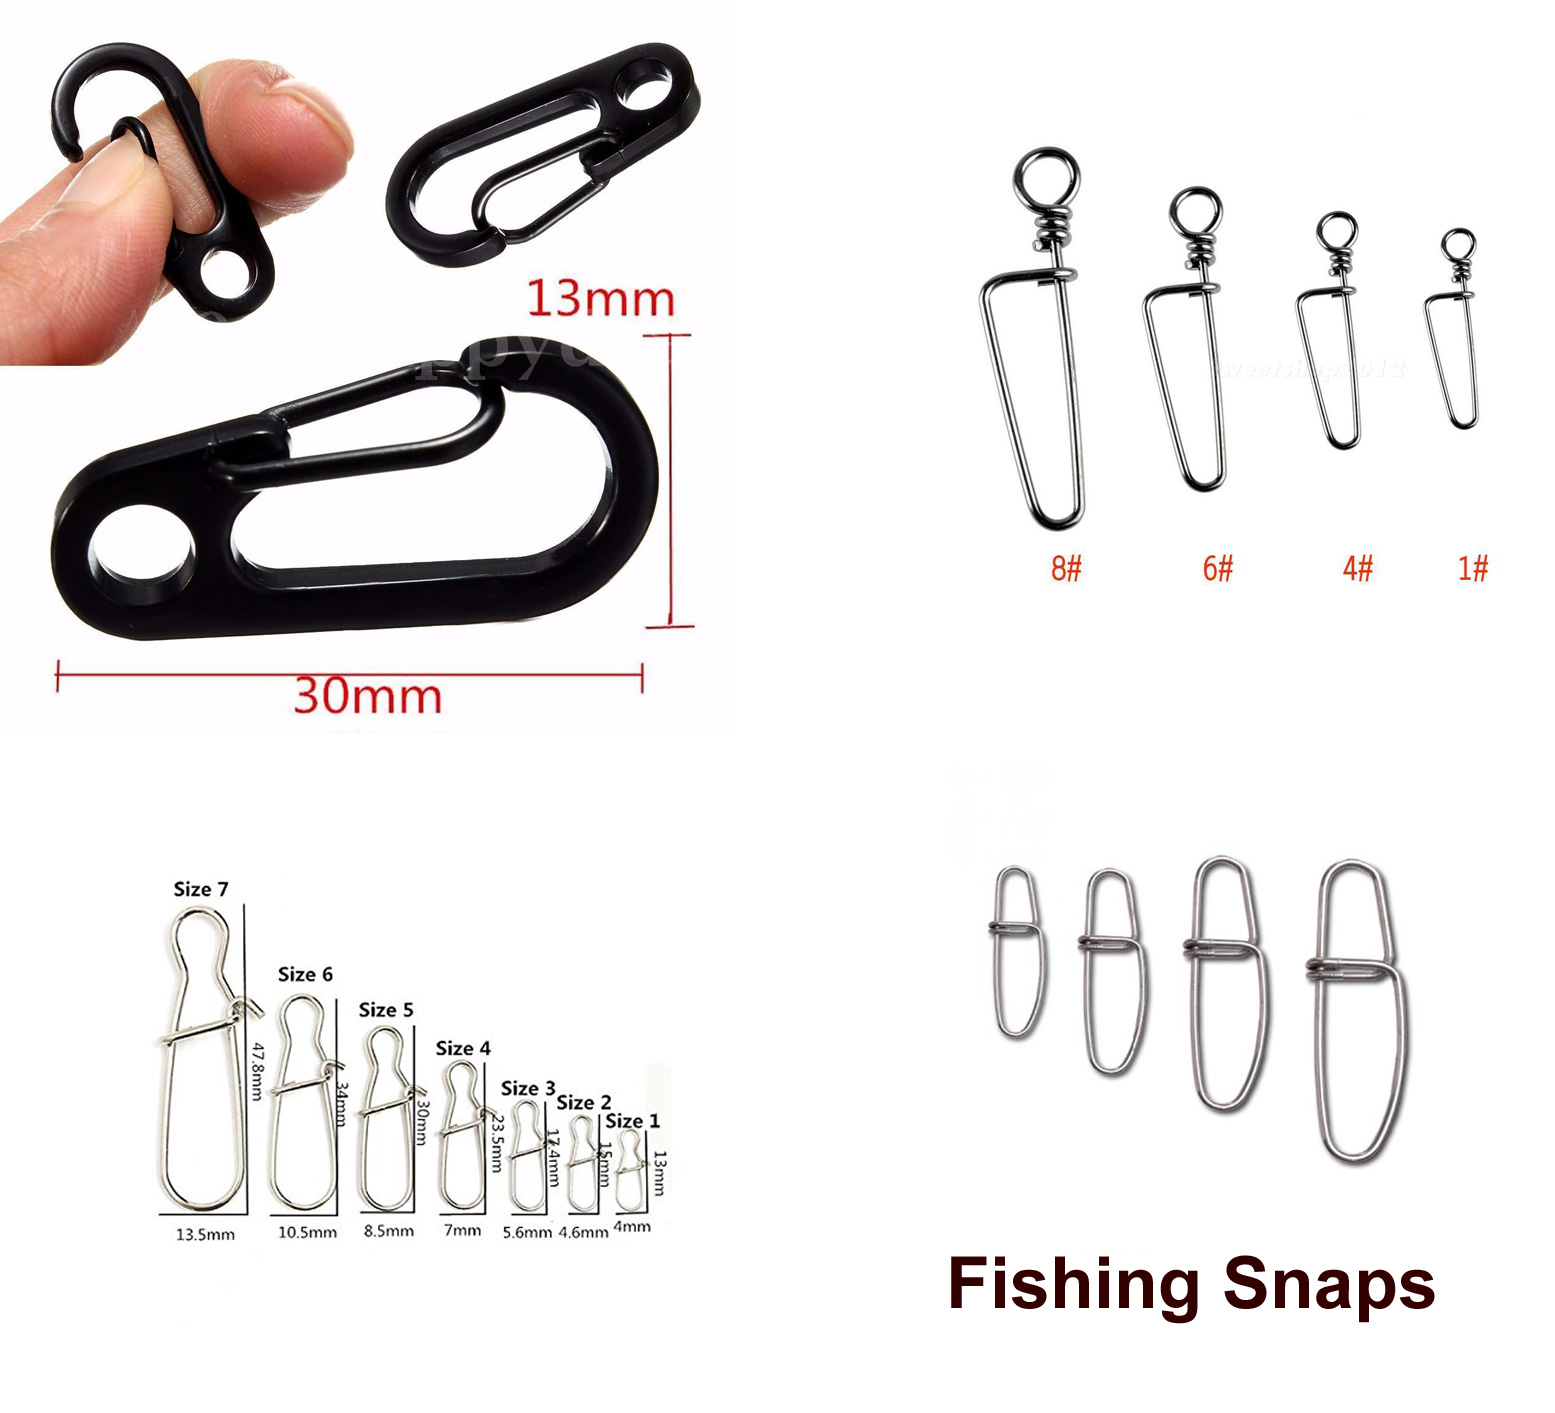
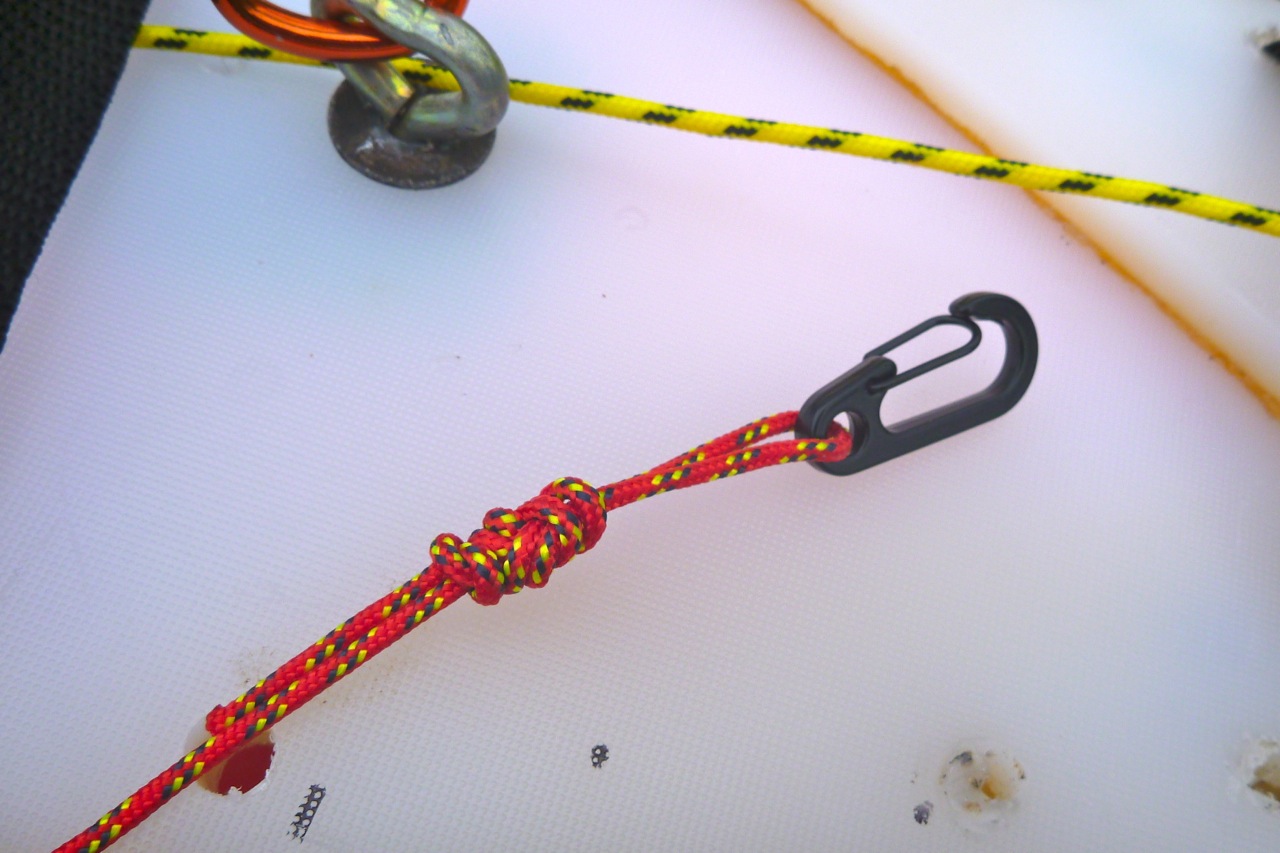
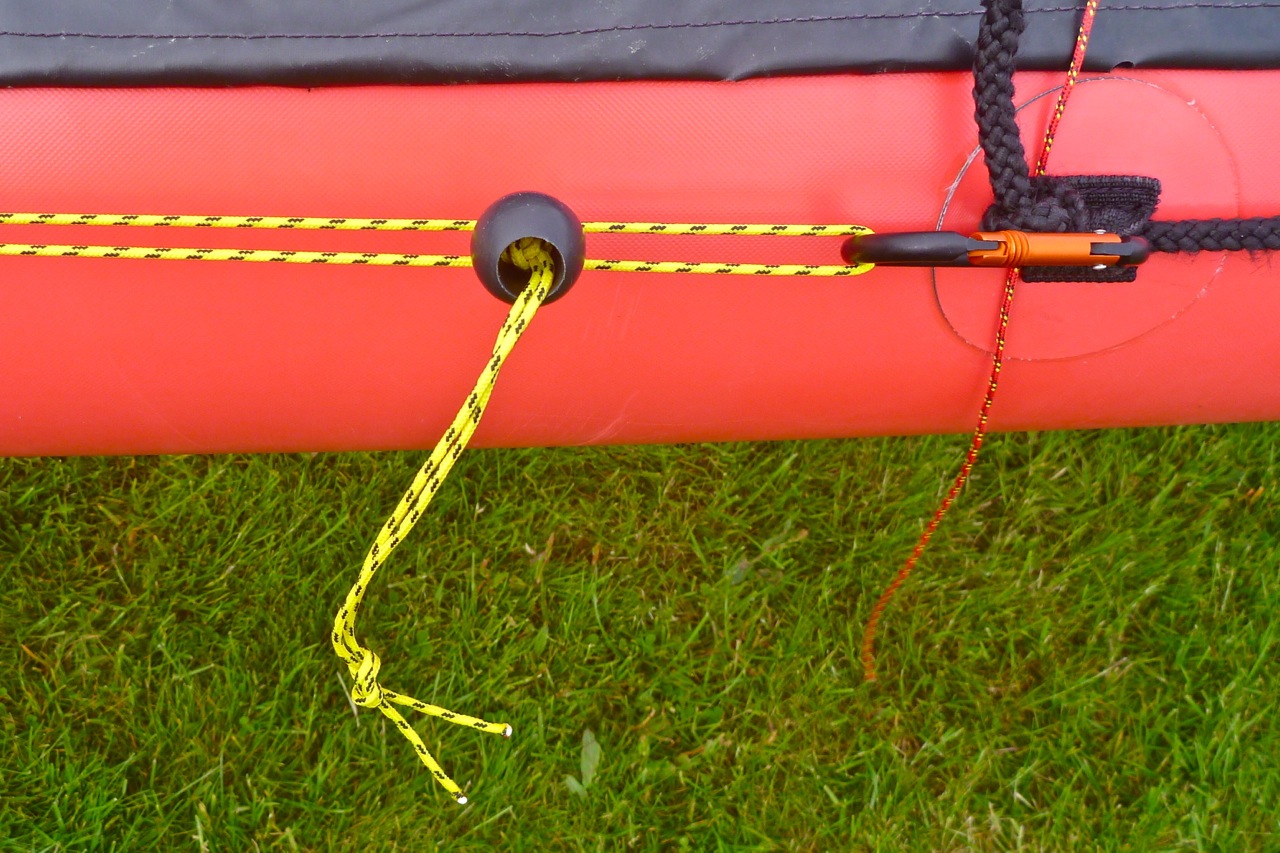
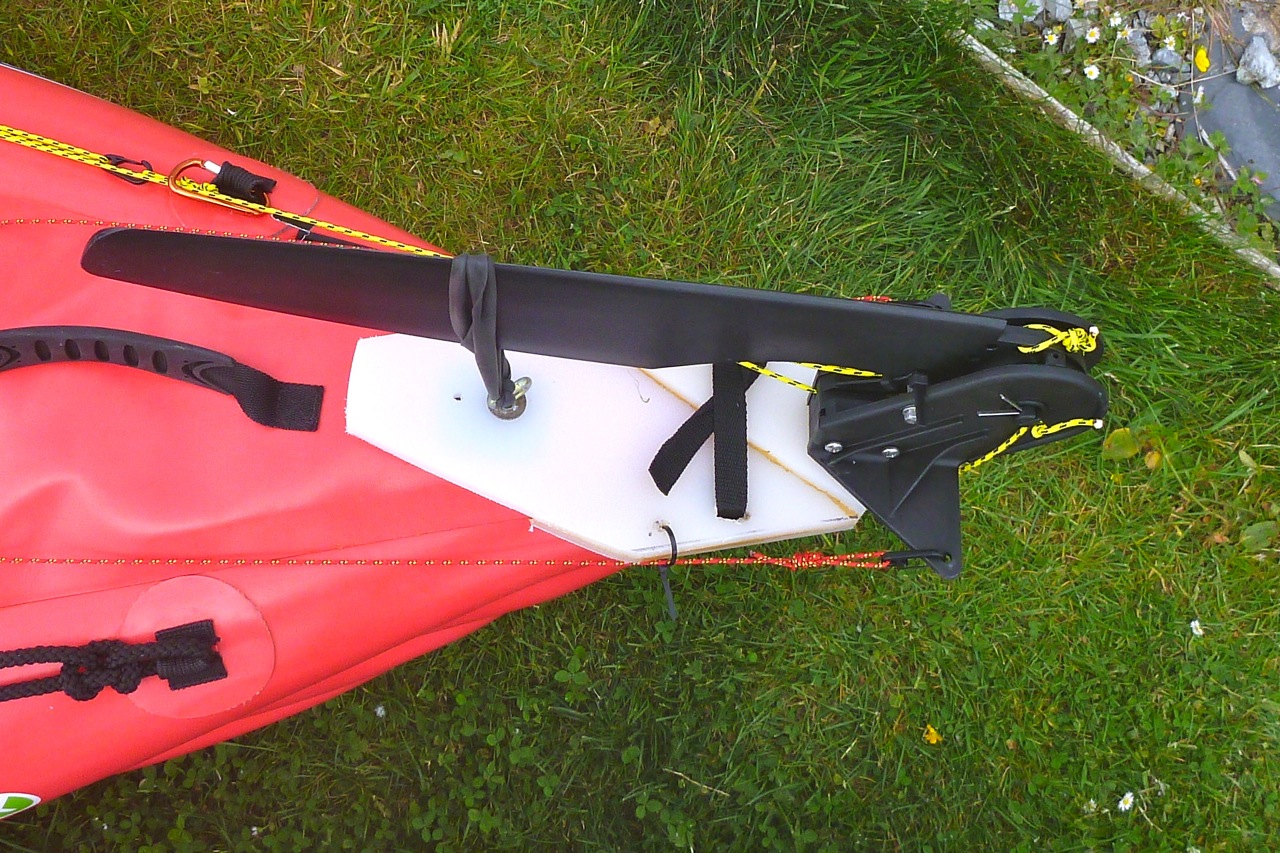
Within hours of finishing my prototype rudder I set about finishing it properly, and after a test run to Tanera Mor, made further improvements before trying it again. The whole set-up wants to be mountable/removable without any tools or knots to untie. I used mini karabiners to attach the various lines but realised snaplinks with a ring are better, as they’re permanently attached so won’t get lost. I recall the fine wire clips on my Incept rudder and after hours of webbery found out they’re called fishing snaps (right). Let me tell you, you can spend a lot of time online trying to figure out if size 00 is bigger than size 8 and still end up buying ones so small you need tweezers to open them. Moving on, some ringed karabiners (black, right) now do the job.
I only know two knots from my climbing days and still regularly use the Figure of Eight, (right and left) a quick way to put a loop on the end of a line that’s easy to undo. If you want to feed an Fo8 into a fixed ring (like the black krabs, above), just knot a loose ‘8’ near the end of the line, then feed the loose end back in and around the Fo8 all the way out again. And add a lock knot for good measure.
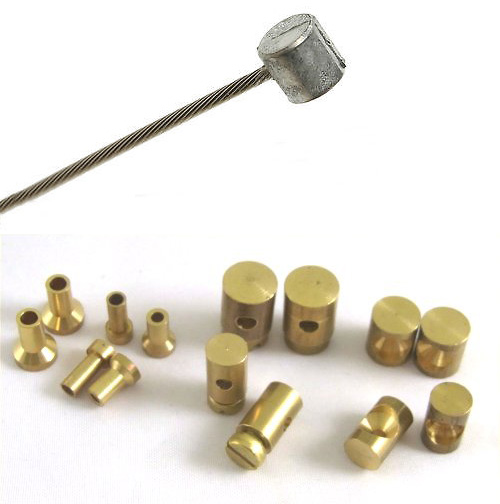
Lines shouldn’t be knotted directly to a fixed object, especially if it’s pivoting, but on the rudder’s lifting pulley there’s no room to attached a krab or mini shackle. The lowering pivot has a hole and channel for a nipple (right). I suppose I could track down a short length of appropriate wire cable, but for the moment it’s a job for our good friends, the zip ties. I also moved the rudder lifting knob to the right side: forward to lift (slightly more effort); pulling back to drop seemed intuitive.
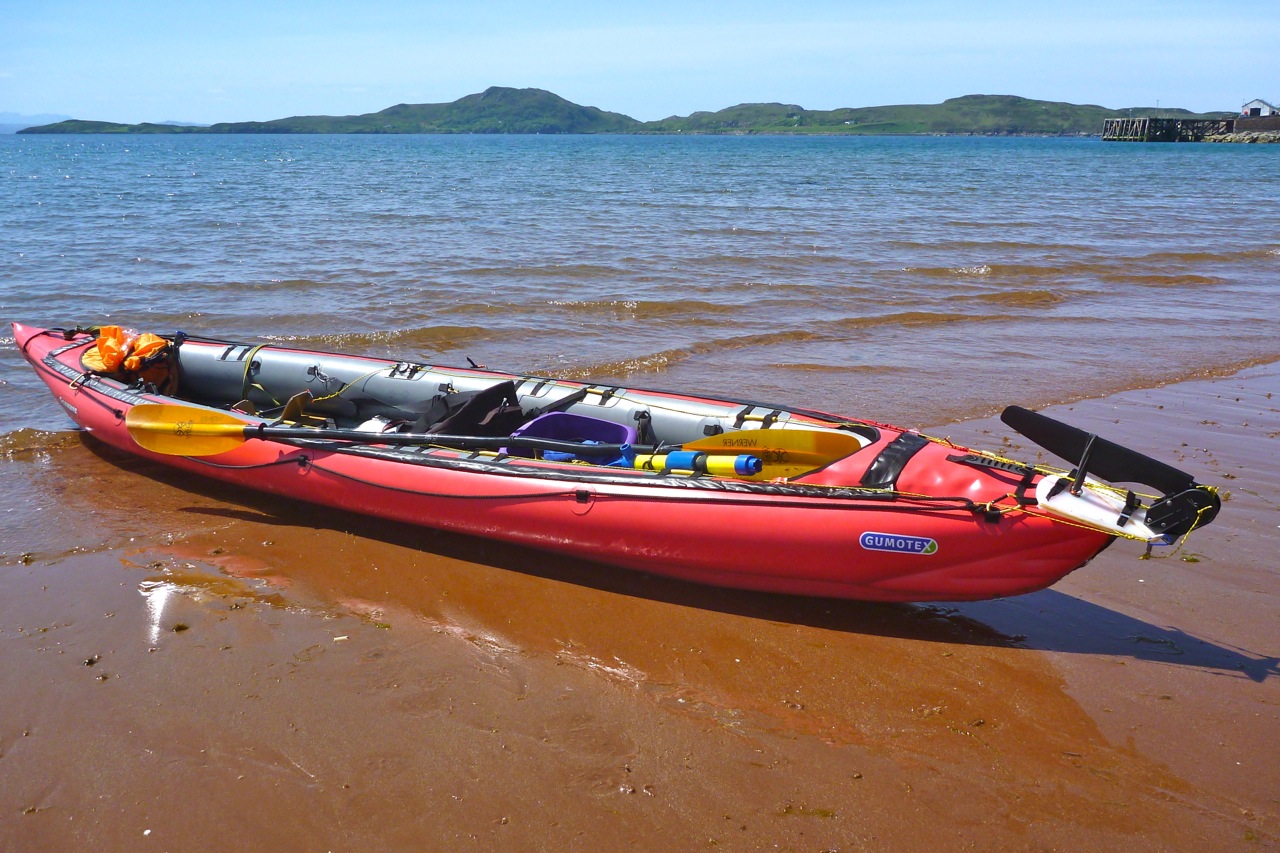
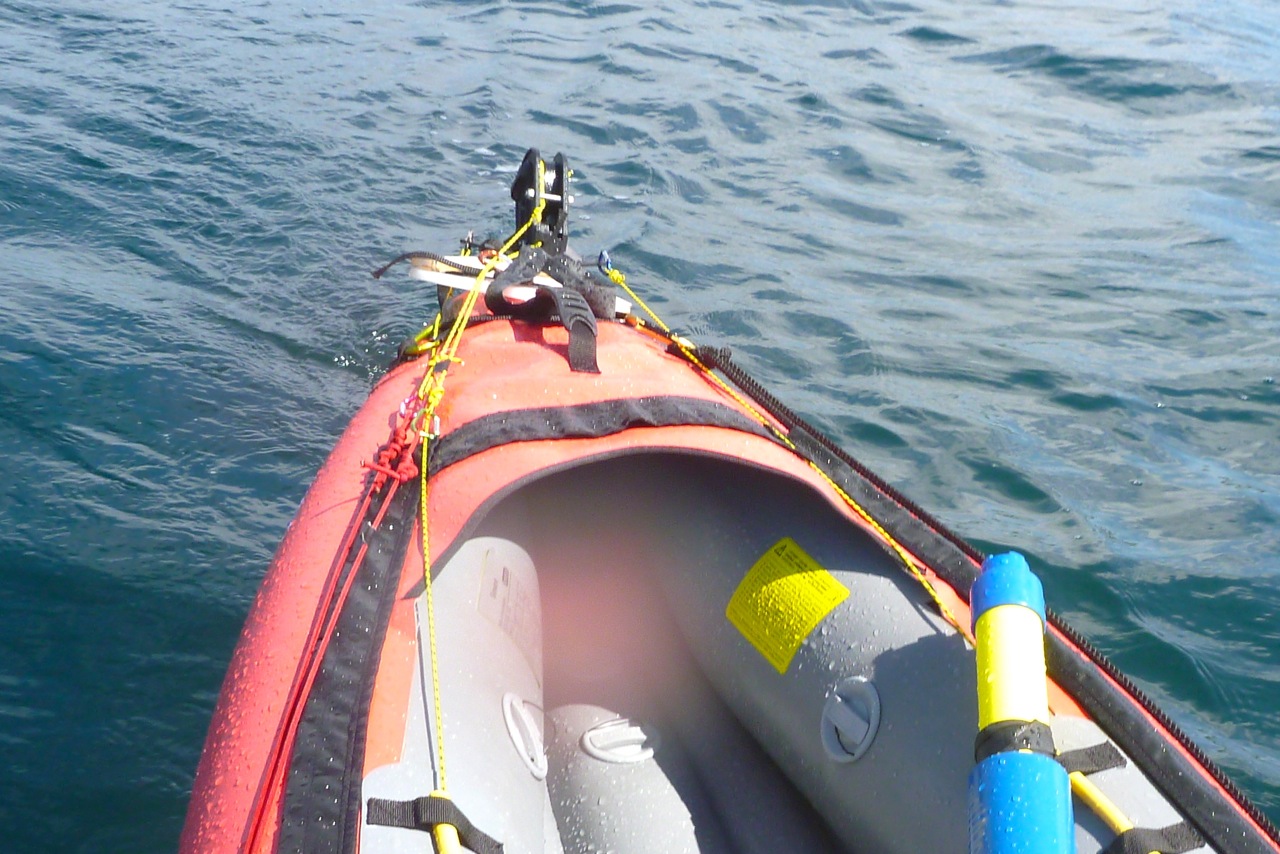
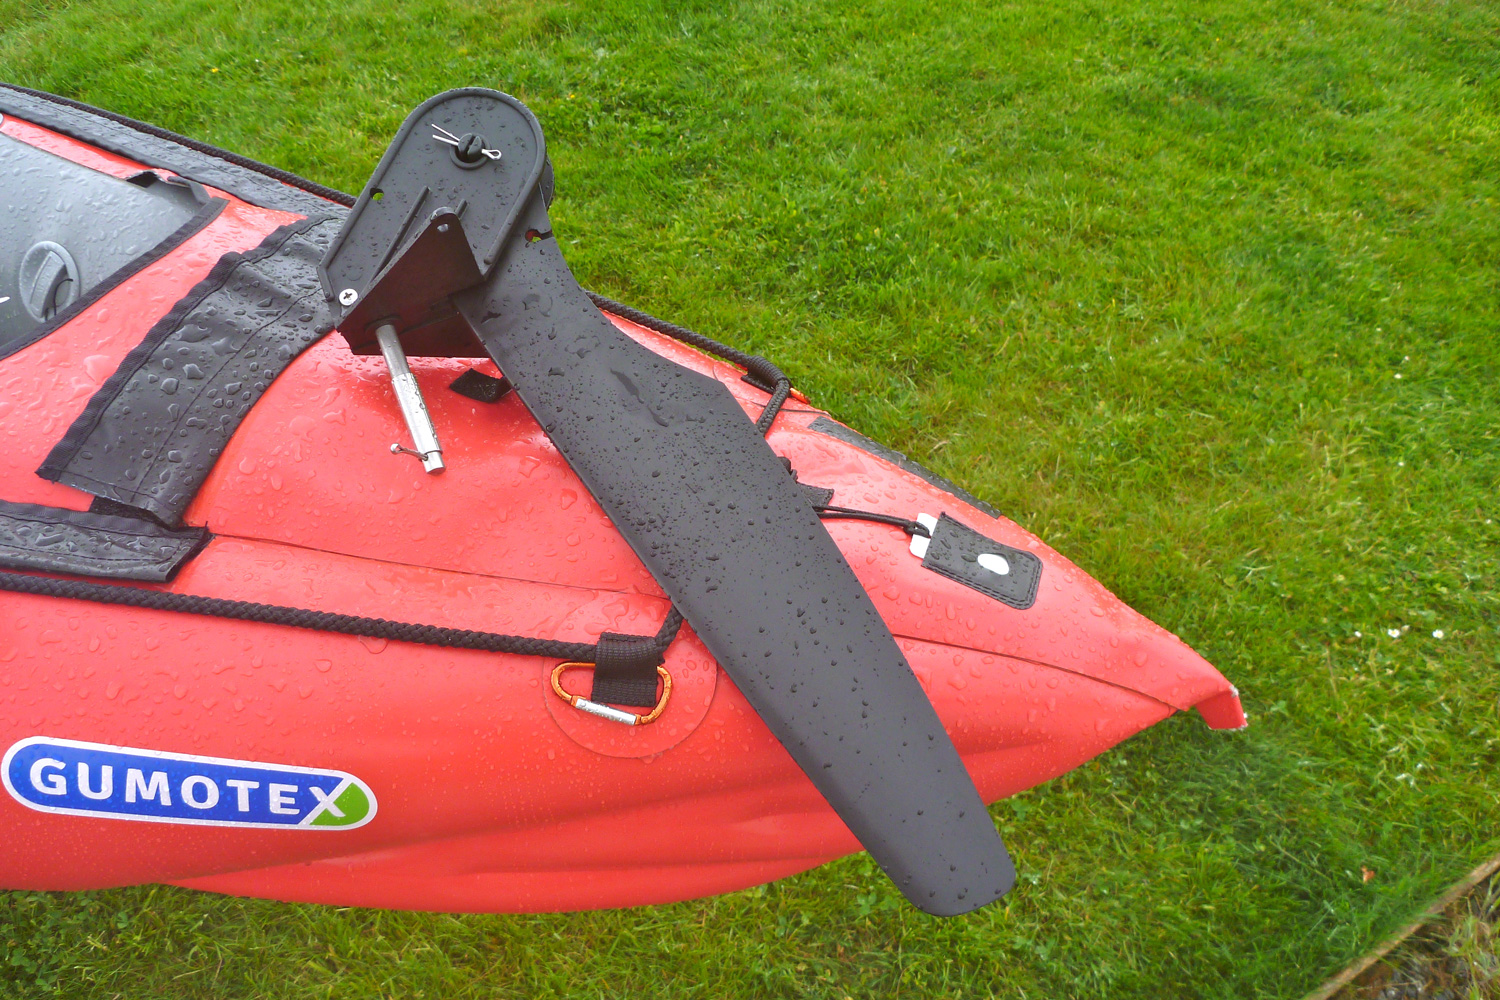
In this pre-optimised form I crossed the two miles to Tanera Mor with a light WSW wind at 2 o’clock. First, like a bush pilot, I checked my flaps: up and down, left and right, then started the engine and pushed on the throttles. Very soon something was wrong. I was having to rudder hard left and the pedals were leaning way forward. I stopped to knot the lines to take up some slack, but still the boat was turning into the wind and the rudder was very slow to respond.
With a skeg on, it’s usually the bow that pushes round on a crosswind. Was the new rudder assembly making more windage to push the back around? More stopping to add knots to the pedal lines. I was also reminded that with a rudder you don’t just set it and paddle away, but are constantly making tiny corrections. You probably do the same with your paddle and a skeg, but never notice until it gets obvious (the whole point of fitting a rudder). For this reason a rudder wants to be as smooth-running and taut as possible.
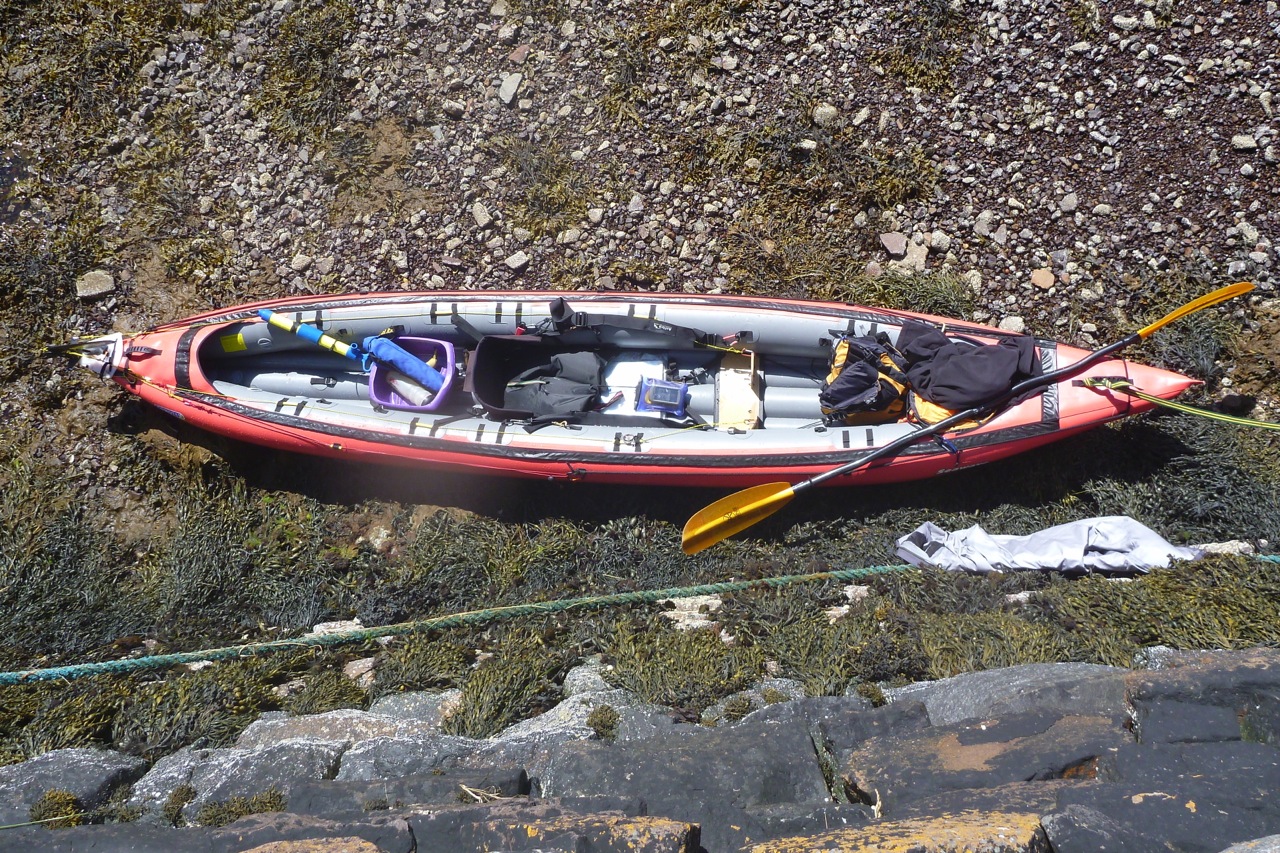
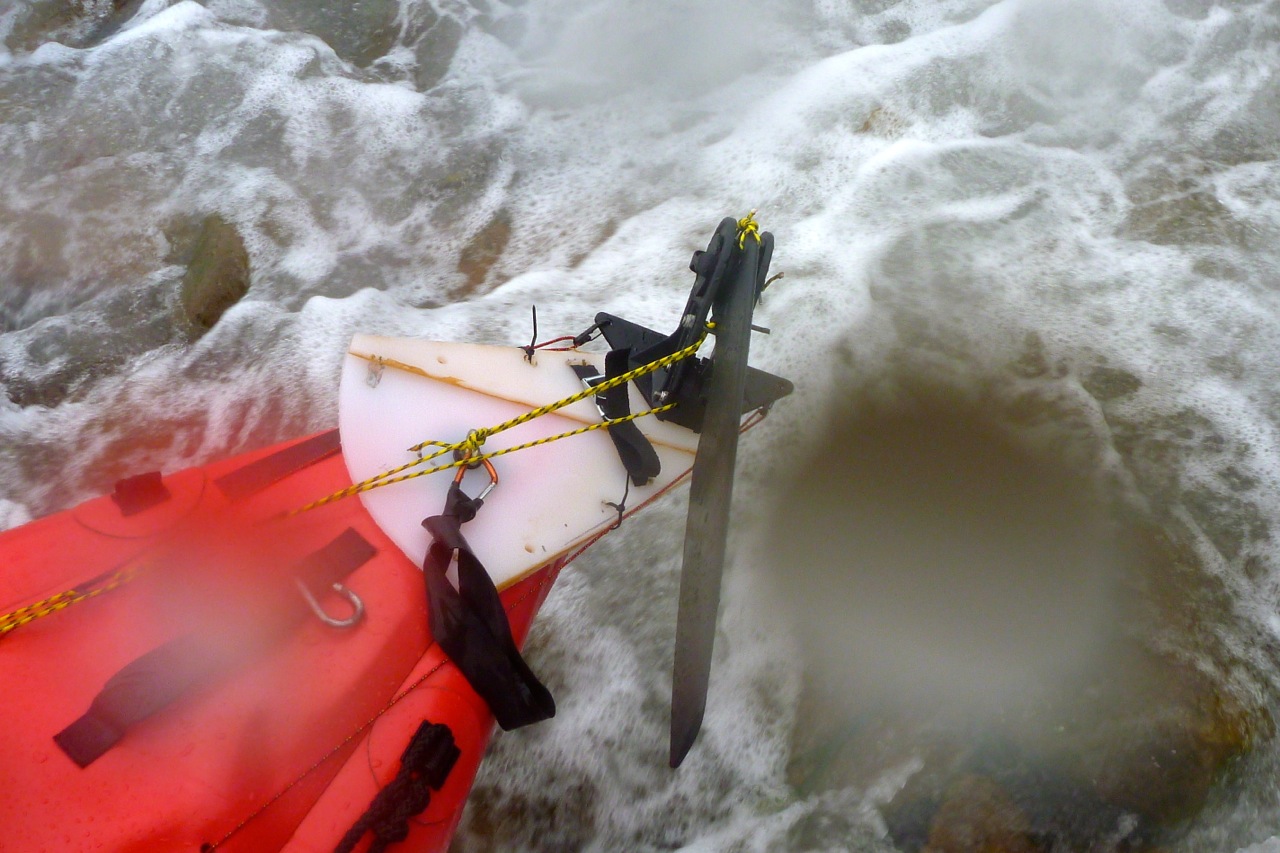
The forecast was cold and northerly so, over-dressed in a cag and dry pants, all this foot and arm work took it out of me as I resolutely tried not to correct with my arms. It was a relief to arrive at Tanera’s 200-year-old pier. Mooring up, I noticed my rudder plate was dislodged (left), explaining why the pedal tension and tracking had gone awry. It was only when I got back that I noticed I’d fitted my nutted ‘underplate’ upside down and the nut had pulled out. Oh Brother What a Plonker. I locked down the plate with a zip tie and readjusted the pedal lines yet again.
It was also clear that my scrapheap pedal board was rubbish. Heels resting on the board (left) put them two inches higher than normal – not good for paddling efficiency, comfort or pedal actuation; perhaps quite good for neglected muscles. That was easily fixed by turning the board around.
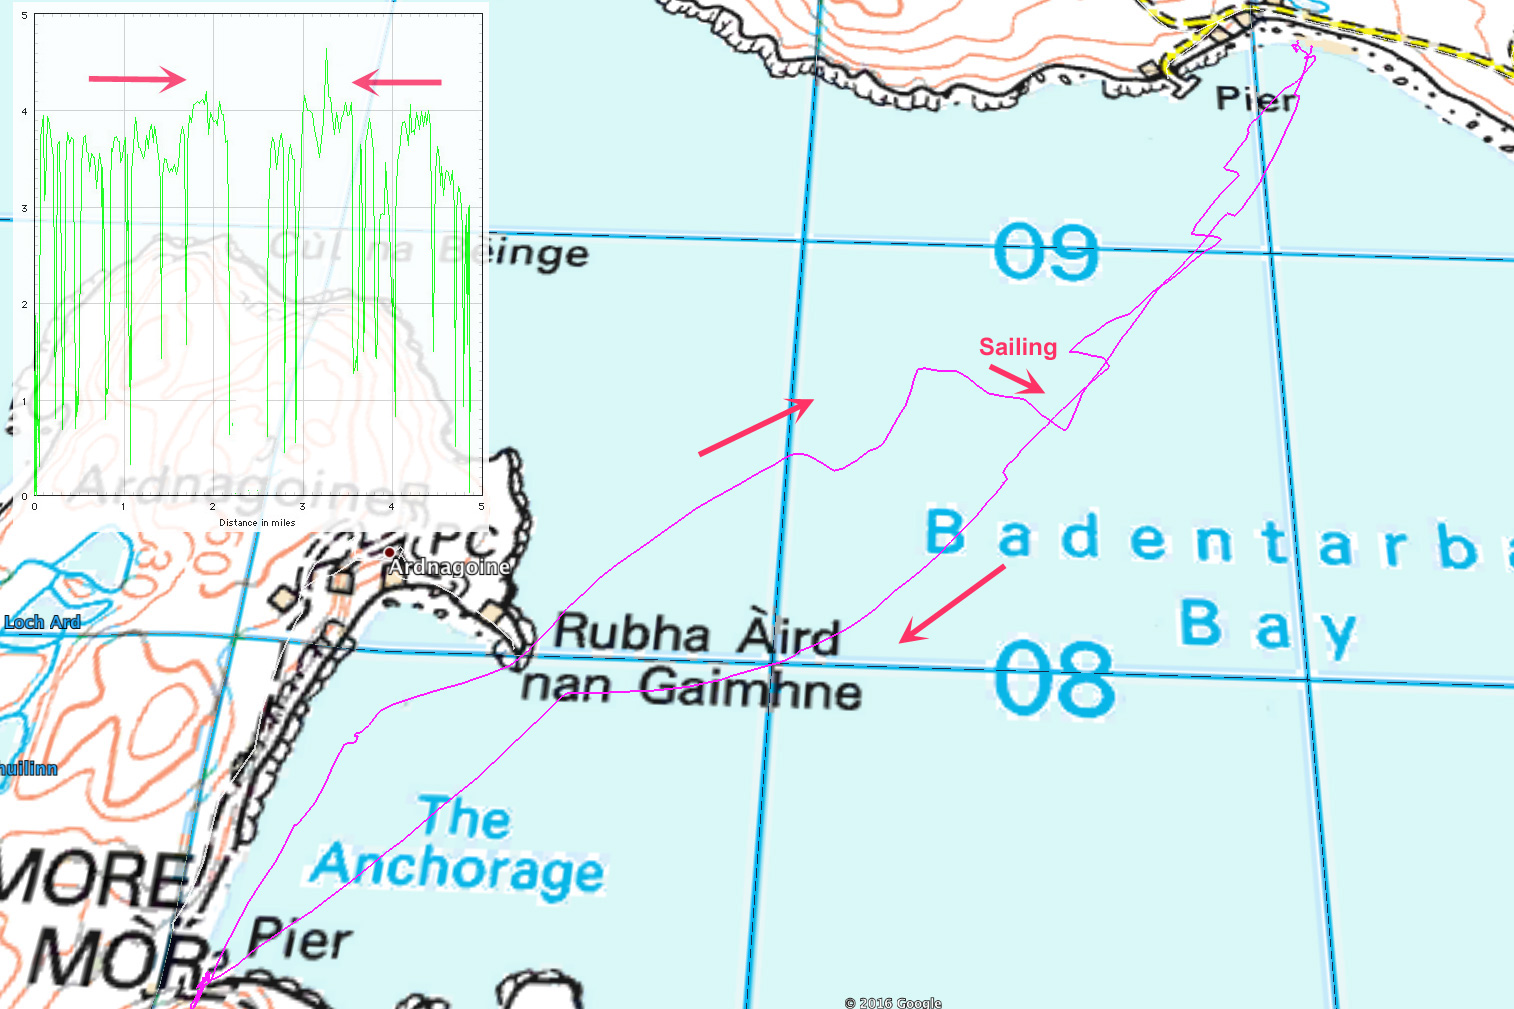
After an hour exploring this historic corner of the island (now no longer possible with the new owner’s developments), I headed back and immediately noticed a much more responsive rudder – now you’re talking! It was like driving with all the wheels done up tight. Lower heels gave a much better angle on the pedals and I noticed I was now operating the pedals with the outer edge of my feet, as I recall on the Incept. Line drag was minimal but now the wood laminate pedal board creaked and the zip tie hinges were a bit mushy. I’d already ordered another slab of LDPE chopping board to make a pedal board out of something more water-resistant than compressed dust, as well as the extravagance of proper marine-grade hinges (well, that’s what it said on eBay). I tried a quick bit of disc sailing too but it wasn’t really windy enough – more on that later.
As I neared Badentarbet beach the g-friend happened to swing by and, showing her some moves, I was amazed how sharply the boat could turn at low speed in the shallows, almost like a handbrake turn. Of course, this is kayaking not The Sweeney, but it’s good to know it worked. I also got a chance to test my newly bootied Kokotat dry pants – they worked like they should, too.
Back at the house, I realised the pedal lines had been cut before considering the need to move the pedal board forward for tandem paddling. Luckily, more Dyneema turned up next day, so I re-used the former yellow cord for the rudder lifting lines and ditched the saggy red paracord. Much tauter action.
The wheeled cord locks turned up too (right). I had a suspicion they wouldn’t work for adjusting rudder lines and I was right. They need tension from the same direction while snugged up against the edge of a stuff sack or something. I tried doubling the lines with two pulling the same way but the red Dyneema is too thin, hard-surfaced and slippery to work with these locks.
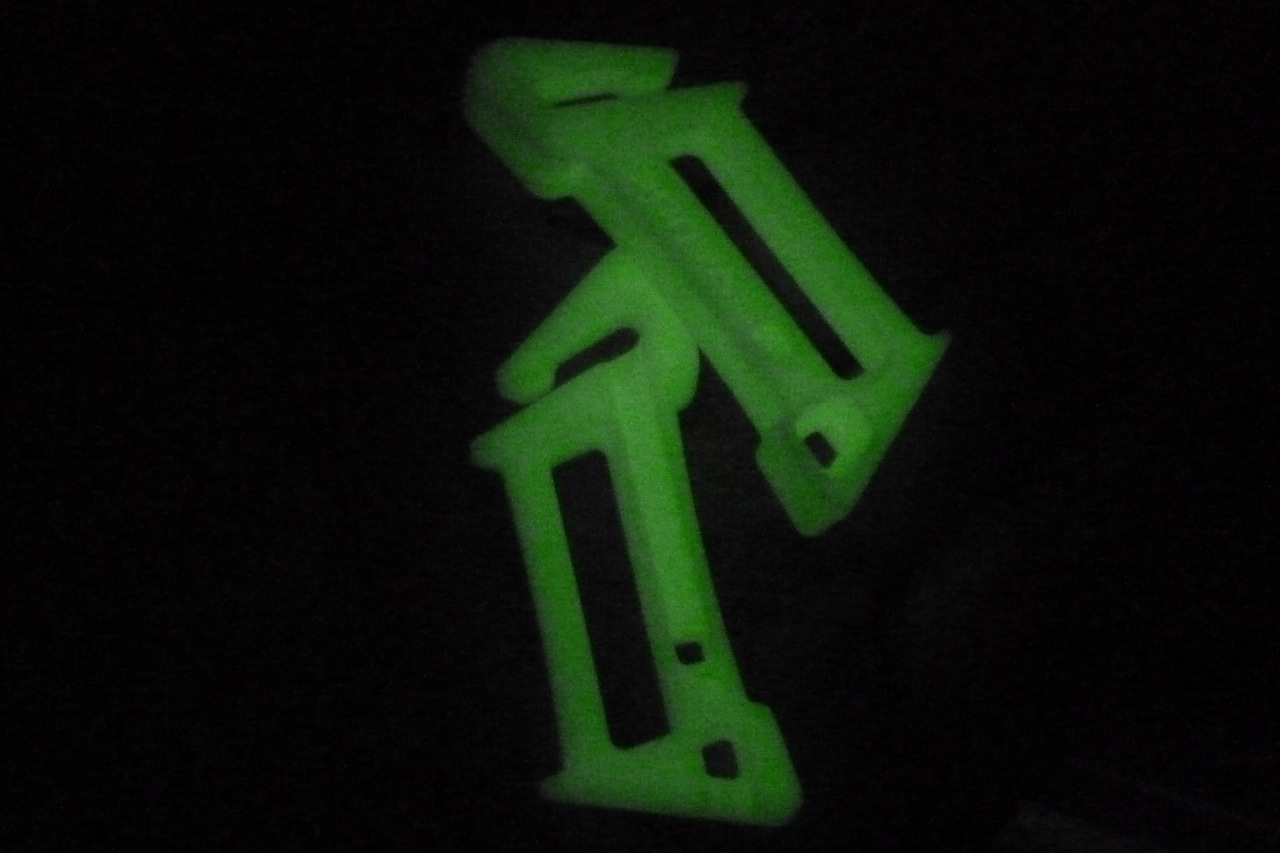
I settled on a ‘truck tarp knot’ then got the idea that the locking guyline adjusters off my Vaude tent might do the job – and they glow in the dark too! My Odyssee has guylines to spare.
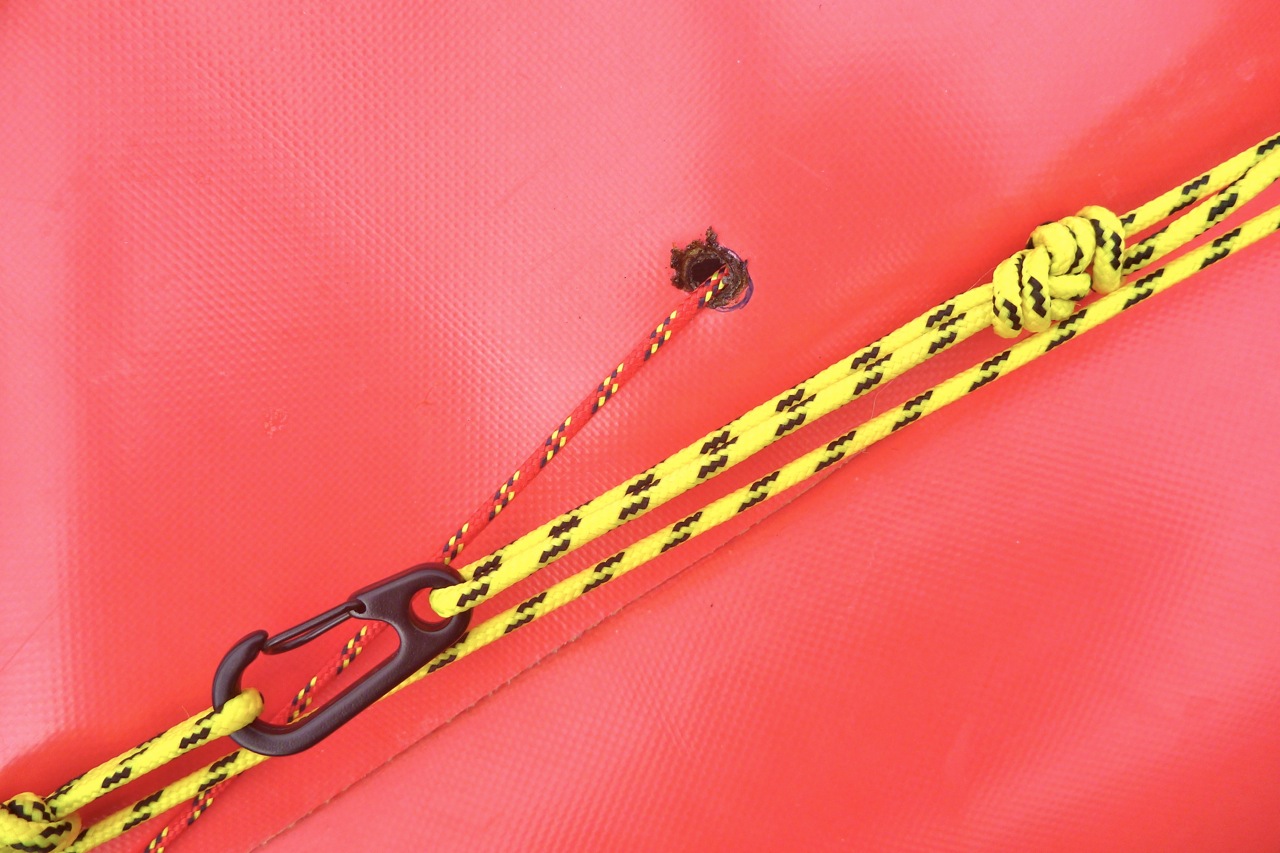
I set about making small improvements, including adding two holes in the boat’s back deck triangle (as Gumotex do on post 2016 Seawaves) to make a cleaner run line for the pivot lines. It’s no great pleasure stabbing a red-hot poker into your favourite IK, but a side benefit is the rich aroma of burning Nitrilon rubber, not some cheap PVC. I’ll track down some nice eyelets later.
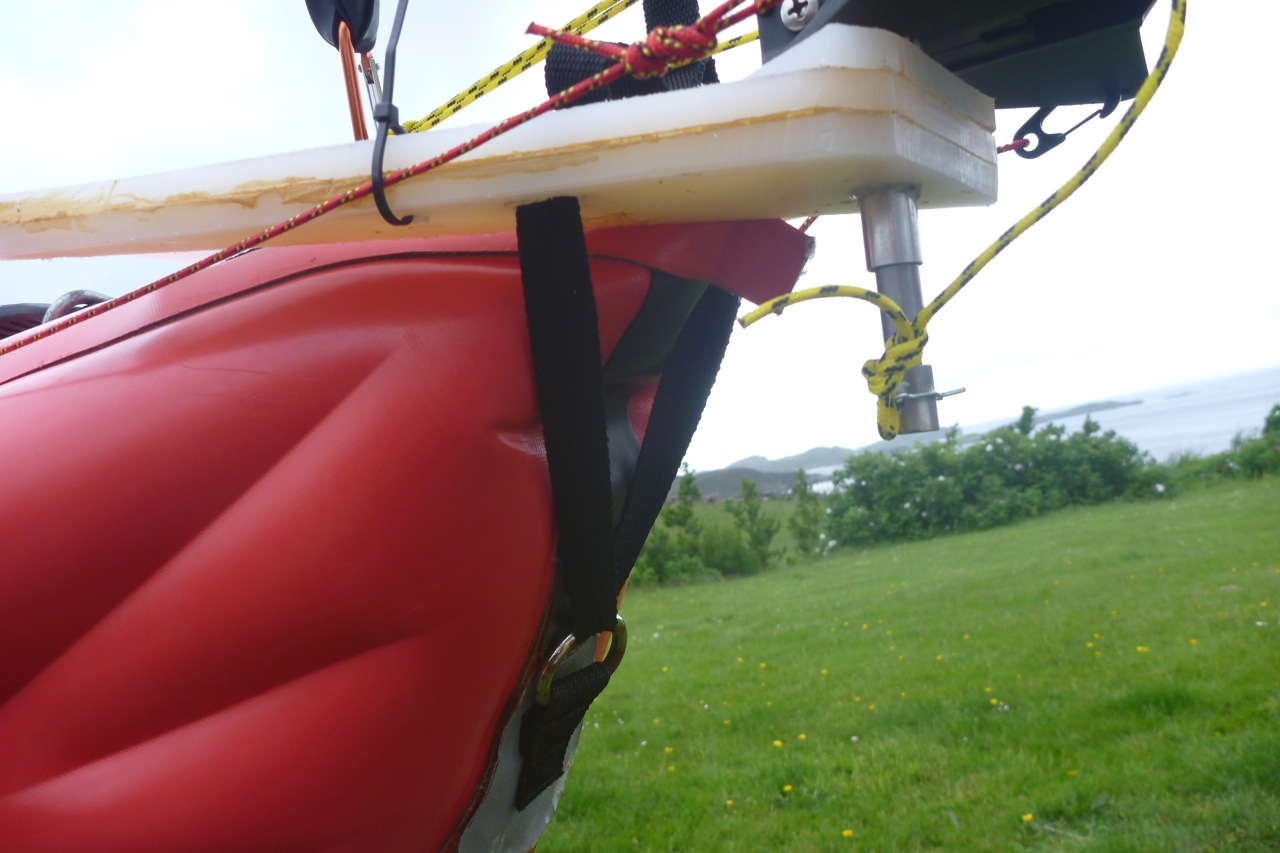
Once I realised the rudder board had come undone because I’d mounted the nut plate incorrectly, it was clear the strap looped to the rearmost deck line sleeves weren’t doing much. The main mount was through the drain hole, which relied on the large nut plate (left) underneath to stay fixed, plus the saddle strap (left) limiting any yawing. The whole plate could be slimmed down to resemble Gumotex’s factory version.
So I think I’m going to follow up on my own speculation and either form a triangular nut-plate below the deck to help keep the rudder plate in line with the boat, or I may make a new long thin plate (yellow, left) that reaches back past the kayak’s portage strap. With a slot to get round the handle, I’ll poke another hole in the deck and this way the plate will have two mounting points plus the saddle strap and will not deflect.
Rudder 1.1 While waiting for more chopping boards to turn up, I went out for another run with the Mk1.1 set-up. Much windier this time – 15 to 20mph from the SW. Normally I’d not go out in this, but the point of the rudder was to ease effort and improve control just before such conditions set in.
That was the theory. In practice I struggled to get out of Old Dornie harbour against the wind and soon had to put in to readjust the pedal lines. What now!? The luminescent Vaude clamps were effective but not a 4-second job like they should be. They can go back on the tent. A better line locking mechanism needed. If I’d looked back I’d have noticed the rudder plate had become dislodged yet again by the forces pushing the boat around. That explained why getting right out of the harbour was such a slog, let alone tackling the 15-knot headwind and lashing rain. Deceptively, there were few whitecaps out there, but a deep swell was rolling through, probably lifting the rudder out of the water. Who’d have thought it was Midsummer’s Day.
Turning back, I hoped I might get a bit of a run on the wind, but control was even worse – shades of Ningaloo but without the mangos and barramundi. Back at the pier, it was a relief to see it was only the rudder plate at fault, although I’d not have been surprised if it was just too windy for any sort of IK-ing today. While waiting for ‘what-do-you-think-I-am-a-bloody-taxi-service?’ to turn up, I strolled along the exposed shore on the off-chance of finding some LDPE jetsam, but all was glistening seaweed and frayed rope.
Rudder 1.2 I’m running out of time with the luxury of having the sea at my doorstep. That evening it occurred to me the rudder plate was always deflecting clockwise because the lip of one glued-on reinforcement plate underneath pressed against the stern and stopped it turning the other way. I did what I’d considered initially and glued a thin strip of LDPE to act as an opposing locating edge so the plate sat more securely once saddle-strapped down to the boat’s triangular stern.
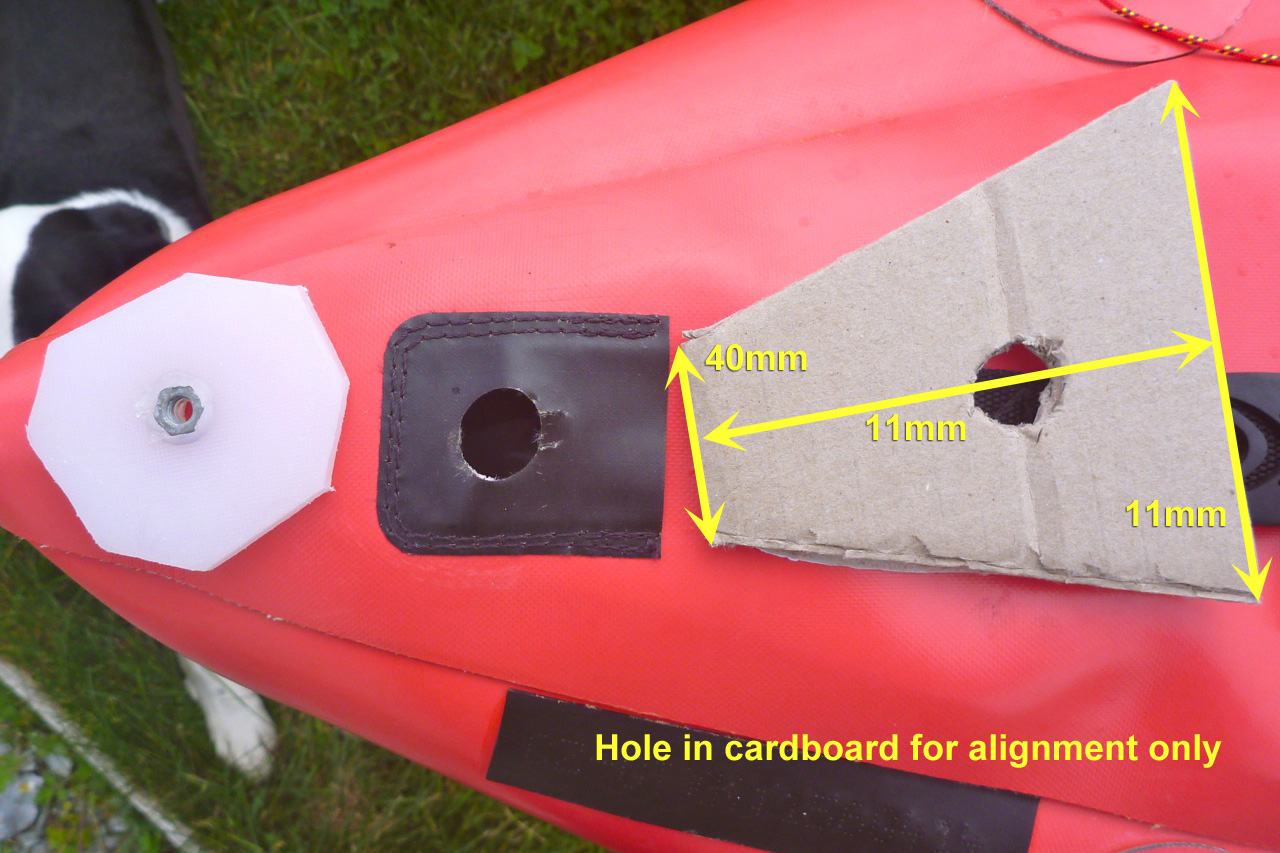
This surely should be enough to keep the plate in place, but while I was fiddling I made a template for the triangular nut plate which might further help locate the rudder plate (right). When more LDPE turns up I’ll cut one out and melt another M6 nut into it. if this doesn’t work a longer plate with another through-the-deck fixture below the portage handle (as visualised above in yellow) ought to fix this once and for all.
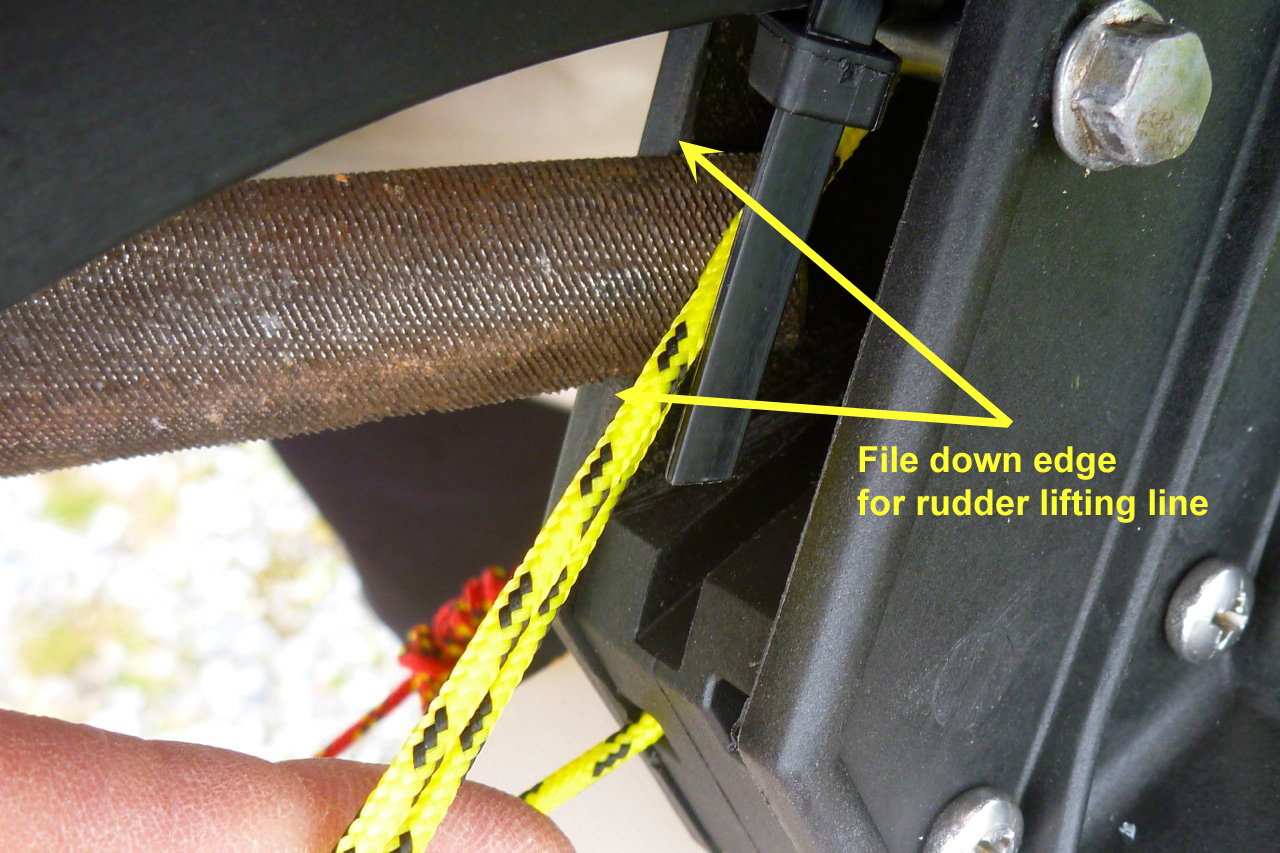
Other jobs: trimming off the board’s unneeded flab to make the current haxagonal shape, filing down the edge of the rudder body where the lifting line rubbed (right), and one more tweaking of the rudder pedal lines.
I headed to back to the harbour where it was still blowing about 15mph, but within a minute suspected it was pivoting again, possibly from the pull when dropping the rudder. The added locating strip wasn’t enough. Who knows how Gumotex manage it but on this set-up the surefire solution is a second in-line fixing point (as above) and perhaps that triangular under-plate to stop the mount pivoting once and for all.
Partly, these issues are due to underestimating the forces that a combined 120kg of paddler in a 4.5m-long kayak moving at 4mph puts on a rudder and its mount. Add some wind, current and waves and how well the small blade is fixed to a big boat becomes critical. Nearly there, brothers and one clear benefit: the ability to sit the kayak on the ground with no skeg stress. I can see me leaving the rudder on there full time and adding some sort of bombproof lock-out to make it the mythical articulated / lifting skeg.
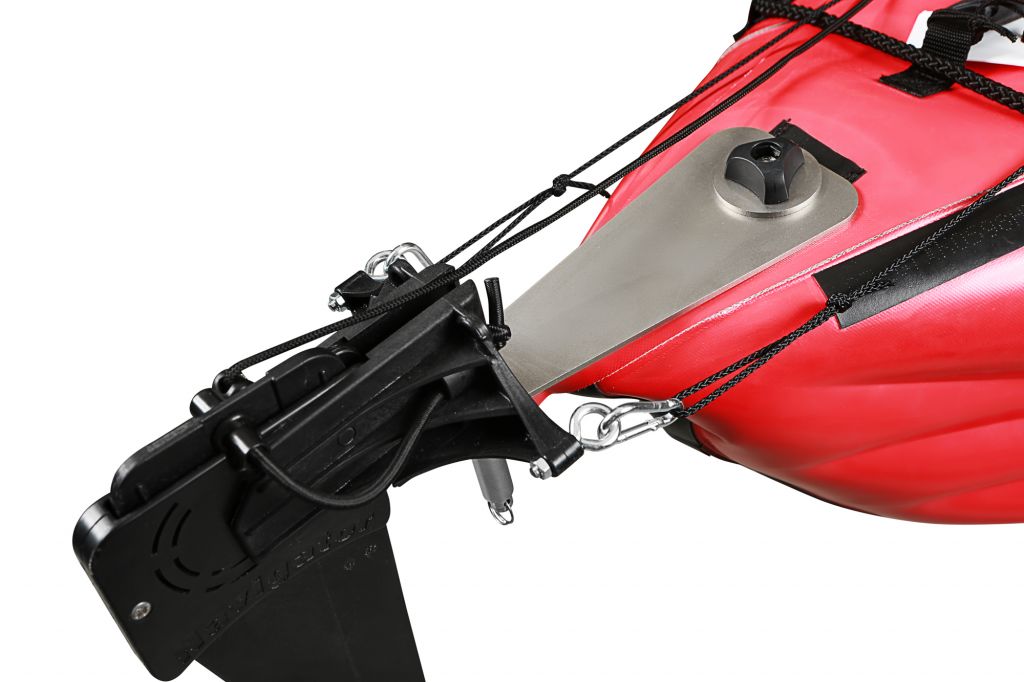
The 2016 Gumotex Seawave has had the stern slightly adapted to take an optional rudder kit. They’ve also improved the velcro bands for the optional deck by using Nitrilon, but it’s the rudder that’s the interesting development.
Coincidentally, I was halfway through adapting a cheap SoT rudder for my Seawave (left) and the factory version (going for £200) gave me some good ideas. The Gumotex rudder kit could be easily fitted to first-model Seawaves, and possibly to other Gumboats with similar triangular stern decks.
For the time it took to make mine I could have fitted a Gumotex kit ten times over but with only these pictures I was unsure exactly how it was secured. I suspect there’s an additional unseen plate underneath the stern decking to help jam the whole set up securely into the back triangle of the boat. I also believe they supply some stick-on velcro which goes behind (aft of) the black knob. Otherwise the plate would be prone to distortion under rudder forces, or give a mushy response like I got that on my prototype version.
The Gumo’s rudder’s retraction method is a pull-up-and-in, (left) whereas my was a more conventional swing-up-and-over which puts the rudder right out of the way over the back of the boat. IMO this is better for negotiating tight turns in narrow sea chasms where an unexpected swell could crunch your protruding rudder blade.
At the pointy end the pedal board looks reassuringly basic (and easy to copy) and the only obvious difference between an old Seawave are the two line guides on the stern deck (right) which I added to my boat to make a straighter, drag-free pull on the lines.
… I deliberately chose [these Kokatat Swift] dry trousers with no sewn-in socks as my drysuit has those. With the Swifts … I’ll just wear short Seal Skins and have no worries about the sewn-in socks getting holed by gravel. Time will tell how they wear and perform.
Well, I’ve changed my mind. I’ve never been convinced by the Goretex/membrane magic; at least not for hillwalking – I get too hot and sweaty. But making less heat paddling an open kayak on a cool Scottish day, the stuff seemed to work. It keeps out the splash and light rain, but because the leg muscles are inactive, sweatiness is barely apparent. Using a regular eVent hiking cag on top produced more mugginess, but nothing as bad as on the hill and easier to control with the front zip and adjustable cuff cinches. Unlike a hardshell, for an IK there’s no great benefit to buying a regular kayak cag with a waist seal as there’s no cockpit spray skirt to seal it against. If you really want to keep dry all over, just use a dry suit.
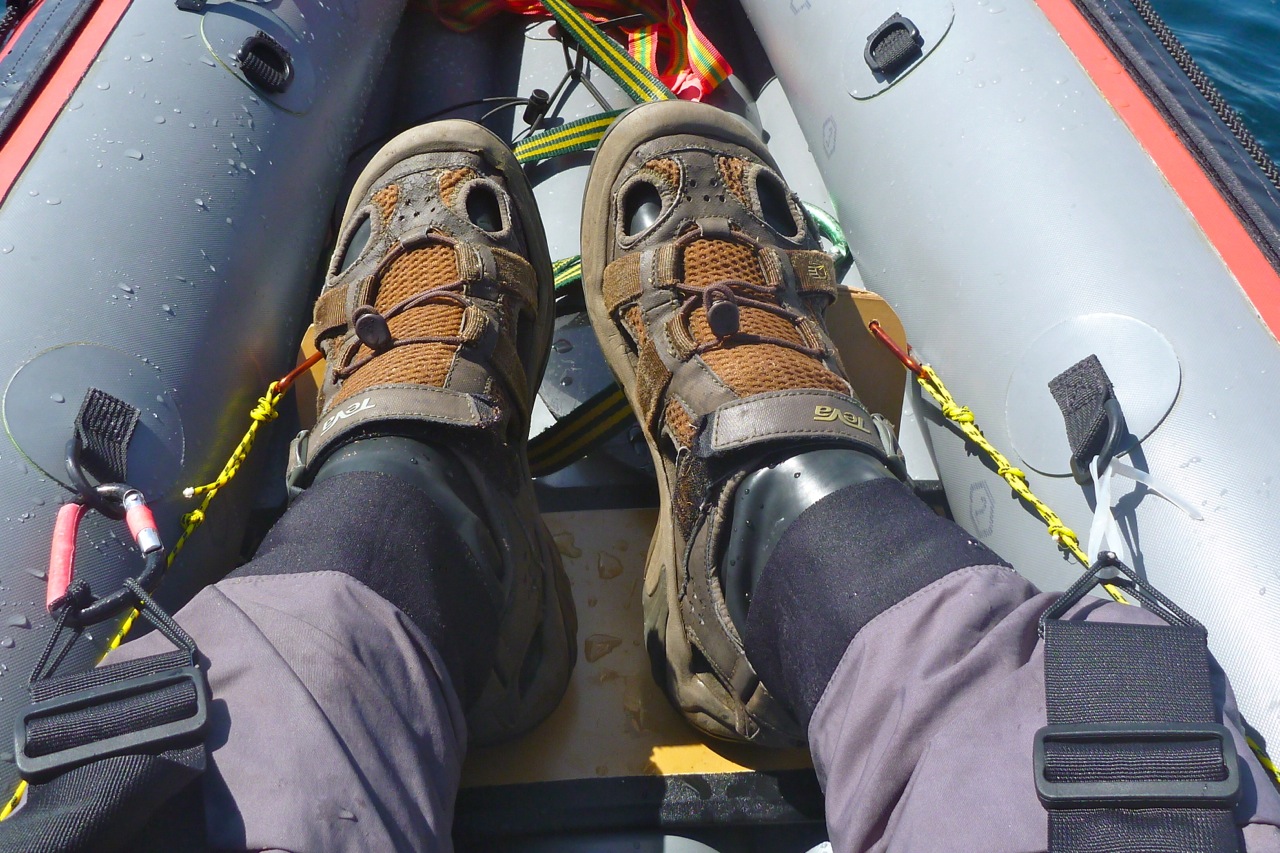
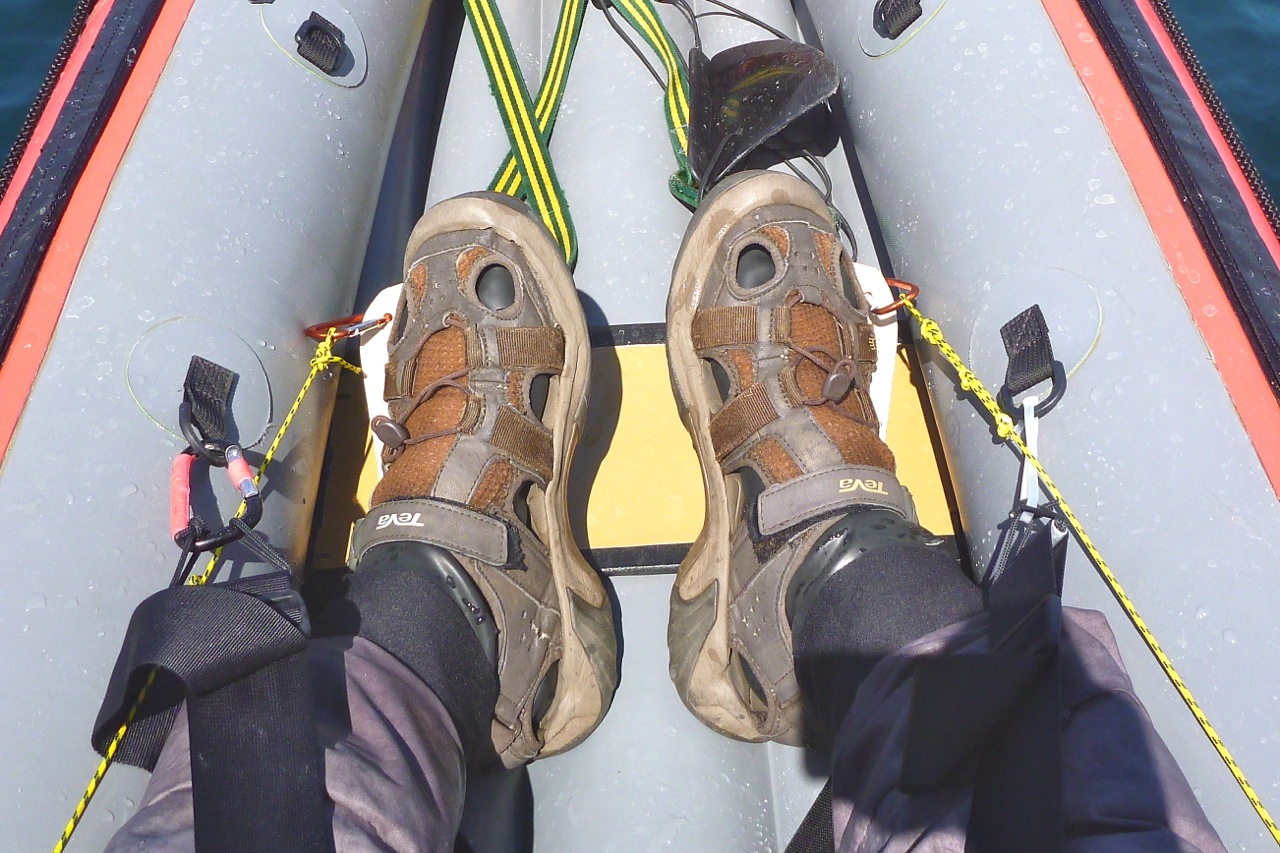
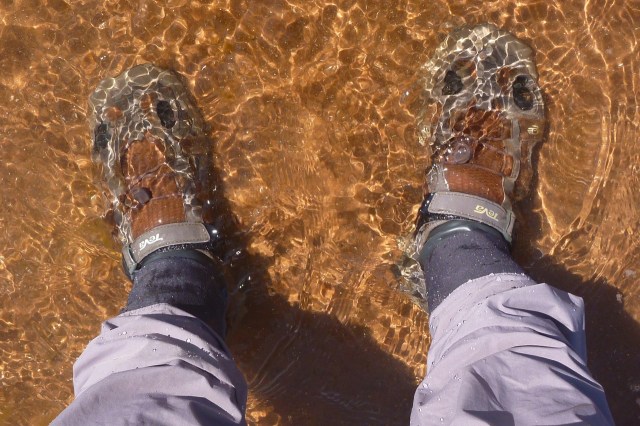
On one trip I found that the Swifts with knackered SealSkinz didn’t really work. ‘Waterproof’ SealSkinz only last until the clingfilm-like membrane goes. Then they become saggy sock-bags with insulation qualities no better than woollen socks. In fact, they may well chill damp feet. Wearing my slowly dilapidating Teva Omnium water shoes (left), I now think it’s better to seal feet properly with latex socks. IMO latex is easier to repair than socks laboriously made from off-cuts of membrane fabric which, like all that kind of stuff, has a limited life span, especially under the grinding weight of a foot. Bizarrely, I see most don’t make dry pants with integrated latex socks, only membrane, which must be a a cost or maybe a UV thing. Anfibio is an exception. But you can easily buy dry pants with latex ankle seals and glue on latex socks which are readily sold individually for around 20 quid.
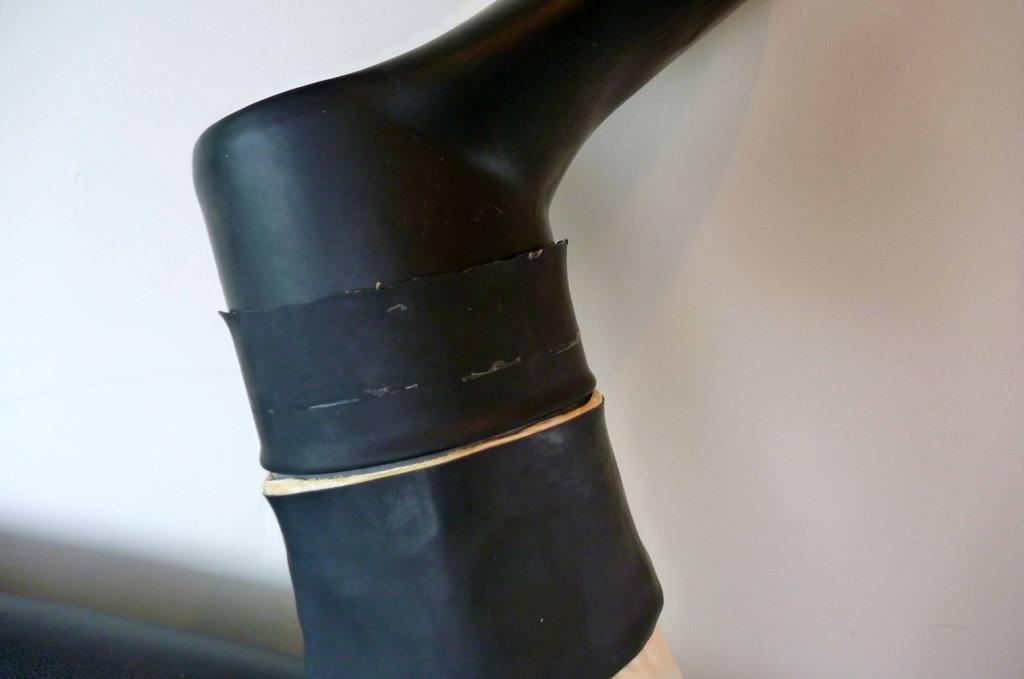
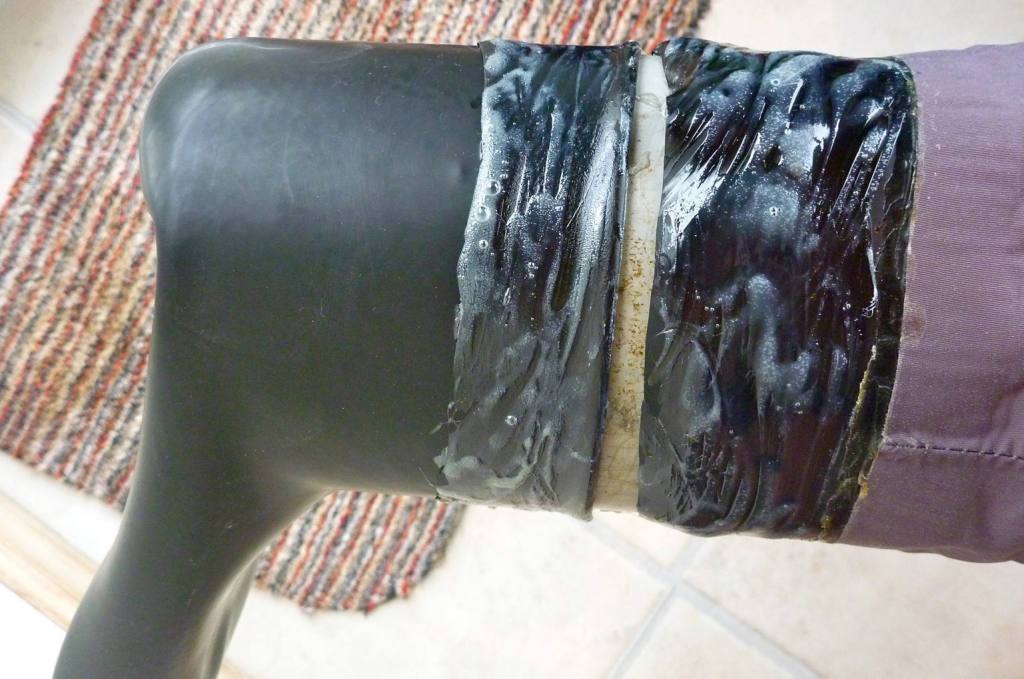
Gluing on latex socks First I trimmed the latex on the trousers and the socks to similar lengths. Getting a circumference match is important if there’s to be no leak-prone creasing once they’re joined. You’d think gluing latex socks to latex trouser cuffs would be simple. Not so it seems. My first go using regular rubber glue didn’t take to the shiny outer surface of the pants’ latex.
I read of using two-part adhesive, even though that refers to the tricky latex-to-dry suit fabric seal, not similar latex. So with the leg and the sock remounted on a piece of 5-inch plastic drain pipe (below), I tried again mixing up some PolyMarine Hypalon adhesive. This stuff sticks like a velcro electro-magnet, but curing times are lengthy and there’s the whole faff of getting the 25:1 mix correct.
Mount on a pipe
Fold sock back and glue
Fold over and press down
I folded back the sock about 3cm on the pipe end and nudged it against the exposed trouser leg cuff (left, above). When the adhesive had cured after 30 mins, it’s another coat (middle), wait 3 mins then just roll the sock over onto the leg and lay in with the roller then strap it up for a couple of hours. There was one small leak, easily fixed.
When cooler weather requires them but you don’t want a full-on drysuit, these fully sealed pants have been great. I can wade right in without getting wet feet, and wearing regular socks underneath the latex is are warm and comfy. A few years later one sock started leaking; a tiny hole, easily fixed with a dab of Aquaseal. They say latex is prone to UV so is best kept out of sunlight (which is why latex cuffs are often covered) and given the odd squirt of 303 UV protectorant or NikWax Solarproof.
Integrated socks – best thing you can do to your dry pants
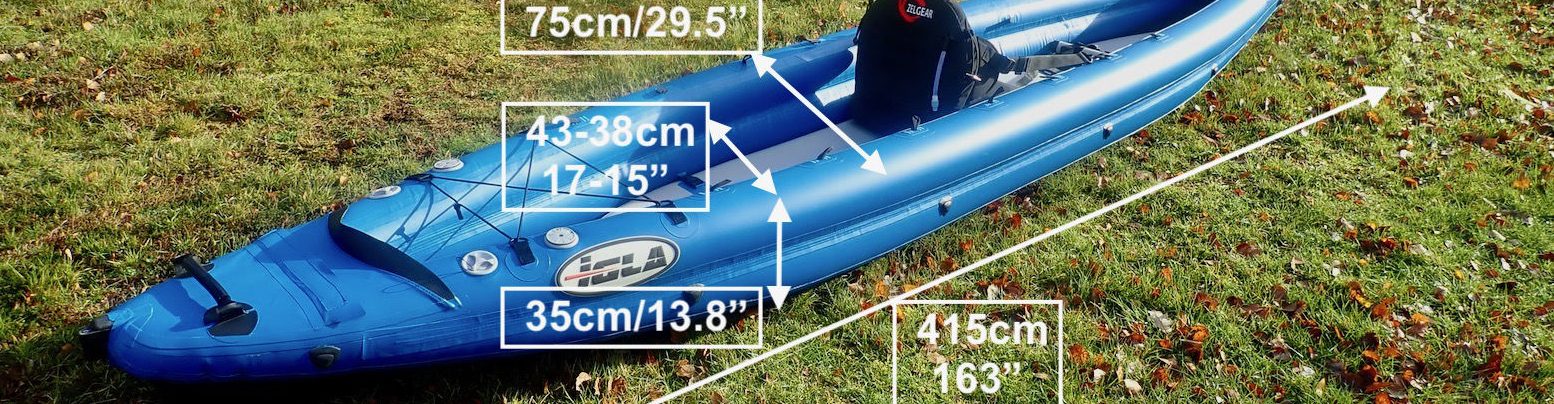
I had a visit from former Olympic slalom trainer and canoeist Jim the other day. He bought a Solar 410C after browsing IK&P and declares it one of his favourite boats. I ran the previous version Sunny for years before I felt I’d squeezed all the potential from it and started changing IKs every year. The Sunny was a tough do-it-all boat and the 410 is the same, but 20cm longer. It was more space but also the greater rigidity of higher-pressure boats I was after.
We were hoping to go out for splish-splosh but for the last few days a cold offshore F4-5 northerly has been spinning off a North Atlantic High and bearing down on the Summers so games are off. Right now the chilling drizzle is nearly horizontal as it blows past the window. Oh hold on, it’s gone sunny now. Is it autumn already?
The 3-seat, 410cm Solar went for as little as £550 in the UK or up to £100 less from Boatpark in Czech when on special. Both do free delivery anywhere. The Seawave costs about half as much again. The 410 is a foot shorter than my Seawave, an inch wider maybe, less slim and pointy at the ends and runs 0.2 bar/3 psi compared to my Seawave’s 0.25 (I run my Seawave sides at 0.33/4.8psi). The old style Nitrilon is thicker so the weight’s the same at 17kg, maybe less with one seat. The Seawave has a bit of a more pronounced keel rib along the middle too, but neither struggle to track without a skeg. It’s just that a skeg enables you to spend less time and effort correcting and so you can power on. Handy at sea, less essential in flowing rivers.
Jim showed me an interesting mod to make his skeg into a rudder to enable paddling into steady winds. By simply not fitting the back of the skeg into the sleeve, he’s able to pivot it off the front and modify the angle with a bit of string attached to the back of his seat (right). No probs with the skeg sliding out and if it does on a rock, chances are you’ll be close to shore and the boat won’t exactly become suddenly uncontrollable anyway.
I usually deal with quartering – ’10 or 2 o’clock’ – headwinds by just pulling harder on one arm, leaning into the wind or repositioning the paddle in my hands longer on the leeward side. I rather lost faith in rudders on the Incept in Australia when it was maddeningly ineffective in controlling the boat in strong backwinds, although I fitted one on the Seawave in the end. But without all the foot control faffery this could be a simple, non-permanent mod to any Gumboat which runs the robust, slip-in black skeg. And unlike my Incept rudder, it won’t come out of the water and be ineffective on steep backwaves.
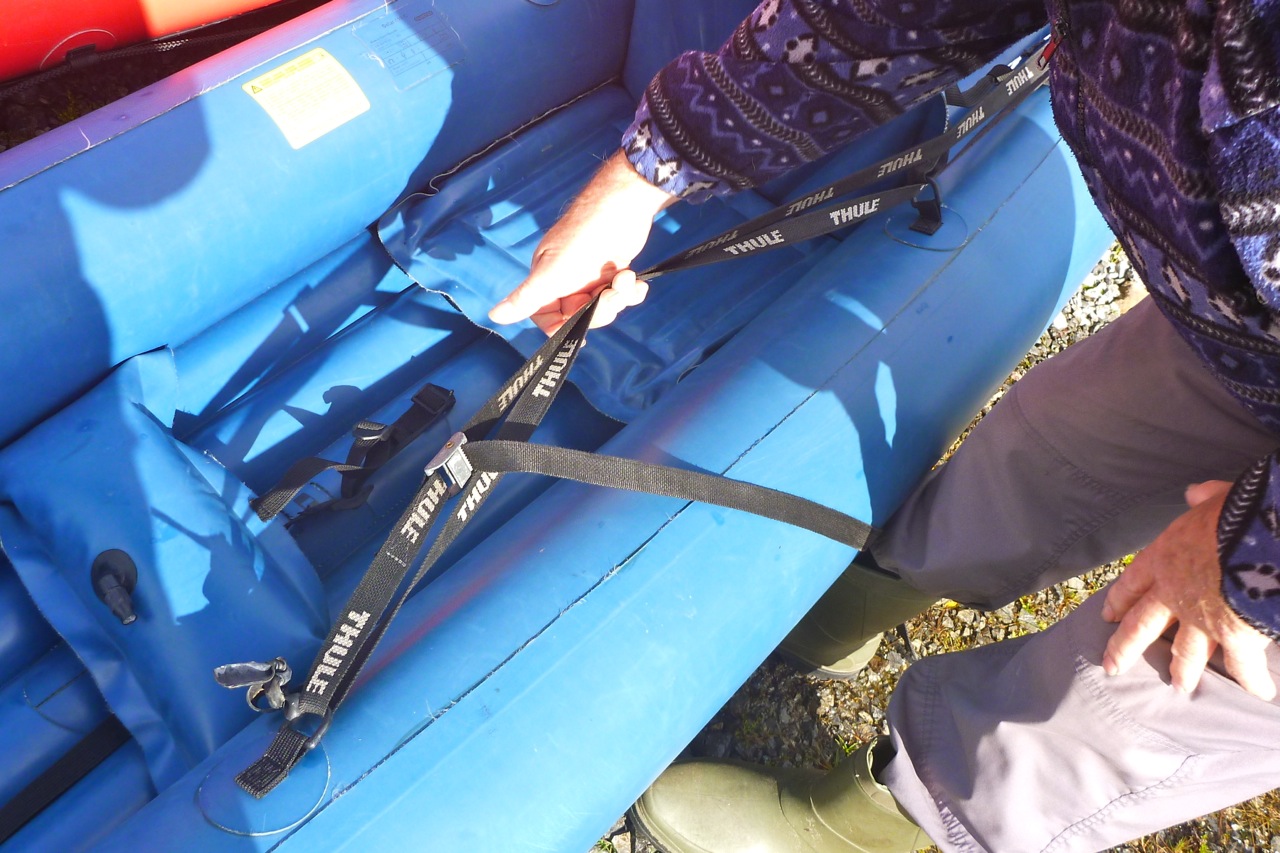
He also showed me a way of simply rigging up his roof rack tie-downs into thin knee braces (left). Like me, Jim agrees they’re a great benefit to paddling efficiency in an otherwise unbraced IK. I have some Packrafting Store ones on the Seawave – a lot lighter than my old SoT braces. And he also said he’s successfully tried an idea I thought of in my Sunny days, but never tried: hull rigidity rods to make the long but low-pressure boat flex less. Either two on the sides which requires gluing fixtures to work best, or as he’s found, simply putting a thick broomstick or whatever under the seat in the middle of the boat
The range of packrafts has slowly expanded since I bought my first Alpacka Llama in 2010 and Alpacka rafts themselves have changed a lot in that time. But here in the UK people are still slow to see the benefits of these lightweight portable boats. Much of this reticence must be due to the price of these niche-interest boats which, at a glance look not much different from what I call Slackrafts: disposably cheap vinyl beach toys. Another reason might be that packrafts appeal more to outdoorsy types looking for a new way to enjoy the wilderness or countryside, but with no interest in acquiring the technical skills far less the storage and transport issues of hardshells. They won’t come across these boats very often but as this test clearly proved, anyone can hop into a packraft, set off down river in a straight line and tackle an Environmental Agency Grade III canoe chute. The testers all ‘got it’ and by the end some were already cooking up packrafting adventures.
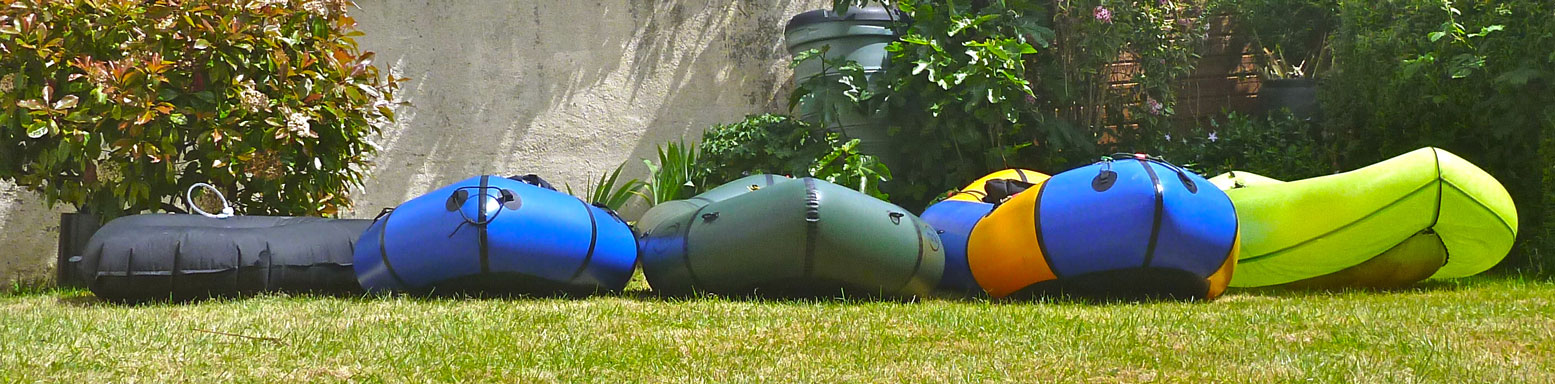
We’re comparing a prototype Aire BAKraft as well as the new Supai Matkat, bothfrom the US; the Russian-made, German-branded Nortik Trekraft, and the Micro Rafting System (MRS) Microraft from China. The unusual Aire calls itself a hybrid IK-packraft, the Supai is an ultralight ‘crossraft’ intended for flatwater use. The other two more closely resemble Alpackas in current or former iterations. My current 2014 Yak made a fifth boat on our test, one which I at least could compare against the others.
These four boats were lent to us by what is now called the Anfibio Packrafting Store in Germany which sells, rents and now makes under its own Anfibio brand, the biggest range of packrafts and packrafting gear in Europe. Sven at the Packrafting Store helped clarify or correct technical aspects in this review but the opinions, observations and most measurements are our own. Some of the more exciting photos are also from the Packrafting Store. We asked NRS to participate: they didn’t answer. At the time Feathercraft’s packrafts were another option but Feathercraft is no more.
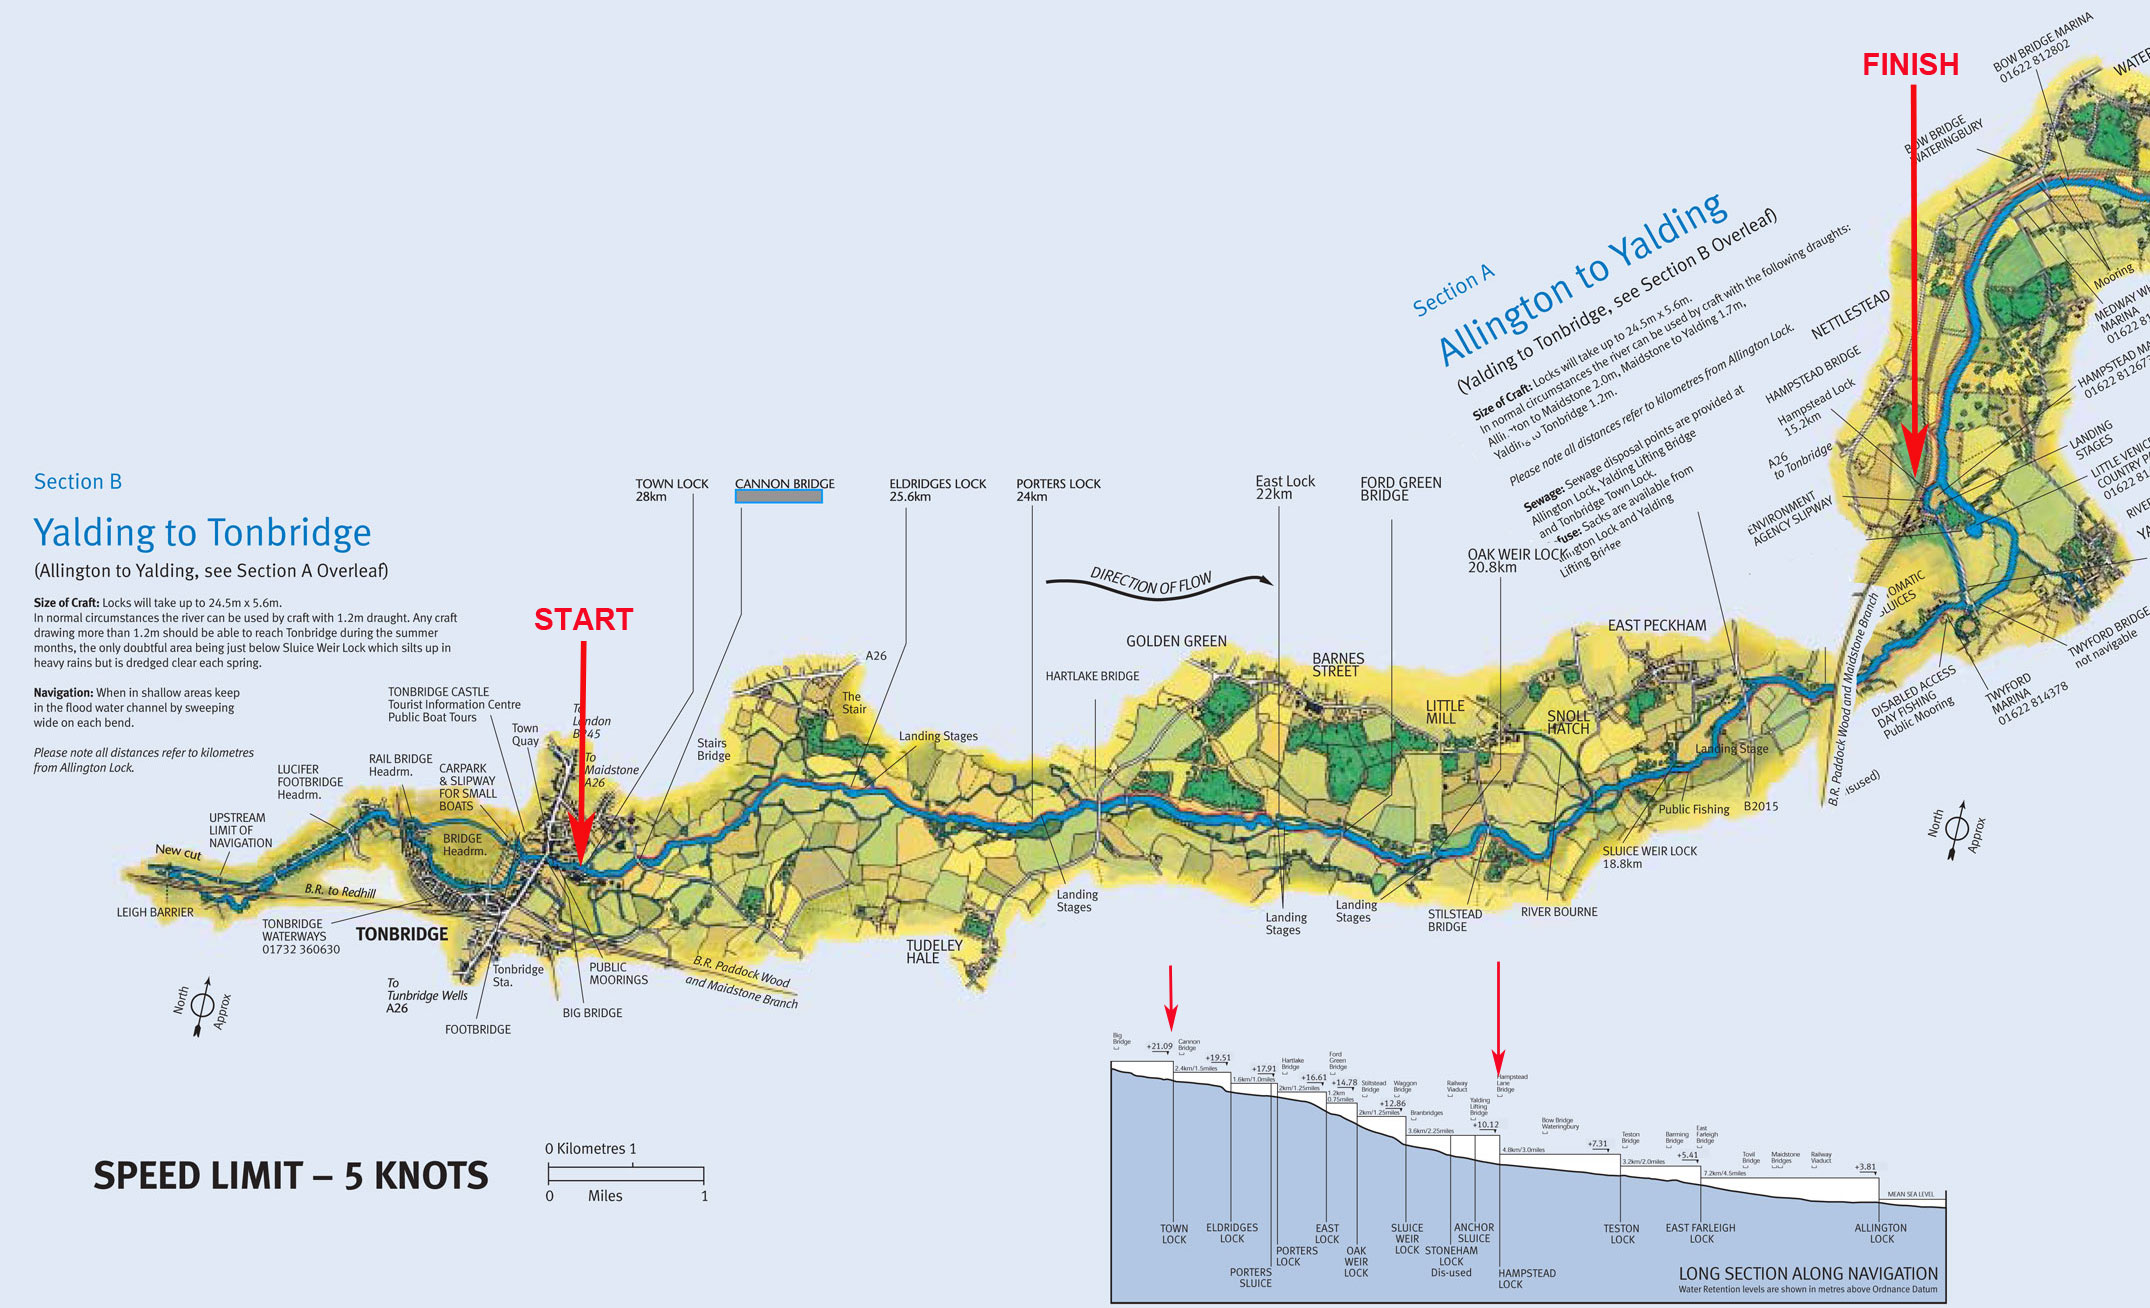
For this group test it would have been great to set off across the hills of Wales or Scotland, deploy the boats and then follow a river, hop out, walk some more, set up camp and swap notes. The reality of combining good weather and four other people with the free time to help do all this was slim. So we settled on an eight-mile day trip down the Medway River in Kent (above): me and four testers who’d all paddled (some with trousers rolled up) but had never packrafted. At each lock and chute we swapped boats, so everyone tried each raft at least once.
Me – Height 1.83m; weight 93kg Experience: Into IKs and packrafts for day trips and touring. On my third Alpacka.
Bob – 1.78m; 85kg Lilo incident, Margate 1965. Lea River canoe lessons, Harlow 1980.
Hannah – 1.75m; 75kg Much canoeing, some kayaking, love touring. Don’t understand eddies, yet.
Lois – 1.62; 63kg Dicking about on the Thames in Gumotex IKs and a Dagger. Rely on enthusiasm rather than skill.
Robin – 1.78m; 85kg Scouts canoeing, NZ white water, Colorado kayaking, various inflatable trips, usually with tides.
How the packrafts were weighed and measured Weighing was done using the classic Salter 1004 SSDR digital kitchen scales. They come with a classy brushed steel finish and still rate at 4 stars on amazon. They were checked and registered 500ml of water as weighing 500g.
Each boat was weighed exactly as it came out of the box, and then weighed again as it was actually paddled, without air bags, repair kits or straps (where included). It was then weighed again before going back in the box. All dimensions were also taken twice, the second time using stakes to get the external measurements at the widest points (above). Internal dimensions were taken at the shortest point, usually halfway up the curved tube side. Measurements from other sources may vary; there’s a table at the bottom of each review’s page and the summary for quick comparison. * Our exterior measurements for the Matkat were 3- to 5cm less than the Store, but 4cm longer and 1.6cm slimmer than Supai states. Unnoticed leaks during the measuring stage may have stopped us pumping the boat up to actual size.
Construction All these packrafts are made from pliable fabrics which form airtight vessels when inflated by human power alone. That’s about 0.03 bar or 0.4psi according to the Packrafting Store’s tests and probably too low for a regular manometer to measure accurately. The BAKraft uses an in-line ‘squeeze pump’ to potentially attain 0.17bar or 2.5psi – firmer than most vinyl IKs. All the models used here except the Supai were pressure tested to an impressive 0.5 bar (7.25psi) by the Store without exploding into a blaze of TPU. As a comparison, my old Grabner ran 0.3.bar as was as stiff as a gangplank. Hardshell-like rigidity is an inflatable boat’s goal, and while design and shape might come into it, some rafts become more rigid than others and so perform better. The best rafts use a fabric (or construction design) which becomes stiff when inflated but is pliable when folded (especially at low temperatures) as well as being durable against sharp impacts and abrasion. Among other things you could add resistance to UV rays, ready supply and ease of assembly in the factory, repairability on the trail, and a range of fabulous customer-friendly colours.
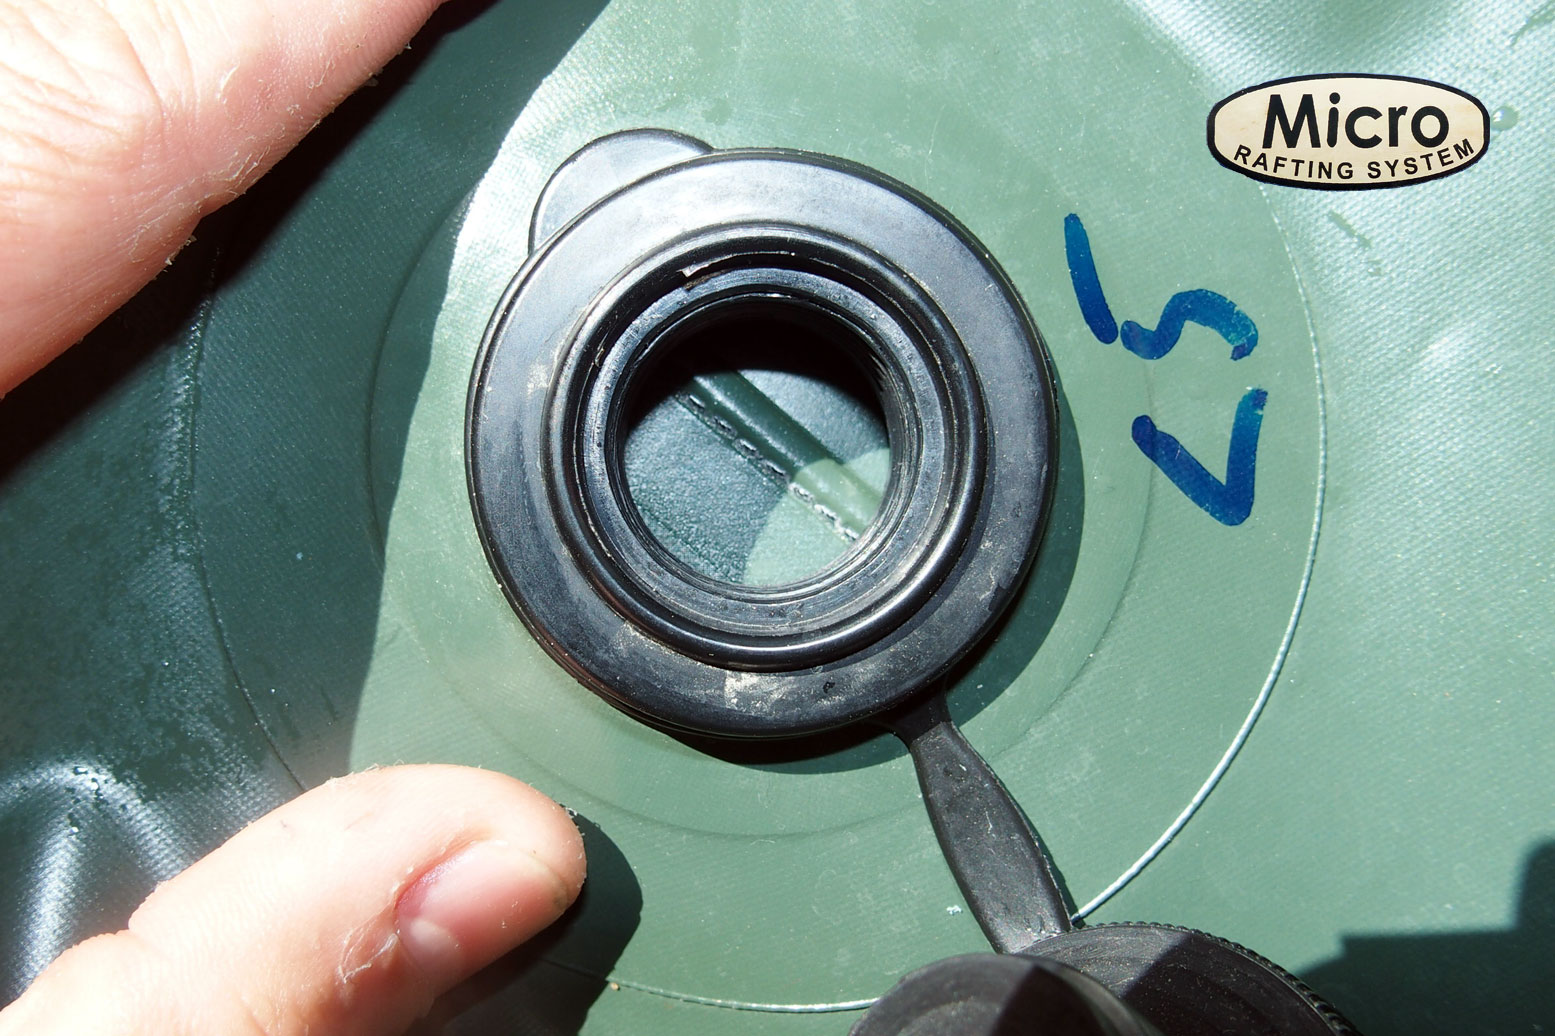
Broadly speaking the hulls of the Alpacka and MRS use ten panels of urethane (TPU) coated nylon fabric which are sewn together. Tape is then heat welded over the seams. The Alpacka fabric is only coated on the outside; the Nortik uses a similar double-coated fabric to the MRS (above; green, but not our Trekraft), but the Nortik’s seams are heat-welded with thicker tape (no sewing).
Double-coating adds weight and other technical aspects of proprietary coated fabrics vary greatly; they’re often specifically formulated for a raft manufacturer. The benefits of an inside coating are a second barrier to punctures when a light scratch to the exterior reaches down to the fabric core but doesn’t actually cut through it.
The floors on the Yak, Nortik and MRS are glued on then taped over (Nortik on the inside, the other two outside). They’re typically two or three times the denier rating (thread weight) of the hull fabric. The Alpacka uses something called ballistic nylon which sounds cool but I’ve found is far from bulletproof. No part of an inflatable raft weighing just three kilos can be expected to be. Occasional repairs are all part of ownership, like a bicycle’s tyres. So is rinsing any grit out the boat before it works its way into the nooks and crannies. On the right click the extra large picture to have a close look under the boats and compare workmanship.
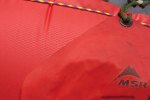
The superlight Matkat is in a class all of its own, entirely made from 75-denier ripstop polyester with a single urethane coating on the inside, the same weight (and sealing method) as an MSR water bag. The red picture below right is of another Supai we tried which you’ll see had a diamond pattern on the surface. The black Matkat we used here had a plain surface like an MSR bag. On both boats the four panels (floor, inside, top and bottom hull) are heat-welded together. It’s possible to repair these seams with a hot iron (or glue).
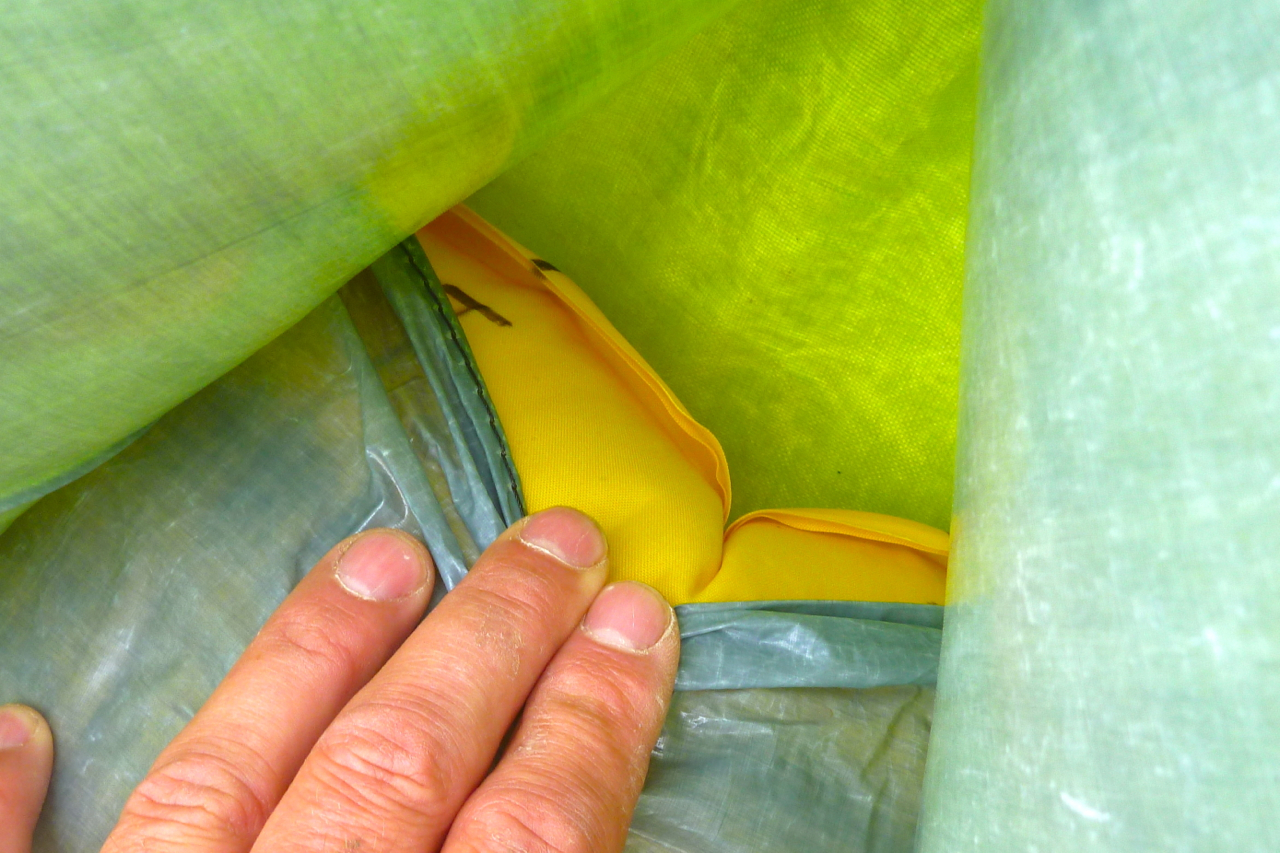
The AireBAKraftprototype we tested used a thin and slightly stretchy urethane film ‘inner tube’ or collar supporting the hull, and a much thicker and stretch-free urethane-coated yellow nylon fabric for the I-beam floor (left). These bladders or ‘AIREcells’ as Aire calls them, are contained inside a sewn-up shell of fabric which need not be air- or watertight. If I interpreted the owner’s manual correctly then the BAKraft’s green exterior shell is made of Spectra and the grey interior of lighter-weight Dyneema fabric. You may know stretch-free Dyneema guy lines found on better tents.
The urethane bladder can be accessed for repair via long zips (left); the nylon floor can be pulled out for repair from each end. On packing or refitting care must be taken not to twist the bladders. I’ve never been a fan of it (for reasons explained later) but this AIRECell system has been used by Aire on their PVC whitewater rafts and IKs for many, many years. With minimal seams compared to a traditional packraft hull, air retention is excellent. On all the boats seats, backrests and decks (where present) are typically made from urethane-coated nylon with seams or joins heat-welded and maybe taped.
Inflation/deflation If you’re combining walking with navigating bodies of water – packing + rafting – you want a boat which inflates and deploys without any faffing about. In this respect the Microraft was the best of the bunch. It used the proven screw-in inflation bag (see video below) and, being a small volume boat, took about ten ‘scoops’ to fill up. The main valve cap is attached with a short plastic ring tab – no fiddly bits of string. Top off the air pressure by blowing all you got into the twist-lock valve and with practice you’re good to go in three minutes.
In the video below, from arriving at the beach to paddling away takes about 8 minutes. Speeded up 15x. A jet passes overhead.
My Yak followed exactly the same inflation procedure, but being a higher volume boat (a little bigger than the one in the video above) took twice as many ‘air-grabs’ to fill up before topping off with lung power. Every time I do this I wonder whether my super-thin airbag will split or unravel at the seams if I scrunch too hard. I can feel the air leaking through the sides.
One-way spring valve
Like the MRS, the Trekraft’s airbag is also made from a reassuringly thick fabric, but is spoiled by a push-in plug, even though there’s obviously a thread in the boat’s port. Compress too hard or if it’s wet and the bag plug might pop out, so inflate gently. Instead of using the old twist-lock to top-off, the Trekraft has a one-way spring valve stem with a cap (which came adrift and eventually got lost). This valve (above left) is dead easy to use and avoids the risk of over-tightening a cheap plastic twist-lock valve (as on older Alpackas). But when airing down, with the spring valve you can’t suck and seal the remaining air out unless you jam something in the valve as you suck. Packraft or IK, this ability to suck your boat down is handy for compact packing.
Next comes the Matkat. No airbag supplied even though the Supai website states: ‘We are working on developing an inflation sack to work with our valves hopefully we will have it released in mid-2014.’ When we tried the smaller red Supai Canyon Flatwater II in late 2013 we found it took about fifty breaths to fill, plus topping off. The higher volume Matkat takes about eighty breaths. I like breathing but that’s not something I’d want to do more than a couple of times day to save the 100 grams of an airbag.
Oh…
Unlike the Alpacka, Nortik or MRS, the Supais use a male threaded dump valve which protrudes from the boat and onto which screws a cap with a thin tube and the twist lock valve on the end (right, red boat) – a neat and simple system that’s just about accessible for on-board top-ups. Alpacka use an identical threaded valve port but on their air bags; it’s a regular American plumbing ¾-inch size. If I had a Supai packraft I’d get an Alpacka airbag for $20 and then either find a female-to-female plastic connection, or jam on a short section of clear plastic tube to join them together. That way I can save the hyperventilating for Glastonbury.
That leaves the BAKraft. Even before I received the boat I had my doubts after seeing pictures of the convoluted inflation system which Aire suggest.
The BAKraft uses Halkey Roberts (or very similar) valves, as found on proper IKs and whitewater rafts: one in the floor and one for the urethane bladder that fills both sides of the hull, or what what they call the ‘collar’. These valves work like car tyre valves (or the Nortik top-up) – a spurt of high pressure opens the seal and a spring seals it shut – except that you can lock them open by pushing and twisting the valve stem. This is necessary to deflate a boat easily, or to loosely pre-inflate it without having to push against the valve spring. These valves are really designed to be used with pumps not flimsy air-catching inflation bags, far less lung power. A simple and compact push-fit pump like a K-Pump will work. A high-pressure stirrup pump with a ‘Summit’ bayonet connector on the end will be even quicker, but is way too bulky to travel with.
With the BAKraft you’re supposed to use the backrest/cargo bag as an inflation bag and scrunch air into the boat via a tube fitted with a bayonet connector (left). But the backrest bag’s weight, odd shape and relatively small volume makes this task awkward, even past an opened intake valve which is still a restricted airway. I gave it a go but soon saw that, while I’d get there in the end, it was going to take ages.
Once the boat has ‘shape’ you’re then supposed to quickly close the boat valve then splice in a low-volume/high-pressure hand-squeeze pump into the ISC bag. The squeeze pump has another one-way spring valve in it: charge it with air from the backrest then squirt air by hand past the closed valve until the boat is firm. This squeeze pump is quite a clever idea but at about 150cc a go will take a while to do the job. Sorry to say I wasn’t even curious to find out how long – I’d guess at least 15-minutes for the whole inflation, same as it took to pump up my 4.5-metre kayak the other day with the one-litre K-Pump Mini. So instead I reached for my Bravo stirrup pump – it took two minutes – and on test day I brought my compact K-Pump which took about twice as long.
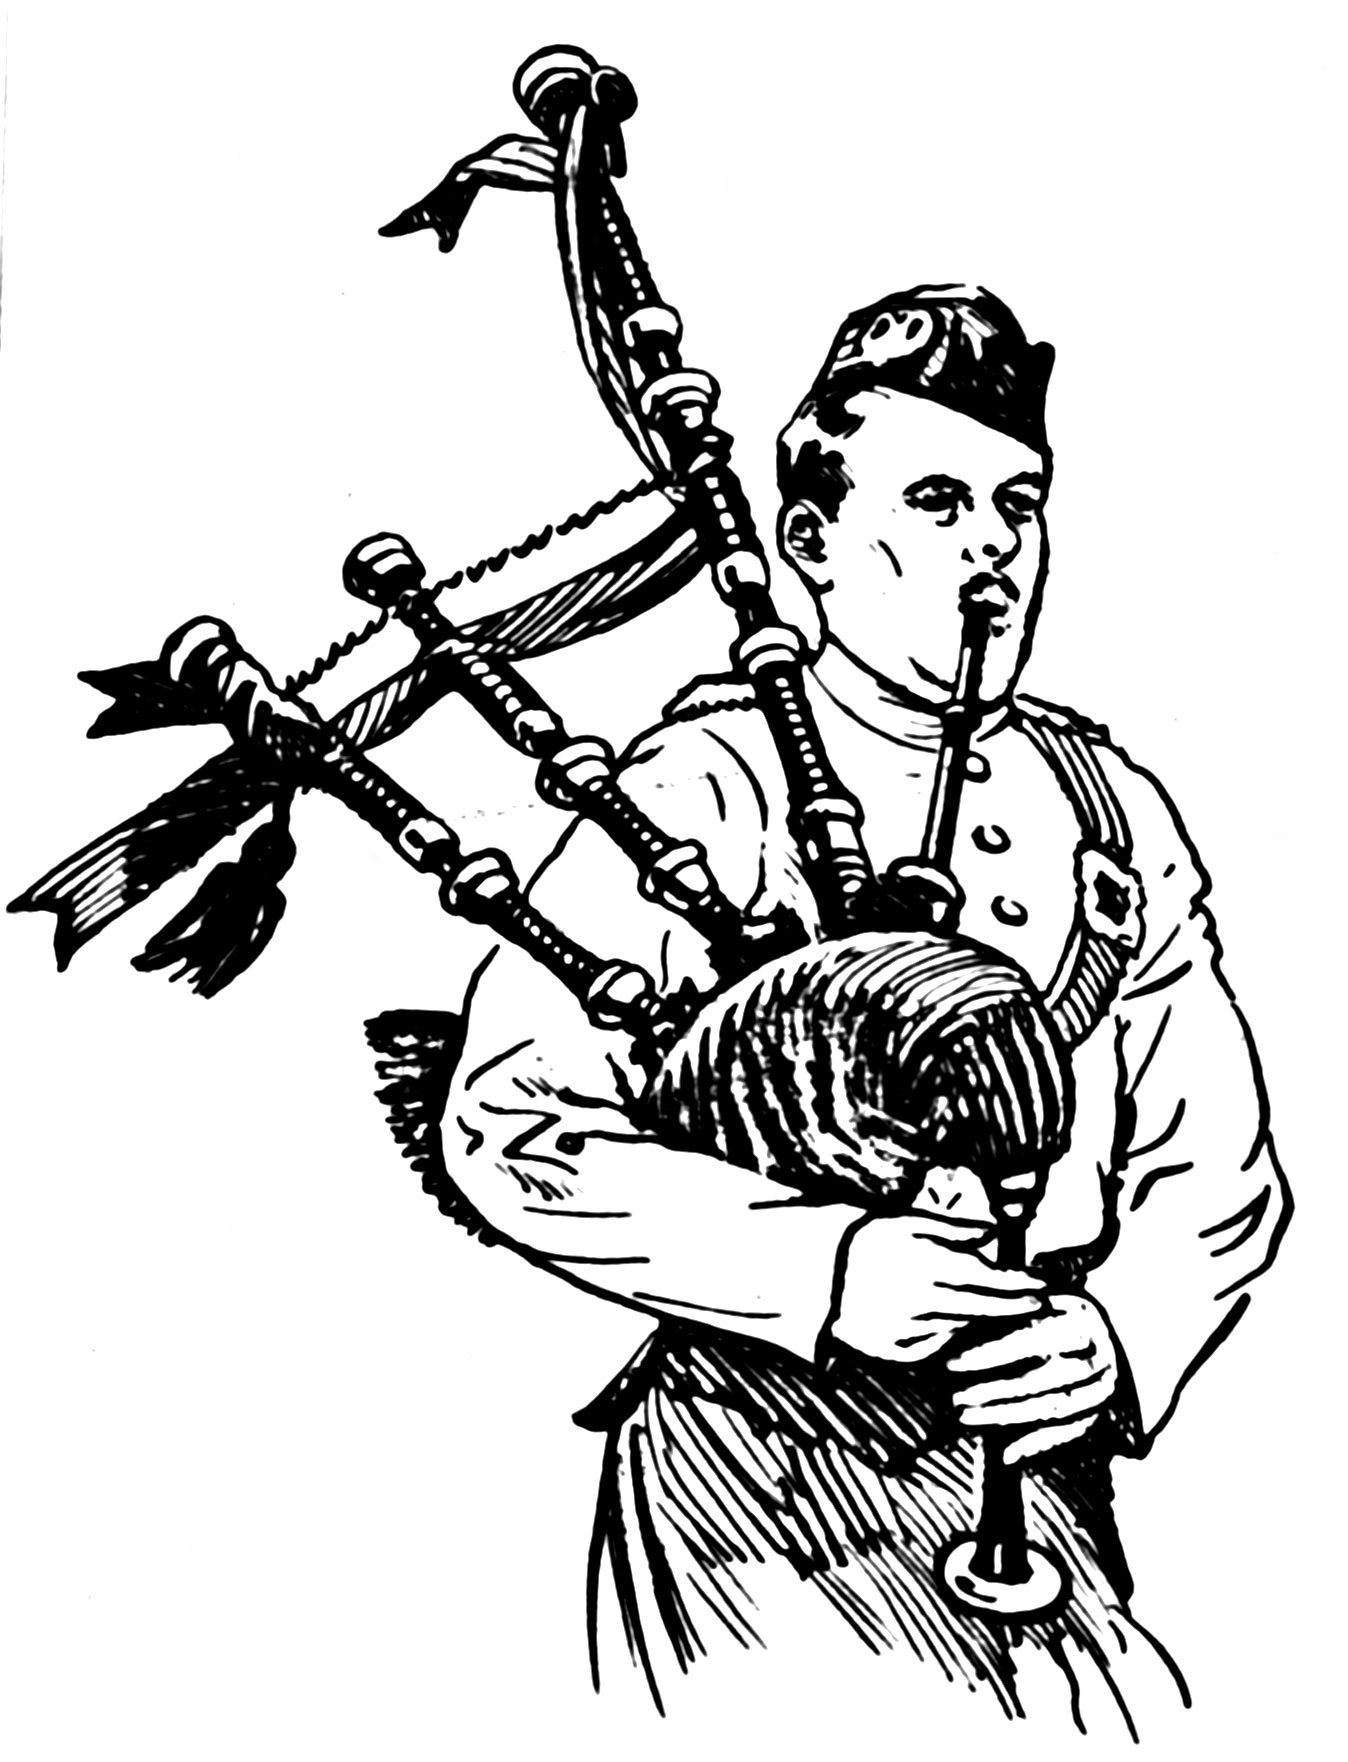
I see now that I’ve actually RTFM I used an alternative method. The image above right suggests you don’t use the backrest bag to charge the squeeze pump, but just blow then squeeze the hand pump directly using an oral tube, like a silent bag pipe. If I’d thought of that I might have tried it as it’s a much less clumsy way of topping off the BAKraft.
All the other packrafts here run at an air pressure that’s governed by the lung power you can exert through the top-off twist valve (left). But with a one-way valve you can pump more air into a raft (that goes for the Trekraft’s top-off valve too, now I think of it). The BAKraft is made to run an IK-like 2.5psi although you’re warned not to over-pressurise or allow it to happen. That can be easily done of you get carried away with a stirrup pump or leave the raft out in the hot sun. It may have seemed clever to give the necessary backrest multiple uses, but it works only a little better for filling the boat with air than it does as a backrest (see review). I’d recommend getting a $20 Feathercraft inflation bag which comes with the ‘Summit’ bayonet fitting from their BayLee packrafts (they also use Halkey-like valves). And if you don’t get on with the oral/hand pump system, then get a 600-g K-Pump Mini too. I’d guess using both these devices will more than halve the inflation time.
From the four corners of southern England the throng gathered at Tonbridge Town Lock, the boats got pumped up, cooled off in the water then topped up some more. Then, after a quick groupie, we set off down the easy first chute. I took it upon myself to get in the Matkat while I was still feeling fresh.
Grappling to get the boat out of the muddy Medway river at Yalding one time put a light scrape on the hull. It reminded me that, along with fitting PRVs to the sidetubes, another winter job was to fit a protective strake under the bow where most scraping occurs. Better to get the protection in early while the boat is newish.
A 70 x 15cm Hypalon off-cut (close enough to Nitrilon) was 14 quid on ebay and once trimmed left enough for another strake or two. I had some Polymarine two-part adhesive (below) and glued the strip to the boat’s curved form with the floor inflated, even if that meant working the roller to press it all together was less effective. I then slathered some Seam Seal around the nose of the strake to protect it from unpeeling (less runny Aquaseal would have been better but a Seam Seal tube was open. More on glues here).
2021 Update A strake is a good idea but actually got hardly worn, so on Seawave 2 I just stuck on some Gorilla tape, maybe two layers, in the same place. Easily renewed/removed.
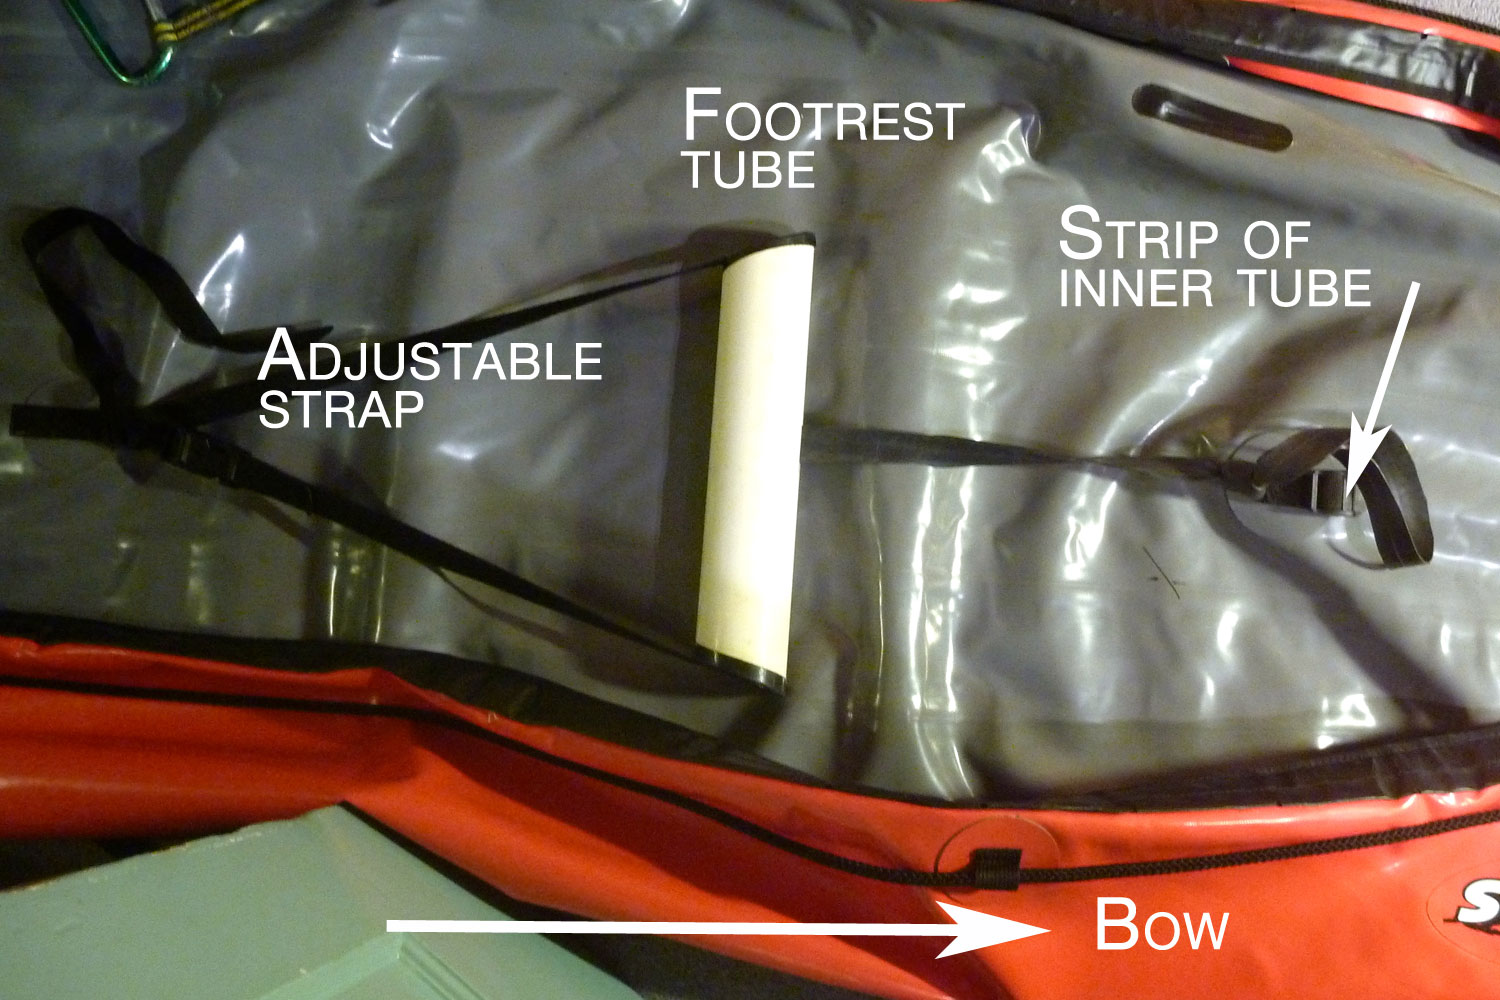
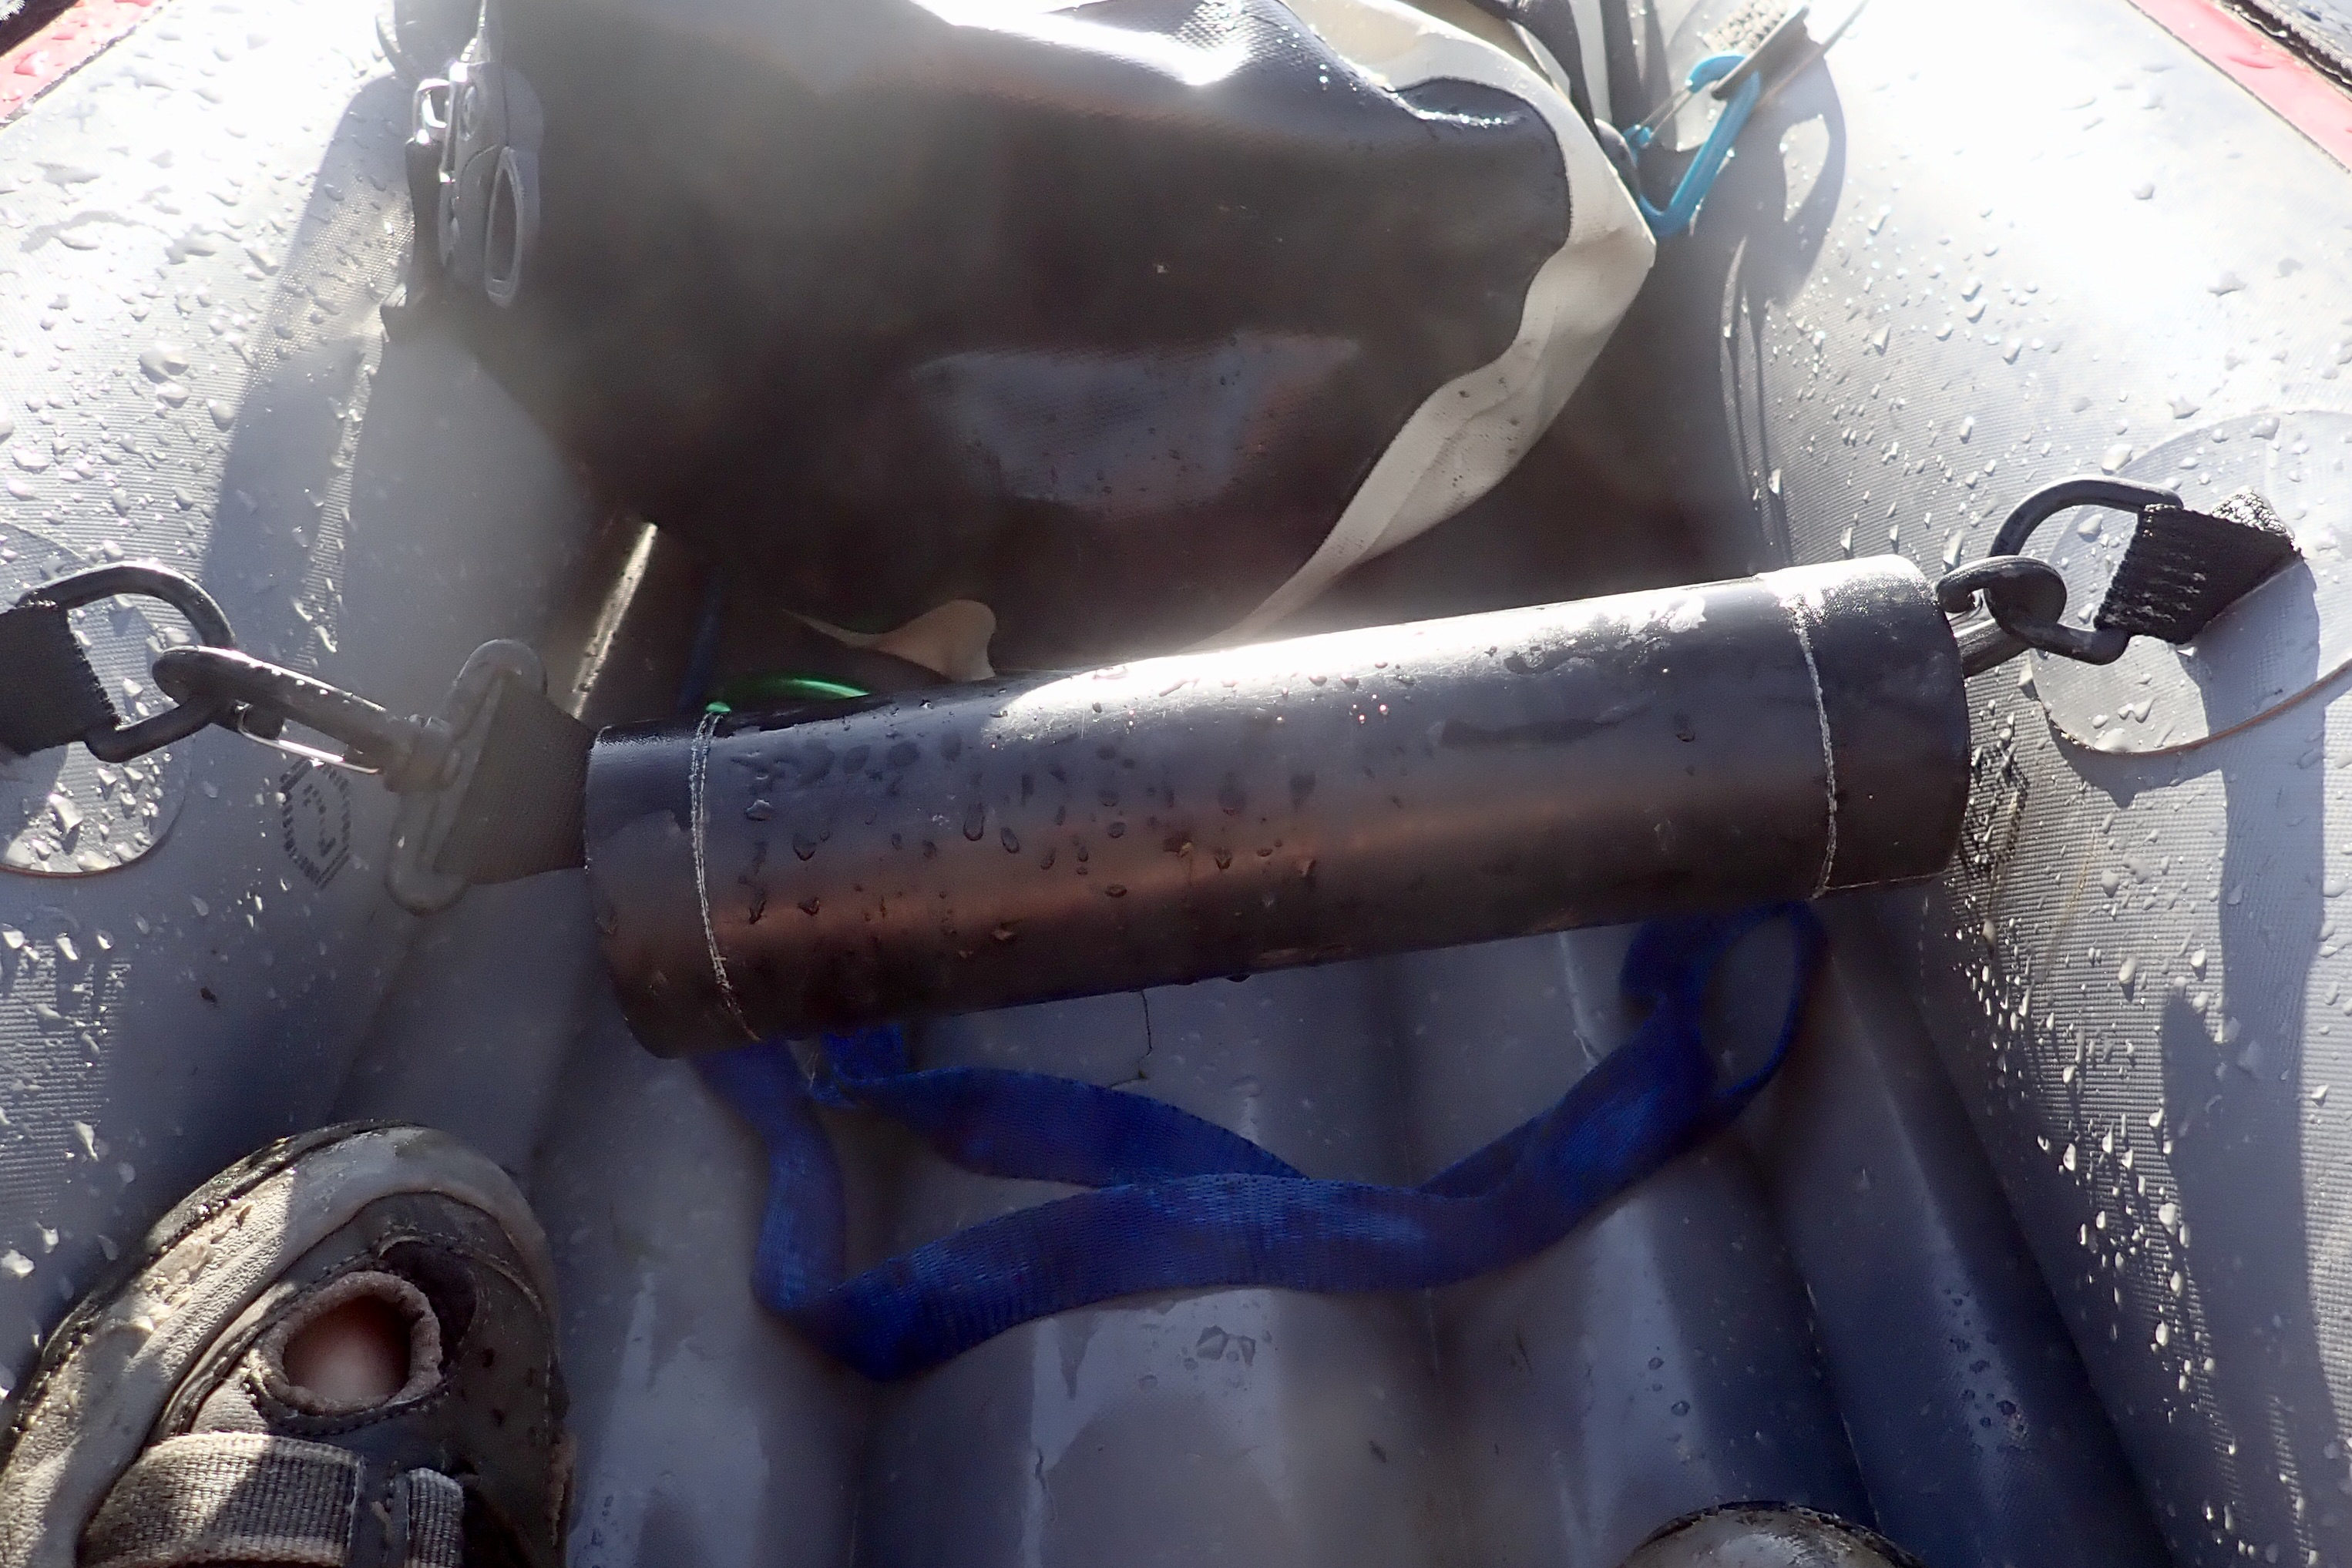
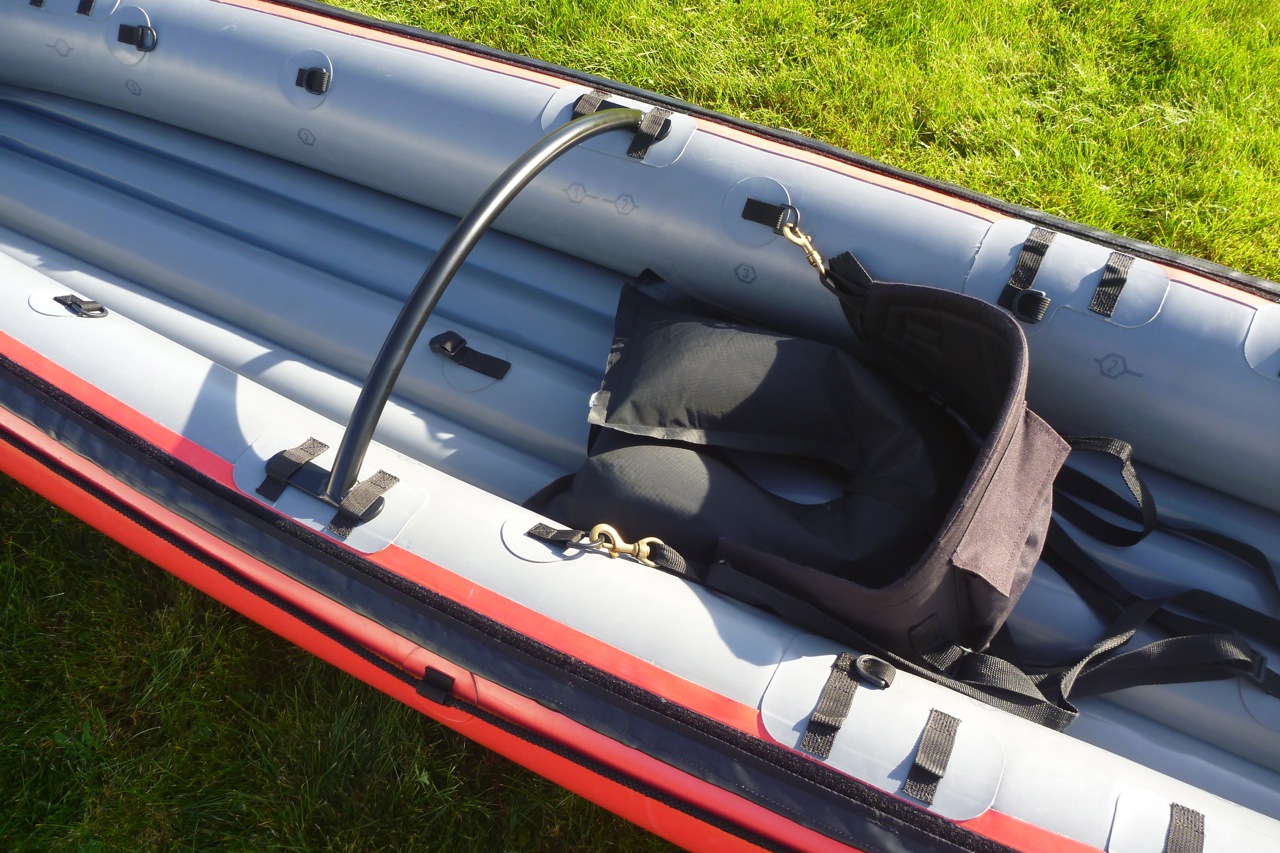
While the boat was filling the hallway and causing a hazard to domestic navigation I also bodged up a better system for the all-important footrest. A bit of inner tube now counter-tensions the footrest from the bow to keep it in position. It means the thing is now fully adjustable across a wide range of positions, can easily be fine-tuned from the water, removes in seconds for boat cleaning/drying and needed no extra fittings glued to the boat. Once great thing about the Seawave is the multitude of attachment points on the floor and sides.
While on the river my aged Mk1 Alpacka U-seat base went flat, split right in the U. This seat is part of a lighter and comfier system I brought over from my Amigo – an improvement on the one-piece Seawave seats. It’s currently unfixed to the boat and the thin nylon must have ripped while yanking it into position on the river after getting back in. Again, I’m trying to avoid gluing extra D-rings to the hull – they’d limit seat base adjustment options anyway.
Better then to attach the seat base to the base of the backrest with a couple of zip ties. The whole backrest/seat base can then slide forward and back off the backrest side straps and it all unclips from the boat in less than 3.7 seconds. I glued up the punctured U-seat but it won’t last, so I’ve ordered MkII Alpacka seats (left) from Packrafting Store: €70 delivered for a pair. From Alpacka US the seats cost $25 but their auto-calculated international postage is nuts, let alone tax and VAT issues. These seats have the U filled in like a webbed foot: stronger and less floppy for just ~12g extra weight.
Seawave 2 seats and thigh straps
2021 Update. I’m using the same system on Seawave 2; a non-U packraft seatbase and a used backrest off a Bic SoT with a piece of stiff plastic board slotted inside.
Heavy
Better
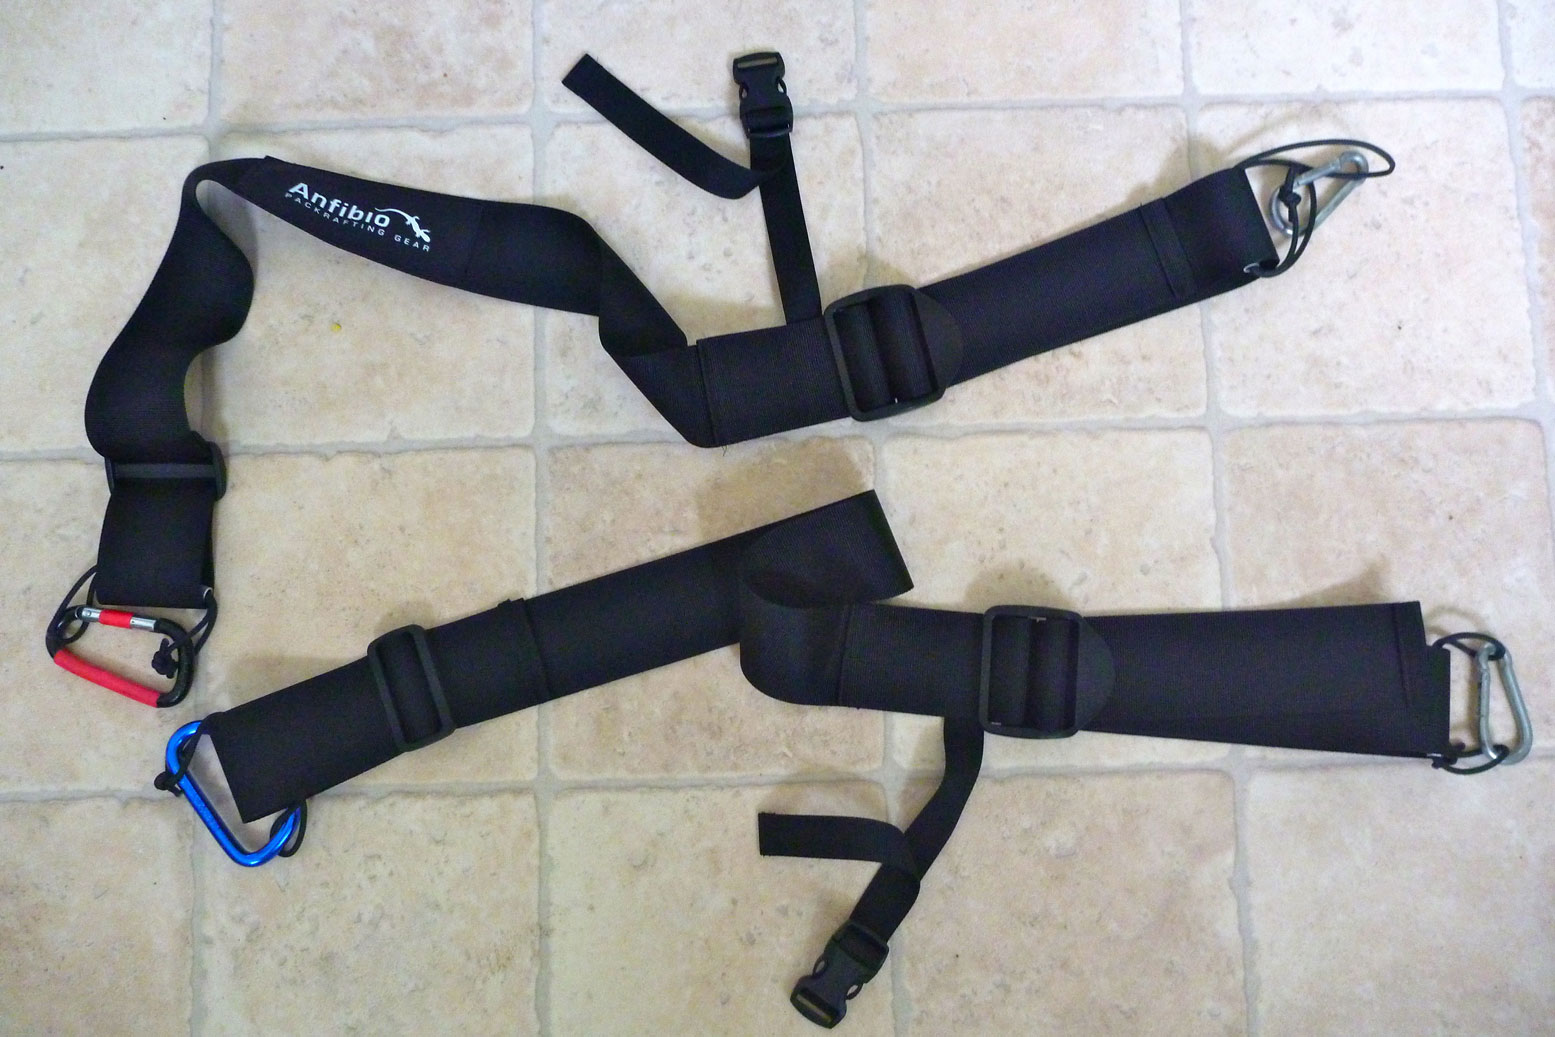
I’ve also ditched my old my SoT thigh straps (left). Nicely padded and effective though they were, the brass spring connectors and padding made them feel heavy and bulky at ~720g.
Instead I got some non-padded Anfibio packrafting straps (they’re different now). With my biners they come in at 270g. The delta-straps dangling off the sides are a clever idea, designed to give a more direct pull when rolling a packraft for example. Can’t see myself doing that in any of my boats. Whether you’re rolling or just paddling, in rough water the more direct connection with the boat the better. I’m a big fan of these light but effective straps now. No need for paddling.
Clipped together is actually the wrong way – entrapment hazard!
My Gumotex Seawave is a well spec’d IK for my sort of coast-hopping and occasional touring, especially as it was factory rated to run at a higher-than-usual 0.25bar or 3.6psi (Gumo normal is 0.2). That means greater rigidity which adds up to less longitudinal sag caused by paddler weight (who, me?!) . And of course a better g l i d e. My previous Amigo and Incept both ran an even higher 0.3 bar, and it’s said that this Gumotex can also be pushed to that sort of pressure on the side tubes without risking damage. Factory hull pressures are set on the conservative side to limit warranty claims.
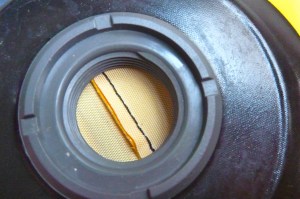
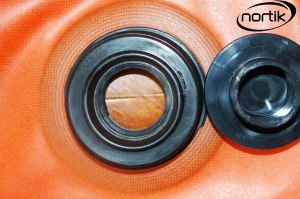
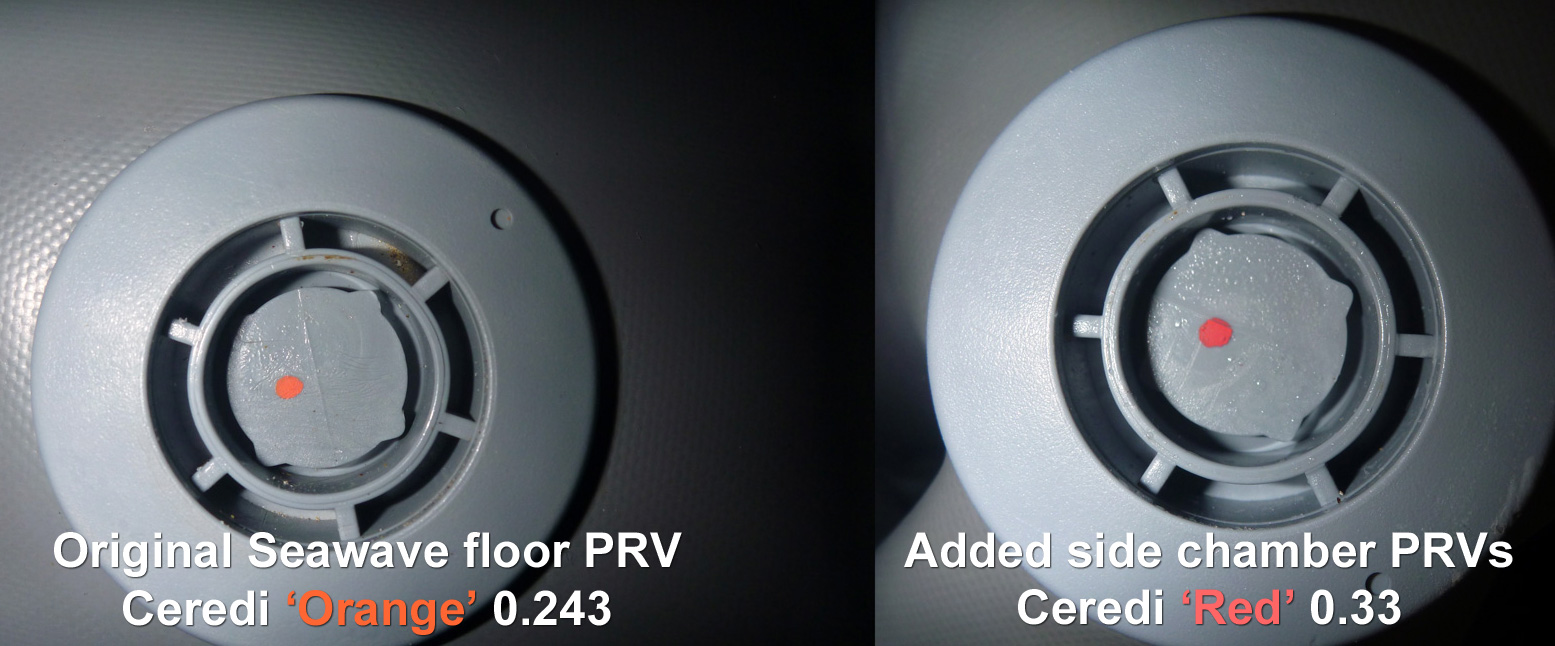
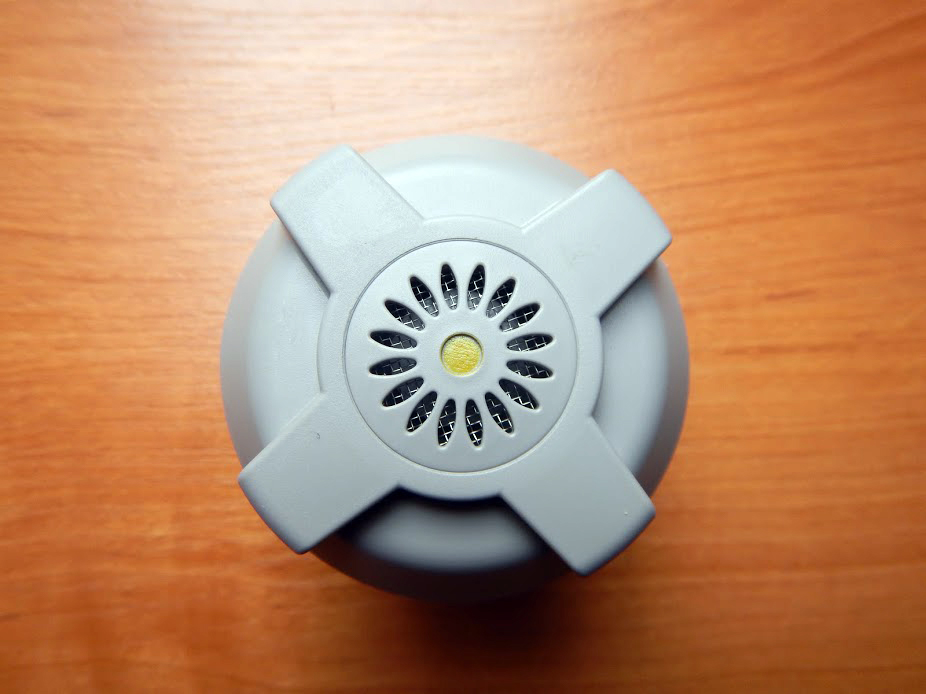
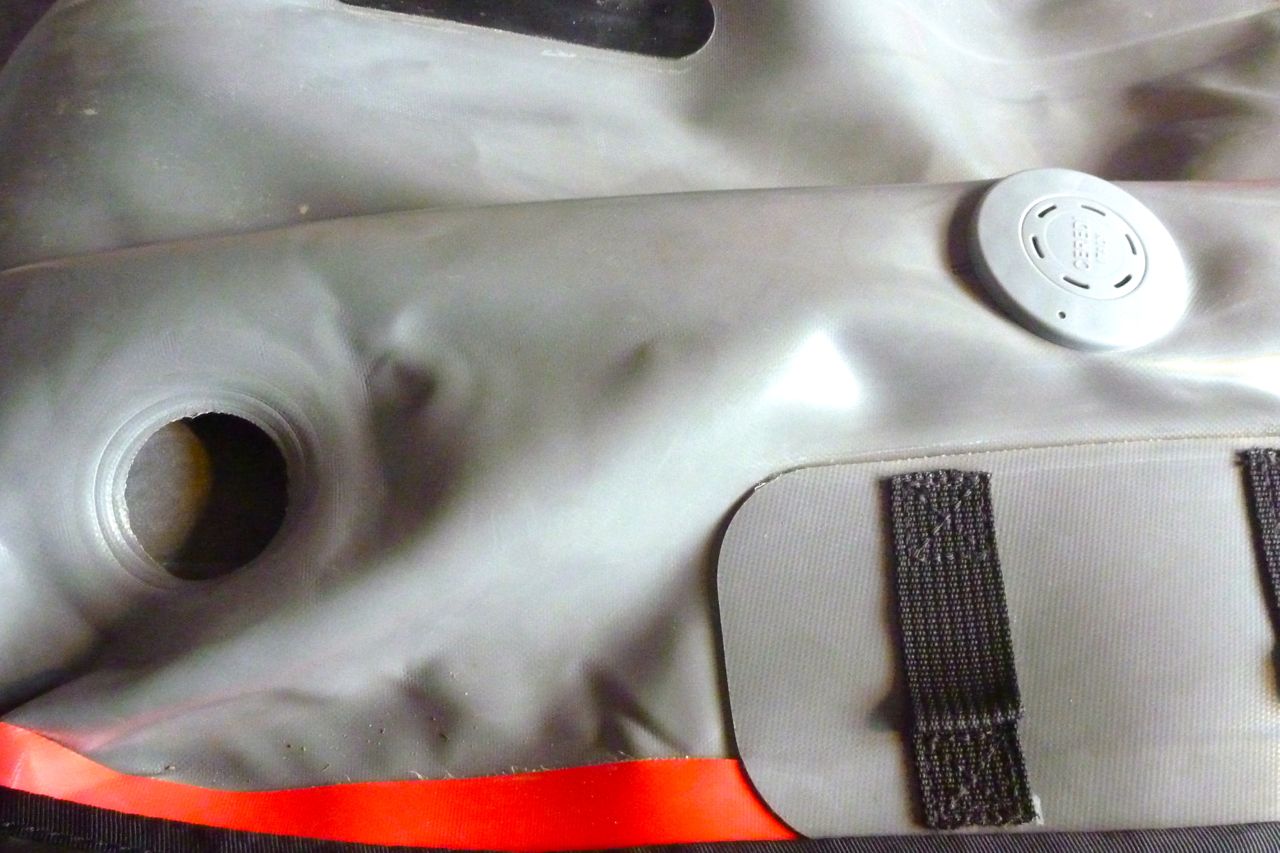
Like all the Gumboats I’ve owned, the more vulnerable I-beam floor chamber has a factory-fitted PRV set at 0.25bar/3.6psi (confirmed below). PRVs are important here as if an IK gets hot (typically out of the water on a sunny day) internal air pressure can increase to the point where seams might rupture. If separation happens to an internal I-beam in the floor it will balloon up and becomes a very difficult repair. I would not meddle with the factory-set PRV on an I-beam floor. As we all now know, the answer to I-beam floor limitations is drop-stitch technology – effectively zillions on ‘I-beams’ spreading the load over the entire area which enables much higher pressures.
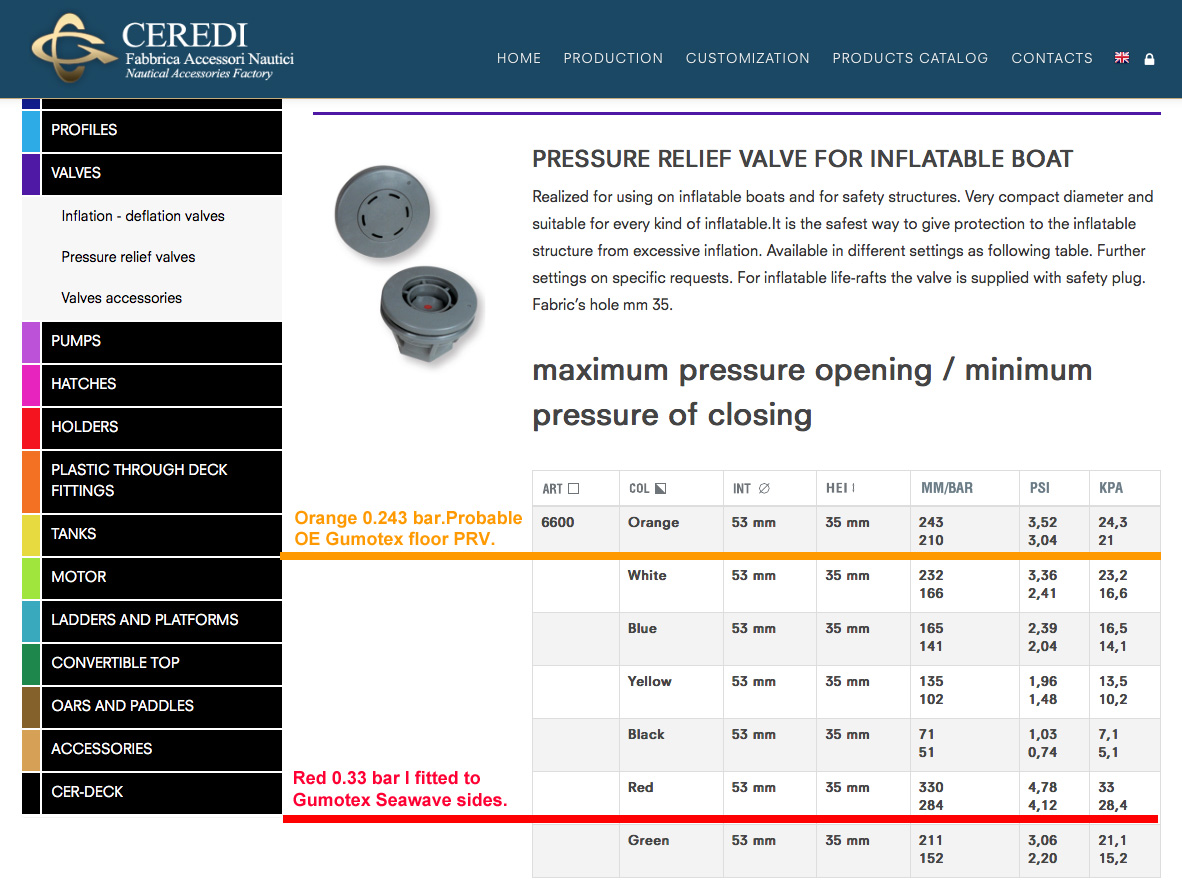
In a discussion with a French Gumtexer, he suggested that Gumotex use the same orange dot 0.243 PRVs in all their boats, irrespective of the stated official rating which is either ‘0.2’ like most – or ‘0.25’ on the Seawave. He sent me a photo of his 2016 Palava floor PRV (left) – orangey-pink, same as my Seawave and classified by Ceredi as 0.243. Officially the Palava is a ‘normal pressure’ 0.2 bar canoe. Upshot? Your Gumboat’s floor may be rated at higher pressure than you think or is officially stated. You’d assume then that the tubed sides can easily handle at least as much pressure. Then again, in the table below, Ceredi state the orange PRV will open between 0.21 and 0.243 so perhaps 0.21 it is and we all just need to calm down a bit.
PRVs use springs set to purge air before pressures reach structure-damaging levels. Then again, my Amigo had no PRVs at all so you assume Grabner were confident their floor construction was solid enough to handle occasional neglect. But I’ve been caught out before and always try to ensure a boat remains in the cooling water when moored up on hot days – even getting up to splash the sides as they tighten up like a drum.
Like most IKs with single side tubes, my Seawave had no PRVs as the tubular profile can handle higher pressures better than the flat, ‘lilo’ floor. However, if you’re planning to run them over-pressure as I am suggesting, that could be risky. The answer: fit PRVs in the side tubes – just like my old twin side tube Incept. That way you can safely leave you IK out of the water in the tropics, go and hike up a volcano (which might be described as ‘the planet’s PRVs’) knowing that all three chambers will harmlessly purge any excess pressure. Sure, when it all cools again back in the water the boat may be saggy, but better a quick top up with your K-Pump than pulling bits of shredded Nitrilon out of the palm trees. Ideally I was looking for a PRV set at a reasonable 33.33% over the factory figure of 0.25 bar – i.e.: something around 0.33 bar or 4.8psi.
I admit that the colours look pretty closebut it’s pinky-orange for the OE floor and red for my 0.33s
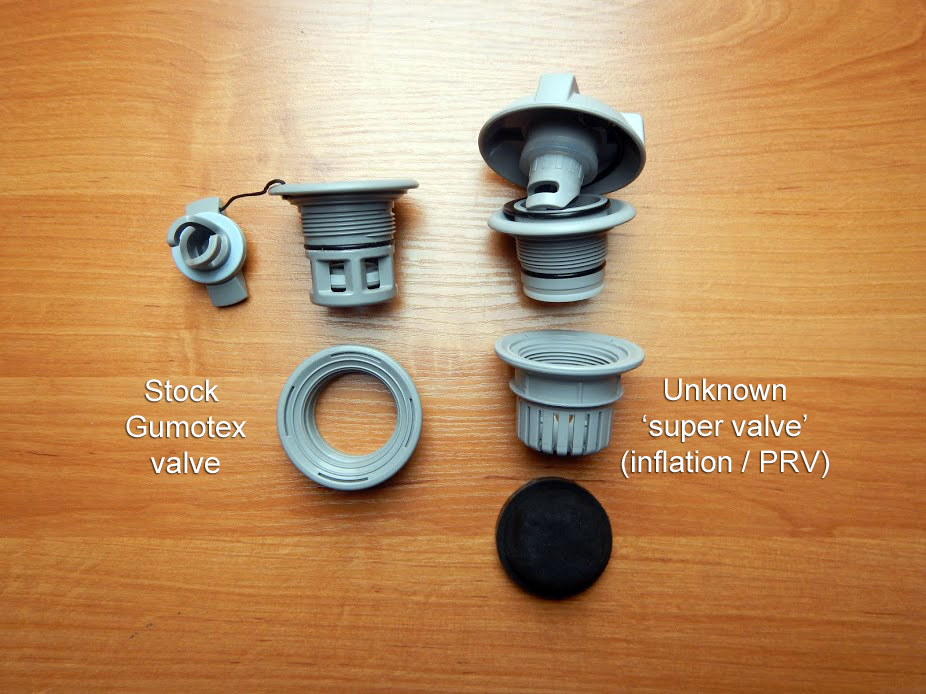
Well-known IK valve-makers Leafield and Halkey didn’t make anything matching my needs (or don’t sell to individuals). The Seawave’s valves are stamped ‘Ceredi Italy’ and once I managed to track them down online, I saw the same Ceredi 6600 PRV series came in options including Red 4.78 psi or 0.33 bar, (above right). In the UK they were a special order via IBS and cost £35 a pair posted.
Before you get too excited, scroll down to the bottom and read Nikola’s PRV nozzle idea.
Ceredi prices too steep for you? On eBay I bought unbranded ‘4psi‘ PRVs from China for about £4 a shot and delivered in less than 2 weeks. Note these are smaller than your Ceredi and require only a 25mm hole. The back nut will easily fit through the inflation valve hole, once you remove that. I pressure-tested the valves I received and they stood up to the claim: more here. Search eBay: ‘Air Safety Release Valve Kayak’.
As you can read from Adam’s comment below, there is – or more probably was – a super valve which combined both inflation and pressure-release duties which means you simply replace the stock inflation-only valve. No need for extra holes to be cut. His link no longer works but I tracked it down to here; the Bravo Super Valve – that’s Bravo as in the Italian branded Chinese-made pumps we all know and love. But there is no mention of a super valve on their valve page anymore, nor in their catalog.
Fitting the Ceredi red dot PRVs
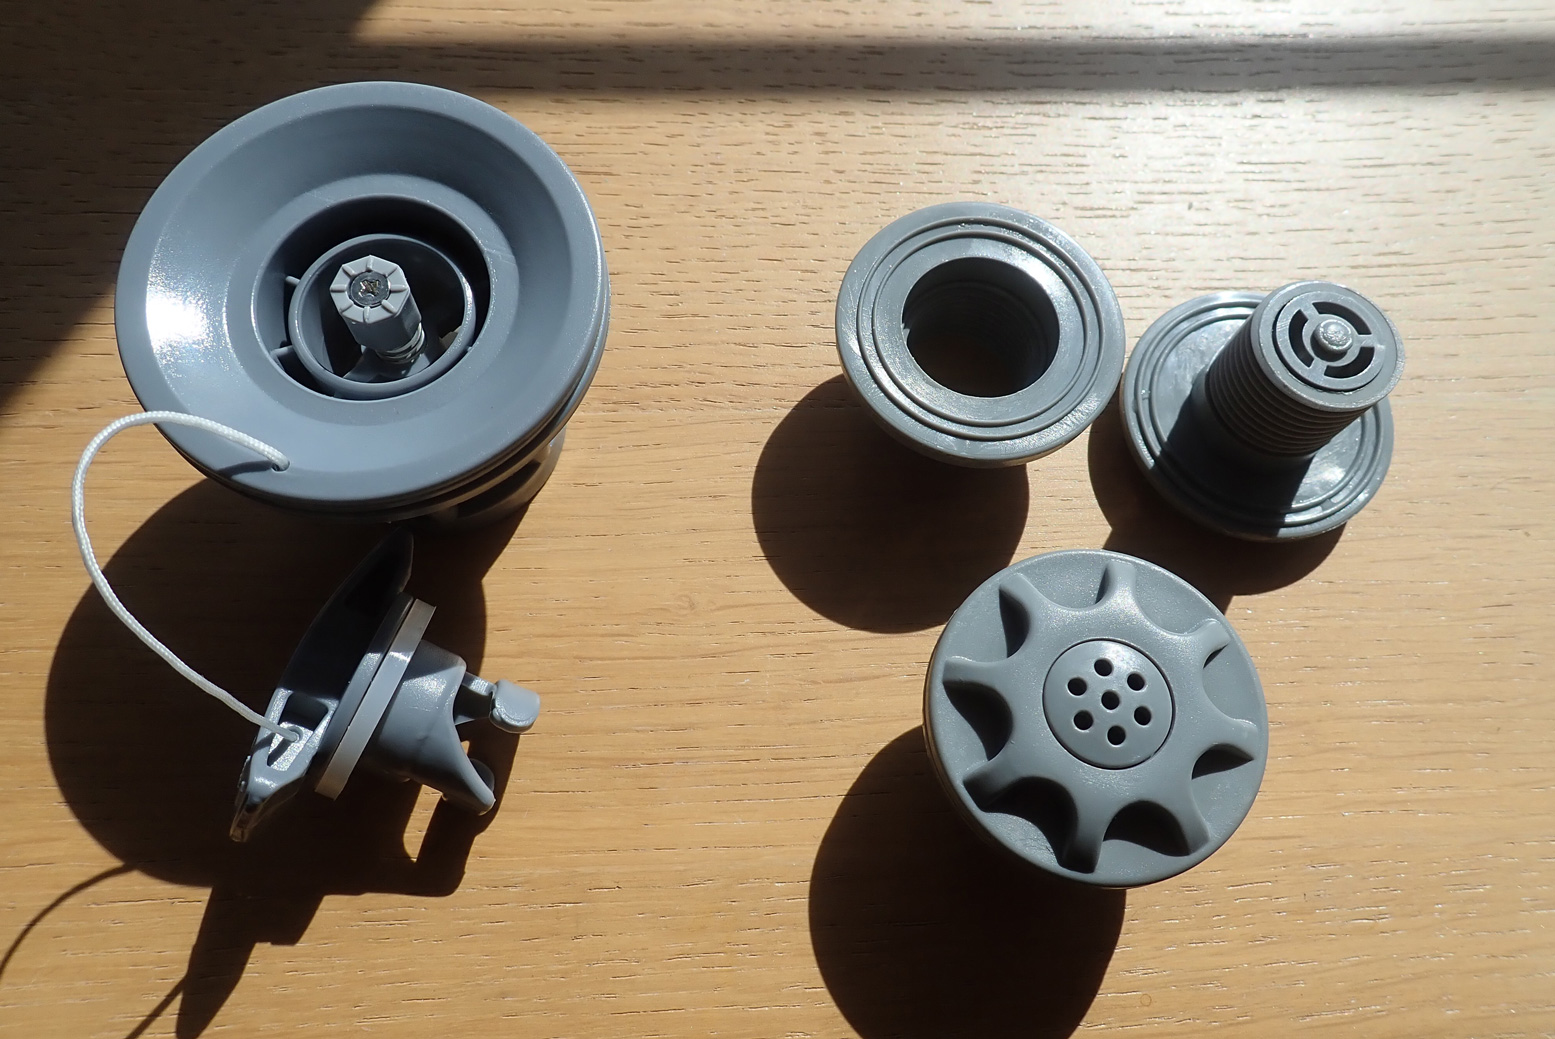
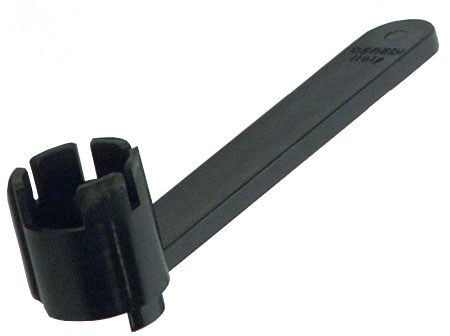
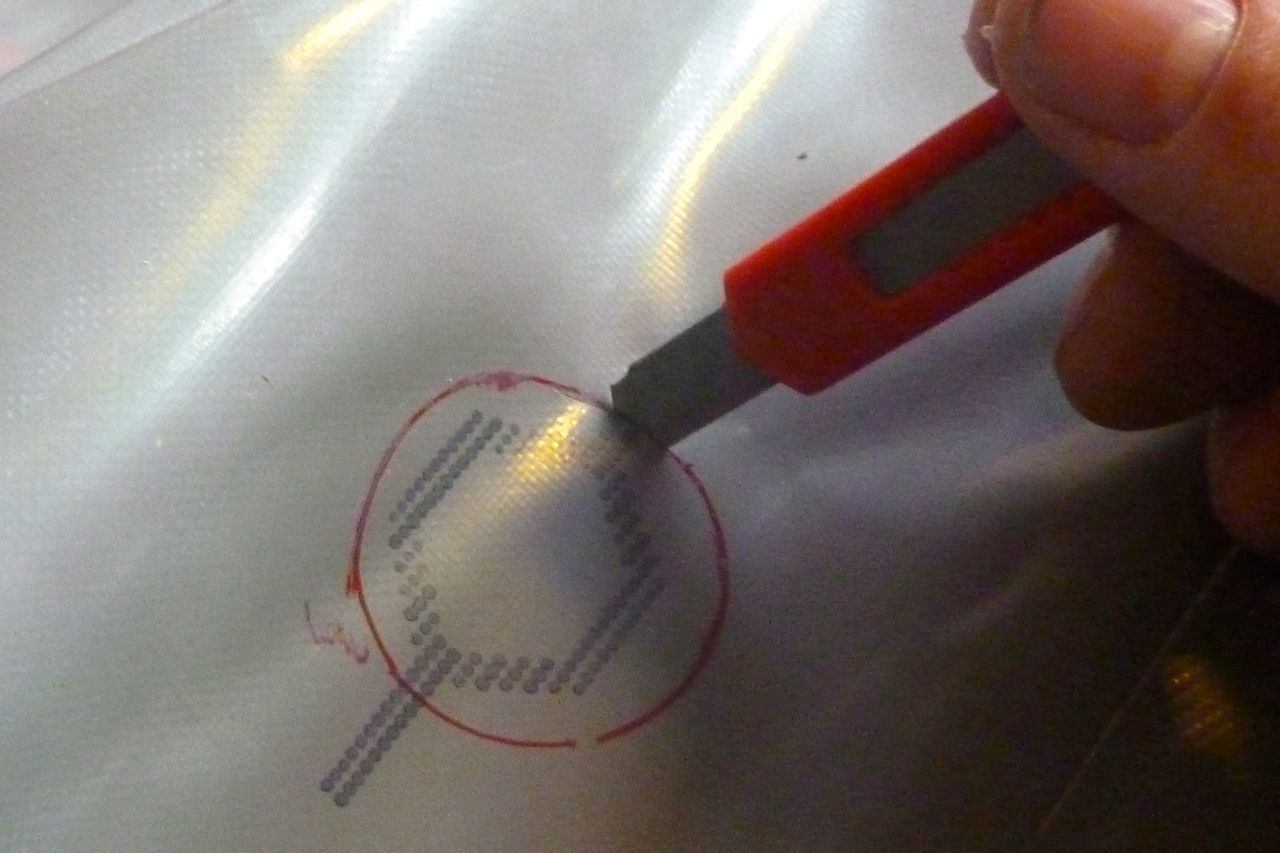
Tools and time needed • Gumotex push-push valve removing tool (fits Ceredi PRVs also). Right; £12 on ebay • Narrow-bladed knife or scalpel • Water pump/lock channel pliers • 30-60 mins
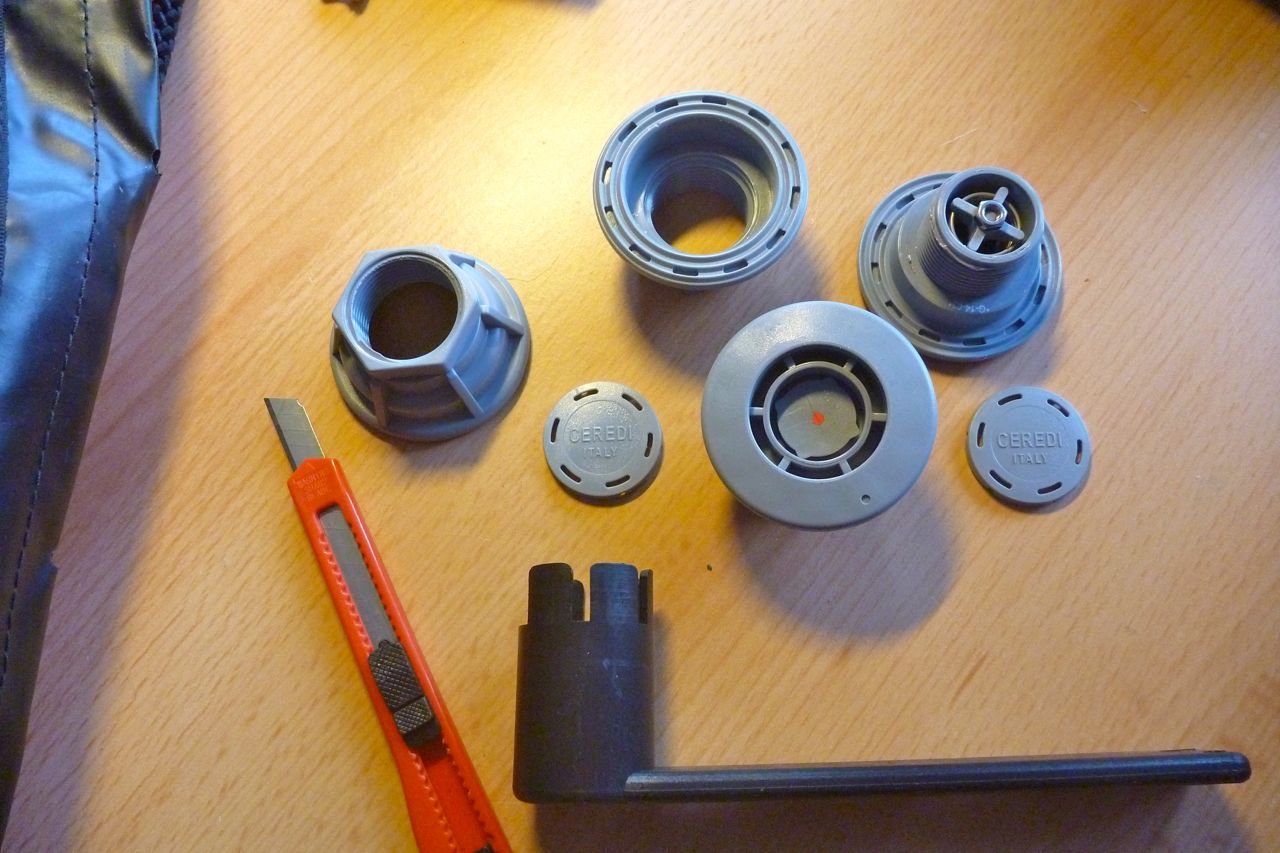
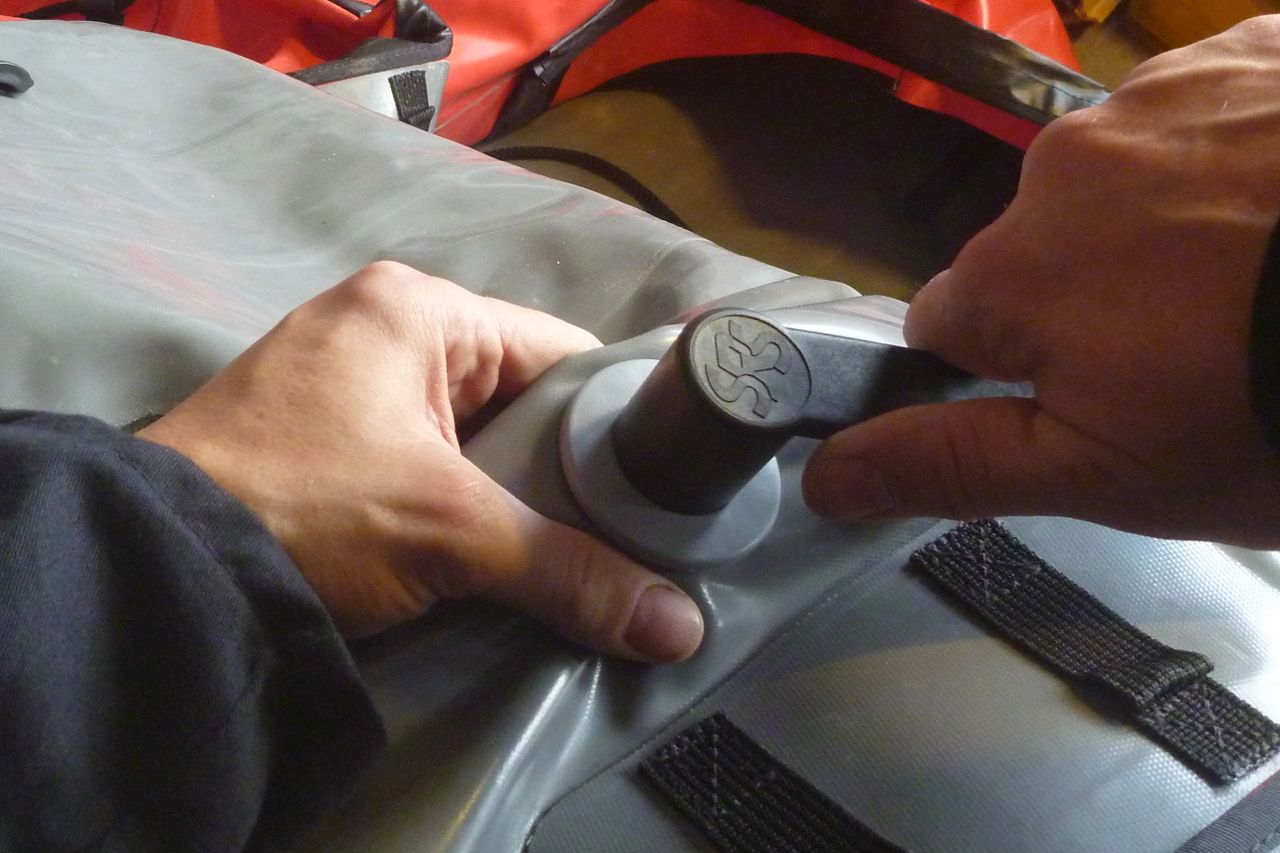
Short version • First, remove the side chamber’s inflation valve with the tool. They can be extremely stiff. If you can’t undo it, maybe think twice before going ahead. Or try silicon spray grease of 303 protectorate to lube
• Choose your spot, mark and then cut a 37mm hole in each side chamber. The Ceredi-suggested 35mm was not enough.Or fit the smaller, unbranded mini PRV (~25mm hole); see above. • Squeeze the PRV’s threaded back collar through the bigger inflation-valve hole, shuffle it over to the new PRV hole and loosely screw on the external part of the PRV by hand • Reassemble the inflation valve and tighten both valves with the tool • Fit push-on caps to the PRVs • Pump up and check for leaks. Maybe retighten some valves with the tool
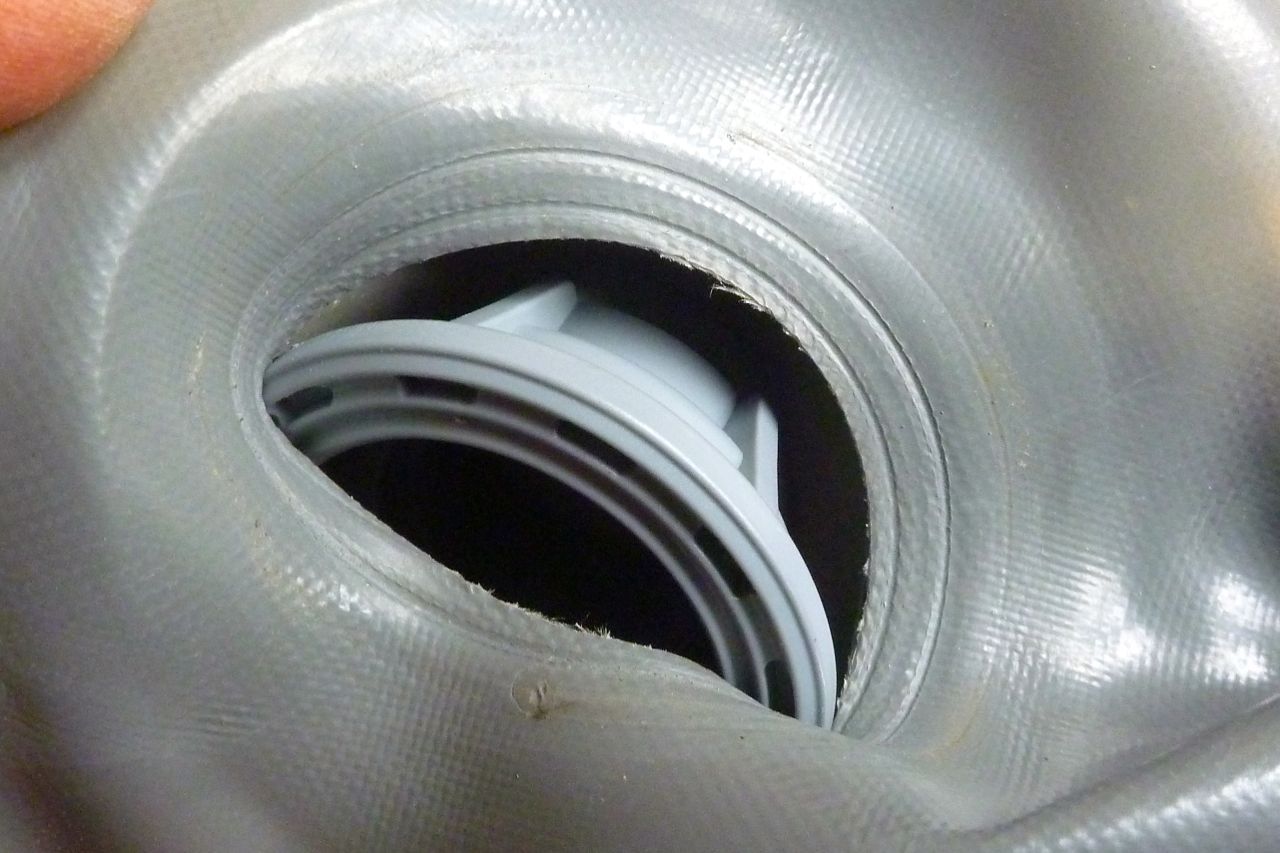
Long version I chose to fit the PRVs close to the inflation valves and at about the same level. There are mysterious markings on the inside of the Seawave to aid symmetrical positioning (Pic 2, below). I used a narrow-bladed knife and of course took care to gather up the hull skin so I wouldn’t inadvertently puncture the other side of the side tube. I assumed the 35mm hole would be big enough to take the back nut. When it wasn’t I was a bit flummoxed. Now I had a gaping hole in my boat, but no way of getting the back of the PRV inside the boat without performing a Caesarian on my Seawave. Luckily two brain cells dropped into my Hadron Collider and it occurred to me that once removed, the nearby main inflation valve’s hole might be bigger. And it was – just. One stock push-push valve was extremely hard to undo. I wondered if it had been glued in or that the plastic valve removal tool would snap (you can buy a metal one for loads more). When the other side undid with less effort I knew it had to be possible.
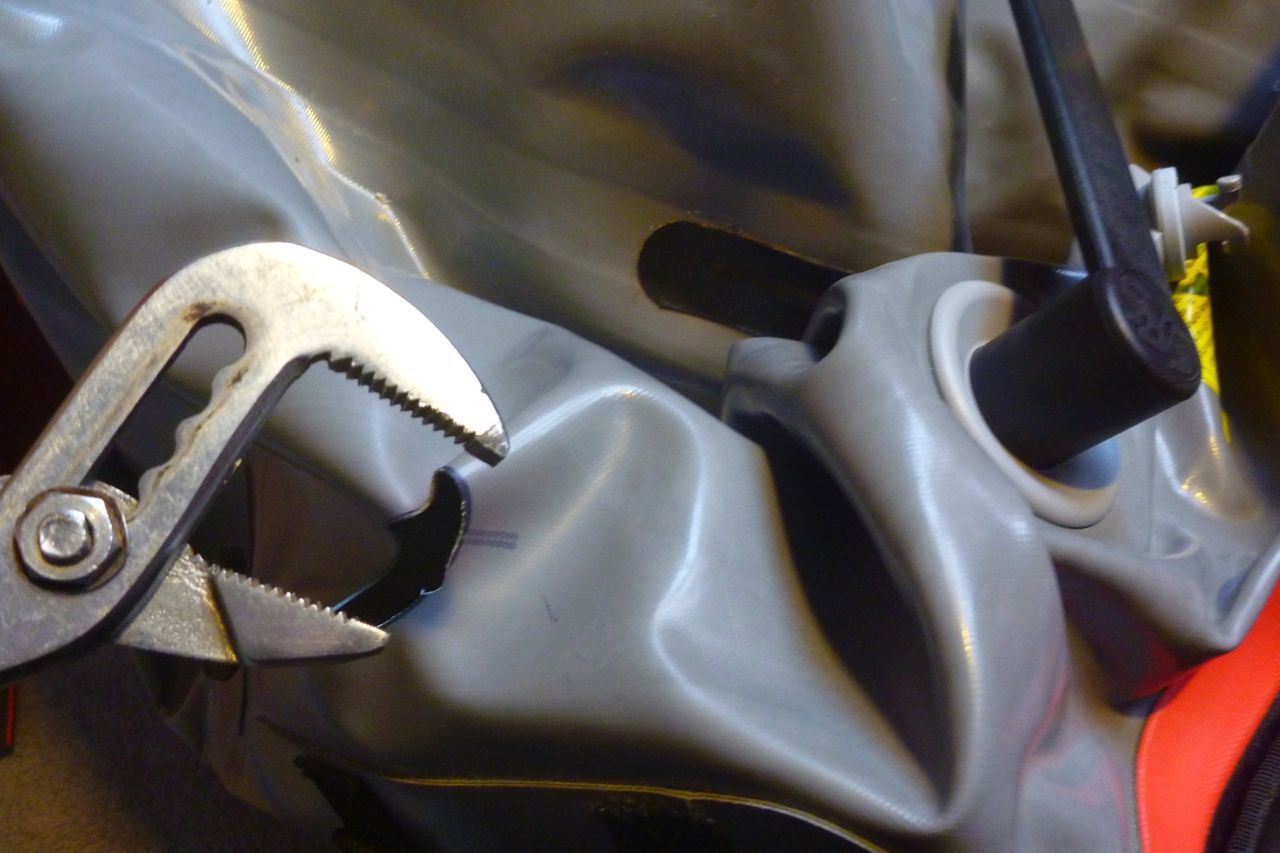
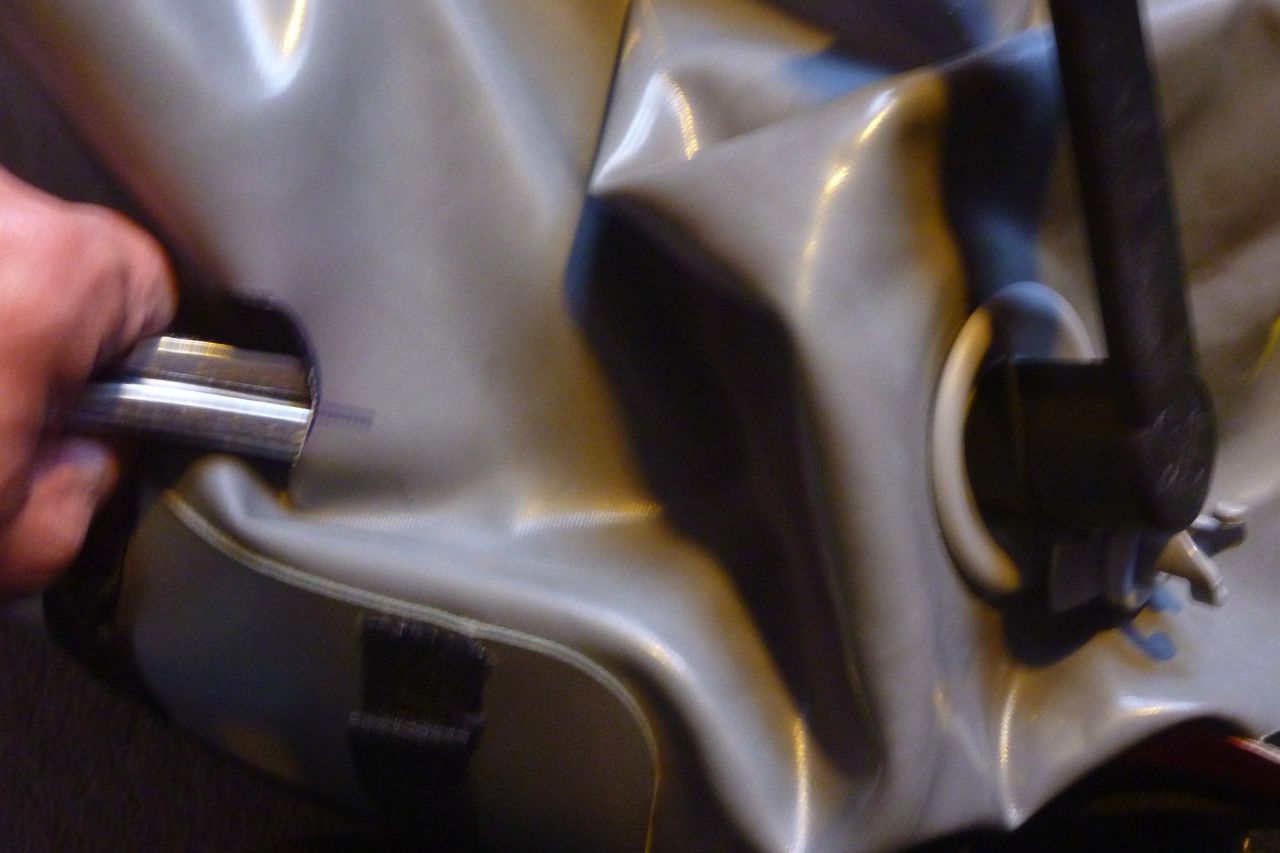
Another problem is that the internal collar or nut is only 10cm deep (pic 4, below) and so was hard to grab through the hull fabric. Until I realised this, I was grabbing the inside part of the outer valve body which screws through the collar from the outside. Trying to ‘unscrew’ the valve body from itself is like trying to pull you head off – eventually the valve tool would break. Another ‘Higgs boson’ moment came over me and I realised that by chance the two valve holes were close enough for me to get some water-pump pliers in there, grab the back collar and finish the job (pic 6, below). After that, no more problems. One thing I noticed while doing all this was the unseen protective patch on the inside of the hull opposite the inflation valves to limit wear and rubbing between valve body and hull when the boat’s delated. Nice touch, Gumotex ;-)
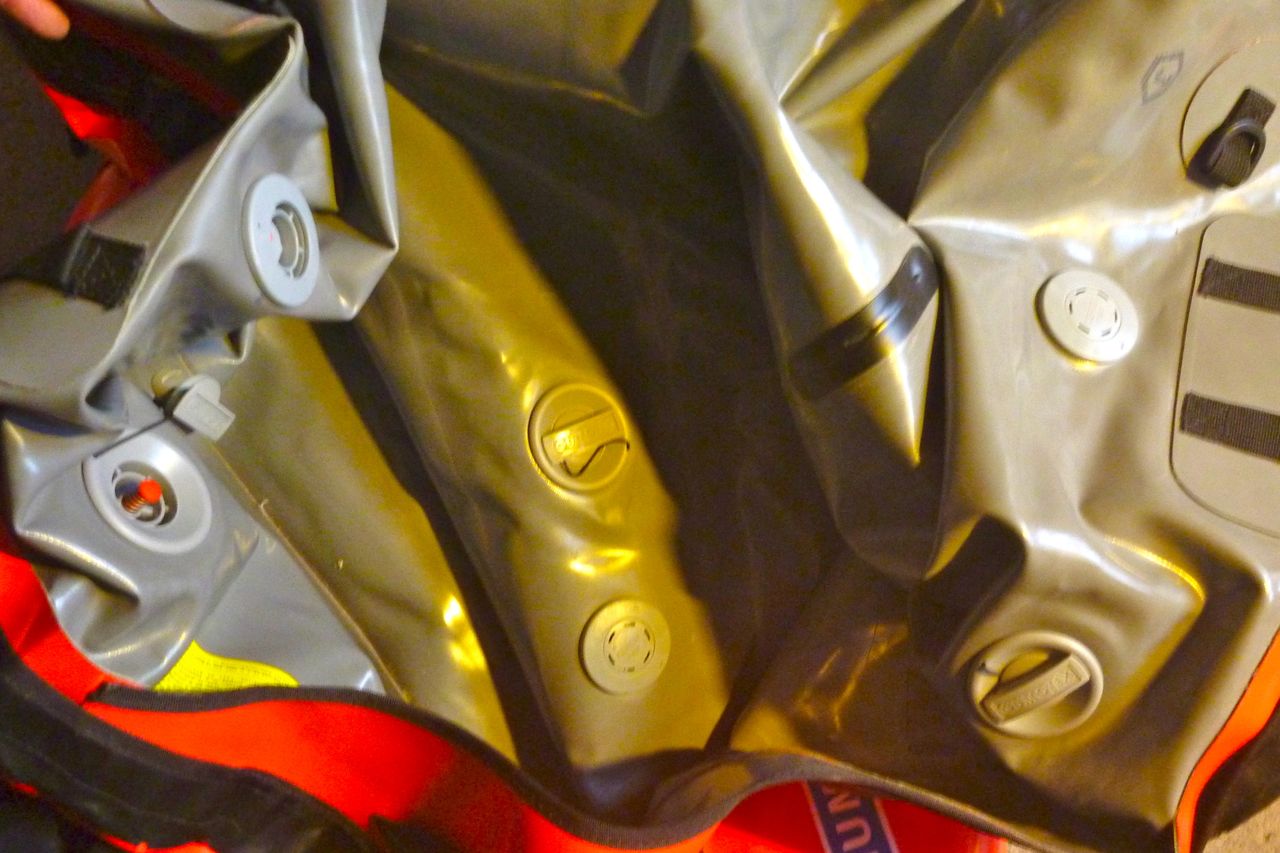
I did all the valves up as hard as possible with tool and hand, and in four more years had no problems. On a hot day in the sun I can hear the high-pressure side PRVs hissing away. The gallery below shows the job in chronological order.
The bits you need. Note the adjustment nut, top right. Didn’t spot that originally.Incision, but the right-sized 37-mm hole is too small to pass through the ’35mm’ PRV back collar37mm hole is better, but still not wide enough to pass through the inside ‘retaining nut’ of PRV assemblyYou need to remove the main inflation valve (it’s hard to grab the inside part by hand). Then the PRV back nut just squeezes through main valve hole and can be shuffled along towards the new holeHolding the PRV back nut in place to tighten is hard by hand. So pass pliers through the main valve hole…… to clamp onto the back of the PRV assembly. This is why it helps to cut the PRV hole close to the main valvePRV done. Now replace main valveClamp them all upPRVs as far as the eye can seeSmall leaks after reassembly test: retighten all valves
Now it’ll be good know that should I doze off as the tide ebbs away, I won’t be rudely woken by an exploding boat. Another side benefit of doing this is that you’ll never need to use a manometer (pressure gauge) again. You simply pump up all three chambers until they hiss and you know they are at full operating pressure.
Nikola’s PRV nozzle idea In the comments below you will see Nikola suggesting the idea of using capped off PRV nozzles you’d usually fit to the end of your inflation pump hose to fill up a boat to the correct pressure without referring to a manometer. The integrated PRV in the nozzle purges at a given pressure. No scalpels required. You will need to block off the open end where the pump hose attaches. The €13 red Ceredi ones he found (left) are rated at more or less the same pressures as a Seawave: 0.25 bar/3.5 psi. I think if I was running a Seawave in a hot country I’d definitely fit some to protect (or not have to worry about) the sidetubes. It might even be possible to adjust the spring inside the Ceredis (beneath the vented cap) to get a bit more pressure before they open, getting closer to the red-dot in-hull Ceredi PRVs I fitted of Seawave 1. Or fit the similar black Grabner inflation relief valve which is rated at a more promising 0.3 bar, but, like everything Grabner, is double the price of the Ceredis.